Creeper World 4

Creeper World 4

138 ratings
Random semi-facts and strategies
By CoyoteTraveller
Semi-obscure facts to answer some of my early questions. Semi-solid numbers from testing. Broad strokes of what strategies work better than others, and how to optimize the early game. Filling the gap before better guides show up.
5
9
3
   
Award
Favorite
Favorited
Unfavorite
Overview
This isn't trying to be a complete guide. Maybe it's more of a FAQ with researched numbers, except I'm not sure if the Qs are very FA. It's partially mechanics numbers, and partially a guide to optimal mini-strategies derived from testing. Hopefully it will help you gain a better general understanding of the mechanics, but you won't find the one-and-only winning strategy here.

With apologies - these numbers aren't accurate down to very many decimal places, but right now I don't see any better ones out there. It is my wish (and expectation) that other guides will supplant this one so I can take it down!

...it sure has grown a lot bigger than I intended, though.
Tower energy production
Basic Tower Facts:
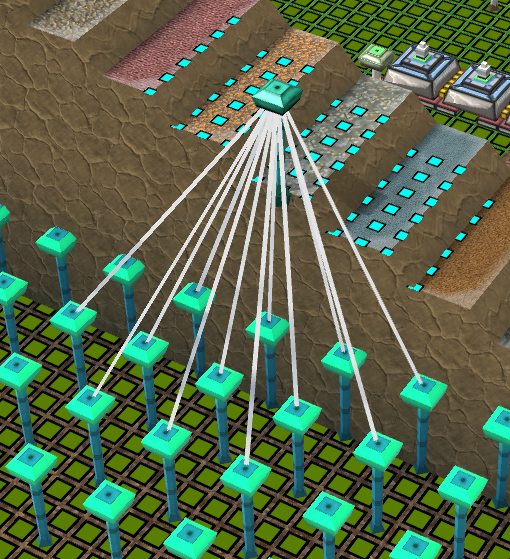
  • Towers produce 0.333 energy per second. (More specifically, a tower produces up to 121 tiles of Soylent, and each tile produces roughly 0.00275 energy.)
  • Towers produce 5 tiles of Soylent per second. This means that a tower with maximum space will generate maximum power after 24 seconds.
  • A maximum-range tower will break even for energy generation at about 30 seconds after completion.
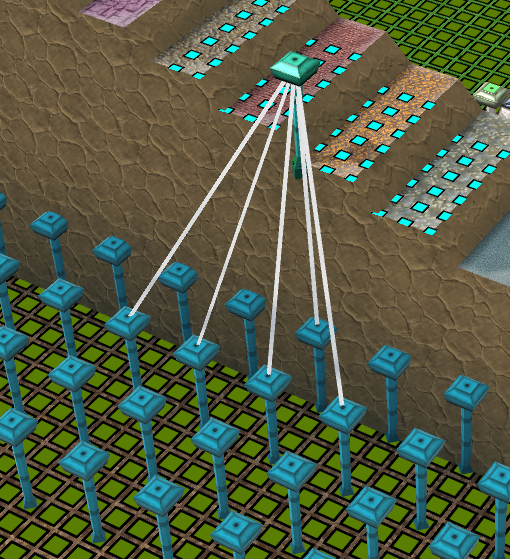
  • Towers can link to things up to 11 tiles away on flat ground, which is a perfect grid of Soylent coverage. They can also link diagonally 11x3, 10x5, 9x7, and 8x8.

Advanced Tower Facts:
  • Towers produce slightly less power the more links they are away from your base. See Kalil's guide for more info - but on most maps, your most distant towers won't drop below 80% of nominal (??? - verify) before you have enough energy not to care. Don't worry too much about this one...but if you are seriously crunched for space and only towers will save you, pylons will shorten the chain and get you a little more power.
  • Towers generate Soylent it on the nearest empty tile within their range (an 11x11 square, naturally). If some tiles are blocked off - for example, if your tower is close to another tower, near steep terrain, or on the edge of the map - it will still generate at 5 tiles per second until it has claimed all usable space. A tower with 81 tiles free and a tower with the full 121 will function exactly the same for the first 16 seconds, right up until the unrestricted tower hits that 82nd tile. You won't get enough energy in those first few seconds to care - remember, you don't break even until after a full tower has already filled up its Soylent field.
  • Soylent field expansion rate is not affected by ERN upgrades.
  • If a Tower becomes disconnected from your Rift Lab, its Soylent fields disappear.
  • You can't put an ERN on a tower. Sorry, CW3 fans.
  • Tower energy production, like all energy production, is affected by the Energy Production upgrade in the ERN portal. They get the same bonus as everything else; see below.
  • When a tower is destroyed, it loses all Soylent fields that it produced. If you cram a bunch of towers close together, this might not be all the Soylent within its range, and it might not even be the Soylent fields closest to it!

Please don't do this.

Tower Strategies:
Four things control your early game tower-building strategy, in order of importance: Build-packet transit times, initial building micromanagement, break-even vs limited terrain, and break-even vs destruction.

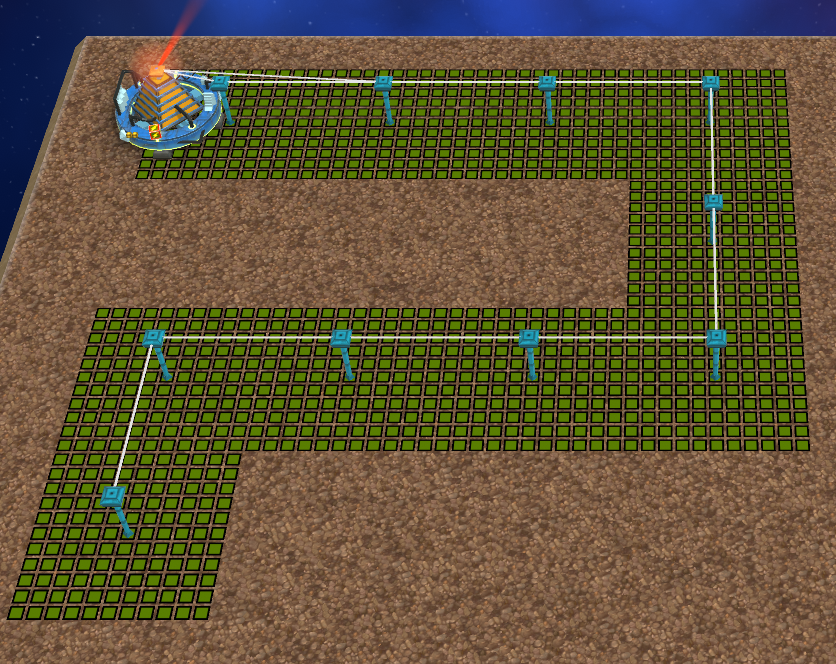
  • Build packets are SLOW...well, not that slow, but they can really slow you down. The farther away a tower is, the longer it takes for build packets to get there. You can't build any towers beyond what you've already built, which means that a long wait for build packets to arrive at a tower means an even longer wait to start sending them to the next one. Practically, this means - develop around your base first. This is seriously important! It will shave a ton of time off the start of your game. When you don't have energy to spare, don't leave it sitting in transit. Optimize for the least number of links.
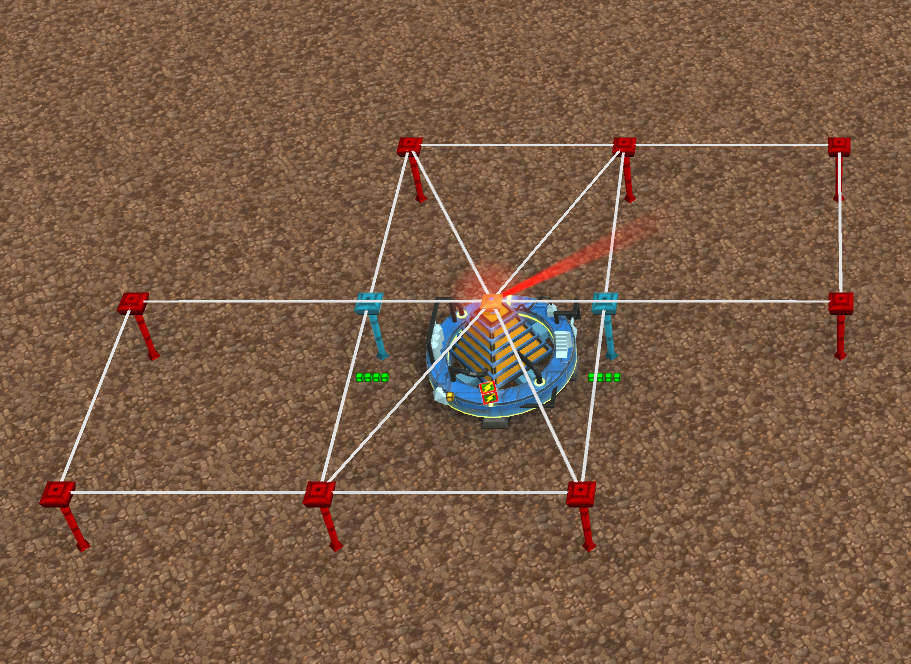
  • Your very first towers need micromanagement, because your base is kinda dumb when it has energy to spare. If you've got a lot of towers linked directly to your base (good), you'll notice that at the very start of the game, it spews build packets out to all of them (bad). That'll set you back, because a half-built tower does nothing for you. Use the "T" key to turn off a building that's under construction - that'll prevent it from receiving any build packets. Your base starts out with 10 energy so you can build the first two towers simultaneously, but beyond that, throttle it back until you've got a surplus; an income of something like 2.5-3 is a good place to start (see the construction section). Realistically though - your base is pretty good about prioritizing packets to your most-finished towers after the very beginning of the game. You'll be pretty okay if you only do the "turn everything else off" trick for your first two towers.
  • A tower with 36 territory (like the corner of the map) only generates 0.1 energy per second. It takes a full 60 seconds to break even. Resist the urge to fill in your territory: delay small-territory towers until after you've built all the good ones, unless they make your path a lot shorter. However, they might be worth prioritizing over mines...
  • Surely, when you start a level, you set it to 4x speed and start it running to see where the Creeper is going to go. Oh, it breaks into that area at the 60 second mark? Better not build any towers there...unless you'll break even. Building a tower six links away can take five seconds for the packets to even get there, on top of a couple seconds for your base to send them. Add those to the 30 seconds for a tower to break even...if your tower will go boom less than forty seconds from when you start building, it's not worth it. Any more, and it is! ...unless it's less than max area. Maybe don't build those in dangerous places.
Why does the Rift Lab hate me

Tower Anti-Strategies:
Cramming multiple towers together is often a good idea for defense, but it is never a good idea for energy production. You really don't want to lose the only link to your neutralizer, sure - build backups for that. But the fact that two towers means double the Soylent field expansion rate is a red herring - the energy you gain from faster Soylent simply cannot recoup the cost of an extraneous tower. Also, towers do not guard each others' Soylent fields if one is destroyed (see the last Advanced Tower Fact), and the energy wouldn't be worth it if they did.

Ah, that feels right.

Tower Build Numbers:
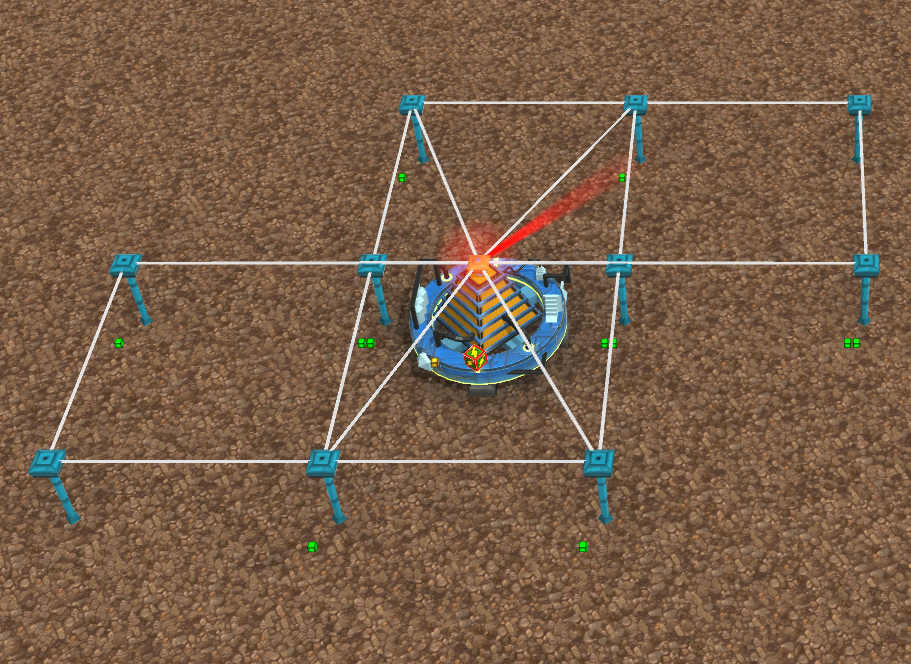
I built two arrangements of ten towers: one in a line, and one clustered around the base, to benchmark their performance. After building those ten towers, I clocked how long it took to rise to 100 Energy. For the clustered design, I also tested it with and without micromanagement through turning off most under-construction towers.
In-game clock
Line
Cluster
Micromanaged
Tower 2
6.8s
9.8s
5.0s
Tower 4
14.4s
15.1s
12.0s
Tower 6
24.8s
21.0s
18.9s
Tower 8
38.2s
28.5s
24.5s
Tower 10
53.7s
31.2s
29.7s
100 Energy
61.0s
57.4s
55.1s
You'll see a funny thing here: the Line layout is incredibly slow because of the long transit times. But, because of the slow Soylent ramp-up, in the long run it's only six seconds behind a much more optimal build. Those six seconds might make a huge difference on whatever map you're playing!... or they might not. In the end, you can afford not to micro. I really like this implementation, really, although it kinda feels like I ran these numbers for nothing.

No, of course the cluster isn't fully optimized. Real maps are much more crowded, though.
Other energy production
Basic energy production facts:
  • The Rift Lab produces 1 energy.
  • It continues to produce this energy even when airborne! Take that, CW3!
  • Mines that are completely covered by resource fields produce 1 energy. The energy output scales linearly with the number of squares covered.
  • A mine will break even 40 seconds after it's completed.
ERN enercy production facts:
  • The ERN portal upgrade for "Energy Collection", at 100% efficiency, increases all energy production by +50%: Rift Lab, towers, and mines. (Apparently it doesn't increase non-buildable structure production.)
  • The ERN portal upgrade for "Mine Production" DOES NOT impact energy production from mines.
  • However, giving an ERN directly to a mine increases its value enormously: a base of +4 energy, wow! This stacks multiplicatively with the ERN portal upgrade.
Mine Strategy:
While a mine does break even after 40 seconds (without an ERN), take into account how long it takes to build - especially early game. The very fastest your base can spit out build packets is about 1.88/sec without ERN upgrades, so the fastest it can come out is over a minute - plus packet travel time. Typically, you'd want to hold off on a mine until you're all out of things that will break even in a minute or less (towers with a quarter coverage), but if you have an ERN, all that math goes out the window.
One of the very best things you can do with an ERN is put it directly on a mine: as mentioned above, that's +4 energy production! Suddenly, your 5/s mine can break even just eight seconds after construction. Okay, it's actually 28+ seconds from start of construction, and then there's ERN travel time too...
Still, if you have an ERN available, I'd recommend building a mine soon after you hit 1.88 energy production. Remember, you don't need an ERN portal to equip an ERN to a unit or building!
Linking units
Basic Linking Facts:
Towers are the gold standard of linking. They can link to each other within 11 tiles, in a circle shape: you can go as far as 11 across and 4 sideways, or 8 across 8 sideways for diagonal. (Good old Pythagoreas.) Towers are somewhat tall. To supply something from a Tower, the center of that object needs to be within that area. Of course, some things get a little strange.
  • The Refinery: The refinery's link point isn't at its center. Instead, it links to a tower on one side. Flip the refinery around, and you can link to it from different places.
  • Pylons: These things can link TO EACH OTHER from 22 tiles away, or 16x16 diagonally. This does not extend the range that they can link to towers or cannons - the range bonus is strictly between pylons. Packets move faster across pylon links, which show up as yellow. They're also very tall.
  • Platforms: I think these are identical to Pylons - need to verify.
  • ERN-Boosted Pylons: They can reach other pylons 36 tiles away! Or 35x8, or 25x25... That seems to be their only feature. It doesn't extend how far they can reach cannons, or the rift lab or towers. You only need an ERN on one end of this ERN-boosted connection, and no, you can't extend the range even further by connecting an ERN pylon to another ERN pylon.
  • The Rift Lab: This breaks the rules. It can connect to *anything* up to 17 tiles away from its center. It's not a pylon, so it can't use the 22-tile pylon (or ERN pylon) range, but it does provide pylon-style 'fast' links to everything it connects with. It seems to be the same height as a Tower.
You might notice that when you connect a tower to a tower, you can make the link from as far away as 11 tiles across and 4 tiles sideways. But when you connect a tower to a cannon, you can only reach 11 tiles across and 3 sideways. Why? Well I did mention that towers were kinda tall...

Heights:
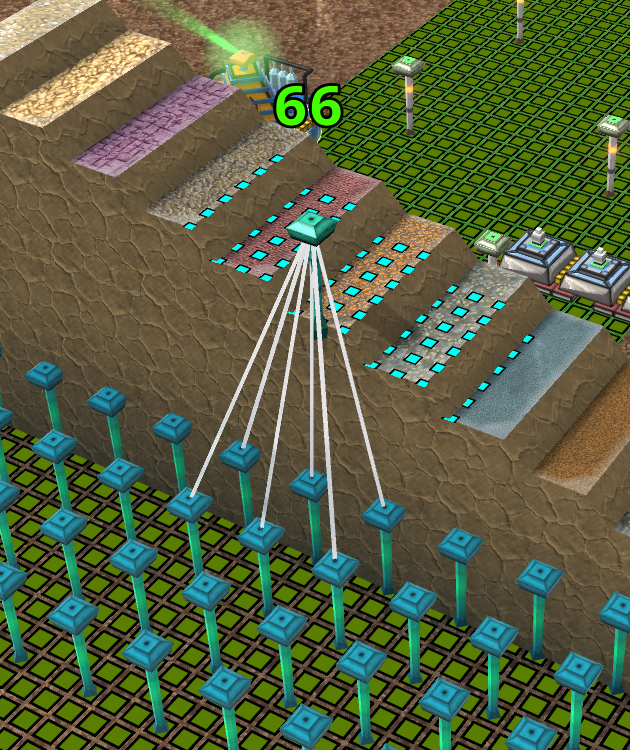
Okay, here's the thing: link distance is a SPHERE. You can't send a link straight through a solid wall, but often your problem is that something that looks 11 tiles away is actually 11 tiles across and five tiles DOWN...out of range.
A height difference of 4 or less might not be noticeable. Remember that "towers can link 11 across, 4 sideways" thing? Even a height difference of 7 or 8 is something you can connect to from a long way away. But the very highest you can link to is 11 up - that's from Height 1 to Height 12 - and you can only do that from a few tiles away.
Anyway, it turns out that yes, a space one unit wide and one unit high is indeed a cube. 11 across is the same as 11 straight up. God, the game makes so much more sense now.
Examples:
X
Z
Y
Distance
Can Link?
11
4
0
11.705
Yes
11
4
3
12.083
No
11
4
2
11.874
Yes
11
3
3
11.790
Yes
11
0
5
12.083
No
10
4
5
11.874
Yes
8
6
6
11.662
Yes
4
2
11
11.874
Yes

...so if you're trying to build a connection from y=1 to something big on top of a y=20 tower, all you need is a single intermediate step, and you can put bottom-middle-top right next to each other.
About those cannons: It looks like towers' link points are 3 units above their base, while cannons' link points are at ground level, and pylons' link points are 5 units up. Good news: pylons can stretch up above low hills without being blocked. Bad news: A pylon cannot connect to a cannon that's 11 units away, unless that cannon is on a hill!

Connecting from height 11 to height 1
Connections blocked by weird collision logic
Connecting from height 10 to height 1

Link Speed
All packets on a Tower link seem to travel at roughly 15 tiles per second, regardless of ERN Portal upgrades, and packets on a Pylon or Rift Lab link travel at roughly 60 tiles per second. These numbers are extremely rough, and are probably off by 10% or so. Just keep in mind that, for each max-length Tower link that a packet needs to pass through, you're adding about 3/4 of a second to the travel time - and that can create a very unpleasant gap between when you finish your Cannon and when the ammo arrives.

Linking Strategy:
Pylons are very fast, but they are expensive, bulky, and don't give you much benefit. Of course you'll need them to cross long gaps, but they should otherwise never be your *first* route into a place. Establish your Pylon route after, or in parallel with, your Towers. For example, if you need to build a Refinery across the map as fast as possible, designate parallel Tower and Pylon paths. The Pylons will build as the Tower line goes up, and build packets will take as much of the faster Pylon path as has been completed so far. Your Refinery will get its first build packets from the slow Tower network, but it's the last packet that matters - and that will come over the finished, and much faster, Pylons.

You can use your Rift Lab to reach farther than a Tower or a Pylon, but it doesn't really help - especially because you're gaining 6 tiles of reach, but 3 of those are taken up by the bulky Lab size. Don't have a shield, and need to power up a Totem that's buried in Creeper? Well, you can land your Rift Lab nearby for the extra reach, or even land it right in the Creeper since it has a ton of hit points, and -- whoops! Haha, anything you'd want the extra reach for, you can't actually use when it's buried in Creeper. Oh well, maybe you can still do that with a giant pile of Bombers. Just don't lose your connection to your energy network!

It's a good idea to move your Rift Lab around as you play. Keep it near the front lines, and...things will build a little faster? On a very big map, things might go up ten seconds faster than if you stayed at the back, or even more if the place is a maze! This can matter a lot for Neutralizers, since you can't move those around.

Add Pylons in your territory when you don't have anything better to do with your Energy. Enough said; it's obvious but easy to forget. Usually won't help (unless your Rift Lab is far from a building site) but hey, better safe than sorry.
Building and Moving
Warning: The numbers in this section are off by a lot more than the rest of the guide. Sorry.

Building Facts:
  • Build speed is limited by how fast the Rift Lab can send out build packets. Each building is capped at about 1.88 build packets per second (I guess this is 1 per 16 frames): I built a Rocket (500 Energy) right next to my Rift Lab, and it took ~266 seconds.
  • With the ERN Portal's "Build Speed" at 100% efficiency, this rate doubles to about 3.76 packets per second: a Rocket right next to my Rift Lab took about 133 seconds.
  • None of the ERN Portal's upgrades increase the packet move speed.

Movement Facts:
  • All your manually controllable buildings - cannons, mortars, your Rift Lab - move at roughly 2.7 (??? needs better number) tiles per second.
  • With the ERN Portal's "Move Speed" enhancement at 100% efficiency, this increases to very roughly 3.8 tiles per second, or about 40% faster. Every little bit helps.
  • Penguins have knees; they're just concealed by feathers.
  • The launch / land sequence for buildings takes about 2.1 seconds seconds without the ERN Portal bonus, or 1.5 seconds with.
  • These are the least accurate numbers in the entire document.

Move and Build Strategy:
Have you ever wondered, "will it be faster to build this Cannon on-site, or to build it nearby and fly it over"? Well, if you already have a tower route to where you want to build it, then for goodness sake just build it on site. Look at those Link vs Unit Movement speed numbers - build packets travel something like five times as fast as a unit. If you need a cannon far away from your rift lab, every 22 tiles you add (yeah, I know I use weird numbers) will add 8 seconds of travel time, or 1.5 seconds of build time + 1.5 seconds to arm it.

On the other hand, if you don't have towers going there yet... actually that's an interesting problem, and the solution is kind of fuzzy. This deserves rigorous research and a table, because flying there can be faster - for something 80 tiles away, building nearby won by a long shot, and it's all because travel time is really miserable for building long lines of Towers. I think there's a cutoff point when the time added per tower (the total travel packet travel time of the whole line, up to that point) is greater than the cost for your Cannon to fly the length of that Tower link. That's 8 seconds, without ERN Portal boosts, and corresponds to five full-length links. I haven't rigorously tested it, but...yeah. Yeah, that's my answer until someone builds a better guide: The fastest way to get a Cannon somewhere past your frontier in a hurry is to build it five tower lengths from your Rift Lab, or maybe four if you want to make sure it gets there with full ammo.

...those numbers are terrible. Don't listen to them, but it might be a cool thing to check.
Energy-efficient Early Cannon
Okay, here's the situation, inspired by a current daily map and surely more to come. You need a Cannon right now. Like, now-now, within the first minute of the game, but you don't want to totally crash your economy. Using the Tower build strategies from the first section, when is the best time to build your cannon, given that you're starting it within the first thirty seconds?

Here's a table of my tests. Micromanaged build pattern, Cannon produced right next to the Rift Lab. Since the test build pattern involves ten Towers, I'm inserting the Cannon into the build order immediately after a specific Tower is built: pause all remaining towers until the Rift Lab has sent the packet with the Cannon's final piece of ammunition. Time is measured in seconds since the Rift Lab fully materialized: when the cannon is finished building (and thus movable), when the cannon is fully stocked with ammo, when the final tower is completed, and when our Energy stockpile finally reaches 100 after everything is done. The sooner we start the cannon, the longer it will take our economy to get up to speed, and the worse shape we'll be in for the rest of the early game.

After Cannon #
Cannon Built
Cannon Armed
Towers Finished
100 Energy
0
17.8s
27.6s
63.2s
88.5s
2
23.1s
29.4s
51.7s
77.0s
4
27.2s
32.4s
45.3s
70.9s
6
32.2s
37.7s
43.2s
67.3s
8
37.7s
42.7s
40.6s
64.6s
10
42.2s
47.2s
39.8s
63.1s

On this table, building your cannon before your 4th tower is complete will completely gut your economy, and it won't even come out that much faster. After 4 towers, though, delaying the cannon doesn't help your economy very much considering how much slower you get that firepower.

It's hard to apply this simulation directly to a real map; you won't always need to wait for full ammo, for example, and you might not have fully efficient tower space available. Plus, you might waste ammo if you start firing too soon: Cannons, like most weapons, are more efficient when there's more Creeper to kill with each shot, and that might mean waiting for the best time to jump in. Still, the 4th Tower feels like a good place in general to anchor your first attempt around.
Terps
Terp Facts:
  • Terp performance is influenced by the ERN Portal Fire Rate bonus. I tested by increasing a 3x3 area from Height 1 to Height 10. It took 85.7 seconds without the bonus, and 66.7 seconds with it, so, 22% speedup.
  • Terp range is influenced by the Fire Range bonus.
  • The Terp drone didn't appear to be influenced by the Move Speed, Build Speed, or Mine Production bonus.
  • Haven't timed the speed impacts of equipping an ERP onto a terp. I know it increases the range, but I'm not sure if it affects speed - seems like no.
  • "Nearest First" can give you a moderate speedup. In a fairly realistic scenario - raising a ~40 unit wall by a large amount, perpendicular to the the Terp - using "Nearest First" took 374.3 seconds, while the default setting took 477.9 seconds. I don't have better records of the test, but another 22% speedup is informative: it shouldn't be ignored, but you shouldn't feel like using "Nearest First" is required.
  • The Terp can't dig up buried ERNs that are covered by Creeper. However, once the area is clear, it digs it up very fast. Bombers or AC Bombers can help a lot - and if you already have an ERN, it could get you the range you need to snag another with the help of air support.

Terp Strategy:
The Creeper in CW4 is more subject to 'waves' than it was in CW3. This means that raising barriers isn't as effective at keeping it out - and keeping it off your terraforming site is a huge pain. Even worse, terrain blocks your shots a lot more than it used to. Your Terp is no longer as useful as a defensive weapon - walls are still useful to give your Mortars a nice reservoir to shoot into once the area is under control, but rushing Terps to block off a route shouldn't be the first thing to come to your mind.

The presence of waves makes "Nearest First" a lot more viable. If you keep a Cannon at original ground level, you can kill the Creeper that makes it onto your wall-to-be, while the parts that your Terp has already touched probably won't get overrun. If you need something up top to shoot at the highest point of your wall, that 'highest point' won't change over time. This isn't a universal change in strategy, but I find it a useful change in perspective. A two-high barrier just isn't what it used to be.
Closing
Hey, thanks for reading this guide! I intended to put about half an hour's worth of research in here in a couple of paragraphs, but apparently I had an entire day's worth of stuff ready to come out. I'm not a big fan of the formatting, though, and I still hope that a better guide takes this info, verifies it with more accurate numbers, and makes this one obsolete.

(I'm sure not planning on maintaining it! God help us if there's a balance patch.)

Kalil already has a very good guide. Check that for more information on resource consumption and weapons! I was about to put up some wrong information about Towers before I saw it.

Have fun! Looking forward to competitive leaderboards someday, see you there <3
28 Comments
levibuck4 12 May @ 10:52pm 
I didn't know that the home base generated energy! When I read that, I decided to go and try one of the daily maps using only the energy produced by the home base :D it was a real challenge, but I did it! I used a lot of porters to store up energy, and I took out enemies one at a time using the overload function on the nullifiers so that I didn't have to keep any nulifiers running. Also I learned that the energy upgrade in the urn portal DOES affect the energy generated from the home base! It took it from 1 to 1.5, which was a big deal. I played at 4x speed a lot, but at the end the timer said 11 hours
Onikage-056, God of Animatronics 4 Dec, 2024 @ 9:59am 
From experience... yes, a wall going UP isn't as useful as it used to be... but if you build DOWN first, then up, it's a lot more effective at slowing the Creep long enough for your mortars to start lobbing shells. A wall up to Y-20 is only as tall as the highest point on either side, to a maximum of 19 layers on terrain (because Y-1 is "bedrock" and can't be removed.)
®BBIE 10 Jun, 2024 @ 7:31am 
Thanks
Wasp #55,221 10 Mar, 2024 @ 6:34pm 
²
Wasp #55,221 10 Mar, 2024 @ 6:33pm 
ngl what I do after getting most of my towers up where I want is that I build pylons that connect to my weapons to speed up ammo/packet delivery
kdimi11 3 Jul, 2022 @ 6:21am 
The best way to speed up production which I believe is missing (just skimmed through the guide):

Move your base around as you start out, to have packets move always from the base directly to towers or anything else you are building, without having to pass through other towers. As this lowers packet travel time, you're having new energy sooner available and this gives you an early advantage. Even if you have to click on creeper territory, you don't have to land or even go all the way there. You can keep clicking on locations to keep it hovering or moving inside a range where you need it.
Hitoshi Shinso 17 May, 2022 @ 6:26pm 
this was a very interesting read
allinyourhead 21 Nov, 2021 @ 4:49am 
It works as along as the wave of creep is not too high. There is a breaking point. Don't expect this to keep back a wave of 500 popped eggs at point blank range. But yes, it seems to work fine. Think more like slowing a wave down and giving time to hit.
CoyoteTraveller  [author] 17 Nov, 2021 @ 11:45pm 
@allinyourhead - I'm trying to wrap my head around the physics, because this sounds very good. Am I understanding right that the purpose of this baffle is to take a spiky /\/\/\/\ creeper, and level it out to a flat -------- creeper? I'm guessing that you would want to build this ahead of your wall, and maybe even litter the field with topological spikes? Yeah, if you could bounce and scatter the waves, the high-water mark would be lower, giving you a lot more time. Even a small bouncing effect could be big.

I wonder if there's an optimal placement, if this indeed what you're talking about. If you put the baffle too close to whatever's generating the wave, it'll bounce out too fast and the wave would be intact, but too close to your own base and it might not be as effective either.

Have you pulled this off, is it effective in practice? I haven't played in half a year.
allinyourhead 16 Nov, 2021 @ 10:43pm 
Given the wave mechanics of creep, building a solid wall is not nearly as effective as.....build a grid of raised single box terrain. x x x t x x x the next line should be x t x x x t x, where t is the single point raised. It gives the creep a way through (bad), but rather than just overlapping a wall, the wall structure you build acts like baffles, slowing the creep wave down tremendously.