Space Engineers

Space Engineers

134 ratings
Planet Map 3D - Full Guide
By SJ_Omega
This guide covers the set up of the Planet Map 3D script, as well as detailing the various commands and features of the script.

Link to the script:
https://steamproxy.net/sharedfiles/filedetails/?id=2286117398

Video Tutorial at:
https://youtu.be/r7GbMPD5zdI?si=eHfFhHw_8N9d9l6l
5
   
Award
Favorite
Favorited
Unfavorite
QUICK SET UP


  1. Load this script on a programmable block.
  2. Put the tag "[MAP]" in the name of the block where you want the map to be displayed. If the block has multiple screens you can change which screen displays the map by going into the programmable block's Custom Data field and changing the "MAP_Index" field.
  3. It's recommended to map at least the basic movement and mode commands to desired hotkey bars.
  4. (optional) Paste "Vanilla" planet and waypoint data into the custom data field of the programmable block. (See below).
  5. (optional) Add the tag "[Map Data]" to the name field of a block that you want to have the Data Display screen. This display page will give details about planets, waypoints, and the map screen itself. (See section 'Data Display Pages' below).
-- Multi-Screen Set-Up --
By default maps displayed on blocks with multiple screens will be displayed on that blocks main screen. In order to change which screen the map is displayed on:
  1. Open the block's Custom Data field in the terminal.

  2. Under the header [MAP DISPLAYS], set the value for any screen you want to display a map on to True and all other screens to False.
    • If you're unsure what number your desired screen is, look at the block's list of screens in the terminal. The screens are listed in numeric order, with the main screen as screen 0.
    • Example: In the control seat, there are 5 screens. The last screen in the list is the Bottom Right screen. Because the first screen is screen 0, the fifth screen is screen 4.

  3. Run the REFRESH command.


-- Menu Set Up (Recommended) --
In order to drastically reduce the number of commands that need to be mapped to the hotbar, and make them easier to navigate, a Context Based Menu can be added to cockpits and control seats.

Depending on which Menu page is selected, the mapped button keys for the context menu can execute various functions, including selecting map display modes, adjusting the map view, and navigating Data Display pages.


SET-UP
  1. Add the Menu Tag (Default: [Map Menu]) to the name of a cockpit or control seat where you want to set-up the menu.

  2. Run the REFRESH command.
    • If you need to change which screen the menu is being displayed on, that can be adjusted in the Custom Data of the Menu Owner.

  3. Map the command BUTTON_<number> to Hotkeys 1 - 7, where <number> is the number of that Hotkey.
    • If you're setting up multiple Menus on the grid, be sure to follow the command with a space and the ID number of that Menu (shown at top of the screen).

  4. Map the command PREVIOUS_MENU to Hotkey 8 and NEXT_MENU to Hotkey 9.
    • Include a space followed by the Menu number if you're setting up multiple menus.

  5. Use Hotkeys 8 and 9 to navigate between Map Menu pages, and buttons 1 - 7 to execute the functions for that page.


DECALS
Map Menus were designed with the wide LCD of the Flight Seat in mind. They're still capable of being installed on other terminal blocks with other LCD shapes. As a result there is often negative space left above or below the Menu bar.

Optionally, this empty space can be filled with a decal set that updates the graphic from page to page. To set up:
  1. In the Custom Data for block where the Menu is installed, under the header [Map Menu] update the parameter Decals= with one of the following values:
    • Graphs
    • Blueprints

  2. Run the REFRESH command.
    • If no decal appears, check the spelling in Custom Data.


COMMANDS


There are two options for running commands for this script:

1: RUN DIRECTLY FROM PROGRAM BLOCK
To do this, simply enter the command into the Argument field of the programmable block. This is a good option for commands like:
  • LOG_WAYPOINT
  • PLOT_JUMP
  • COLOR_PLANET

2: MAP TO HOTKEYS
To do this, go to the G-menu for your desired interface (i.e. cockpit, command seat, button panel, etc) drag the programmable block to the target hot key, and select the action "Run". This should prompt a dialog box, asking for an argument. Type your command here.


Commands with multiple arguments
Some commands take multiple arguments such as NEW_PLANET. This argument would be followed by the name of the planet, which this guide will denote as <planet name>. You don't need to include angle brackets, but make sure that there's a space between the first argument and the second. It's alright if the second argument has a space in it.

Example:
To create a planet named "Eden Prime" just run the argument:

NEW_PLANET Eden Prime


View Commands for Multi-Screen systems
View commands for multi-screen arrangements should take the following format:

<VIEW_COMMAND> <MAP_NUMBER(s)>

A map's number can be found in its upper right corner in brackets.


By default, View Commands can be run with no additional arguments:

ROTATE_LEFT

This command will rotate the first map in the map list to the left by 5°. This is enough for single map arrangements. It is essentially the same as running the argument:

ROTATE_LEFT 0

In order rotate a different map, run the command followed by that map's number as an argument. For example:

ROTATE_LEFT 2

This will rotate the third map (because the first map is 0) by 5°.

View commands can be run for multiple screens simultaneously, by running the command with a comma separated list of map numbers as an argument:

ROTATE_LEFT 0,2

This will rotate the first and third maps left by 5°.

Lastly it is possible to run a view command for all maps simultaneously by running the command with the argument "ALL":

ROTATE_LEFT ALL
-- Rotational Controls --
This script uses an azimuthal rotation system. The camera can rotate around the center of the map at an adjustable radius both along the horizontal plane (azimuth) as well as up and down (altitude). The altitude is limited to ±90°

NOTE: In the picture, the altitude angle is labeled as "Elevation".

STEP ROTATION
Increment the rotation by a single step (default 5°):
  • ROTATE_LEFT
  • ROTATE_RIGHT

  • ROTATE_UP
  • ROTATE_DOWN


FLUID ROTATION
Increase or decrease the angular velocity of the azimuth, creating a continuous spin. Running the command multiple times will increase the velocity further, and running the opposite command will slow or stop the rotation (similar to increase/decrease velocity action for rotors).
  • SPIN_LEFT
  • SPIN_RIGHT

-- Translational Controls --
Move the camera laterally across it's relative XYZ axes.

STEP TRANSLATION
Move the camera at fixed step length, based on the zoom level:
  • MOVE_LEFT
  • MOVE_RIGHT
  • MOVE_UP
  • MOVE_DOWN
  • MOVE_FORWARD
  • MOVE_BACKWARD

FLUID TRANSLATION
Increase the velocity of the camera so that it moves continuously in straight line. As with fluid rotation, these commands can be called multiple times to further increase the velocity, or the opposite command can be called to slow or stop the movement.
  • TRACK_LEFT
  • TRACK_RIGHT
  • TRACK_UP
  • TRACK_DOWN
  • TRACK_FORWARD
  • TRACK_BACKWARD

-- Zoom & Other Movements --
ZOOM
Adjust the focal length of the map, effectively zooming in and out:
  • ZOOM_IN
  • ZOOM_OUT

ROTATIONAL RADIUS
Adjust the distance of the camera from the map's rotational center:
  • INCREASE_RADIUS
  • DECREASE_RADIUS

STOP
Stop both rotational and translational fluid movement:
  • STOP

CENTER SHIP
Set the map center to your ship's current position:
  • CENTER_SHIP

DEFAULT VIEW
Set all map parameters to their default value, including centering the map at (0,0,0):
  • DEFAULT_VIEW
-- View Settings --
WAYPOINTS
Toggle all display of all waypoints:
  • GPS_ON
  • GPS_OFF
  • TOGGLE_GPS

Toggle display of individual waypoints. Be sure to include a [space] between the command and the waypoint name.
  • WAYPOINT_ON <waypoint name>
  • WAYPOINT_OFF <waypoint name>
  • TOGGLE_WAYPOINT <waypoint name>

NAMES
Toggle names on all waypoints and planets:
  • SHOW_NAMES
  • HIDE_NAMES
  • TOGGLE_NAMES

INFO BARS
Toggle map parameter bars at top and bottom of map
  • SHOW_INFO
  • HIDE_INFO
  • TOGGLE_INFO

SHIP POINTER
Toggle the ship pointer on and off (including "off-screen" pointers):
  • SHOW_SHIP
  • HIDE_SHIP
  • TOGGLE_SHIP

BRIGHTNESS
Change Screen Brightness:
  • BRIGHTEN
  • DARKEN
-- Map Modes --
FREE
Map remains static.
  • FREE_MODE

WORLD
Similar to FREE mode, but the view is zoomed out and top down to give a broader perspective.
  • WORLD_MODE

SHIP
The map centers on the ship, and follows it as it moves.
  • SHIP_MODE

PLANET
Top down view of the ship as it travels across the surface of a planet.
  • PLANET_MODE

ORBIT
Profile (side) view, centered on the middle point between the ship and the planet. Accurately show's the ship's distance from the planet's surface. Use NEXT_PLANET or PREVIOUS_PLANET plus the map number to select the active planet for that map. By default it will be the nearest planet.
  • ORBIT_MODE

CHASE
Aligns the map's azimuthal angle with the ship. Currently doesn't align with the ship's pitch relative to the global coordinate system.
  • CHASE_MODE

CYCLE MODES
Cycle through map modes:
  • NEXT_MODE
  • PREVIOUS_MODE

CYCLE PLANETS
Cycle map focus through all charted planets (sorted nearest to farthest). Doing so will return the map to FREE mode. This will also set the active planet for ORBIT mode.
  • NEXT_PLANET <MAP_NUMBER>
  • PREVIOUS_PLANET <MAP_NUMBER>

CYCLE WAYPOINTS
Cycle map focus through all charted waypoints. Doing so will return the map to FREE mode.
  • NEXT_WAYPOINT
  • PREVIOUS_WAYPOINT
-- Charting Waypoints --
Log waypoints of specified marker type from your current position. Waypoint names can include [space]'s as well as most special characters (No semi-colons).
  • LOG_WAYPOINT <waypoint name>
  • LOG_BASE <waypoint name>
  • LOG_STATION <waypoint name>
  • LOG_LANDMARK <waypoint name>
  • LOG_ASTEROID <waypoint name>
  • LOG_HAZARD <waypoint name>

  • DELETE_WAYPOINT <waypoint name>


PROJECT WAYPOINTS
Project a waypoint of a given type directly in front of you ship at a given distance (in meters). Useful for projecting Hazard markers to distant and dangerous locations.
  • PROJECT_WAYPOINT <distance> <waypoint name>
  • PROJECT_BASE <distance> <waypoint name>
  • PROJECT_STATION <distance> <waypoint name>
  • PROJECT_LANDMARK <distance> <waypoint name>
  • PROJECT_ASTEROID <distance> <waypoint name>
  • PROJECT_HAZARD <distance> <waypoint name>

Example: PROJECT_HAZARD 25000 Pirate Base
This command would project a Hazard Marker called Pirate Base 25km in front of your ship.


PASTE FROM CLIPBOARD
Log waypoint of specified type by copying GPS data from terminal and pasting it into the argument:
  • PASTE_WAYPOINT <GPS string>
  • PASTE_BASE <GPS string>
  • PASTE_STATION <GPS string>
  • PASTE_LANDMARK <GPS string>
  • PASTE_ASTEROID <GPS string>
  • PASTE_HAZARD <GPS string>

PLOT ORBITAL JUMP POINT
You can also plot a Waypoint just outside of a planet's gravity well. This command will plot the jump point on a direct line between your ship and the planet center, and will automatically generate the waypoint name:
  • PLOT_JUMP <planet name>


BATCH CAPTURE
GPS coordinates can now be input into a tagged LCD block for quick capture of multiple coordinates.
  1. Rename desired LCD blocks to include the Import Tag (Default: [Import] )

  2. Run the command IMPORT_WAYPOINTS.

  3. The same command can be run replacing WAYPOINTS with any of the other marker types, such as ASTEROIDS so that all newly logged waypoints will appear as that type.

CYCLE TYPE
The currently selected waypoint on any map screen can be quickly cycled through the different marker types.
  1. In any map, navigate to the desired waypoint, either by using the Context Menu (see section Menu Set Up), or by running the NEXT_WAYPOINT command.

  2. Run the command

    CYCLE_TYPE <#>

    where <#> is the map number. The map number is optional, and will default to map 0.

  3. Repeat the command until the Waypoint has been changed to the desired marker type.
-- Charting Planets --
This script can be used to chart new planets for custom planets and scenarios that don't use the default Star System (such as Never Surrender).

Note: The old 4-point method of charting planets is now obsolete.

REQUIRED BLOCKS
  • Camera Block named to include tag [Scan Cam]

COMMANDS
  • SCAN_PLANET <Planet Name>
    Run once to begin charging the scanner. Run a second time to scan the planet when the scanner is charged.
    • Designated scan camera must be pointed at the planet.
    • Planet surface must be within the current max-range of the scanner.
    • If the planet has an atmosphere, it's highly recommended to scan the planet from within the atmosphere.
    • Planet can be scanned multiple times to improve the measurement.


  • SET_SCAN_RANGE <Distance>
    Set the maximum scan range for the planet scanner in kilometers.
    • Longer distances require more time to charge the scanner.
    • Argument DEFAULT will set the scanner to the default distance.

  • DELETE_PLANET <planet name>
    Unleash the awesome firepower of your fully armed and operational mapping script!!!

  • COLOR_PLANET <color> <planet name>
    Recolor specified planet. Be sure to include [space] between command and color, as well as color and planet name.

    Color argument can be Hex Code or any of the following default colors:
    • RED
    • BLUE
    • GREEN
    • YELLOW
    • MAGENTA
    • PURPLE
    • CYAN
    • LIGHTBLUE
    • ORANGE
    • TAN
    • BROWN
    • RUST
    • GRAY
    • GREY
    • WHITE
-- Data Display Panel --
Optional display interface on a separate screen that allows browsing of planet and waypoint logs, map parameters, and the GPS clipboard which allows you to copy a GPS string that's formatted specifically for the terminal interface.

In order to add the Data Display Panel, you will need to add the tag "[Map Data]" to the block where you want to add the display panel. You can also specify a different tag in the programmable block's custom data, by changing the attribute "Data_Tag". You can also change the screen it selects by changing "Data_Index".

PAGE NAVIGATION
  • NEXT_PAGE
  • PREVIOUS_PAGE

  • SCROLL_UP
  • SCROLL_DOWN
  • SCROLL_HOME

EXPORT WAYPOINT
Generate a GPS string formatted to be pasted into terminal. This string will appear on the "Clipboard" (page 4) of the display screen. It can be copied from that screen's text field.
  • EXPORT_WAYPOINT <waypoint name>

PLANET LIST


In most scenarios you can quickly add all of the default planets by running the command:

LOAD_VANILLA_PLANETS

Alternatively, you can add them to the map by pasting the following data into the Custom Data field of the programmable block. They may not be accurate to some scenarios such as Never Surrender. NOTE: Make sure that there is no whitespace (spaces or blank lines) between Planet_List= and the planet entries.

Planet_List=
|EARTHLIKE;(0,0,0);60000;GREEN;1
|MOON;(16388,136375,-113547);9394;GRAY;1
|MARS;(1032762,134086,1632659);64606;RUST;1
|EUROPA;(916410,16373.72,1616441);9600;LIGHTBLUE;1
|ALIEN;(131110.8,131220.6,5731113);60894.06;MAGENTA;1
|TITAN;(36385.04,226384,5796385);9238.224;CYAN;1
|TRITON;(-284463.6,-2434464,365536.2);38128.81;WHITE;1
|PERTAM;(-3967232,-32231.5,-767231.5);30066.5;BROWN;1
POINTS OF INTEREST


These geographic oddities may be worth a visit, just for the view, or for something more? Waypoints can be pasted into Custom Data the same way that planets can.

Waypoint_List=
|Cliffs of Madness;(-292963.9,-2471866,372147.3);LANDMARK;ACTIVE
|Olympus Mons;(1035143,117597.2,1695051);LANDMARK;ACTIVE
RECOMMENDED HOTBAR SET-UP (Obsolete)


IMPORTANT: If possible, it is highly recommended to set up a context menu in one of your control seats or cockpits. See section -- Menu Set Up (Recommended) -- . If setting up a menu is unfeasible, then feel free to continue with these recommended settings.

This is the set-up I use for most command-seats and cockpits. It's built around a logic of having similar commands for the same buttons on differently themed hot-bar menus (i.e. MOVE_LEFT and ROTATE_LEFT use the same button on different menus).


MENU 1: General View Controls
[1] TOGGLE_INFO
[2] TOGGLE_GPS
[3] TOGGLE_NAMES

[5] PREVIOUS_MODE
[6] NEXT_MODE

[8] PREVIOUS_PLANET
[9] NEXT_PLANET


MENU 2: Rotational Controls
[1] ROTATE_LEFT
[2] ROTATE_RIGHT
[3] SPIN_LEFT
[4] SPIN_RIGHT

[6] ROTATE_DOWN
[7] ROTATE_UP

[9] STOP


MENU 3: Depth Controls
[] ZOOM_OUT
[2] ZOOM_IN
[3] INCREASE_RADIUS
[4] DECREASE_RADIUS

[6] MOVE_BACKWARD
[7] MOVE_FORWARD
[8] TRACK_BACKWARD
[9] TRACK_FORWARD


MENU 4: Lateral Controls
[1] MOVE_LEFT
[2] MOVE_RIGHT
[3] TRACK_LEFT
[4] TRACK_RIGHT

[6] MOVE_DOWN
[7] MOVE_UP
[8] TRACK_DOWN
[9] TRACK_UP
TROUBLESHOOTING


If you have any troubles while running the script, please leave a comment either here, or on the script page. Try to give any relevant details you can, including error messages from the terminal and what actions led up to the crash/bug. I will look into the issue and do my best to fix it.

Common Issues
  • Ship Marker Pointed Sideways / Yaw and Roll Axes swapped: This may be because your reference block has not been specified. Be sure to include the reference tag (default: "[Reference]") in the name of one of your forward facing blocks. Cockpits and Remote Blocks are good candidates.

    If you're in a scenario that doesn't use the Vanilla Star System, such as the Never Surrender scenario, not only will the planets be in the wrong places on the map, using Planet Mode might make it seem as if your reference block is not set (even when it is). In this case, you will need to get the actual locations of the planets (likely mapping them yourself).

  • Ship Marker Rotates in Opposite/Different Direction from Ship: This is likely due to your map's perspective compared to that of your ship. You're looking at the map from a different angle than your ship, and so your motions may seem "backwards". This is a bit like flying a remote control plane. Try using CHASE or PLANET modes for a more intuitive sense of direction.

  • Caught exception during execution of script: Line 19 ... : If you've already tried including the planet data, make sure that your planet entries immediately follow the entry "Planet_List=" on the next line. Make sure that there's only one line in the customer data that says "Planet_List=". If you haven't already tried to add the planet list, and you're still getting this error, please let me know, and I will try to investigate the problem.

65 Comments
E-gora 19 Aug @ 1:53am 
Why no Hoxxess on map? It means i can`t rock and stone?
Mos7Wan7ed 10 Aug @ 7:00pm 
Such a unique mod...
AridTheFox 16 Mar @ 4:12pm 
there a way to add custom planets? im playing on Stone servers and they have no vanilla ones
Nicole Morningstar 7 Mar @ 4:01am 
I would love an option to rename planets :3
McStone 3 Oct, 2023 @ 9:21am 
I love this mod, is it still being updated? If so there are 2 things I am wondering about.
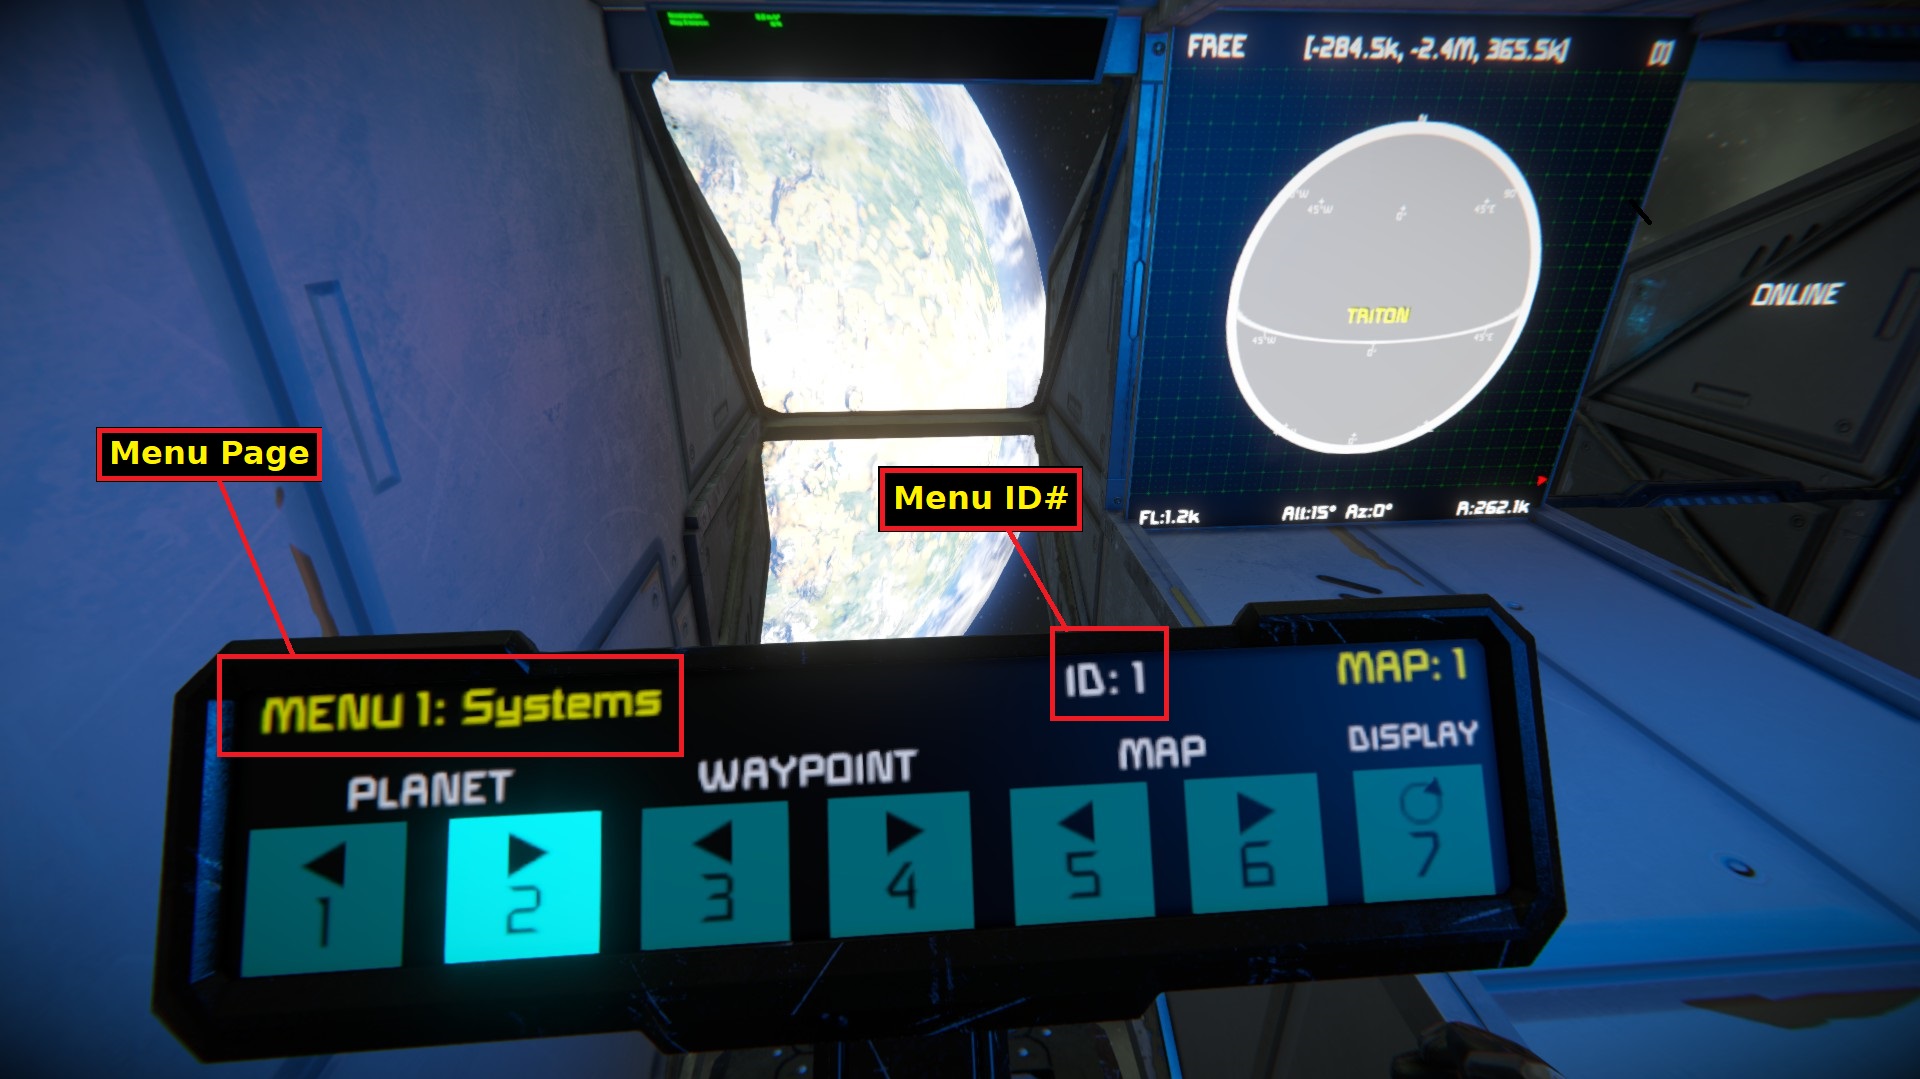
1, When you zoom_out to a scale of FL:1 it gets stuck and you can not move the camera anymore, and refresh or recompile don't work. you have to go back to default view and start over. Is this something with my setup or is this a known bug that will be fixed?
2, Is it possible to include a mode which puts all planets in view, preferably from an angle which maximizes visual distance between them to minimize overlap of planet labels? I would like a map of our whole system, but it is very difficult to get by using the zoom and track controls and it needs to be redone manually every time you refresh or recompile.
Anyway thank you very much for the content!
FrogMachine 5 Mar, 2023 @ 8:22am 
Would also like an option to adjust the size of the waypoints. Default size is quite large, resulting in more screen clutter than I want. I found a way to turn off ALL GPS markers, but no way to customize their display options like you can with the vanilla gps system, which lets you hide them.
Suggestion: Zoom and traslational controls in the same menu. "Radius" and "Zoom" do essentially the same thing.
FrogMachine 5 Mar, 2023 @ 7:13am 
@UN Warkeeper I ran into that issue on my first try at setting up a stationary world map interface on my planetary installation. I think it happened because the camera was blocked by my own grid. I rebuilt the scan cam on the end of a long pole sticking out over the voxels directly underneath it and the scan missed message went away.

I have run into some issues setting up the LCD and Programmable blocks requiring me to reload the script several times while I was getting everything tagged, but eventually it worked.

However, the IMPORT_WAYPOINTS command is not working for me. I can paste waypoints in individually from my GPS, but either that command does not work or does not function in the way I imagined. Some clarification on how to use the command would be appreciated.
FrogMachine 5 Mar, 2023 @ 7:13am 
I'm still trying to figure out how to get the script to generate the kind of map I want. It's a shame that rotation is turned off in PLANET_MODE bc that's the view mode I want to use for this station's map display. It would be nice to have the option to scan across the surface of the planet I'm stationed on in PLANET_MODE with the arrow keys or using a controller and be able to visualize where all my waypoints are located relative to my station's position.

I am hoping to set up a radar dish soon and to see what I can do with mapping out POIs generated from the radar. I'm frustrated that I cannot seem to find a way to easily turn distant antenna signals into GPS coordinates for adding to the map's waypoints databank.
Director Krennic 16 Feb, 2023 @ 11:32am 
Hi! Been trying to chart planets with the SCAN_PLANET command however, even if i am literally 500 meters from it i keep getting the SCAN MISSED message. The camera is pointed at the planet, any ideas?
Lt.Fenix 28 Dec, 2022 @ 9:33pm 
Is there a way to give several screens the same map ID? I want several LCD's showing the exact same thing.