PAYDAY 2

PAYDAY 2

1,152 ratings
DSOD Loud guide
By KevKild
Brief information and examples of running heists on DSOD difficulty. Help those get their achievements, or pursue further into their skillsets.
19
15
9
11
21
3
9
3
5
4
2
2
3
3
2
2
2
   
Award
Favorite
Favorited
Unfavorite
Intro
Guide simply put to help those with DSOD stuff.
Whether it is achievements or continuing after, this guide is to help give information on maps, and team-play strats with others.

There is a YouTube series where I go over to commentate as much as I can. May not be everything so any CNC (criticize 'n critique) will be appreciated.

Many parts are split because I continue to hit the Steam max character limits per section. Otherwise it would look a little cleaner? Oh well.

DISCLAIMER: This guide is not perfect, a lot of variation/RNG into this game, as well as working with 3 other teammates. My recommendation is try what works best for you, and let time/experience take care of the rest.

Anyways have fun 'Drill'ing into DSOD, here's a funny;

Change Log - Update: Dec9
- Nov 18: Added Guide. Fixed several build links & Rifle suggestions, thank you Rockymoto. Fixed skill description from bloodsheet comment
- Nov 19: Added Slaughterhouse Keycard locations
- Nov 20: Added Silk Road DLC bundle
- Nov 21: Added pictures for Uppers and Scavenger information
- Nov 22: Added Reservoir Dog Day2 joker tip
- Dec 8: Added Interactions section for drills/doors in General DSOD Information
- Dec 27: Major update. Included Update 201 changes for Federal Police damage changes for San Martin, Breakfast Tijuana, Buluc's Mansion. Added more information for San Martin and Buluc's Mansion, with their difficulty changes. Added Spawn trap for Hotline Miami Day2. Embedded links for Silencer LMG and Infamy videos.


2021
- Jan 5: Added screenshots for Shacklethorne Auction, Heat Street, GO Bank
- Jan 30: Added Green Bridge information about killing the turret for safety
- Feb 18: Added personal 21 build video, corrected Aftershock infinite assault
- Mar 20: New Jiu Feng Dragon Heist added
- Mar 28: Added saw section for recommendations for heists
- Apr 18: Added more screenshots (Reservoir dogs/Green Bridge) updated captions for several screenshots throughout guide for more detail. Added Making Space video
- May 11: Revised personal Perk deck opinion tier list
- Jun 18 : Added DLC The Ukrainian Prisoner heist and info
- Jun 23 : Reworded parts of skills perks and weapons (SB/US/Rogue/ARs/SMGs) etc
- Aug 22 : Tabled DSOD cop damages and more accuracy, thank you Carrot for idea
- Oct 22: Updated all perk related builds for folks with video examples
- Oct 25: Updated tips/spawns with screenshots for heists
- Oct 26: Reworded and updated all skills/weapons on PD2 updates
- Oct 28 -> Nov 09: Even more tips/spawns with screenshots & gifs for heists
- Nov 10: 2.0 Revamp finished. Included suggested builds for some of the harder heists
- Dec 4: Added spawn groups and finished heist screenshots
- Dec 15: U216 Introducing the most broken deck, Leech
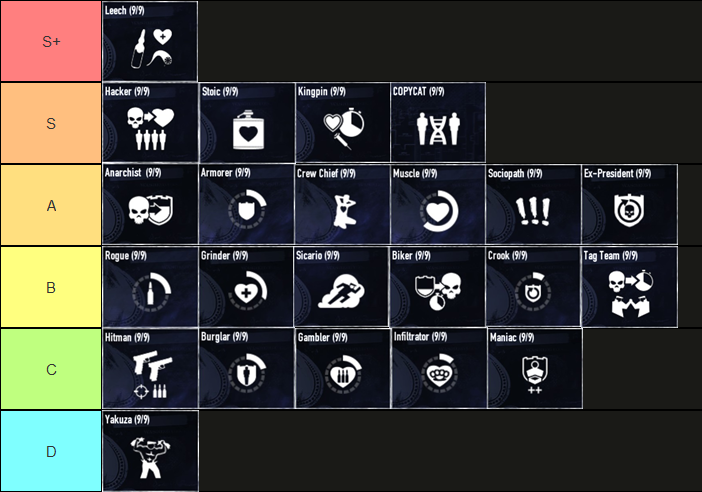
- Dec 31: Adjusted Tier list for Leech S+


2022
- Mar 11: Added New Mountain Master Heist section
- May 29: Fixed 30+ corrupted screenshots because Steam support failed to fix 'em
- Jun 22: Added Midland Ranch heist. Combined contractors in page
- Jul 10: Added more GoatSim info. Updated Perk Tier. Added Lecture section
- Sep 3: Added spawn group and damage for Marshal Marksman special
- Sep 15: More Lecture material from others and updated Sniper example
- Oct 3: Added another Goat Sim strat, and revised Perk Tier list
- Oct 26: Added Lost in Transit heist
- Dec 30: Reworked Pistol recommendations. Started U232 Copycat Section


2023
- Jan 2: More detail for Birth of Sky, White House, Aftershock, Hell's Island
- Jan 15: More detail for White House. Added advanced info for Snipers & Drills
- Jan 20: More detail for Beneath the Mountain and Dragon Heist
- Feb 24: Added Hostile Takeover Heist and added Uncle Goat sim video
- Apr 15: Added BoS gif jump, modified pistol skill descriptions
- Apr 24: Added deployment section for ammo/meds
- Jul 2: Added Crude Awakening Heist
- Jul 9: Cleaned up sections to match current segments
- Sep 16: Updated Minigun Dozer damages to 120 from U240 changes
- Dec 9: Updated damages for Taser 195>70 and Shields 70>35
General DSOD Information pt1
DSOD 'Rules'
  • Time and Practice. If you are here for the achievements, that's fine. Some players like to pursue further. Having map/heist knowledge is the most valuable tool to DSOD. Since every heist is uniquely programmed by OVERKILL, knowing what's efficient will help. Rest is proper builds (DPS/Sustain/etc), using your brain, and not getting frustrated.

  • No extra loot. Only get the objective requirement. There's no reason why you need "More money or EXP" for one more bag of coke or cash, etc. Treat it like CrimeSpree where extra loot doesn't matter. Most players are max Infamy or have lots money already.

  • Spawns per heist. Different heists will have different spawn counts. Not every heist is the same. Hence not every build needs to be 1:1 how to complete a heist. I have examples in my DSOD Build guide of every map to give an idea, but the examples below will be cut-pasted from my stream/YT.

  • Proper Technique. Similar to PD:TH, you peek, shoot, back into cover. If you take a hit, either get back into cover, or assume you can hit a headshot for bullseye armor proc. Once the area is clear, then you can move. AOE killing from Shotguns/Snipers/Launchers will come in handy if there is more than one enemy. But the process is the same.

  • Fades and Objectives. When it feels like there are less cops (Assuming DPS/clearing), fade is typically when you wanna move and do objectives. If your team is not able to clear as much area compared to other lobbies, general rule is wait for fade to do 'X' objective so you don't waste downs. Otherwise making space for you and your team can easily pursue objectives. You can do everything in this game without 'Swan Song abuse' or risky downs/plays.
    Can't do 'X objective'? -> DPS/CC (Crowd Control>Flashbangs/fire) or wait for fade.

  • Pre-Planning. Check your team's loadout/equipment. Some heists can be optimized by bringing C4 (shaped charges) instead of more medic bags. Those shaped charges can break doors/safes to speed up drill timers, lock-picks, etc. Doesn't make sense if your team has 8 medic bags. Can use some variation, even 1 ammo bag replacement.

  • Joker Sharing. If everyone has Confident aced (2-joker skill), make sure everyone gets their first joker before getting a second joker. The benefits they bring is huge, and nothing is more frustrating than seeing 1 person with 2 jokers, and your teammate without any.

  • Dominated Cops. MAX number is 8. A full 4-team, 2 jokers each. After that, you cannot dominate anymore cops, or make them hostage. If the team has 6 jokers, and there are 2 dominated cops, you cannot dominate another one. So keep in mind where teammates have cops as hostage, or kill them if need (If you are moving like Heat Street, Brooklyn 10-10, etc). If there is a CrewChief in the party, might be a good idea to keep them.
    Otherwise, dominating cops is good mid-fire fight if you hit them, press F to shout. This will prevent you from getting shot (hopefully) mid reload or if you miss, etc. But if you are at the max number, this trick will not work.

  • Reviving Teammates. If area is enclosed/clear, probably fine to revive/inspire right away. But keep in mind, if you don't have Painkillers, please make some space before using inspire on them. Some folks also play with Anarchist/Armorer/Kingpin, wait at least 12 seconds before reviving, good chance they will have their ability ready by then. Kingpin a bit longer.

  • Captain Winters. He is a priority. He will make your guns do LESS DAMAGE. Know where the locations are on the map, then prepare for him when he shouts. Wait for him to fully spawn (Blue Shield Icon on assault bar). Don't kill him as they are walking/spawning in. Or it will be permanent and folks can't get out of custody. When Winters is active, all enemies become more tanky (50% less damage after 40 seconds).

  • Custody with Teammates. Not often this should be happening assuming proper play and use of medic bags. But if 1 person is gone, slow down a tad. 2 folks in custody, stay together. 3 in custody, hide/stay in one spot until the assault is over to trade.

  • Please have Levels. This is a team based game, any level 0[i.imgur.com] or a low level player without proper builds should not expect themselves to get carried in DSOD. Make sure you are comfortable with your build/current level (90-100 for example) and bring DPS or Team helping skills (Jokers, Inspire, Nine Lives, etc).

  • Long Guide. Not really a rule but for any other non-DSOD like information, check the Long Guide for other stuff. Long Guide

  • DLC. Another non-rule, but having the Legacy collection or any up-to-date DLC will always help for better builds and of course getting every heist achievement, etc.
    https://steamproxy.net/steamstore/bundle/3756/PAYDAY_2_Legacy_Collection/
    https://steamproxy.net/steamstore/bundle/29146/PAYDAY_2_Silk_Road__City_of_Gold_Collection/

Performing Interactions
This one was a bit of an oversight, but I continue to see players messing this one up. You can't expect 100% cover when repairing a drill or opening a door. I try my best to provide cover, but if a spawn group comes in, 1 of the 5 enemies is likely to hit you.
Position yourself to be aware of enemies spawning in so you can be prepared to cancel the interaction and deal with them.

First example is to repair the drill and face farthest away so you can see spawns coming.

Second example is checking the area while doing said interaction.

Third example is facing yourself where spawns are likely to come towards you (Stairs/Elevator).


Deployment (Ammo/Med) Recommendations

General DSOD Information pt2
Mods
  • SuperBLT: To get any mod working. Drop the WSOCK32.DLL file into the Payday2 Directory.
    \Steam\SteamApps\common\PAYDAY 2\
    SuperBLT[superblt.znix.xyz]

  • BeardLib: This is meant for visual stuff, incase you want to pretty up your game. Not really helpful for DSOD, but incase any one asks why my Anime stuff works.
    BeardLib & mods below goes into mods folder.
    \Steam\steamapps\common\PAYDAY 2\mods
    Visual mods goes into the mod_overrides folder.
    \Steam\SteamApps\common\PAYDAY 2\assets\mod_overrides
    BeardLib[modworkshop.net]

  • PocoHud/VanillaHUD+: Probably the best to get information of what is going on. With a lot of customization and information available, it definitely helps to understand a lot of things during assaults, enemies, and general overview of the game.
    PocoHud
    VanillaHUD+[modworkshop.net]

  • Low Violence Mode: Helps deal with this game's terrible optimization, and tracking to next enemy target after you kill it. Makes bodies disappear after you kill them. This will help FPS issues folks have. HIGHLY RECOMMEND you get this.
    Low Violence Mode[modworkshop.net]

  • Crosshair/Laser: Current lasers are inaccurate. Suggest those struggling to aim, get either of these to help. U217 introduced Motion Sickness dot, enable this for free crosshair under Accessibility Options.
    Crosshair[modworkshop.net]
    Accurate Laser[pd2mods.z77.fr]

  • No Screen Shake: Not sure why OVERKILL thought it was a good idea to have your screen shake when you shoot your gun (Immersion Maybe?) but recoil is still a thing in the game. Some folks get headaches from playing this game. So I recommend getting this. This will not change stability/recoil on weapons in the game. It will help for more consistent shooting.
    No Screen Shake - Shooting[modworkshop.net]

  • Custom Maps: These are handy for warmup, testing builds, or checking damages on enemies. Drop these in the maps folder in your game directory.
    \SteamLibrary\SteamApps\common\PAYDAY 2\Maps
    Enemy Spawner[modworkshop.net]
    Proving Grounds[modworkshop.net]

Infamy
  • Just do it. 1 Infamy is enough to maximize builds via unlocking the tier 4 skills at 16 points, instead of 18 points. There's lots of achievements for Infamy, take this time to learn more maps and spawns on Overkill/DeathWish to get comfortable with the maps

  • Infamy 3.0 Update. November 11 2020, has added 3 more achievements to get, which means another reason to infamy. Fastest way is full team spamming Diamond Store with 8 Team Boosts on weapons, even with -30%. Infamy per hour.

  • Crime Spree. There is an achievement for 250 Crime Spree, but after that, up to you if you want to keep going. Frankly, there are folks that want to Crime Spree boost for levels/infamy. This doesn't help you teach the game/maps/DSOD etc.

Bots
  • Playing with Bots. Default key is 'Z' to hold a bot in position. Have them out in the open taking aggro while you deal with enemies/objectives. They have 8000 base health, but are terrible for doing damage. My recommendation is the Brenner LMG, or the R93 Sniper.


  • Bot boosts. Quick action & Accelerator is OP. Having boosts in the first slot will be saved until last player joins lobby, and will be stronger for every bot player in the lobby. I like the shield piercing skill and the inspire skill for bots. Sharp-eyed for more ammo will create bad habits for when you go public into games. As for the other boosts, feel free to chose what you need for certain builds. Dodge for Hacker, health for Stoic, etc.

Crime-net Offline
  • Main differences. As put in the long guide, armor regeneration is faster except Anarchist. "The default regeneration time is 3 seconds (1.75 in offline mode), which is multiplied by each skill." Captain Winters will not spawn with the shields in offline/singleplayer mode. You can also pause the game.

  • About this guide. I don't have every heist examples with bots. The focus on this guide is with other people as a team. All suggestions and tips within the videos can be helped with bots. If you need them to carry bags, toss the bags on their backs, and wait for them to move. My advice for builds is to have high-end CC or DPS to handle several maps.
    https://www.youtube.com/watch?v=8WfdOJzjv70

Portable Saw
  • Heists with Saw Benefits. Some teammates with a LMG/Sniper or Perk such as Stoic/Kingpin may bring a saw to help speed up objectives. Below are my recommendations what heists would be best for a saw, and what maps can use one.

  • Better heists for Saw:
    Art Gallery - Security door and Paintings
    Transports - Lock boxes
    Border Crossing - Hangar doors, security cages
    Hotline Miami - Day1 cages (Can use C4 here), Day2 door (Can't C4 this door)
    Breakfast in Tijuana - Security door, door in cells (Optional: Cuffs if host is afk)
    Firestarter - Day1 trucks, Day2 for first door & Security door, Day3 for vault & upper door
    Midland Ranch - For all cages for assault rifles/parts
    Mountain Master - Both doors for elevators and Hard drive cage

  • Other heists for Saw:
    Bank Heist - Vault (Get keys from pre-plans) & (Optional: Security Door)
    Diamond Store - (Optional: Security door, cops open it)
    Reservoir Dogs Heist - (Optional: Day2 final door, but have C4)
    GO Bank - Lockboxes in vault (Decent cover)
    Alesso Heist - C4 closets (Hack takes 1 assault, fade to pick lock)
    Train Heist - Security Doors (Just wait drills or KC from civi)
    Dockyard - Containers for the bomb parts
    Counterfeit - (Optional: Basement doors, but have crowbar)
    Brooklyn Bank - (Optional: Lock Boxes for loot)
    Shacklethorne Auction - Doors for torch
    White House - West wing doors, usually in fade after assault
    Buluc's Mansion - Door to hack computer
    Goat Simulator - Day2 Bridge security door (Use under stairs to repair drill)
    Meltdown - Security cages
    Nightclub - Security doors
    San Martin - Beginning door
    Hoxton Breakout - Day1 doors (Low cop count and after assault)
    Big Bank - Security doors and Vault doors (Otherwise get keys/c4/keycards)
    Scarface - Power boxes
    Brooklyn 10-10 - (Optional: Speed up upstairs door)
    Big oil - Security Doors
    Election day - Cages (Correct day) or the vault (Incorrect Day)
    Framing Frame - Security door and Paintings, Day3 for security doors
    Biker Heist - Garage security door if RNG (Not worth a saw)
    Watchdogs - Catwalk door and left cage
    Boiling point - (Optional: Security Door - keycard is nearby)
    Dragon Heist - 2 beginning doors, then door for torch
    Lost in Transit - 1 Security door for containers and torch
    Crude Awakening - 1 Security door for server. But Keycard from lab/worker civvy

  • If there is a Drill. Sometimes someone may place a drill on a door you need to saw. For the Cage, aim lower. For Security, aim for the top/side.

General DSOD Information pt3
Advanced TECH
  • Hostage Tanking - HOST ONLY
    - Dominate a cop, and it provides free cover for the host/green. Other players cannot use this trick in the lobby. You can hide inside the dominated cop to buy time for cooldowns (Kingpin/Stoic/Anarchist) or to divert some attention. Careful not get melee'd or hope your jokers/teammate doesn't kill the dominated cop.

  • Double jumping / Bunny Hopping
    - Jumping ontop of boxes or objects may be just short of reach. But if you jump then perfectly jump a second time, you will jump higher than your first. Giving you some height advantage depending on map and situation. Pretty easy to do, but timing your second jump takes a bit of practice.
  • LMG Bipod dual-shout
    - There is a 'second' shout with LMGs. You can alternate shouts with the bipod and without. This won't make shouts faster or cancel the first, so you simply alternate between the two. Can use this to dominate cops faster, or shout at NPCs faster (Undercover: Taxman).

  • Underbarrel sprint cancel
    - Ketchnov and Little Friend have an underbarrel grenade launcher. If you press the swap key and then sprint, you can immediately have the attachment ready. This makes for quick play or AOE disposal much easier to handle. Easier to use if you have Lock n' Load.

  • Jump & Crouch Interaction
    - If you jump in the air, you can crouch and interact with objective or player. Then when you land you have cover from said window, ledge, or place on the map. Great for Brooklyn Bank or Undercover. Or just getting revives through windows/ledges.

  • Sniper x10 Scopes
    - Snipers with the Theia Magnified Scope or the Box Buddy sight, will highlight specials and turrets without HVT aced. Great for team communication or high powered-snipers.

Spawn Camping
In this guide indicates various spawn points for cops maps that are on the more difficult side. This is to help attack them before cops attack you. They will go through a vault or slide animation, you can use this time to kill them easier.
After getting some practice learning how cops spawn (Playing for achievements/build practice on Normal->DeathWish difficulty) and learning the maps, it makes DSOD a lot easier.
There are different spawn groups for spawn area. These will vary from:
  • 1 Cloaker (If this spawns, there's always another 1 cloaker spawn)
  • 2 Marshall Marksman
  • 3 Heavy Zeal, 1 Light Zeal
  • 2 Heavy Zeal, 2 Shield
  • 1 Medic, 4 Shield
  • 1 Medic, 1-2 Heavy Zeal, 2 Shield
  • 1 Medic, 3 Heavy Zeal, 1 Light Zeal
  • 2 Taser, 3 Heavy Zeal, 1 Light Zeal
  • 2 Dozer, 3 Heavy Zeal, 1 Light Zeal

DSOD Cop Damages
These are for the majority of maps. Damages[docs.google.com] will change for Boiling Point.
Enemy changes (Taser/Shield damage [195/165 & 70] were changed after u240.3) could be more to be discovered.

Enemy Unit
5 Meter
10 Meter
20 Meter
30 Meter
Zeal Heavy
225
225
225
225
Zeal Light
67.5
67.5
67.5
67.5
Federal Heavy
225
225
225
225
Federal Light
225
225
225
225
Taser
75
60
37.5
37.5
Shields
35
30
30
20
Sniper
240
240
240
240
Marshal Marksman
70
105
140
105
Marshal Shield
70
60
40
40
Marshal Shield-Broke
90
80
40
40
Heavy-Swat (Tan)
100
75
62.5
50
Gangsters
67.5
67.5
67.5
67.5
Cloaker
20
17.5
12.5
10
Medic M4A1
60
30
30
30
Medic Shotgun
140
35
35
14
Medic Dozer
20
17.5
12.5
10
Mini Dozer
120
120
120
120
Skull-LMG Dozer
120
120
120
120
Saiga-Shotgun Dozer
255
240
150
105
Green-Reinfeld Dozer
560
490
70
28
Shotgun Street cop
525
490
350
210
Lecture Section
All the video tips and other information in one spot. Boring for the casuals, but I guarantee you will learn or improve on things in this section if you take a moment.


Lecture Section from Others
Other high-end players and their great teaching material.
As there is more to the game than just build, Build, BUILD?!?

Carrot

MrCreepy

Bay1k

RuggedlyHandsomeBunBun

Ace

TheKknowley
Perks pt1
Overview: These are all based on personal opinion, there will be folks that agree/disagree. Also have a tier list where I would put things how well they work with various builds without 'Abusing Uppers', relying on one setup/build, etc.

I will also give a 'status' like indicator of what perk decks should operate/feel like.
Status indicators: DPS - Sustain - Tank - Support - Risk

Joker input: If Yes, highly recommended for the deck. Optional, it will benefit but not critical. No, not the first thing to build in the perk/build.

Where I personally would put things overall. Also, perks are tiered within their ranks.

https://www.youtube.com/watch?v=WFBxADGTuGI
https://www.youtube.com/watch?v=jBwAEgLQ5wo


CrewChief
Status: Tank, Sustain, Support+
Joker: Yes
Example from Phoxniix (AK5 Rifle, 5/7 AP Pistol)
https://pd2builder.netlify.app/?s=xk3I1000c1100010iF0010Bi100100&p=0&a=1&t=4&d=5
https://www.youtube.com/watch?v=1YHcrtMxL3U
Overlooked as a noob deck, but seriously, the tanking/sustain potential this deck has is amazing. This is the deck that makes sure you and your team has less downs, sometimes no crew downs in DSOD matches. Keeping everyone tanky with more HP/Armor/Damage reduction, as well as free stamina. It's too good ignore. Problem is, reliant on jokers/hostages to support the team. If your teammates do not have joker skills, you need to dominate cops to support them, otherwise the bonuses will not work for them. Best support deck and why.

Muscle
Status: Sustain, Support
Joker: Yes
Example from Martino (Repeater Sniper, Broomstick Pistol)
https://pd2builder.netlify.app/?s=xk1GgF00d010-91058xc0100&p=1&a=3&t=4&d=5
https://www.youtube.com/watch?v=n1Lrg-hw-4A
Great all-rounder perk deck with the benefit of taking heat for your team with the aggro. Comes with free hostage taker skill, giving this deck more variety into builds and how you want to support yourself and the team. High health pool with joker skills, this deck performs well. Just be very cautious on the aggro, as enemies will target you faster than other perk decks. At least this gives your team some space. The Panic feature can help the team slow down enemies as well, but only works on non-suppressed weapons.

Armorer
Status: Tank, DPS
Joker: No
Example from Hikigaya (Platypus Sniper, CR805B SMG)
https://pd2builder.netlify.app/?s=1G003U00fM10-950Ba000100&p=2&a=6&t=4&d=3
https://www.youtube.com/watch?v=iVOrETF6pzE
It's hard to screw up the name, put on ICTV and play slow. ICTV armor gives the ability to consistently tank 225 Zeal shots without waiting too long for the armor to recover. Added benefit of getting 2 seconds of invulnerability. Only problem is the speed going in-out of cover, be careful of enemy suppression otherwise your armor-regen will not save you. Don't recommend this on fast moving maps with your team, but if you play at your own pace, this deck is for you.

Rogue
Status: Risk+
Joker: Optional
Example from Bay1k (Tempest Rifle, Mark10 SMG)
https://pd2builder.netlify.app/?s=5g1G0-4dg10-5gF00w7h60-6&p=3&a=0&t=4&d=5
https://www.youtube.com/watch?v=jdgGY9okcl4
The noob trap. Social media considers this the all-in-one perk deck to go to. Dodge doesn't help you learn how to play the game. There's not much to this deck with innate 45% dodge. Dodge is not 'Survivability', it is still a chance. No damage taken from chance sounds great on paper, but in reality with many cops on the map, the house will always win. Personally, my luck sucks so I don't like relying on RNG dodge mechanics. The best 'dodge' is cover when you have made your shot from peeking. The weapon swap speed is great, but it doesn't help the deck compared to others. Lastly, the Elusive part will hurt your team by making them priority targets. Dodge alone keeps this perk average amongst other perks, but there are better alternatives. My recommendation, bring joker skills, sustain with First Aids and Hostage Taker.

Hitman
Status: Tank
Joker: No
Example from Jamm (Akimbo Krinkov SMG, Krinkov SMG)
https://pd2builder.netlify.app/?s=1G0010008N100010i90050121201Ba&p=4&a=6&t=4&d=3
https://www.youtube.com/watch?v=P_giovFEznc
Free akimbo skills, and some nice armor bonuses. Anytime your armor is completely destroyed, it will come back 1.5 seconds no matter what. This helps ICTV and non-ICTV armor setups. If you manage to land a Bullseye proc within the 1.5 seconds, you can armor gate with this perk deck. Since there are no other bonuses, this forces the deck lower in the tier. Either play slow, similar to Armorer, or pack on some ICTV-Frenzy, etc.

Crook
Status: Tank, Risk
Joker: No
Example from Spikes (Lion's Roar Rifle, Judge Shotgun)
https://pd2builder.netlify.app/?s=1G000100U510-5hG001010-415G&p=5&a=3&t=6&d=3
https://www.youtube.com/watch?v=aQEcC-CHdt0
Mix of Armorer and Rogue. Many different builds can fit into this perk deck. Whether you want to sustain your HP with joker skills and Hostage Taker, or surpass 225 breakpoints with the HBV setup (Die Hard aced, Iron Man, and Frenzy aced[175.5 armor]). Crook comes with armor recovery bonuses, but no 2-second invulnerability like Armorer. However, you gain the benefit of a tiny bit of dodge. Beware of Black/Saiga dozer, they deal 255 damage up close.

Burglar
Status: Risk
Joker: Optional
Example from NotYourAvStalin (GL40 Launcher, Contractor Pistol)
https://pd2builder.netlify.app/?s=1O1G0-4d010-5j000C9l0M90100&p=6&a=0&t=4&d=5
https://www.youtube.com/watch?v=voW-TrAoVO8
Not really sure why you would run this on loud builds. More of low-end stealth build. Does have dodge, and does create your team as a priority target (Similar to Rogue's Elusive). Neat thing is you can lock-pick doors faster. This can help for Hoxton Breakout or Shacklethorne Auction. Not recommended for serious builds, recommend First Aid Kits/Jokers keeping you alive.
Perks pt2
Infiltrator
Status: Tank
Joker: Optional
Example from Rockymoto (Desertfox Sniper, Mark10 SMG)
https://pd2builder.netlify.app/?s=1Q38iF008110-6100301m000152&p=7&a=1&t=4&d=5
https://www.youtube.com/watch?v=YrX7JCZWxv8
Not a melee focused deck. With damage reduction close to enemies, you can make some tank setups with ICTV. Melee to get health, or delete Dozers in 2-swings. I would put this perk into Sustain category as well, but melee in this game is very risky, sometimes Dozers will melee shoot instantly. Like any other Tank deck, take it slow and wait for opportunities. Deck can fall short if there are 2+ Dozers next to each other.

Sociopath
Status: Tank
Joker: Optional
Example from Carrot (Brenner-21 LMG, UZI SMG)
https://pd2builder.netlify.app/?s=xa001000fM1000102V0050520-4xc&p=8&a=6&t=4&d=3
https://www.youtube.com/watch?v=cyO0APVCoag
Not a melee focused deck. This deck is a straight upgrade to the Infiltrator deck. Better armor gating than Anarchist if you are focused on making alternative kills (Cooldown of 1 second). ICTV or non ICTV setups, this deck can help support teams with Panic as well. Since this deck is not like Armorer/Anarchist, you don't have 2-second invulnerability. So take it slow and wait for opportunities to melee Dozer, etc.

Gambler
Status: Sustain, Support
Joker: Optional
Example from Namatokunsi (M308 Rifle, GSPS 12G Shotgun)
https://pd2builder.netlify.app/?s=xk38091Q8N10001010005052000100&p=9&a=6&t=4&d=5
https://www.youtube.com/watch?v=e1rTzOiWolY
Nothing stellar from this deck. You help your team with ammo (assuming you grab it first). The cooldowns from this deck are far too high to make it up in the higher tiers. Running out in the open every 3 (health) or 5 (ammo) seconds to grab ammo pickups, encourages risky game play. You can support your team by healing them with ammo pickups you get.

Grinder
Status: Sustain
Joker: Optional
Example from Ace (Tempest Rifle, Heather SMG)
https://pd2builder.netlify.app/?s=1G0-68h1Q0010gF00107g000100
https://www.youtube.com/watch?v=zxDDUgVKjF0
Life steal. Problem is the long 1.5 second cooldown and the lack of armor choices. There's only one option to take in order to 2-tank a 225 Zeal shot (Hostage taker proc with Quick fix effect at full health), but that defeats the entire purpose of the deck. Play this like a tank, as it will be slow to keep up with the team, but at least you can always heal up quickly.

Yakuza
Status: Tank
Joker: No
Example from Carrot (Queen's Wrath Rifle, Heather SMG)
https://pd2builder.netlify.app/?s=xa0-6fM100010iF00101a0-4Ba&p=b&a=6&t=4&d=3
https://www.youtube.com/watch?v=83Dw7cvJScA
Speed and armorer recovery. I don't have much to say for this deck unless you pack ICTV-Frenzy LMG setup like Armorer/Hitman, or rely on Uppers. To fully maximize the ICTV-Frenzy setup, find a light swat or shield and take 1 hit from it. After that, you can have some potential and fun with this deck. Otherwise, falls very short compared to others as it doesn't have anything else to add to benefit yourself or the team. Be aware of surroundings with this deck.
Note: Yakuza is a challenging deck to benefit the speed bonus from lower HP. With high risk to grace and no dodge or 2second invul from other decks. Alternate build below.
Example from Koqurow (KSP LMG, Bronco Pistol)
https://pd2builder.netlify.app/?s=1G0010008N10-5iF0010120001xc&p=b&a=6&t=4&d=3
https://www.youtube.com/watch?v=3VzNBFT0GDs

Ex-President
Status: Sustain
Joker: Yes
Example from Jamm (Akimbo Judge Shotguns, Akgen-21 SMG)
https://pd2builder.netlify.app/?s=5O00101Q81100010iF00017g000100&p=c&a=0&t=4&d=5
https://www.youtube.com/watch?v=49F5YRQ44MI
Having a second health pool is great. Armor blows up, you get some health. The health can come back instantly the second you make a Bullseye hit to again armor. Comes with some small dodge too. The armor recovery rate for when you have max-stored health from is very fast (More kills -> faster rate). May not be able to tank 2-tank a Zeal shot, but this deck comes with huge sustain with the added bonuses of everything else. Even if you are struggling to make space or kills, your teammates creating kills also helps store health for this deck.

Maniac
Status: Tank, Support
Joker: No
Example from 5 Seconds of One Direction (Gewehr DMR, China Puff GL)
https://pd2builder.netlify.app/?s=1G003g01gF10-9503800011I&p=d&a=6&t=4&d=3
https://www.youtube.com/watch?v=R4riTKa6_xY
Update 200 fixed this perk deck making it great support and self tanking. The damage reduction it offers is a FLAT number, not percentage based where DSOD numbers can matter. It may help teammates at the weirdest of times, but it encourages you to continuously attack enemies to keep stacks up. Deck needs to be somewhat aggressive to keep stacks up. More damage means more damage absorption. Can be played with ICTV or ICTV-Frenzy setups.
Note: If playing with Frenzy or Berserker based setup, your hysteria stacks will stay for a while if you do damage. By zerking earlier in the match without doing damage means better zerk value.
Perks pt3
Anarchist
Status: DPS+
Joker: Yes
Example from MrCreepy (Contractor Sniper, Krinkov SMG)
https://pd2builder.netlify.app/?s=1G381G0-41000100100307o0-4xc&p=e&a=0&t=4&d=8
https://www.youtube.com/watch?v=QoVoUdbAEAo
This deck I recommend anyone to at least put some effort learning. This is NOT A TANK DECK. Move your ICTV armor to Armorer or tank based perk decks. OVERKILL designed this deck to be Suit only so you can benefit the skill points into other skills. Allowing for more utility, crits, and DPS for your team. Since your health is halved, there's no need for Hostage Taker. But Joker skills will help this deck and your team on the HP -> Armor conversion. Damage you deal, will grant armor. The Suit will also regen armor faster. With the added bonus of 2-second invulnerability, this deck is very strong for players. Can fall short if you prefer passive play styles.

Biker
Status: Sustain
Joker: Yes
Example from Martino (Akimbo Tatonka SMG, Para SMG)
https://pd2builder.netlify.app/?s=1Q380010dg100010gF00101m120100&p=f&a=3&t=4&d=5
https://www.youtube.com/watch?v=ArhxCBzX5gQ
The weaker Anarchist. Your teammates kills can mess up the healing of HP and Armor it gives. It can stack up to 4 times, on 4 different times, but it is not enough to keep up with Sociopath or Anarchist. The deck does benefit with faster healing with less armor, but cover is your best bet to have armor back in the first place. Take this deck similar to Grinder, take it slow.

Kingpin
Status: Tank+, Sustain, Support
Joker: Yes
Example from Loothound (Mosconi 12G TACTICAL Shotgun, Judge Shotgun)
https://pd2builder.netlify.app/?s=5O3I10F6d0100010-512xk000100&p=g&a=3&t=g&d=5
https://www.youtube.com/watch?v=WxgPl-_zEqI
The only counter is green dozer/shotgun enemies. Otherwise the best Tank deck in the game. Comes with healing if you have armor and take a hit, with the injector active. Having one joker can allow this deck to 2-tank a Zeal heavy shot at full health. All rounder deck to fit many builds (DPS, Support, Tank), it is a great tool to help any team and complete maps. It will take a while to learn and longer to master. Inject when you want to push objectives or there are too many enemies. More details and suggested playstyles/tips here.

Sicario
Status: Sustain, Risk
Joker: Optional
Example from Verzweif3lt (Lebensauger Sniper, Heather SMG)
https://pd2builder.netlify.app/?s=5g3I0H10d0100010-611S0-6&p=h&a=0&t=0&d=5
https://www.youtube.com/watch?v=-S1jO6DltXI
The better Crook. Every time you dodge, you get armor back. Every time you get hit, you gain dodge. Rinse and repeat, you can sustain the dodge risk factor very well. Just be patient with the 4-second cooldowns it has. With the Smoke, you can push objectives in-out on your own accord. However, this deck can fall short because it is still 'dodge' at the end of the day. Frankly, it offers more utility than other dodge decks to have it higher up (Rogue/Crook/Ex-Pres). Best suited for using the Suit or LBV. Any higher armors may mess up the dodge-gating.

Stoic
Status: Sustain
Joker: Yes
Example from Bay1k (VD-12 Shotgun, Judge Shotgun)
https://pd2builder.netlify.app/?s=xk3I10F65g100010-5501Q000100&p=i&a=0&t=c&d=5
https://www.youtube.com/watch?v=uzM_EDukohQ
Armor gets converted to HP. More Armor, means more sustain. You can 'tank' with this deck, but you can't tank everything. Which gives this deck great Sustain. Only recommend this deck with FAKs to keep your health up, and push objectives for the team. Just be cautious on your placements as if a teammate may 'die' next to one, Uppers will proc and it is gone. Otherwise, I have converted dodge based players to start using this deck then move onto other decks and survive in this game. Best starter deck for DSOD.

Tag Team
Status: Sustain, Support
Joker: Optional
Example from ArcoXO (AK Rfile, Mark-10 SMG)
https://pd2builder.netlify.app/?s=5g3I00109k10-5gF0030xm0-6&p=j&a=1&t=f&d=5
https://www.youtube.com/watch?v=qVVEeM72wdg
Another support deck to heal your team other than Hacker or Gambler. Problem is, you need line of sight with a teammate. Simply 'tag' them and start making kills. Both will heal from the benefits of this deck, and gain damage absorption. Any DPS players can sustain longer, but 12 seconds of killing can lead this deck into being great or being terrible. Need to know timings of when you and the player will perform kills. Having map knowledge will also help this deck.

Hacker
Status: Sustain, Support, Risk
Joker: Optional
Example from Hybrid (Lion's Roar Rifle, 5/7 AP Pistol)
https://pd2builder.netlify.app/?s=5O3c100081100010gF0001xm000100&p=k&a=0&t=d&d=5
https://www.youtube.com/watch?v=5lr0viMjnRs
The best dodge deck for those doing aggressive kills. Similar to Tag-Team to heal allies when they make kills, you gain dodge and you heal yourself when you make a kill under ECM-effect. As buggy as this game is with host desync, this deck can fall short for players. Playing the Hacker perk may be frustrating if enemies are not stunned by the effect. However, the dodge/sustain it provides can provide some serious crowd control and support for the team. You start with a base dodge of 30%, and get 20% more when you make a kill with ECM effect active. Be cautious of Berserker players in your lobby when you use it, it can heal them and will mess up their damage.

Leech
Status: Sustain+, Support
Joker: Yes
Example from Ace (R700 Sniper, CR805B SMG)
https://pd2builder.netlify.app/?s=5O1GgF00d010-910Ba000100&a=3&d=5
https://www.youtube.com/watch?v=oC-wAsDUm6k
FAKs or Meds, this deck is KP on Stoic drugs. Use the AMP when in danger to get out of said situation or make a play for an objective. Otherwise save it if you're downed to find the nearest medic bag. The AMP performs as 'whatever damage you take will be 1 chunk' as your health is divided into 10 chunks. OVERKILL changed it so any 200+ damage received, will now remove 2 chunks. Killing enemies while AMP is active gives more health, making this best Sustain deck.

CopyCat
Status: Sustain, Support
Joker: Yes
Example Video here https://www.youtube.com/watch?v=dxigP7uPeJs
Customizable deck with strong features to come with. 2-Sec Invul, Weapon swap, and small sustain on headshot. Combine this with Jokers and FAKs with an HP setup, the deck becomes super easy to work with a lot of builds. With the final card (Best with Biker, Gambler, Anarchist, Grinder, Socio, or Ex-pres) you can create very strong setups. Shooting a joker in the head also gives 10 HP.
Skills - Overview
Overview: All based on personal opinion. Will give my recommendation on what skills are good for scenarios and team-based play. Myself I prefer having things to benefit the team and myself. There's no '1-build to meet all needs' as there are solo-like players that perform just fine.

Solo-like build example with Hacker (Akimbo CR805B, 5/7 AP Pistol)
https://pd2builder.netlify.app/?s=003c1000d01k0-4iF00Ghh6120100&p=k&a=0&t=d&d=0

I have my own guide here to showcase what can be effective in terms of DPS, making space, and still helping the team. Lots of examples, and links to other build guides.
https://steamproxy.net/sharedfiles/filedetails/?id=2141942312
Skills - Mastermind
Medic:
The tree to have the most OP skill; Inspire aced. Clear the area first as best you can, before using a 'Quick Fix Inspire'. Otherwise Painkillers will save players health and armor a lot more. Please DO NOT put Quick Fix and Medic bags together, the 1-second faster deploy is not 'clutch' or anything better than Painkillers. I have a video of this in my build guide why Painkillers is superior. Combat Medic aced also can screw up players with Berserker if they go down. They'd get 74% damage increase instead of 80%.

Combat Medic:
- Needed to climb for Inspire/FAKs/Medic Bag. Great if combined with Die Hard
Aced: No, it will mess up Berserker players on revive
Quick Fix:
- Meant for FAKs/HP based builds or not having infamy to get Inspire
Aced: Only for FAKs, NOT MEDIC BAGS
Painkillers:
- Best thing for Inspire Aced/Medic bag builds
Aced: For Inspire and to get Combat Doctor (225 damage becomes 31.5)
Uppers:
- Only for FAKs based builds
Aced: Only for FAKs/reach Inspire
Be mindful of kit location, placing it too close to a wall will be 'wasted space' of the 5 meter radius. Try to cover as much space next to the objective and anchor points for cover
Combat Doctor:
- Only for Medic bag based builds
Aced: To reach Inspire
Inspire:
- Meta-team based number 1 skill. If only Basic, at least have Die Hard
Aced: Most builds will have this aced. Otherwise Kingpin/Stoic/FAKs/etc can keep this basic

Controller:
Joker skills. This is where you go to Sustain in your builds. If you are getting joker skills, HAVE PARTNERS IN CRIME ACED, otherwise they will die fast. Having a joker is another 'health-pool' for your team to give space and support. Another video of their power and team benefits. Forced friendship aced is useless, keeping 8-hostages for the flat damage reduction, not worth. Stockholm Syndrome is not a clutch skill, I've seen players using this go back into custody from it. Otherwise if you need more sustain, Hostage Taker aced is the way to go. Basic is a waste of points, either aced or don't take it.


Forced Friendship:
- Tier 1 if you need HP from jokers or Hostage Taker builds
Aced: No, 4 flat damage absorption is nothing
Confident:
- Increased shout range, not worth basic
Aced: If you plan on 2 jokers for build, otherwise don't take at all
Joker:
- Required to start jokers
Aced: If you have extra points, or want super fast conversion
Stockholm Syndrome:
- Meant for stealth. But really, Joker skills are far better.
Aced: Why? Come back to an assault to die again?
Partners in Crime:
- Basic IS NOT good enough, get Aced
Aced: Standard 12 points for a joker, get it. Extra HP and space for your team
Hostage Taker:
- Basic isn't good enough, unless playing Muscle, otherwise don't get
Aced: Standard to ace, 4.5% is superior than 1.5% for health builds in DSOD

Sharpshooter:
Sniper stuff, or fancy AR reloads. Similar to Hostage Taker, Graze is either aced or not at all. Aggressive reload is what this tree does to keep sniper rifles and single fire ARs in the fight. Marksman aced can keep low accuracy (Contractor/Grom) snipers have 100% accuracy when scoped/ADS. Ammo Efficiency is nice, even basic, but only good for 255/500 snipers. Rifleman is a personal preference skill where the faster snap to zoom is nice (Same as professional basic), but the faster movement can overshoot corners into danger when peeking.

Stable shot:
- Great 1 point for stability if you can, helps LMGs or Rifles
Aced: Meant for snipers or less mobility, rarely need to ace
Rifleman:
- Preference based on players, doesn't offer actual benefits other than ADS speed
Aced: Again, no good benefits, not worth
Marksman:
- More added accuracy for snipers and single shot ARs
Aced: Meant for low accuracy snipers and single shot ARs, but only scoped
Ammo Efficiency:
- Basic to help get to Graze if sniper is high accuracy already
Aced: If you have extra points, otherwise ammo bags for more ammo
Aggressive Reload:
- Basic to help reloads, but always better to ace
Aced: Standard on snipers, situational on single shot ARs
Graze:
- Basic is useless
Aced: Standard on snipers
Skills - Enforcer
Shotgunner:
Needed for shotguns to work without Dragon's Breath. Only need basic Overkill to get the damage bonus after a kill. Shotgun skills are cheap. The aced variant is to have that damage bonus on other weapons, you still need a shotgun kill for the bonus. So keep it basic, and stick to those shotguns with a secondary Claire/Judge. Far away can help for longer shots, but damage fall off is going to limit the performance. Shotgun Impact can be used to reach for certain breakpoints. Otherwise Crits (Low Blow and Unseen Strike) will make shotguns shine.


Underdog:
- Basic is good for other breakpoints, and to start Tier 1 shotgun stuff
Aced: Typically used for ICTV 221 armor builds to tank 225 shots
Shotgun CQB:
- Faster reloads keeps shotguns DPS up
Aced: Even better reload and to reach Overkill
Shotgun Impact:
- Basic for Izhma breakpoints or extra points
Aced: For M1014/Pred or even more damage/non-magazine shotguns
Far Away:
- Preference, otherwise can help for longer shots, not a lot of maps need it
Aced: Again preference, but most cases no
Close by:
- Standard to reach Overkill and have hipfire for easier bullseye/enemy stagger
Aced: Standard for Izhma/Goliath/Grimm shotgun setups
Overkill:
- Better have it for any shotgun build
Aced: Only meant for extra points or AR/SMGs/Akimbo setup for dozer melting

Tank:
Bullseye basic is your main priority here, unless you are a Stoic player. Aced variant will not help in a lot of decks cause a 225 Zeal shot only needs 5 armor. No need for 25 armor. Die hard is great for objective pushing/tanking. Die Hard aced variant to get that 20 armor for LBV/crit builds. Shock and Awe aced is meant for shield knockback from melee or bullets. Iron Man aced is where you get ICTV armor. There are various ways to setup this tree but it will depend a lot on the build you are making.

Resilience:
- Tier 1 needed for bullseye
Aced: If you're unlucky with flash bangs, otherwise preference
Die Hard:
- Really good if you can afford, makes objectives & equipment use less stressful
Aced: Meant for crit LBV 70-armor builds, otherwise use HBV with 75DR
Transporter:
- Goat sim, otherwise not critical for most maps
Aced: If you have ICTV and extra points, otherwise not needed
Shock and Awe:
- Free armor recovery, if you have extra points, but cover is best recovery
Aced: Most LMG/AR builds have this for shields without swapping, or melee them
Bullseye:
- EVERY build should have this except Stoic. Anarchist is optional, recommend on Sociopath
Aced: Mostly useless, unless generating armor on Anarchist. Having 5 armor > 25 armor
Iron Man:
- Can help certain armor breakpoints, otherwise useless to have basic
Aced: Only meant for ICTV builds.

Ammo Specialist:
Scavenger basic should be on all builds. To grab ammo on ledges, ceilings, elevators, or odd places. Aced variant is useless as 20 ammo boxes can only be on the map, and what if the 6th one is in a place you cannot grab? Most builds only spec for 2 ammo bag builds. Having basic portable saw can help for support maps if you bring a heavy primary/LMG. Fully loaded can come in handy, but the majority of ammo will be from your bags.

Scavenger:
- The second best skill in the game, basic 1 point skill for ammo reach
Aced: Useless if you 'need' ammo, bring ammo bags. "6th kill" could be in a unreachable spot
There can only be 20 ammo boxes on the map, anymore will disappear. If you spawn trap enemies, this is why you don't take Scavenger Aced
Bulletstorm:
- To get Extra lead, getting ammo for very small 'infinite ammo' duration
Aced: For any ammo bag build, last use will be 60 seconds of infinite ammo (15 sec basic). If it's not your ammo bag, please don't take the last amount left. Most ammo bag users don't mind sharing, just SAVE THEIR BULLETSTORM for their build/dps. If you accidentally take their last bit, at least do damage or have DPS to make kills.
Portable Saw:
- Free saw for LMG/Saw support build. Easy 2 points to speed up objectives
Aced: Meant for stealth for 1-tap boxes, useless on most loud maps.
Extra Lead:
- Standard for ammo bag builds
Aced: If you can afford it, otherwise JOAT (Jack of all trades) for one ammo can be used
Saw Massacre:
- Sawing enemies? What are you doing
Aced: Go play Vermintide instead, please
Fully Loaded:
- Basic for more start-out on weapons, cheap 4 points if build can afford it
Aced: For high aggressive builds to have many flashes or molotovs
Skills - Technician
Engineer:
Only main thing to consider here is taking JOAT (Jack of all Trades). Bring a second deployable, but it will be halved. Otherwise you don't see much sentry build setups. Too much hassle to move, pickup, and care for. Joker skills create more space and give yourself more benefits with HP/Speed. Otherwise sentries have high range for maps like Bomb:Forest.

Not recommended speccing into sentries for newer DSOD players.

Third Law:
- Tier 1 for JOAT (Jack of all Trades) or sentries
Aced: Standard for sentries, basically armor for the front of the turret
Sentry Targeting Package:
- Sentry yes
Aced: Sentry yes
Eco Sentry:
- Sentry no, bring LMG or shotgun for ammo
Aced: Optional if you have points, but keep sentries far from dozers
Engineering:
- Only to get aced
Aced: AP rounds are very strong in all sentry situations
Jack of All Trades:
- Basic is not good enough
Aced: Or not at all, to get a second deployable, such as ammo or ecm
Tower Defense:
- More sentry
Aced: More sentry, but jokers can be a better alternative

Breacher:
Every build that can afford 1 point into a drills should. 10 to 7.5 second difference is huge. Can push objectives faster and help your team. The extra drill points for faster timers can change with enemy spawns/fades depending on map, but it will help the team eitherway. Optional as 6 extra points can be costly. Some support builds carry ShapedCharges for doors or bridges in Hoxton Breakout. Fire Trap and higher Trip Mine damage can delete dozers and spawns, but needs high map awareness and knowledge. Not recommended for new players.

Not recommended speccing into Trip Mines for newer DSOD players.


Hardware Expert:
- Another great 1 point in skills
Aced: 10% chance is useless, don't
Combat Engineering:
- Basic isn't great. You can crit with Trip Mine explosions for Dozer kills
Aced: Best for deleting Dozers with their multiple armor plates proccing the explosion
Drill Sawgeant:
- Basic can help, but best to ace
Aced: Speed up thermal drill maps. Small drills can benefit, but not recommended
More Firepower:
- Support builds if you have points
Aced: Support builds if you have points
Kickstarter:
- 20% chance is useless, don't
Aced: If you're lucky, can use the points elsewhere
Fire Trap:
- Fire is short on basic, better to ace
Aced: Support builds and hold spawn groups for a great amount of time

Oppressor:
LMGs and ARs here will benefit from Body Expertise, Surefire, and Lock and Load. Most AR/Pistol/LMG builds need Surefire aced here. Rest is personal preference. Body Expertise helps tremendously to kill enemies faster, but it will not help Dozer headshots. Heavy impact is a waste of points. Steady grip aced will a lot of weapons. Fire control basic is great if you hipfire a lot or need '12 points of accuracy' and the aced variant can help for longer ranges.

Steady Grip:
- Another great 1 point in skills
Aced: Meant for LMG/AR setups, great to have to reach Surefire/Lock N' Load
Heavy Impact:
- Useless for 5% stagger, just kill the enemy
Aced: Even more useless for 20%, waste of points tbh
Fire Control:
- 12 Accuracy for not using right click, can help LMGs/ARs
Aced: Gives hipfire 20% accuracy, overall a 'nice to have'
Lock N' Load:
- Great for hipfire/bullseye procing. Meant for aggressive plays or cover to cover
Aced: If you can afford it, use it for long reload LMGs or ARs without speed mag
Surefire:
- 15 extra bullets needed for Valkyria/Clarion/No speedmag, otherwise useless
Aced: Helps LMGs/ARs/Pistols, great for Zeal staggering. Works on all weapons
Body Expertise:
- Basic is rarely used for specific Crit/Zerk breakpoints, go Aced please
Aced: Or not at all, recommended if you have the points for an LMG/AR setup or save ammo
Skills - Ghost
Shinobi:
The stealth tree. I don't see any builds for loud DSOD builds for this, other than Nimble aced. The rest is merely for stealth builds. There are the ECMs, but if you are not the host, the feedback is probably not going to work. It may help with Heat Street/Hoxton Breakout turrets so they shoot enemies for a small duration, but turrets are RNG on heists. A major bug with ECMs is other players, feedback on ECM will cause enemy bodies to stay forever, causing lag with infinite dead bodies. Be cautious using these.

Not recommended speccing into ECMs for newer DSOD players.

Chamaleon:
- Stealth? Okay... useless here
Aced: ^
Cleaner:
- Stealth?
Aced: ^
Sixth Sense:
- Stealth?
Aced: Best for Expert driver for transports. Otherwise shouldn't be used
Nimble:
- Stealth?
Aced: May help for lock doors in Shackle/Breakout, but wait after assault
ECM Overdrive:
- Can help turrets a little longer, can be a waste of points
Aced: ^
ECM Specialist:
- Stealth?
Aced: Can help turrets a little longer, can be a waste of points

Artful Dodger:
Duck and cover basic, all builds need this, the best 1 point skill in the game. Parkour should only be put for ICTV/CTV setups for the speed. Suit/LBV/HBV don't benefit from Parkour. There's also Partners In Crime for movement speed. Inner pockets for the extra crit builds. Dire need to stagger enemies if your armor broken, can be handy for aggressive/glassy builds. Shock proof for Tasers if playing aggressive. Sneaky Bastard is a risky and heavy point investment. 20 points to get 10% RNG, while limiting your weapons/build? Don't jump to this skill right away on every build. Team skills (Inspire/Jokers), DPS/Crits should come first, then Sneaky Bastard.

Duck and Cover:
- Best 1 point skill in the game, EVERY build has to have this
Aced: A "nice to have" for builds if points are available and using suit/LBV
Parkour:
- Only meant for ICTV/CTV builds. Partners in Crime (Jokers) also gives speed boost
Aced: Reload cancelling is important. Does more harm than help, don't ace
Inner Pockets:
- 2 points to save some concealment for crits, good to have
Aced: Only meant for LBV/HBV setups if you can afford
Dire Need:
- Good for dropping specials or heavy units (With Surefire Aced) for small armor builds
Aced: Longer lasting staggers for more enemies
Shockproof:
- If you have the points, rarely used
Aced: If you have the points, rarely used
Sneaky Bastard:
- Limits your weapons for 20 points using 4DR. Can be rough to have good DPS weapons
Aced: Same amount of dodge, but allows more weapon mods for 23DR

My take on Sneaky Bastard: A lot of new players like to go into this 'Dodge is Surivability' mentality. Better weapons (DPS/Crits) and having Team skills (Inspire/Jokers) will go a lot longer in public matches and gets you into better habits of playing.

Silent Killer:
Critical hits! Your aim here is to benefit with 23 detection (DR) or lower for low blow aced. This gives the 30% crits for weapons. Basic versions needs 4DR or lower, so consider what weapons/detection/attachments needed for efficient crits. Unseen strike is another amazing skill, despite the wrong description. Take one hit, wait 4 seconds, you have 6 seconds of 35% more crits. If you get hit again during the 4 second phase, it will reset the timer. But if you get hit during the 6 seconds, you still have 6 seconds of crit. Basic version is enough for most builds, to take out Dozers for example. Aced version will not give more crits, just changes the 6 second part to 18 seconds. Aced variant can be helpful if you play aggressive, or need more DPS for low damage weapons.

Optical illusions is similar to Rogue, but it is needed to get low blow. Can help save you if you have joker skills, forcing the enemies on them. The aced version can help lower detection on silenced weapons. Professional basic helps silenced-snipers quick scope the Aced variant helps silenced-ARs/LMGs for more accuracy/stability. Lastly, High Value Target helps with any special, and sniping. HVT Also gives infinite marking/shouting distance. Helps kill dozers and ping out specials for the team. Lastly, Second Wind aced does more harm for your team than help. The random speed boost can steer teammates outta cover.


Second Wind:
- Won't work on Anarchist. Great for all builds
Aced: DON'T ACE THIS. Unless you want your teammates dead over-peeking corners
Optical Illusions:
- Needed to get Low Blow, works same as Rogue. Helps with Jokers
Aced: To help lower detection for Crit-based builds using silencers
The Professional:
- Great for Sniper ADS, and LMG/AR stability
Aced: Even more amazing for LMG/AR/Pistol builds to get more DPS/recoil control
Low Blow:
- Basic if build can be concealed into 4DR or lower
Aced: To have more mod options on weapons to fit 23DR or lower
High Value Target:
- Basic may help but requires shout, better to ace or not at all
Aced: Infinite range, longer duration, more ranged damage. Helps snipers a lot
Having HVT Aced can be great smoke counters for Taser/Cloakers or anything you don't know behind the smoke. Just right click through the smoke and take it slow
Unseen Strike:
- Basic is enough for this skill. Helps with Dozer/special kills
Aced: Expensive cost for longer duration. Only recommended if your DPS on build is low
Skills - Fugitive
Gunslinger:
Similar to the Shotgunner tree, most pistols need the basic Trigger Happy tier 4 skill. Aced variant extends the timer similar, so it's not needed. Pistols overall perform well as dozer killers. If you are running akimbo shotguns or akimbo SMGs, Akimbo aced will help with stability and ammo situations. I prefer One Handed Talent for more damage. If you take less bullets to kill something, you reload less, saving ammo. Desperado faster encourages aggressive gameplay, but can be deadly with ammo bags. Reminder, 5/7 AP Pistol can hit the 128 breakpoint without One Handed Talent by adding a Flash Hider. Saving you 5 skill points.

Equilibrium:
- Basic is enough for this skill, if you are bringing utility 5/7 AP Pistol
Aced: Rarely used. Get 1-pt Steady Grip or better mod setup on weapon
Gun Nut:
- Meant for single pistols to climb up tree
Aced: Not for automatic pistols, maybe semi-automatic
Akimbo:
- For any akimbo Pistols/SMGs/Shotguns
Aced: Aced, or not at all. Don't leave it on basic
One Handed Talent:
- More preferred for Pistols as they are designed to melt dozer/single target
Aced: Aced, to get trigger happy
Desperado:
- More accuracy, but pistols are meant to close range
Aced: Recommended single variant pistols or preference
Trigger Happy:
- Basic is all you need to keep damage on pistols going
Aced: Recommended for 128+ damage breakpoint pistols for 1-shot Heavies

Revenant:
Most builds go for Nine Lives Aced. A lot of noobs fall into the trap of "Oh Swan Song makes me push objectives and have infinite ammo, etc". It is not worth the 9 extra points. I see too many noobs running and gunning into the open to risky areas where they cannot be revived. I used to run with Swan Song basic/aced, until I realized better/slow playstyle and better builds will result in greater gameplay. Feign death, same thing. I'm not lucky, so please don't rely on this. Messiah is not clutch, Bullseye will save you more often. This skill encourages eating Medic bags, so don't do it. It's too risky incase an enemy knocks you instantly in bleedout phase too.

Nine lives:
- Basic is not enough for the main purpose
Aced: Standard for DSOD, or incase stupid AI/things happen, etc
Running from Death:
- 10 second bonus for dieing, why use this?
Aced: ^
Up you go:
- 10 second bonus for dieing, why use this?
Aced: Painkillers exist. Stop using Quick fix
Swan Song:
- Basic is useless compared to aced variant
Aced: 9 point sink, use jokers/crits/DPS should come first. You die less with better builds
Feign Death:
- Not something to get immediately in builds but risky point spend for a chance
Aced: You like dice?
Messiah:
- Basic can get you up, but at what cost, 16 more points?
Aced: Waste of medic bags and risk your team with aggressive gameplay

Brawler:
Where certain builds can make or break. Armorer/Anarchist players will typically setup their builds with Berserker here. To allow more damage control because the deck allows armor tanking or armor gating. Folks can setup their Berserker damage with a HE judge, grenade launcher or a Molotov. Frenzy basic and aced can help change Zeal 225 breakpoints for armor setups. Counterstrike is so rare for builds, not useful.

Martial Arts:
- Tier 1 needed to get Berserker
Aced: Shock and Awe aced is better, don't ace
Bloodthirst:
- Basic is great to reach for Berserker/Socio setups
Aced: Can be used to replace Lock and Load aced, otherwise most guns can fast reload
Pumping Iron:
- Basic is not enough for the skill worth. Stick to Bloodthirst for Berserker
Aced: For the dozer kills or random cloakers/specials, etc
Counterstrike:
- Rarely used, not even recommended
Aced: Same as above, this ain't Vermintide
Berserker:
- Basic doesn't work on weapons for certain break-points, needs aced to work
Aced: The 12 points for Anarchist/Armorer/etc zerk builds. Bring Molly/GL/HE Judge, etc
Frenzy:
- Basic only needed for consistent 221 ICTV Armor build breakpoints for 225 damage units
Aced: Not recommended for most builds, maybe HBV-Crook, not needed
Using Frenzy basic for Armorer/Yakuza/Hitman for example, our HP is lowered from 230 to 69. With 10% damage reduction, 70 damage turns into 63. With Shock and Awe Aced, we can safely zerk from a shield after taking a hit. Can shoot or melee them close to knock them down.
Weapons
Overview: Not going to go over much detail here, but overall thoughts of where weapons and stuff are within DSOD levels.

Update 204 introduced Damage Range falloff for several weapons (LMGs/SMGs/Pistols/Shotguns) making breakpoints inconsistent. ARs and Snipers were not affected as much. Keep in mind when using your weapon/build when doing DPS or maintaining ammo.

Breakpoints: When making a builds or weapon, one of the few things to consider is the damage breakpoints. Weapons with damage skills (One Handed Talent for Pistols, Shotgun Impact for shotguns, etc) will show up on the weapon status in the inventory.

Key numbers to remember are 127.76 and 255.51 (Basically 128/255).

128 will allow to one-shot a light/shield unit (480 HP) in one click. The heavies and Zeals have 960 HP. This is where the 255 breakpoint will one-shot them.
Examples of these numbers would be the M60 LMG with Competitive Compensator having 128.1 damage. The 5/7 AP Pistol with Flash Hider having 128.1 damage.
255 is common with the Rattlesnake, R700, and the Repeater Sniper Rifles. However, putting a silencer on those snipers will result in their damage lower than the 255 breakpoint.

You could opt the for More Weapon Stats mod[pd2mods.z77.fr] but I prefer testing my stuff in the Enemy Spawner custom maps.

Made a video on personal picks of where things are at. The top three I picked (Akimbo-Goliath Shotguns, KSP LMG, and Rattlesnake Sniper) are great weapons to any build to start learning with.
https://www.youtube.com/watch?v=xeXu7-Jx5fs

Recommend using Proving Grounds to test weapons/builds/aim.
https://www.youtube.com/watch?v=kewdc8ASUQo

Carrot's video is up to date and reflects very similar thoughts I have in place.

Tier: In terms of how skills/builds can be used, and how effective they are since U204;
Snipers > ARs > Launchers > SMGs > LMGs > Shotguns > Pistols


Snipers
Explanation: DMRs with Graze benefits. Graze gives the AOE needed for snipers to keep up with heavy spawns. However, the type of sniper will determine the build. There are 168, 255, 500 snipers. 168s are not enough to one shot heavies, 55% Berserker or reliant on crits is needed. 255s are great by their own. 500s can one shot specials, but have very low ammo pickup.

Weapons recommended; Contractor, Rattlesnake, R93.


ARs
Explanation: ARs don't suffer from horrible damage fall off, but take a lot of effort to get 100/100 (Accuracy/Stability). Body Expertise will help over Berserker/Unseen Strike to maintain ammo. Rifles themselves are best with crits & silencer skills, while aiming for the head. Otherwise, pair these with a 5/7 AP Pistol or Shock and Awe Aced to take care of shields. BR (100+ damage) or DMR (168+ damage) based rifles are very effective with Berserker setups. May need ammo conservation (Body Expertise or ammo bags) if not going for headshots.

Weapons recommended; Lion's Roar, AMR-16, AK-17.


Launchers
Explanation: AOE clearing and ammo sustain for any other weapon. Launchers can keep up with themselves and help any other primary or secondary weapon. They also help kill shields and remove dozer face plates. Launchers also encourage peeking in-out of cover to eliminate enemies and staying alive. They also do not require any skill points to function.
Another launcher to recommend is the Commando101. It cannot pickup ammo dropped from enemies, but paired with ammo bags and some Bulletstorm, they can carve through serious amounts of enemies, specials, and Dozers. Don't shoot your teammates though.

Weapons recommended; Compact 40mm, GL40, Commando101.


SMGs
Explanation: Backup Assault rifles. Akimbo variants are best put with ammo bag/Bulletstorm usage. LMGs work better, if you wanted team-based skills. If you want low-detection for crits, SMGs can easily fit that category. They can be used with Overkill-aced/Unseen Strike setups to melt dozers as fast as pistols. SMGs can help LMGs for taking out enemy snipers or having a weapon ready without reloading the LMG. SMGs also help Sniper rifles incase you need a quick automatic close quarters weapon for small enemies.

Weapons recommended; CR805B, Micro Uzi, Akimbo-Krinkov


LMGs
Explanation: Great all rounder weapon for any build. High damage, good ammo pickup, but they suffer from damage fall off compared to Rifles. Another issue is the high detection and long reload. Playing smart/slow can make LMGs very strong. Apply silencer skills (Professional Aced, Stable shot) with High Value Target and Unseen strike, LMGs can melt anything quickly. Try to aim for stability and accuracy to keep the recoil under control. Can recommend Body Expertise Aced, Lock & Load Aced, and Shock & Awe Aced to keep the LMG at max potential.

Weapons recommended; KSP, Buzzsaw, Brenner.
Shotguns
Explanation: Shotguns are cheap on skill points. So you can opt for crits or zerk based builds. Their spread with the DHL (Donald Horizontal Leveller) attachment can create AOE output. The lesser accuracy the shotgun has, the wider the spread - less accuracy is good. OVERKILL designed the game to have the most damaging pellet be the main source of damage. Aim close at the enemy head and you're good to go. Add some crits with Low Blow and Unseen Strike, they become fun to use.
Newer DSOD players may start with shotguns with their ease of use and build potential. However the damage falls off past 10 meters making these very situational to use. Secondary Shotguns have great utility for Fire or Explosives for high crowd control on enemies.

Weapons recommended; Akimbo-Goliaths, Izhma, The Judge.


Pistols
Explanation: Since they have their own skill tree, Automatic pistols can perform better than semi-automatic ones. However, some semi-automatics do have better damage. Without One Handed Talent and Trigger Happy, they will not perform great for damage. Their main purpose is to melt single targets similar to ARs. Dozers can easily get melted by the Akimbo Pistols. The 5/7 AP pistol has piercing rounds, to take out shields or go through heavy unit body armor. The 5/7 AP pistol is both utility and a great backup.

Weapons recommended; Akimbo-Stryk 18c, 5/7 AP, Bronco .44
Heists: Bain
Timestamps of each heist in YouTube video description:
https://www.youtube.com/watch?v=woV3C2H8lcA

Art Gallery
Difficulty: Very Easy
Status: N/A
Key Points:
- Short first assault
- Low spawn count
- Saw support build if you wanna speed things up

Bank Heist
Difficulty: Easy
Status: N/A
Key Points:
- The Thermal Drill, go get it. Otherwise regular assault
- Escapes vary based on RNG, wherever you spawned. DPS/CC to get there if needed

Cook Off
Difficulty: Easy
Status: N/A
Key Points:
- Similar to Bank, but more work involved
- Far van is better RNG and cover. DPS/CC needed for closer van
- Van will move unlike Rats

Diamond Store
Difficulty: Normal
Status: DPS, Tank
Key Points:
- More exposed, less cover, have something tanky. DPS needed for swarms or turret
- Have at least 1 person upstairs, and 1 person in security room. Other 2 rotate.
- Still easy task, move bags to objective. Van doesn't move
- If van in 2 far spots, wait for fade

GO Bank
Difficulty: Normal
Status: DPS
Key Points:
- Better or worse drill cover depends on RNG
- Cage parts and setup location will require some clearing
- Left side for easy spawn camping/Cloaker. Right side NOT good, cops shoot through wall
- Optional roof spawn camp points for Launcher/Sniper weapons

Jewelry Store
Difficulty: Very Easy
Status: N/A
Key Points:
- Lots cover and fair assault, nothing else
- Killing civs will spawn snipers

Reservoir Dogs Heist
Difficulty: Hard
Status: DPS, Sustain
Key Points:
- Day1 is straightforward, wait for fade/clear to get Mr Pink. Car is RNG, but does have step-like cover if rushed. DPS/CC to move to saw location and back
- Saw is 100% RNG, no clipping will not show contents. Saw order recommended for cover
- Saw storage side can have cops shoot through the ventilation. Saw order doesn't matter

- Keep an eye on the 3 sniper spawns. Side 2 can be killed from inside warehouse.
- Day2 definitely needs DPS and Sustain. Running back and forth for objectives. But car objective running/grabbing can be done on fade
- Start outside if you need a joker. If spawns are from roof, kill the cloaker and dominate the Zeal. Otherwise wait for police cars after clearing the elevator spawns
- Do a 2:2 person split (2 Router, 2 Front desk) if you get router hack
- Don't bag jewelry. These will NOT count for the objective. Not even for cop bait, there's a lot of cops that swarm. You need 6 Diamonds to secure, so don't mix them
- Wait for drills incase Bain says electrified. No drill skills they need 1 repair. Fade should occur after they are finished, grab nitro tanks after drills are done/during the fade
- When vault opens, only bag 6 diamonds ASAP. Have them ready to move when fade occurs, don't zipline. If you bag too many, or don't have them ready, assault will come fast if unprepared
- May also be trapped, again get ready/group
- Infinite assault after running past the black pylons. Move as a team, or wait behind green/tall pillar when team arrives

Alesso Heist
Difficulty: Easy
Status: N/A
Key Points:
- Lower cop count than usual, watch the doors for cop flanking
- Lots of waits, cover each other for C4 planting
- Be mindful of snipers, HVT (High-Value Target is handy here to spot them)

- Don't use zipline. Team gets split, too many moving parts, wide open spaces. Just move the bags upwards toward the top, it is not far, and has better cover


Transports
Difficulty: Hard
Status: Risk
Key Points:
- Refer to video for team setup and strats. Have someone with Sixth Sense aced for driver
https://www.youtube.com/watch?v=XxE-UpbwzqA
- Don't do these with drill. Get a team of 2-DPS/2-Utility (C4/Saw) and rush it.
- Bag 1 loot so start escape van startup
- Have high sustain to deal with drills/bots if you plan on solo
- Park: Pillars to move loot/camp. Underpass: L tunnel to camp. Harbor: Crates by water to camp. Crossroads: Restaurant for camp. Downtown: Audio cues to determine van/heli, camp back desk for helicopter


Train Heist
Difficulty: Very Hard
Status: Tank, Sustain
Build Suggestion: Anarchist - Rattlesnake Sniper & Krinkov SMG https://pd2builder.netlify.app/?s=1G3cgF0-4103812100010xc000100&p=e&a=0&t=4&d=30
Key Points:
- Spawns with long distance. Camp back by buildings with a sniper/Graze (2:2 person split), or wait for close kills by the drills. If person gets stuck behind finished drills, have them jump & crouch over them. Recommend stealth if you want achievement
- CrewChief/Jokers or sustain builds here will help. High DPS builds are not recommended
- Care for enemy snipers on both sides. Bring HVT Aced to easily spot them
- Recommend doors towards truck side opened
- Recommend Drill Skills for shorter timers
- Keycards from civvies will help. There are 3 train sections, use keycard on last door
- If you don't get 1 or 2 drills on the first assault, just restart. Otherwise get the drills ASAP
- Very long/patient heist. Only go out to move bags and help team
- NEVER fight on the middle catwalks. Only shoot cops when inside a train car for cover
- Have long range and camp by buildings, or stick by drill/end train with Shotgun/LMG
- RNG dependent heist. Truck preferred, has better cover, less zipline usage
- If boat RNG, zip the bags ready at tunnel-end and do a 1:3 person split. DO NOT USE THE FAR ZIPLINE FOR BOAT. It is terrible and will lead to cops getting bags. 1 person can wait by loot drop off while the other 3 manage spawns and loot. Only move between areas on fade
- Recommend resetting if you get boat RNG, it will double in heist time compared to truck
Heists: Classic
Timestamps of each heist in YouTube video description:
https://www.youtube.com/watch?v=wMY2edj_dwU

Counterfeit
Difficulty: Easy
Status: N/A
Key Points:
- Can get half the mission done if you start quiet
- Use cover when managing Hose and Valve spots during objective
- Safe zones here. Picture from Marcmb
- 'Loud-Timer' starts after first cop is dead/dominated
- Stack up by the basement gates if C4 is mentioned, C4 timer will start when gate opened
- Keep an eye on 2 far valve spots for enemies, prevent their objectives
- Rotate using the basement
- Snipers will spawn after first assault

Diamond Heist
Difficulty: Normal
Status: Sustain
Key Points:
- Easy to camp spawns, but hard because of terribly optimized heist
- Walls are very penetrable, enemies and your own snipers can easily wallbang
- Cops spawns based on where router-boxes are
- Get all bags out of vault ASAP, only best cover is under turret if swarmed
- Infinite assault after 8th bag secured, use left side/construction for cover to zip bags
- Jump on the triangle (butt) plant to make quick movement

- Spawn trap easily on roof for CEO escort and escape

First World Bank
Difficulty: Easy
Status: N/A
Key Points:
- Tie down the manager. Killing the manager will force snipers to spawn faster
- Drill on PD2 side is much easier/better RNG
- 2:2 person split suggested. For Drill:Lock & Vault:Outdoor
- Get ammo from kills when it is safe, then rotate back into cover
- Semi-lower spawn count
- Use kitchen counters to move if PD2 drill side
- Use back wall to rotate to other side, if you get PD:TH drill side. Top hallway blocked
- Infinite assault after wall explodes

Green Bridge
Difficulty: Hard
Status: DPS
Key Points:
- Easily stuck in side bridge pockets on start, if no space being made
- Rush back to have control of back spawns to maintain forward pressure
- Keep eye on snipers on back, they will rarely miss
- Wait for fade to repair drills - out in the open like Transports
- Infinite assault after Kazo pickup. After plane miss, raising balloon is guaranteed pickup. Even if enemies are trying to take it down
- Flash outta scaffold to run out, can use inner side pocket for more cover
- AOE weapons for side spawns
- Killing the turret at the scaffolding, will not spawn a turret for the last part rush
- Last part; drill doesn't break, be mindful of snipers/turrets, best to rush after truck moves

Heat Street
Difficulty: Normal
Status: Sustain
Key Points:
- Slow cover to cover moving. Can use flashbangs/CC to rush the corner with crane
- Sniper weapons perform best here
- Missing far shots can cause enemy aggro, try not to miss
- Turrets RNG, have crits to destroy them
- Have the 5-sniper spots memorized. 4 after getting Matt, last 1 at the top. You can hit the far one right under the bridge if you sneak up under him. Incase you don't have long range weapon

No Mercy
Difficulty: Easy
Status: N/A
Key Points:
- Hallways for easy AOE
- If half-stealthed, hear from civi on abnormal heart, and look for the tattoo on the neck
- RNG based on the vials, could be fast, could be a while
- Can dupe saws from first door, but need placement on ICU doors at the same time

Panic Room
Difficulty: Normal
Status: DPS
Key Points:
- Enemy tunneling at start similar to No mercy, have AOE
- 2:2 person split suggested. For Lower:Upper/Drills. Suggest positioning for roof
- Multiple ways to attach the magnet in the floors, pick what works based on team
- 15 snipers spawn max 2 per. Need to kill
- Assault need to be over for Bile to come with magnet
- 2 ways to deal with roof. DPS, or hide below and wait assault
- Greatest example of Spawn Trapping
https://www.youtube.com/watch?v=Vfo5ZB1BVwE

Slaughterhouse
Difficulty: Normal
Status: N/A
Key Points:
- SHOOT THE GENSEC TRUCK WINDSHIELD. Forces best location
- Can use truck side as cover to repair drill and grab gold
- 8/10 gold needed to be moved. Fade to move gold outside, or watch left/right flanks
- Space out gold if moving during assault in the 3 suggested circles
- Keycard on far hallway door to prevent getting overwhelmed by spawns
- Keycard locations here, thank you Duck for screenshots
- Having contractor voices on to hear audio cues when sniper spawn
- Best 2 crates to be around/inside
- infinite assault after escape starts

Undercover
Difficulty: Easy
Status: Tank
Key Points:
- RNG heavy dependent heist
- Host has saw, only he can place
- Jump&crouch repair saw, to have cover on roof
- Mindful of snipers, plank the server room, plank parts of roof
Heists: Locke
Timestamps of each heist in YouTube video description:
https://www.youtube.com/watch?v=0jmokbrDTbE

Alaskan Deal
Difficulty: Normal
Status: Sustain
Key Points:
- Get to boat ASAP, rush-kingpin, or use the middle house to make kills and flashbang to run
- Removing rope easier than you think, ramp/posts provide good cover
- Saw spots can be easier/harder on RNG, protect it. Fade repair it
- Sniper spots to be aware of, you can wall bang them easily


Beneath the Mountain
Difficulty: Hard
Status: Sustain
Key Points:
- Heist is much easier the faster you complete objectives. First section most important
- Bottom yellow bar for blowtorch does provide front-cover, be very close to it
- There is a gap in the airlock where players will not register, so have every in green square
- Max out jokers at very start, they disappear in the airlock
- Open Masterpiece and Artifact vaults. No need to say which are empty
- Demeter it is next to ziplines. Stick to Masterpiece (Light loot) and Artifact (quick)
- There is a monitor of the map that shows vault openings. Look for the entry and zipline exits to find where you are the the vault doors
- Zipline usage: 2 folks go at the same time immediately. Folks that have DPS or Tank potential can wait. Be aware on whoever using ziplines, one person using them instead of two is a waste
- Jokers will disappear after the ziplines from U209. Keep in mind if your build and team needs that Joker/PICAced bonus for health
- Stand on the box to jump out faster. Person with the light loot, and 2 others immediately plant C4. Person with Artifact should secure it ASAP
- Infinite assault once hose is attached. Place FAKs by chopper, be ready to get in same time

Birth of Sky
Difficulty: Normal
Status: N/A
Key Points:
- Rush plane controls, no hard threat.
- Keycard the cafe door closest to outside, not the kitchen door
- First palette will trigger ALL spawn points. Second/third palette will have specific spawns
- Not triggering objective/palette will force cops to spawn at all spawn points
- Different regions of map will have various spawn points
- In the car shop, flares can be lit underneath the roof if they are close
- Use perimeter to rotate. Work as a team to deal with horrible RNG spots
-
-
- Spilled loot should be last. This gives time for folks to get jokers, positioning, team co-ordination etc. Sometimes you can get this at fade if you are quick on the first two pallets
- Infinite assault after opening the tunnels. Jokers may get melted by turrets above
- Tunnel has dozer spawns. Take care of them as a team, or get overwhelmed
- Getting out of the boat is safer when close to light swats
Heists: Locke pt2
Brooklyn Bank
Difficulty: Normal
Status: Tank
Key Points:
- RNG heavy heist. Want saw to open door. (4 spots), Circle cutter doesn't open up map
- Cutting tarp will make cops inside spawn immediately. Save the tarp! You can jump through the window from the scaffolding or on the flag inside the bank from counter


- Sewers preferred, otherwise VAN can be during fade
- Use CrowdClearing or suggested movement to get supplies

Hell's Island
Difficulty: Normal
Status: DPS
Key Points:
- Remember to grab 2 thermite
- DPS needed for ambush (39 kills)
- If thermite is used closer to spawn, cops will drop down faster
- Turret in showers can be destroyed, aim for top right/white weakpoint
- DPS needed when Locke takes break (10 kills [Picture from Unknown Knight])
- Have at least 1:45 timer left when hacking the control panel so Locke can move

Henry's Rock
Difficulty: Hard
Status: DPS, Sustain
Build Suggestion: Hacker - Akimbo CR805B & 5/7 AP Pistol https://pd2builder.netlify.app/?s=003c1000d01k0-4iF00Ghh6120100&p=k&a=0&t=d&d=0 [NON-INSPIRE]
Key Points:
- Backtracking and hard to reach ammo forces DPS
- In labs have 1 person guarding hall, 1 person rotate hall/lab, 2 people in labs doing objective/DPS. Recommended spots for positioning for the labs
- Ammo efficient weapons/fire preferred. Scavenger to grab ammo on ledges
- In the weapons lab, you can interact the objective through wall, have 2 sets of batteries ready
- 3 options for the turrets. 1) Hack the panels and run back inside spawn for cover, keep eye on boxes, use ranged DPS. Saves jokers/team from getting melted. 2) Have 1 person each hack a panel and stay behind the boxes. The other 2 hold in spawn. 3) If team is doing well on DPS, can destroy them. Once safe/clear, move the bags

Shacklethorne Auction
Difficulty: Hard
Status: DPS
Key Points:
- Keycard civvy ASAP. Lockpick doors for torch on fade/after first assault
- Watch turret if spawn camping balcony
- Similar to diamond heist, fastest assault map that spawns cops near objectives
- Don't have more than 2 people stuck in the corner of the vault room, spread out
- Infinite assault after grabbing black tablet

The White House
Difficulty: Hard
Status: DPS, Sustain
Build Suggestion: Anarchist - Contractor & CR805B https://pd2builder.netlify.app/?s=1G381G00811000101000307o000158&p=e&a=0&t=6&d=3
https://www.youtube.com/watch?v=dDrc_bkDI28
Key Points:
- The easier but longer Henry's rock
- High moments of crashing folks-unoptimized heist in general. Recommend stealth
- Panel locations. 2 lower, 2 red, 2 green, 3 kitchen, 1 piano, 1 in each hall (3)
- Sniping is very strong here. Hallways and channels throughout heist, wallbangs too
- Open 1 door at start if you don't have explosives. Recommended to kill the turret
- The 4 Safe spots can be seen underneath painting saving interaction time
- 2:2 split in West wing. Everyone on PEOC stairs. Use cover boxes/doorways on last part
- Books on the vault door DO NOT have the button. Recommended to lure jokers in vault
- Turrets may spawn after time. If you have ammo, take them out or wait 4-5 mins they despawn
- Coming outta the PEOC, can lure jokers back. Green square infront will count them in
- Infinite assault after the PEOC, run to any of the opened doors you made earlier for hack
- Remember to share ammo. Scavenger to help pickup side hall and entry ways
Heists: Vlad
Timestamps of each heist in YouTube video description:
https://www.youtube.com/watch?v=0j7mtne64FA

Aftershock
Difficulty: Normal
Status: Tank
Key Points:
- Host has saw, get them opened ASAP. Drill skills will help
- Can grab safes from the side of truck (Similar to Slaughterhouse) if not bagged
- Start moving them towards middle train/exit. Stay as group, don't stop moving
- Alternate strat or less people, load up safes in train car and back in the truck
- Snipers may spawn. But good idea to bring HVT. Last part will have a guaranteed sniper
- Move as a team to get C4
- Infinite assault/New Spawns after using the flare
- Have team ready to get in the truck at once. Place FAKs and/or CC the area

Four Stores
Difficulty: Very Easy
Status: N/A
Key Points:
- Saw/C4 and wait 5 minutes

Goat Simulator
Difficulty: Hard
Status: Sustain
Build Suggestion: CrewChief - R700 & Krinkov https://pd2builder.netlify.app/?s=1Q3IgF0081100010-510xc000100&p=0&a=3&t=4&d=5
Key Points:
- Great video by Uncle to summarize below & indepth information
- General strat for Day1, is get all goats, take them to burning house, move them on fade. First wave of cops takes a minute to spawn. Use this beginning time get goats to burning house. Should have around 10 once the team is prepared.
- Saw 'goat' is better than drill 'goat'. Faster and breaks less
- If you crash your car into an 'invisible wall' in construction area, the truck will spawn there
- Throwing goats is faster than running with them, even without Transporter
- 3 folks need to split to front/mid/cafe. Then move towards burning house. Source. Bring the Longfellow and use upper window to 'trap' them from cops
- Once fade occurs and when the team is ready, throw the goats to the location
- Day2, start with throwing goats in the back of the barn under window
- Plank the back window under hay pile to prevent flanks
- Grab cage parts on fade, determine where goats need to go. On Bridge, toss goats out the window and move them up. Silo, break the window and toss them back there. Road is best RNG, can have cops move them or force them as a team. Transporter helps again
- If team is struggling and gets Bridge RNG, don't force it entirely. Get 1 goat and start the balloon, and get what you can in the cage without spreading the team apart
- Car part is very important, drive CAREFULLY. Any crash/slow will spawn more cops once you drive past the parked semi-trailer. Turrets will melt the car's HP, drive carefully - not fast
- Better path to bridge is left. Less line of sight of cops while driving and it is a bit shorter
- Can sneak behind turret if blocked. Definitely worth it
- If no saw, can repair drill underneath. If team has lots of medic bags, can take 3-shaped charges/c4 for the door. Any cops on roof part will gas inside.
- Suggest a 2:2 split where 2 near red car, 2 near control room. Watch for hill/helicopter snipers
- Create more jokers from helicopter Tan enemy drops
- Infinite assault after security door opens
- Advanced strat; can have one person shoot the 4 tans as the car pushes them, so their aim isn't interrupted. This will draw aggro/front and back to put more safety on the driver
Heists: Vlad pt2
Mall Crasher
Difficulty: Very Easy
Status: N/A
Key Points:
- Wine store, car shop, tech store, then wait 4 mins

Meltdown
Difficulty: Normal
Status: Tank
Key Points:
- Can get laggy with multiple cops on map
- Find the objective, get crowbars, and have 3 forklifts ready by the vault
- No Keycard on DSOD
- 1 Crowbar behind cages, 2 inside warehouse Picture guide here
- Move forklifts on fade. Can move 1 forklift bags to longfellow, but you still need the 2 forks.
- Mindful of snipers, not as threatening compared to other maps though
- If solo, pack all nukes on forklift, and slowly take them to the longfellow. Then put 4 bags on the windshield of the car and drive carefully. Right-click to change camera while driving, press shift to check back for any fallen bags
- No real driving pattern. Forklifts can sneak past turrets and some other tight sections

Nightclub
Difficulty: Very Easy
Status: N/A
Key Points:
- Saw/keycard/c4 doors and wait for drills
- Reminder for money objective, not coke

Santas Workshop
Difficulty: Normal
Status: Tank
Key Points:
- Cover here is very limited and there are 3 levels of where cops can spawn
- Use middle section for cover, or have something to tank multiple hits
- Can toss 4 meth bags into one of the spots ahead of time, carry the other made 4. Otherwise wait and move as team to get the bags in. Use back tram for cover, eye on snipers
- Suggested spots to be in, have 1 rotate upper if needed

Stealing Xmas
Difficulty: Normal
Status: N/A
Key Points:
- Can start heist with lockpick and/or drill shoe store door
- Saw/C4 support build can easily speed up objectives
- Majority of cops spawn in the 2 mall entrances, can spawn trap
- Objectives are straightforward waiting
- Plant c4 on fade, be mindful of the snipers/cops spawning on roof

Ukrainian Job
Difficulty: Very Easy
Status: N/A
Key Points:
- Easier than Jewelry store

White Xmas
Difficulty: Hard
Status: Tank
Key Points:
- Even less cover than most maps and RNG of where the pilot needs to move
- If far RNG for pilot, wait assaults or create space/CC. Can always reset
- Mostly waiting in the garage
- Heist has inconsistent assaults. Can be very long and may not follow similar timers. The assault can end even when Captain Winters is up. Be cautious of enemy count during assaults
Heists: Dentist
Timestamps of each heist in YouTube video description:
https://www.youtube.com/watch?v=25Kj4spjUv8

Golden Grin Casino
Difficulty: Very Easy
Status: N/A
Key Points:
- Lowest spawn rate in Payday2
- Mindful of snipers outside. Lots waiting, stay indoors or slow outside
- Pre-Plans for Van and Extra battery. Rest is up to you
- Literally wait for drill simulator

Hotline Miami
Difficulty: Easy
Status: N/A
Key Points:
- Pre-Plans for less gangsters, & time out on cops
- Get first objectives done ASAP, remind team for gas/c4
- Cover back alleyway side, watch side occasionally
- Can restart vehicle in the front of the truck for cover
- If you get far cable drop, use cars for cover.
- No extra crowbars on DSOD, drill gate again or use C4
- Day2, no real strat. Just have some DPS to cover each other while repairing drill
- Door cannot be C4'd, bring a saw or wait about a minute and the drill breaking
- Some folks let the fire to 'break' the thermal drill instead of cops. There are i-frame spots on the corners of the vault to repair, but this is risky. I prefer to have the sprinklers on, for players with low HP, and reduce visual smoke around the area

Hoxton Breakout
Difficulty: Hard
Status: DPS
Build Suggestion: Muscle - R93 Sniper & CR805B SMG https://pd2builder.netlify.app/?s=1O3cgF0081103810-510xa000100&p=1&a=3&t=4&d=50
Key Points:
- Infinite assault until reaching parkade. If 2 are in custody, probably recommended to reset
- 2 ways to go about this. 1) Joker management and DPS for standard players. Getting flanked by cops/turrets will cut teams. Any enemies left behind in first parts can easily hurt teams, especially ignoring minigun dozers. 2) Hide in corners/cover and force spawned cops behind to stay alive. This will slow down cops spawning where the front truck is moving. Use CC or jokers to move. This is less DPS focused, but more risky
- Each truck move will start new cop spawns. These will vary based on road RNG
- Suggest spots to stay in relative 2:2 formation on first sections
- Other tips, signal car and plank/wire up with cover provided, keep back clear
- Use middle cars cover to signal driver, move with DPS/CC accordingly
- If you want to get ahead, make sure to use some CC (Flash/fire/etc) around corners
- Last sections you will be grouped up again in corners, use car to block turret
- Once in parkade, stay relatively close, and refresh jokers if need. Can signal car through wall
- Day2 is the chill version. Have upper stairs unlocked by keycard. This allows rotation, ammo pickup, and spawn trapping.
- Save a keycard for final door as grabbing server is infinite assault
- Have a 2:2 split. 2 in the corner stairs where keycard is opened, 2 halls/objectives. Cover inside where Hoxton is will vary based on RNG, but stick to the walls and corners

Hoxton Revenge
Difficulty: Easy
Status: N/A
Key Points:
- Get inside, wait for good time/fade to get drill
- Use cover inside, similar to Undercover heist
- Use rocks and trees for jump in, otherwise look for broken planks on fence
- Have 6 evidence bagged by drill, before killing the rat Hector
- Worst helicopter spot is garage, have bags ready on fade

Big Bank
Difficulty: Normal
Status: N/A
Key Points:
- Standard heist, with easy channels/hallways to kill and spawn trap. Sniping is strong here
- Pre-Plans should be Thermite and Elevator trick. This prevents team split from beast drill drop from the pig and repairing it when placed. Thermite doesn't need repair but may need cover from heavy swats when placing it. Elevator trick is safer/cheaper than tunneling from snipers. Last 2 points can be ammo or reduced time-lock duration
- Watch for snipers on the top 2 pillars, they will shoot down if given the chance
- Find manager first thing. If he doesn't drop KC, it is in the safe - drill it. Drilling on roof can be dangerous cause of snipers and split from team. Find other KeyCard for PC door. Use 2nd KC on upper roof. Bringing a saw will eliminate all Keycard/C4 needs
- Hard part is KC and computer management with team. Have 1 person on PC, and 2 looking for the one with the firewall screen (top red flashing icon with noise)
- Bag one loot to toss up, this will start elevator opening. Use keys/C4 to get outta the vault
- Windows by front cubicles will spawn cops after first assault
- Stay ontop of spawn camping. Do 1:3 split Vault:Back when vault is opened, keys/C4 will help
- If someone has keys next to their name, or a saw equipped, only they should go in the vault. NO ONE ELSE NEEDS TO GO IN THERE. The 3 others protect the front area

The Diamond
Difficulty: Easy
Status: N/A
Key Points:
- Cover, easy wait objectives, small spawn count, easy spawn traps
- Pretty hard to mess this one as a team
- Tips for puzzle is to count 1-6 on the rows and have a pattern to 'walk'. Example, 3 w w w r r w w w w (As shown in the video example). If a path has too many turns, the timer will be shorter, may be recommended to reset pattern or bring drill skills
Heists: Butcher & Continental
Timestamps of each heist in YouTube video description:
https://www.youtube.com/watch?v=cO-32MqFThk

Scarface Mansion
Difficulty: Normal
Status: Sustain
Key Points:
- Long range fights with lots of objective waiting, bring ammo and high health, etc
- Sosa can act like a joker attacking cops while lockpicking the box. Does weak damage at far
- Mindful of snipers going in and out of house at the back doors
- Stick to the perimeter when attaching cars. Hedges can provide good cover
- Sosa turrets are super weak
- When vault is opened, new snipers will spawn. Keep and eye on top of the house
- Escape is RNG. Front escape shows up instant and is the hardest, use left-side hedges in front. Left escape, use the hedges as cover. Boat escape, toss the bags inside the house to the back
- Depending on escape, different snipers spots will spawn. Look up and behind leaving the house

Bomb:Dockyard
Difficulty: Normal
Status: Sustain
Key Points:
- Pre-Plans for Boat. I prefer having ammo on right side incase computer is there
- Find the side with computer ASAP, this will determine the major part of the map.
- Flare is RNG, use the spot that gives most cover for bag/assault. Typically left side
- Plant C4 and head to the computer side to defend
- Left side will have easy to grab ammo/enemies. Right side you may need to spawn trap them, as they can shoot through the containers. Use the house inside for cover
- Be mindful of snipers, they aren't aggressive. New sniper spots will spawn after computer hack. They will be closer to the boat
- Infinite assault after the boat moves/gate opens
- DRILL FRONT END TOWARDS ESCAPE. You don't want the containers opened where the enemies are coming in from

Bomb:Forest
Difficulty: Hard
Status: Tank, Sustain
Build Suggestion: Grinder - GL40 & Dragon's Breath Grimm Shotgun https://pd2builder.netlify.app/?s=1G3c0-4c1100%2C10j0-4150-4100&p=a&a=0&t=4&d=63
Key Points:
- I would put this Very Hard, but the trick is jokers and waiting. Can DPS with far snipers/ammo
- Pre-Plans for helicopter escape, and top left trains for the map
- Don't waste time lock picking ladders. Learn to jump on angled trains to get ontop of them. Just jump and move forward, similar to Lab Rats jumps/surfaces
- Train with bomb will determine RNG of water intake. Bile chopper is better RNG/further top left of map. Getting river hose is horrible RNG and will have cops messing with it
- Stand very close to the helicopter while securing the bomb parts. If you are not tossing them point-blank, they will fall over and getting them downhill will be a mess
- Watch back hill spawn and don't aggro too much forward

Brooklyn 10-10
Difficulty: Normal
Status: DPS
Key Points:
- Spawn trap enemies easily in all sections of map
- Suggest 2:2 split for lower and upper/stairs on first section and second section
- Last section, don't crowd up on upper ledge where Charon is. Best to have folks closer to cars. Best spot is the small tunnel by the back police car. All lower spots help the team create space
- Look for crowbar ASAP before next assault happens
- Be sure to drill the right gate, similar bars to bank heist, not ammo deposit. Gate with briefcase cannot be saw'd, needs to be drilled. Other gate does have a crowbar, but get the other 6 spots
- Zipline usage: 2 folks go at the same time immediately. Folks that have DPS or Tank potential can wait. Be aware on whoever using ziplines, one person using them instead of two is a waste
- Infinite assault after elevator hatch opens. Wait till TEAM IS READY before opening
- Can move police cars on opposite side for better cover
Heists: Elephant
Big Oil
Difficulty: Easy
Status: N/A
Key Points:
- Rush in to grab intel spots before bikers start burning it (Airplane keys cannot be burned)
- Becomes the cook off house waiting for drills
- Day2 is figuring the data room and the clipboard locations
- Front data room is easy to spot/green lights. Back will determine if you can easily spot the tall servers on the left. If you need to step back further than normal to spot them, it's the shelves
- Locations for clipboard also here
- Number of black hoses attached is on the blue canister
- Make notes such as 1H/2H/3H, Nitro/Helium/Deterium. Lab computer will determine whether pressure is above > or below < 400 PSI. NOT THE RED LINE/BAR
- LED combo/flashlight attachment on weapons can help incase cops hit the power
- Grab any 'wrong' engine ASAP to start the flare, this helps Bile come sooner
- Flare will be location of where Bile is coming in for the engine pickup. Escape will always be the runway spot, so use the ditch for cover

Election Day
Difficulty: Easy
Status: N/A
Key Points:
- Rush Day1 with an ECM, or fight one assault
- Day2 (assuming failed) is similar to bank heist. Rush in, get computer, plant C4 (Step the hell back, they do most damage), get drill, and wait
- Mindful of snipers on escape, they are easy to spot on top of the buildings

Framing Frame
Difficulty: Easy
Status: N/A
Key Points:
- Day1 is Art Gallery, same stuff, low spawn, etc
- Day2 is trade. Very likely to be an ambush if Day1 was loud. Lockpick door and rush
- Day3 to find and defend a computer with power
- Have control of balcony/lower area to maximize spawn camping potential

Biker Heist
Difficulty: Normal
Status: DPS
Key Points:
- Would put this hard, but that's Day2 RNG
- Day1 is follow instructions and do objectives when you are comfortable
- Suggest taking turret out regardless of mechanic spot, can melt team/jokers
- Take out snipers before they take you out. They are aggressive similar to Alaskan Deal
- Infinite assault after grabbing the bike. WAIT FOR FADE if bike is by garage. If front mechanic spot is clear, then it is probably fine. But if the person grabs the bike by garage and dies, it can wipe a heist because the bike is slow
- Only let one person get bike rest should run. Don't take more bikes, and kill cops in alleyway
- Day 2 can be reset heavy based on fast spawns
- Jokers converted in the middle of the train can distract the assaults. Otherwise move as a team and have some hard DPS or CC. Hacker is strong here
Heists: Hector & Jimmy
Timestamps of each heist in YouTube video description:
https://www.youtube.com/watch?v=43CYJ2yw-mA

Firestarter
Difficulty: Easy
Status: N/A
Key Points:
- Day1 saw helps a lot. Can use burning container if it is closer, but be very careful of the explosion timer when the weapons are tossed in, it is random. Otherwise, grab all 8 needed weapons and use the backside alleys to the van
- Day2 saw only helps first and second door. Still need a drill for server cage. Bring drill skills and move as a team to carry the servers out, or wait for fade, etc
- Day3 is the same bank heist. But wait, the vault is electrified. KEYCARD THE UPPER DOOR.

Rats
Difficulty: Easy
Status: N/A
Key Points:
- Day1, cook meth like usual, grab materials outside first. Listen to Bain slowly
- Van will stay during assaults if you need to wait for a fade to run
- Day2, just hope RNG doesn't force a fight. Otherwise wait drills and leave
- Day3... kill gangsters - done

Watchdogs
Difficulty: Normal
Status: N/A
Key Points:
- Day1 Saw can open up bottom trailer and side door, otherwise key jumps to remember
- Strat is 4 bags left, 4 bags right, 4 bags for carry. Get on the garbage can to make the jump, wiggle mouse left/right while jumping, then unlock the door ASAP. Other jump requires to 'double-jump' on the boxes, then jump over the fence
- Day2 get the coke to the front ASAP, only need 4. Rest is camping and waiting with cover
- Second assault wave will have spawn points closer to warehouse

Boiling Point
Difficulty: Very Easy
Status: N/A
Key Points:
- Easier DeathWish+
- No Zeals, just lights and heavies. Care for specials, they do usual DSOD damage
- May be a turret, crit it down like any other turret
- Infinite assault after grabbing server. Snipers take 2 minutes to spawn after getting server
- Be mindful of snipers escaping, HVT (High-Value Target is handy here to spot them)
Heists: Event & Other
Cursed Kill Room
Difficulty: Very Easy
Status: N/A
Key Points:
- Start... wait 5 mins, press button.
- Also, no Zeals

Lab Rats
Difficulty: Hard
Status: Tank, Sustain
Build Suggestion: Stoic - KSP LMG & Compact 40 GL https://pd2builder.netlify.app/?s=1Q3I10-4l100010gF001012000100&p=i&a=3&t=c&d=5
Key Points:
- A lot easier if you know the jumps, video below for more details
https://www.youtube.com/watch?v=U1EEB2oQ-PI
- Learn jumping on angled surfaces, similar to Bomb:Forest
- May need DPS to deal with headless dozer spawns
- Tie down civs or shout at them, so they don't call the assault, can save a few seconds
- GET BACK BAGS FIRST. Retrieving back bags will be a problem
- Hide behind the CS (Caustic soda) bin. 2:2 split with 2 behind the CS, 2 running objectives
- Toss MU (Muratic Acid) bags to spawn, cops will take them toward the spawn/truck. Make sure they are past the halfway point on the map, or they take them to the back area


- Use the jumps beside the CS to carry up HCL/CS bags. Left side of second container


- Only need to bag meth, no need for secure

Prison Nightmare
Difficulty: Hard
Status: DPS
Key Points:
- First section is how well can you spawn trap. Otherwise you will need to wait for the assault to move the first keycard. Can CC with flashbangs/fire/hacker ECM, to get the first door. But it can be very risky cause of the long distance to travel, be ready as a team
- Can have 2:2 split. 2 on upper hill, and 2 by slope
- Keep eye on sniper spawns upper after you kill the ones from the hands
- Door lower and by first wheel opens when first keycard is used
- Only 2 drill locations to worry about, recommended positions to be in
- Reminder, this is DSOD, no need to loot
- Zipline usage: 2 folks go at the same time immediately. Folks that have DPS or Tank potential can wait. Be aware on whoever using ziplines, one person using them instead of two is a waste
- Objective will trigger once all is on train car, and reached end to trigger C4 drop
- Use side parts for cover in train
- Rush ending part, have guns ready for the snipers shooting you

Safehouse Nightmare
Difficulty: Normal
Status: DPS
Build Suggestion: Sociopath - Thanatos Sniper & Commando101 https://pd2builder.netlify.app/?s=1G0-4101Qxk381a0-41010-4152&p=8&a=6&t=4&d=03
Key Points:
- Actually need DPS. Bring a special build for the Dozers & Cloakers
- Thanatos and Commando/RPG way to go. With some drill skills
- Otherwise, something super tanky to repair drill (Kingpin & FAKs)
- Cheese method with sentry
https://www.youtube.com/watch?v=tJ-vKRhHXUk

Safehouse Raid
Difficulty: Easy
Status: Sustain
Key Points:
- Camp. No need to get objectives
- Ammo efficient weapons will help
- Best RNG is bags on the 2nd floor
- 2:2 person split suggested. 2 in garage area, 2 on 2nd floor computer room
- Any captured bags, grab them and toss them in the corner of the 2nd floor computer room
Heists: Silk Road
Border Crossing
Difficulty: Hard
Status: Sustain
Key Points:
- Another lag heist, disconnects/desync can easily happen
- Can stealthy shot cameras with sniper wallbang to 'skip day1'
- Wait for drills for "Day1", or try to stealth as much as you can. Jokers will not travel
- "Day2" get hangers open ASAP. HUGE map, stay together. Spawns can swarm very fast. Take main warehouse first, then small warehouse. Rotate position using hangers/perimeter of map
- Be mindful of the snipers, they can shoot inside the warehouses
- Can grab loot from sides for money/coke

Border Crystals
Difficulty: Easy
Status: N/A
Key Points:
- 3 material sets on map. 2 in small warehouse, 1 on main warehouse walkway
- Camp and wait for Locke's lines

San Martin
Difficulty: Hard
Status: Tank
Key Points:
- Update 201 changes; Federal Light/Heavies do 225 damage now, with similar outfits
- Grab objectives after assaults. Turrets and wide open map is extremely dangerous
- Some dark hallways will make it tough to see some enemy units, take care moving
- Shotguns and Snipers will help for the hallways
- Use Perimeter to get objectives and move loot (smoke can be done ASAP)
- Bag-Zipline from pre-plans will determine side for escape van

Breakfast in Tijuana
Difficulty: Normal
Status: N/A
Key Points:
- Update 201 changes; Federal Light/Heavies do 225 damage now, with similar outfits
- Fairly balanced map, just use the objectives to rotate with team
- Saw to speed up doors. Host needs to be by the hostage to trigger cuffs objective

Buluc's Mansion
Difficulty: Hard
Status: DPS
Key Points:
- Update 201 changes; Federal Light/Heavies do 225 damage now, with similar outfits
- Tight corners and hallways, similar to No Mercy. Shotguns/Snipers are best
- Dark hallways in basement area can be hard to distinguish targets

- Objectives determined by checking Sanctum door
- Server is safer/less moving. Setting Bomb is quicker if all parts are obtained immediately. Codes for wine cellar (fertilizer) are on notes on opposite ends of the mansion
- Wires in front room, diesel in garage. Always need saw, so get it regardless
- Torch in spare room for fertilizer
- Clock in either bedroom upstairs, or bedroom near garage
- Have helicopter escape for pre-plans to make escape a lot easier
- Final room with Buluc will have the most swarm. Use chairs next to safe, for cover
- Optional mod: Translated clues[modworkshop.net] for faster code recognition
https://www.youtube.com/watch?v=Aibr6aachbE
Heists: City of Gold
Dragon Heist
Difficulty: Normal
Status: N/A
Key Points:
- Shotguns/Pistols for inside, Snipers for outside alleyways
- Touch the road to activate the drill drop timer and escape timer
- Helicopter pre-plan is random drop points (easier or same as Tram)
- DPS or CC area to get drill/escape in the open. Multiple enemy spawn points
- All members staying inside shop after grabbing Dragon Artifact makes C4 escape easier

Video explanation since this was made after my DSOD series was complete:
https://www.youtube.com/watch?v=2UB4ohRnWyM

The Ukrainian Prisoner
Difficulty: Normal
Status: DPS, Sustain
Key Points:
- White house length, but easier. Pathway choices aren't critical (Avoid boat ramp)
- Stick to sides/walls of the map during the entire heist for cover and forced spawns
- After setting drill before assault, attack the turret to get initial damage
- Wait for jokers to past first gate otherwise create new ones with forced spawns
- Server hack door for bollards and boat ramp (2nd left) will remove jokers if left behind

Video explanation since this was made after my DSOD series was complete:
https://www.youtube.com/watch?v=T7zZqxXnfXw

Black Cat
Difficulty: Normal
Status: DPS
Key Points:
- Enemies will spawn slow (2-3 enemies at a time in spawn points), be cautious of stragglers
- Advise using fast DPS clears for immediate spawns on sides of boat to maintain space
- 2 loud strategies, both in similar length and spawns of cops
- Loud1: Getting 2 parts, and getting a hack. Then secure loot and setup the 3 signal extraction. This method is harder due to how spawns tend to flood in and time for objectives
- Loud2: Attach c4 to place 4 saws. Winch safe, attach magnet. Take out 2 sniper, 1 chopper
- Chopper with turret will leave after after it has been activated/aggro'd and at the end of an assault. Advise taking it last if team cannot DPS it
- Anytime the vault is NOT OPENED, c4 will override any progress of objectives into Loud2
- Loud2 option with C4 is much better because of rotational cover and better escape
- Lots of rotation for cover, use hallways to clear and rotate. Bar patio great for middle clear
https://www.youtube.com/watch?v=bbC3URgZeQc

Mountain Master
Difficulty: Easy
Status: N/A
Key Points:
- Low spawn count throughout the heist
- Majority of initial spawns are lobby, hang back for hacks and objectives
- Balcony Railings are walls/solid (use if need for sniper)
- Shaped charges and Saw can help speed objectives
- Endless assault after signaling helicopter
- Boss only takes front head and body shorts. Enemies will spawn during this fight.
Bloodthirst/Berserker recommended for fast melee kill. Otherwise slowly kite boss downstairs.
- Boss will toss down AOE Fire (max armor damage) when 1 person is near him. Take turns 1 at a time for safe melees for those with Bloodthirst/Zerk
- Securing gold before chopper arrival puts escape at top. Balcony escape is available if not all gold is secured ahead of time

https://www.youtube.com/watch?v=G00GzLTk4Lc
Heists: Texas Heat
Midland Ranch
Difficulty: Easy
Status: N/A
Key Points:
- Far spawns from objectives, recommend far ranged weapons (Rifle, Sniper, etc)
- Start laptop side first for loud, to get jokers and get warmed up to assault

- Keep eyes on chopper snipers as they have lots of sightlines
- Fulton creates more bag moving and potential for cops to take bags, recommend zipline/carts
- Utilize paths to move rifles. Carts PREVENT cops from taking rifles on the ground. Carts can store up to 4 rifles. Use the one to store weapons, and on fade move the last cart
- Spawns can get swarmy if you choose weapons side first, and if all team members move rifles
https://www.youtube.com/watch?v=s3FPIeCYYys

Lost in Transit
Difficulty: Normal
Status: N/A
Key Points:
- Far spawns from objectives, recommend far ranged weapons (Rifle, Sniper, etc)
- Suggest extra torch, RFID hacking, and 2 ammo (Warehouse/Crane) for pre-planning
- Small time save using train to jump from left to right (not critical)

- Warehouse/Corner-Stairs is priority to stay on top of cop kills
- Use Colors to help determine shipping locations from objective
- Can utilize stairs for quick jump for hooks
- Use side stairs when fade/clear to do objectives
- Suggest 2:2 split during crane objectives (2 by warehouse, 2 by crane area)
https://www.youtube.com/watch?v=bd2iyO4L3zI

Hostile Takeover
Difficulty: Easy
Status: N/A
Key Points:
- Can split the 4 objectives to complete heist under 4 mins (Email-Voice-Recorder / Secure Neo-2 (Thermite or Saw) / Secure 4 Research Documents / C4 Lab)
- Suggest stashed equipment by spawn (Guard Booth), Open Door, and Overclocking
- Guard by lab always has keycard (KC) saving 1 hack panel
- Neo 2 can be sawed or faster with thermite if lab is blown up first
- Be ready for escape by front so you don't risk turret+another objective
- Otherwise can use cart to destroy it
https://www.youtube.com/watch?v=gu1jjFWep28

Crude Awakening
Difficulty: Hard
Status: N/A
Key Points:
- Pre-plan suggestions Ammo Bag for Pipe Arena (Level D), Medic Bag by boss room (Level B), Bridge Lockdown Override, Pump Pressure Control (Loud) and SOUTH Bridge Selection. Pump asset is hidden inside the INSIDER HELP section
- Recommend Boat/stealth start up (lets players start zerk, civs tied, etc)
- Color oil is highest in chart and type is in note where sample lab is
- Correct color is needed, correct type will speed up process to 5 seconds (from 35)
- Pump Mini-Game will have 3 colors and 2 generators (Credit to Haxune [6 possible outcomes])
- Blue Oil setups
- Red Oil setups
- Yellow Oil setups
- Ammo spots for boss room. Recommend using Socio/Infil for the 2.5x melee boost (Credit to Rockymoto for info). Boss has explosive resistance. Jokers made before the boss room may be removed entering boss room
- Only 1 door opens from boss keycard. H1-4 pipes on higher, L1-4 on lower
- NOTE: Muted Contractor voices WILL NOT SAY CORRECT LINES NEEDED. Have this unchecked so Locke can say correct H and L valves
- Go walking pace on PONR escape. Dozers on door chokepoints, take care. There's no need to rush last part, plenty of time.
https://www.youtube.com/watch?v=cWG9daD8fSE
54 Comments
fut1le 18 May @ 1:23pm 
crude awakening still top 3 :aa_phoenix:
BongusGrongus 17 Dec, 2023 @ 8:04am 
awsome guide very helpful :steamthumbsup: :2:
Artyom 13 Nov, 2023 @ 10:46pm 
I'm sorry, but Safehouse raid should not be on easy at least in my case. For whatever reason, the KPM required goes up to like 20+ KPM. I don't have any mods like fast cops mod, it's completely unmodded Payday 2 and for some reason, they bunch up incredibly hard and fast. I finish killing a group, go to cover for armor regen and boom, the area is now occupied by a fraction of the original number of cops, about half maybe more.

Maybe its skill issue, but even Soloing white house for me wasn't this much of a DPS check.

Also it may be AI inconsistency because when I hosted a game of Panic Room, my team went down easily commenting about how hyper aggressive cops get and asking if I had the mod.

Is it just Payday 2 being one of the games of all time?
Taberone 24 Aug, 2023 @ 8:57pm 
For bots, Akron LMG is better than Brenner 21, Brenner 21 is now second place

For some reason the Akron does 348 DMG while the Brenner only does 50 DMG (According to More Weapon Stats, which lets me view the bot's weapon stats)

Requires having McShay Weapon Pack 3 though, no idea if Overkill will ever nerf that so have fun while it lasts
Jomamoon 25 Jul, 2023 @ 11:01am 
tbh hacker is the best, its higher than t0 and it should be isolate to a new lvl
Igniz 23 Jul, 2023 @ 3:36pm 
This guide can be useful for newer players if they want to understand the mechanics. They shouldn't jump on ds/dsod to early though. Thanks for the guide man :)
KevKild  [author] 2 Mar, 2023 @ 5:17pm 
may not be the fastest you're right. But it is more efficient and less chance of mistakes. BB can screw up players aren't amazing at stealth/ECM rushing.
But it's infamy, only need 1 for better DSOD builds here xd
that_one_guy9 2 Mar, 2023 @ 1:07am 
spamming diamond store is no longer the fastest way, the fastest way of getting infamys is by doing 5maps (diamond store, shadow raid, election day, black cat, big bank)x2, infamy every 35-40 mins. read more on zmanis guide https://steamproxy.net/sharedfiles/filedetails/?id=2741548182
crabzero 24 Feb, 2023 @ 6:53am 
jsyk not always the host on aftershock spawns with saw
Loki_Drummer 18 Oct, 2022 @ 9:38am 
I think you can take 2 shots from a ZEAL heavy with anarchist if you have a joker and you're wearing LBV. Depending on how Joker extra health works with anarchist. maybe not the best idea, idk