Divinity: Original Sin 2

Divinity: Original Sin 2

38 ratings
Guide to Installing Mods and Using Them In Multiplayer (Definitive Edition)
By pocketlint60 and 1 collaborators
This guide provides a detailed rundown of how to correctly install mods in DOS2, as well as how to synchronize modded games between multiple players.

Note: This guide is intended for definitive edition.
   
Award
Favorite
Favorited
Unfavorite
Introduction
This guide will detail how to correctly install mods for Divinity: Original Sin 2 off of the Steam Workshop, and also how to properly synchronize modded games between hosts and players. This guide is focused primarily on GM mode, but many of the same issues effect Story and Arena. Following this guide will solve most instances of inconsistency between players and the host, excessive load times, subscribed mods not being available in-game, and crashes when loading new areas.

The Basics of .pak Files
In the Divinity Engine, game content is packaged modularly into .pak files. Every mod for the game, regardless of size, is .pak file, though exceptionally large mods may be multiple. When you subscribe to a mod on the Steam Workshop, the .pak file (or files) of a mod is installed on your computer.
However, the folder that the .pak files are moved to by Steam Workshop is not the folder that the game searches when trying to find the mods you have installed.

If you have ever subscribed to a mod on the Workshop and found that it was not available in-game, this is why.

The incorrect folder, where Steam Workshop installs mod files, is:
\steamapps\workshop\content\435150

The correct folder, where the game looks to find your installed mods, is:
\Documents\Larian Studios\Divinity Original Sin 2 Definitive Edition\Mods

The following two sections describe two methods on how to correctly install mods: either with or without additional software.
Method #1: Manual Installation


Step 1: Navigate to 435150 and find your mod files.
Inside this folder is a list of folders labelled with long strings of numbers. Each of these folders is a mod, containing a .pak file (though some very large mods have multiple .pak files).

Step 2: Move .pak files from 435150 to Divinity Original Sin 2 Definitive EditionMods.
Check the folders one by one and move all .pak files to the mod folder in Documents. This will install them correctly, which you can double check by launching the game and looking for it on the modlist available from the main menu.

Step 3: Sort 435150 by Date and repeat Step 1 each time mod files are updated.
Whenever a mod is updated and that update is pushed to the Steam Workshop, it drops the updated version of the mod in the wrong folder again. You will have to manually find the .pak, move it again, and replace the older version with it. Sort 435150 by Date to put the most recently changed files on the top of the list.

This method is not recommended because you will have to manually move every single mod file, one by one, not only when installing a new mod but also every single time any mod updates. This method is only preferable if you prefer not to download third party utilities.
Method #2: LaughingLeader's Divinity Mod Manager
Step 1: Installation.
LaughingLeader's Divinity Mod Installer is available on Github.

LaughingLeader DivinityModManager GitHub:
https://github.com/LaughingLeader-DOS2-Mods/DivinityModManager

Latest Release Direct Download Link:
https://github.com/LaughingLeader-DOS2-Mods/DivinityModManager/releases/latest/download/DivinityModManager_Latest.zip

The Github page includes installation instructions for the Mod Manager itself.


Step 2: Allow the Mod Manager to automatically update your mods.

Navigate to Settings/Preferences.
Find "DOS2 Workshop Path" and enter the path ending in 435150.
Once it has this path, the Mod Manager will be able to perform the Manual Installation method described in the previous section for you. When you subscribe to a new mod on the Steam Workshop, the "updates" button at the top of the window will count up and the number will turn red. Click it to open a menu and and click "copy files to mod folder" to complete the process.
Turning Automatic Updates on will make this process happen on it's own everytime you run the launcher, keeping your mods up to date. Still, keep an eye on that "updates" button.

Step 3a: Create the Load Order as a .json file.

Divinity Original Sin 2 does not synchronize the order in which mods load for different players in the same game. Mod load order effects which mods override others, with mods lower on the list overriding ones higher on the list. By default, mods are ordered in the order a player downloaded them, which makes it very common for the load orders of two different players to be incongruent. When players have different load orders, this can cause inconsistencies between those players to occur, such as enemies not being present for certain players or in-game items having appearances and properties that vary from player to player. The solution to this is to make sure that the load order of your mods is the same across all players. The in-game utility to change your load order does not work, but the Mod Manager features a load order editor.

The mods on the righthand column are all your installed mods. The lefthand column is your load order. Once your lord order is correct, navigate to File/Save Order As... and save the Load Order as a .json file. You can create multiple Load Order presets this way.

Step 3b: Import a .json Load Order into the Mod Manager.
Once one player (preferably whoever is planning to host/GM) has assembled a load order and saved it as a .json file, he can uploaded it to any file sharing website for his fellow players to download and import into the Mod Manager. To import a load order, navigate to File/Import Load Order from File... and find the .json file which your host provided.

Step 3c: Export the Load Order from the Mod Manager into the game.
Importing a load order in this way will only save it to the Mod Manager itself, not to Divinity Original Sin 2. Finally, navigate to File/Export Order to Game, which will overwrite the in-game load order with the one you previously imported into the Mod Manager.

Step 4: Activate the mods in-game.

Finally, launch the game and navigate to the "mods" menu. The mods in the load order should be at the very top, in the order you arranged them. The mods after that should be in the default order. Note that the counter in-game load order will differ from the manager's load order by 1, this is just because the manager starts at 0 while the in-game list starts at 1.

This is the final step for Story Mode and Arena Mode.

Note: This step is only necessary for the host of the game. This is the player who started the lobby and, in Story and Game Master Mode, holds the save files. If the client players have the correct mods installed, they do not need to activate them in their "Mods" menu, the activated mods are determined by the host.

Step 5a (For Game Master): Activate the mods in Prepare Mode to determine which mods are active within that campaign.

In Game Master Mode, open Prepare Mode, select your campaign, and click the gear icon in the corner and navigate to the "addons" tab, where you will find a nearly identical mods menu.

Step 5b (For Game Master): Synchronize the main menu mod list with the mod list in your campaign before loading a GM mode save.

When you begin a GM campaign, the list of mods active in the game is determined by the campaign's mod list as determined in Prepare Mode (from Step 5a).
However, due to a bug, when you load a GM mode save file, the game checks the main menu mod list (from Step 4), not the campaign's mod list (from Step 5a) and activates those mods when the save is loaded.
Inconsistencies between your save games' mod lists and the main mod list can break saves and cause infinite loading screens, so be sure to synchronize them!
The easiest way to do this is to make sure the main mod list (Step 4) matches the campaign mod list (Step 5a) before creating your save game (Step 5b).
You can double check what modlist your save will be loaded with by clicking the gear icon in the corner of the save menu.
Osiris Script Extender

Osiris Script Extender is a utility that expands what DOS2's scripting is capable of. Most of it's utility is for modders, not players, but it has one function that makes it extremely vital to playing modded games: Loading Speedup, which as the name implies dramatically reduces load times. The Script Extender is a massive time saver for any game with more than 10 mods, or with several very large mods. It is nearly essential for Game Master mode if you want to use multiple map mods.

You can download Osiris Script Extender from this link:
https://github.com/Norbyte/ositools/releases/tag/v38_1

In LL's Mod Manager, you can also click "Download & Install Osiris Script Extender", which will take you to the above link. Either way, the link gives more specific installation instructions.

You can tell if you've installed OSE correctly because the first loading screen of the game will display it. It will also give you a version number; OSE should update automatically if you run the game with it installed. As of May 16th, 2020, the latest version is v46.
Credits
This guide was primarily made for both the players and Game Masters of GM Bastion,
a Discord community dedicated to Divinity Original Sin 2's Game Master Mode:
https://discord.gg/wff4U5

Feel free to click the invite above if you're interested in hosting as a Game Master or finding a game.
Many thanks to Luxen, the server's admin, for assistance with this guide.
3 Comments
pocketlint60  [author] 31 May, 2020 @ 6:49pm 
@HeartlessBastard While writing this reply, I accidentally deleted the comment it's a reply to. Sorry about that.

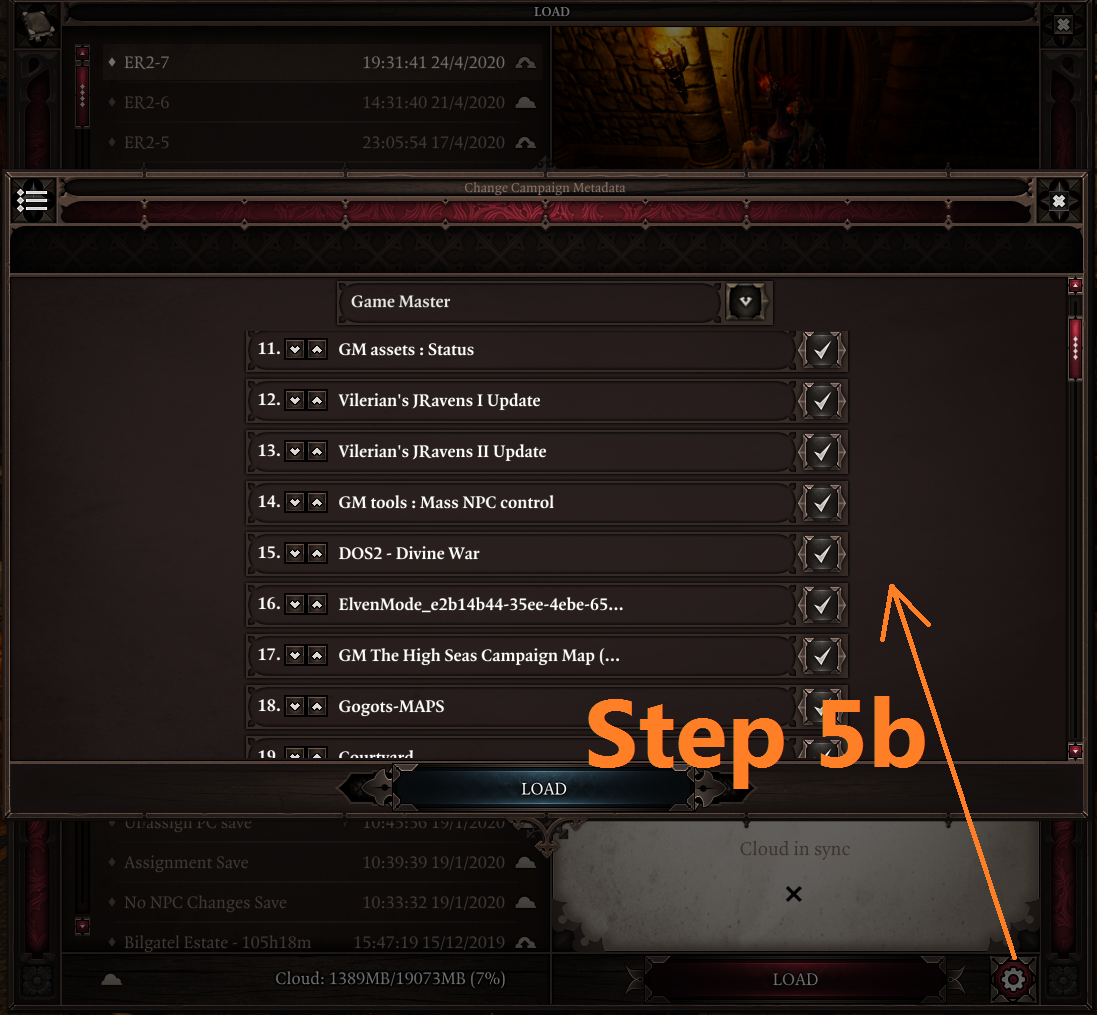
That depends on what mods you're using. It only matters if two mods are effecting the same thing. The only universal rule I can give is that total overhaul mods, or mods that directly alter elements of the game like how certain Skills work, should always go on the BOTTOM of the list. Overrides happen in the order listed, so items on the bottom of the list override everything above them.
pocketlint60  [author] 31 May, 2020 @ 4:03pm 
@HeartlessBastard The in-game mod list can be changed, but it's painfully slow; you have to click the arrows next to a mod to move it up or down one at a time. Thankfully when you export from the Mod Manager, it changes the way mods are sorted in game. You can sort the mods in the load order by simply clicking and dragging them in the Mod Manager.

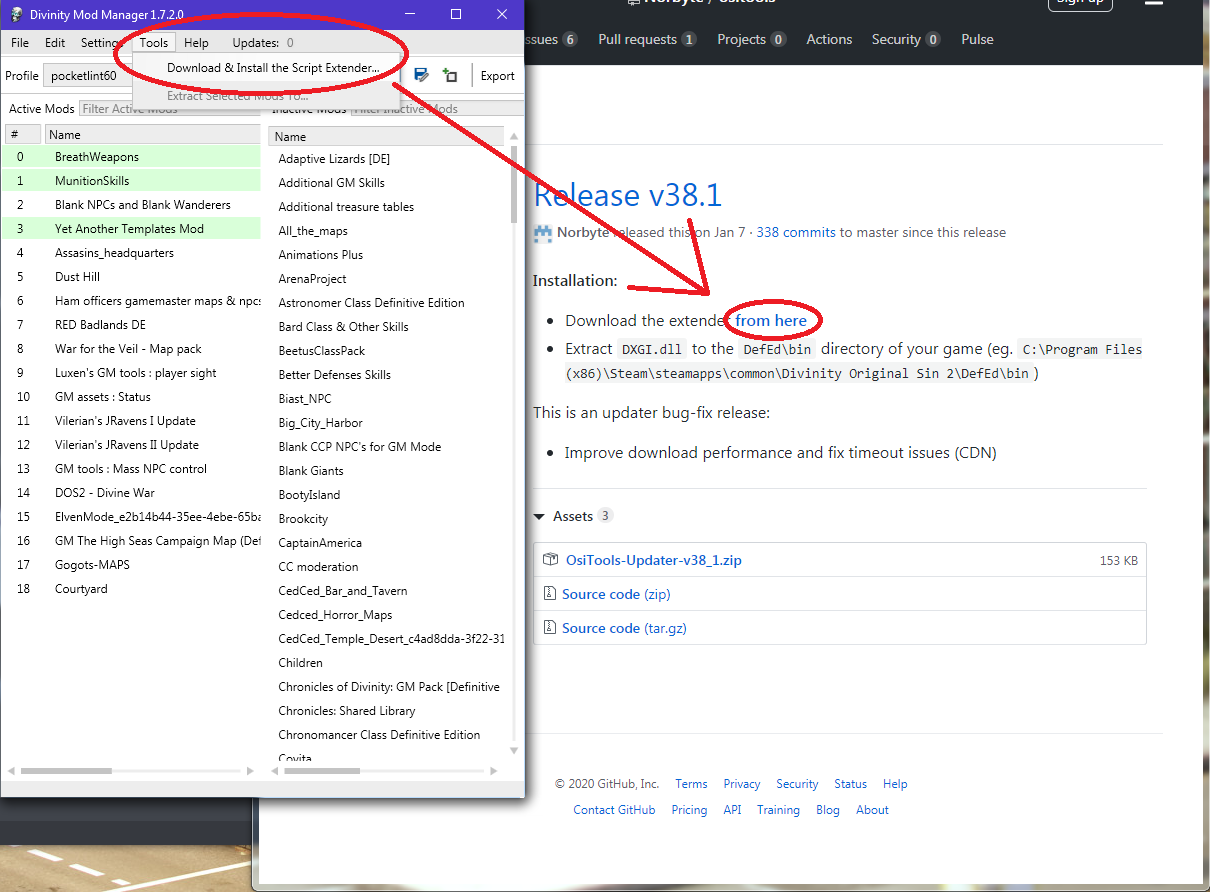
If you were asking for a method without the Mod Manager, sorry, the one-by-one method is the best you've got.
HeartlessBastard 31 May, 2020 @ 1:15pm 
Is there a recommended way of sorting mods, that can be easily applied to a whole order? It would save time of moving them all manually.