Dungeon Defenders: Awakened

Dungeon Defenders: Awakened

41 ratings
Dungeon Defenders Insane Survival Setup's Guide, (WIP, 10/12 maps)
By ZERO and 1 collaborators
A Guide Showing Setups For Every Survival Map In Dungeon Defenders. Both in video format and Written Guide.
2
   
Award
Favorite
Favorited
Unfavorite
Intro
This Guide is to help players get gear, and progress in the survival, the strategies used are made to (hopefully) require less stats than most other strategies would by utilising CC and high DPS traps,

These Strategies will be useful for high level and equipment score players but they provide the most use to players without fully optimised equipment.
BASE GAME - CHAPTER 1
The Next 4 maps are The Deeper Well, The Ancient Mines, The Lava Mines, and the Alchemical Laboratory. These maps are good maps to start out gaining your first pieces of end game loot.
The Deeper Well
The First Map in the game, The Deeper Well, This map has 4 choke points you need to defend.

This map does not spawn ogres, which means you can focus on strategies to defeat dark elf warriors and normal trash mob hordes,


For this map you will need

x4 Squire (x4 walls)
x4 wizzard (x4 fireball tower)
x6 huntress (x2 explosive trap, x2 gas trap x2 lightning)
x2 Monk (x2 weaken aura's)

Place 2 walls, one at the bottom of the stair case and the other next to the water wheel

Place the huntresses gass and explosive traps in front, bellow, close to the wall so the AOE spreads to the top floor, After that place a thunder spike trap behind the walls somewhat far back, do this at each side

After you have placed the thunder spike trap place 2 fireball turrets from the mage on each thunder spike trap, this will provide extra AOE to both sides if placed well.

and finally place the monks weaken aura's at each side to strip the enemy of elemental defence.

(SIDE NOTES)
Do not stand on the crystal due to dark elf warriors, standing on the blue environment crystals on the sides makes it so you can avoid them entirely, as they have trouble pathing ontop of the crystals.
The Ancient Mines
The Second Map in the game, The Ancient Mine, This map has 3 choke points you need to defend.
And Drops The Mist A mine (rock) pet


For this map you will need

x3 Squire (x3 walls)
x5 wizzard (x5 striker tower)
x7 huntress (x3 explosive trap, x3 gas trap x1 lightning)
x2 Monk (x2 weaken aura's)

Place Squire walls at each of the choke points (3 in total)

With the Huntress place explosive traps in front of the walls, and gas traps slightly behind the explosive traps, and finally place a lightning spike trap far behind the crystal next to a stone obelisk

With the Monk, on the right side of the map, place a weaken aura between the two choke points, so you cover both sides with one aura, and then place one at the final choke point.

And finally the wizard, place 5 striker turrets on top of the lightning spike trap facing all 3 entrances,

(SIDE NOTES)
Do not stand on the crystal due to dark elf warriors, standing on the wooden scaffolding just in front of the crystal lets you avoid the dark elf warriors.
The Lava Mines
The Third Map in the game, The Lava Mine, This map has 2 choke points you need to defend.
And Drops The Steam Robot pet


For this map you will need

x3 Squire (x3 walls)
x3 wizzard (x3 striker tower)
x5 huntress (x2 explosive trap, x2 gas traps, x1 lightning)
x2 Monk (x2 weaken aura's)

Place Squire walls at the choke points, one at the bridge to the left of the crystal, and 2 by the pipes on the right,

With the Huntress place a mine trap in front of each choke point, with a gas trap behind it,
and the final trap with the huntress is the thunder spike trap, placed behind the wooden fences that are behind the crystal

The Monks Weaken Aura's go in front of the walls, just far enough so you can repair them from behind the walls, 1 on each side

Finally the Mage, place 3 striker towers on top of the thunder spike trap, face them so they can hit both choke points, (this will require a good range stat.

(SIDE NOTES)
Do not stand on the crystal, a good place to stand is near the striker turrets, because dark elf warriors very rarely go that far, and normally get gunned down by the striker turrets before they get too close.
The Alchemical Laboratory
The Fourth Map in the game, The Alchemical Laboratory, This map has 3 to 4 choke points you need to defend. And Drops The propeller cat pet


For this map you will need

x6 Squire Towers (x6 walls)
x3 Wizzard Towers (x3 striker tower)
x9 huntress Towers (x3 explosive trap, x3 gas trap x3 lightning)
x3 Monk Towers (x3 weaken aura's)

First, place explosive traps and gas traps in the 2 doorways to the left and right, as well as on the staircase behind the furnace,

Then place 2 walls at each choke point on the sides, locking the enemy on top of the traps,
and the last 2 walls at the sides of the furnace, close enough to the explosive trap to lock the enemies in the blast radius,

Next, place the monks weaken aura's at each choke point, these will remove enemy elemental resistances.

Then the mages towers, the three striker turrets go at the back of the map behind the crystal on a small raised section of flooring, aim the turrets so that they are facing each side entrance, as well as the middle, 2 lanes, and the final turret facing only the middle.

Then switch to the huntress, and place a lightning strike trap at each side door close to the wall, as well as one on top of the 3 striker towers.

(SIDE NOTES)
As usual do not stand on the crystal, and the best place to hide from the dark elf warriors so they are killed by the traps is on top of the furnace.
BASE GAME - CHAPTER 2
The Next 4 maps are Tornado Valley, The Tornado highlands, The Ramparts, and The Throne Room. These maps are great if your looking for a challenge, and are great for loot.
Tornado Valley
The Fifth Map in the game, Tornado Valley, This map has 5 choke points you need to defend.
And Drops The Little Wizard pet.


For this map you will need

x13 Wizzard Towers (x13 Walls)
x15 Huntress Towers (x5 explosive trap, x5 gas trap x5 lightning)
x5 Monk Towers (x4 weaken aura's and x1 enrage aura)

First Place The Huntresses Explosive Traps and Gas Traps at all 5 choke points, making sure to place the gas traps closer to the choke points and the Explosive traps further away.

Then block all the choke points with the Mages Walls, giving extra attention to make sure there are no gaps, especially in the middle of the the two walls on some choke points,
(NOTE: Switch all level up points into fortitude, while there are no ogres on this map the normal enemies can still hurt)

Next place the monks weaken aura's There should be 4 in total as you can use 1 aura for 2 lanes
On the lanes where you only had to place one aura place an enrage aura also.

And finally place the huntresses thunder spike traps BEHIND each set of walls, making sure the trigger is just poking out of the front, this will kill the Dark elf warriors when they rush the walls,

(SIDE NOTES: It is best to be a huntress during this Setup as you will boost all of your offensive traps, but as shown in the video you can remain any class and this is still a valuable setup.)
Tornado Highlands
The Sixth Map in the game, Tornado Valley, This map has 4 choke points you need to defend.
And Drops The Etherian pet.


x7 Squire Towers (x7 walls)
x3 Wizzard Towers (x3 striker tower)
x10 huntress Towers (x4 explosive trap, x4 gas trap x2 lightning)
x3 Monk Towers (x3 weaken aura's)

Place Explosive and gass traps at all 4 choke points, and Squire barricades behind them.

Place 3 of the mages deadly striker towers 2 facing the large bridge, and the other facing the lower choke point,

Place The monks weaken aura's at each choke point, but at one of the points you can cover two choke points with one aura,

And finally place 2 lightning strike traps with the huntress at the paths furthest away from the deadly striker towers.

(Side Notes, Dont stand on the crystal and try and avoid standing on the ground because of the dark elf warriors)
The Ramparts (Written Part WIP)
The Seventh Map in the game, The Ramparts, This map has 3 choke points you need to defend, as well as 3 points where flyers can attack from.
And Drops The Genie pet.

The Throne Room (Written Part WIP)
The Eighth Map in the game, The Throne Room, This map has 5 choke points you need to defend, as well as 2 points where flyers can attack from.
BASE GAME - CHAPTER 3
The Next 4 maps are The Arcane Library, The Royal Gardens, The Promenade, and the Summit. These maps are good maps to Test your skill and get some of the best loot available in the base game.
Arcane Library (N/A)
Royal Gardens (Written Part WIP)
The Tenth Map in the game, The Royal Gardens, This map has 5 choke points you need to defend, as well as 4 points where flyers can attack from.

The Promenade (Written Part WIP)
The Eleventh Map in the game, The Promenade, This map has 4 choke points you need to defend, and is possibly the best map for farming high tier equipment, in the base game, with fairly low stat requirements compared to the summit,

The Summit (N/A)
19 Comments
Boo 24 Oct, 2021 @ 10:23pm 
well now it really dosent matter after the warden came i just use the 2nd tower with buff beam only and have completed the game afk so i got my solo build
ZERO  [author] 24 Oct, 2021 @ 4:48pm 
@Kjeldgaard at the time they where the only 4 characters, so there was not much point in not taking all 4, that and I find the rangers traps to be some of the most useful, at least at the time.
Boo 24 Apr, 2021 @ 11:56am 
any guides for us that does not use the ranger?
robert. 7 May, 2020 @ 4:43am 
Obviously quite some time has past but I remember this guide when both Hardcore and Nightmare were not out yet. Gave some good insights and actually works out with gear you have while progressing.

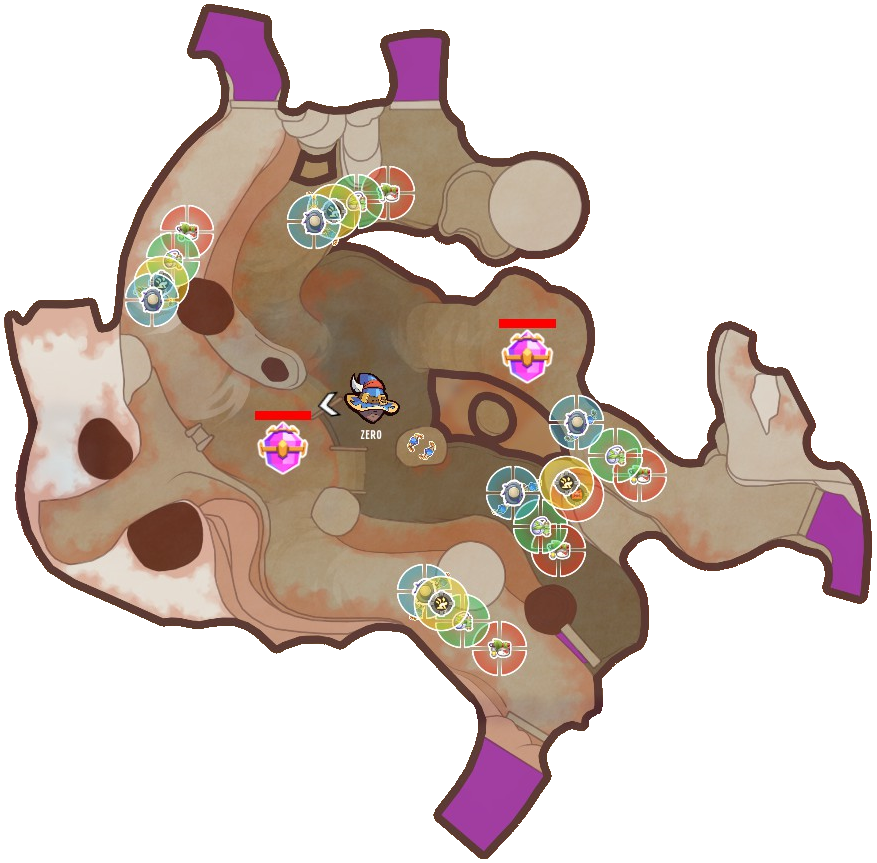
I recommend this to all players still doing progression on insane level and urge to stay offline until you can consecutively clear maps yourself.

Everyone enjoy the grind and thank you Zero for all time spent in this guide and videos!
JohnnyDollar 17 Apr, 2020 @ 1:50pm 
Thank you so much for the help, hope you keep updating going forward!
ZERO  [author] 5 Apr, 2020 @ 5:42am 
The map was updated @skrewex
skrew 5 Apr, 2020 @ 2:43am 
I had an ogre spawn on wave 10 of Deeper Well even though your guide says it shouldn't spawn any ogres, has the map been updated or am I missing something?
RxC_BigBoss 3 Apr, 2020 @ 10:24am 
will you be returning for nightmare?
Twistedsoul85 28 Mar, 2020 @ 11:48pm 
OK. So I gave your setup a try, while it does work it requires more baby sitting for the spiked walls towards the end cause the single target DPS from DST isn't high enough. My stats on all of my builders are either equal to or higher, except for my traptress. She is slightly lacking in the power department but my app and squire have considerably more stats than yours. I like a build which is kinda similar. Have spiked walls exactly where you have them, darkness trap and str drain in same area, and 4 FB towers for the single ogre lane, 5 FB towers for the double ogre lane, 3 for the others. Way easier than this setup imo
Twistedsoul85 28 Mar, 2020 @ 9:29pm 
I like your Promenade setup, by just watching it atm. I am wondering if putting FB towers up would be more effective. The ogres died really really slowly while doing a lot of dmg to your walls. My current setup has a lot less traps but I am going to give this a go with FB towers.