Stormworks: Build and Rescue

Stormworks: Build and Rescue

192 ratings
How to make realistic 3D renders of your Stormworks Vehicle
By iogic
This guide will show you how to make realistic 3D renders of your Stormworks vehicles using the free 3D software Blender. From exporting the right vehicle, to importing it into blender, changing rendering settings, shading, texturing and exporting it into a picture. It is very simple, and when you got the hang of it, you can make a rendering of a vehicle in just 5 minutes or less!
3
2
2
9
2
2
   
Award
Favorite
Favorited
Unfavorite
Introduction
In this guide, I will show you how to make realistic 3D renders of your Stormworks vehicles using the free 3D software Blender. You can still follow the tutorial even if you have never used Blender before, but I really recommend watching some beginner tutorials, as well as messing a bit around yourself, if this is your first time using the software. Here are some renders I have done previously:

Aeno Interceptor - by me

Quake Truck - by me


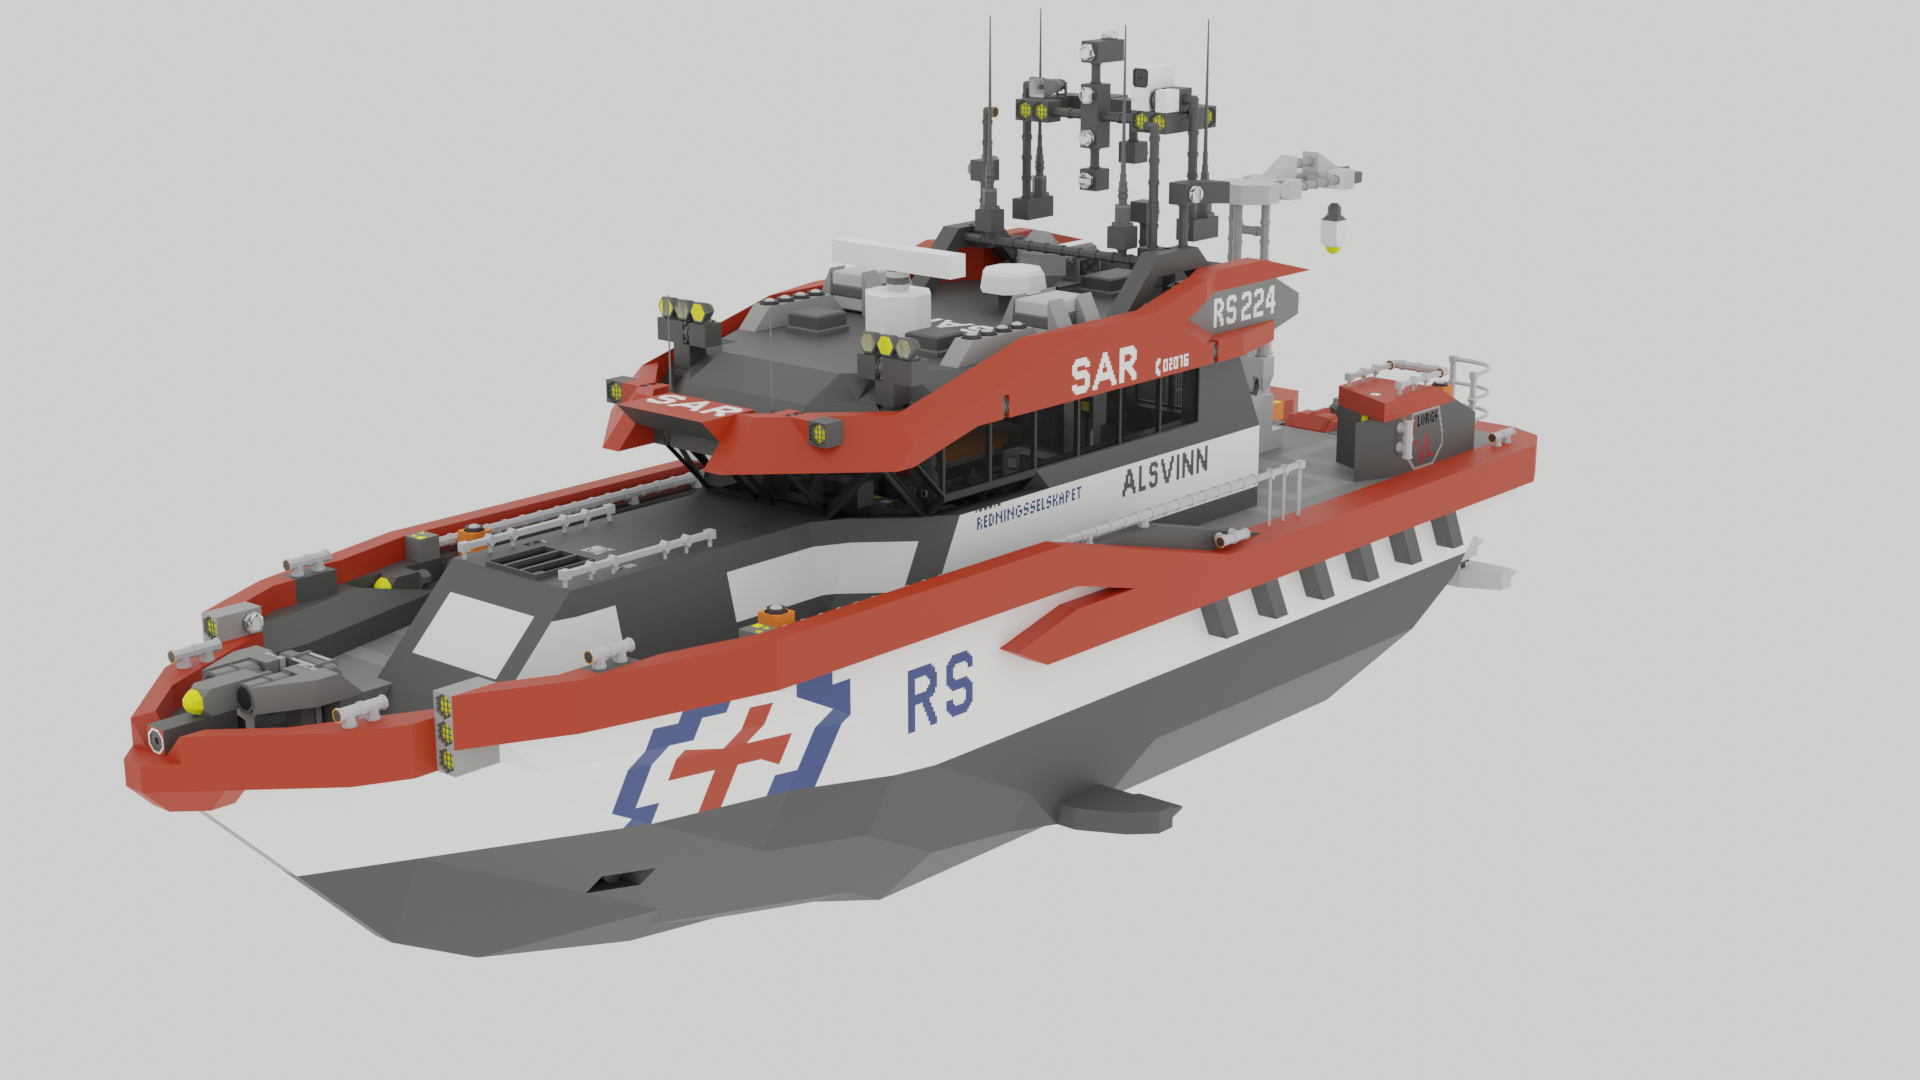
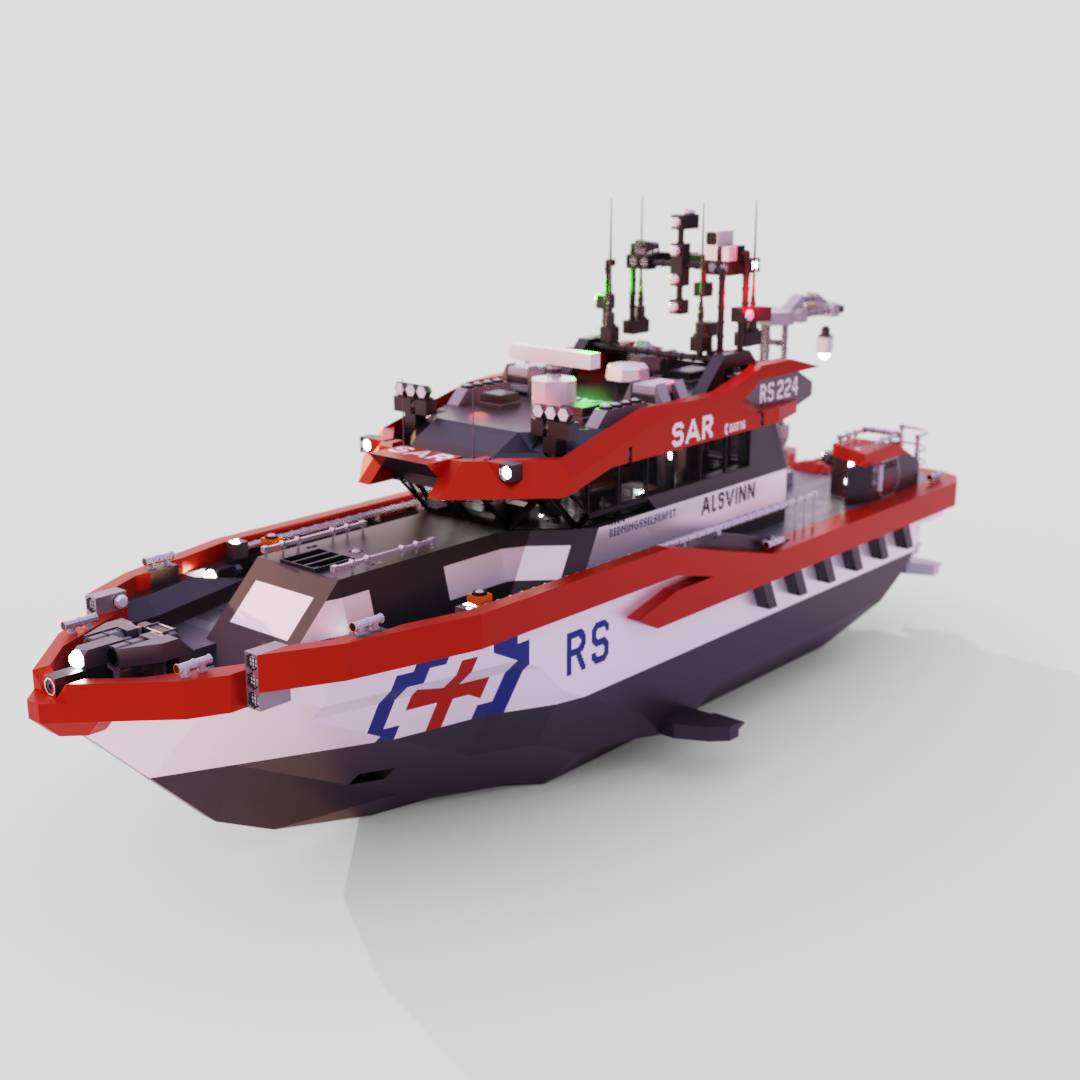
Alsvinn - by Lorgs


Before we start, I just want to mention, that I am not any professional in Blender, but might be a bit better than the average. This tutorial is just the basics, you will get a pretty decent rendering, but I won't go through how to add lighting and that stuff. I really recommend that you watch some blender basic, general tutorials if this is your first time, I ain't that good explaining stuff. This is my first ever actual Steam Guide
Getting Started
First of all, you need the 3D software Blender, it is free, you need no account or membership, and you can download straight away from www.blender.org/download/ and simply follow the instructions on the page and throughout the installation.


When you are done jump into Stormworks and load your creation into the workbench that you want to export and render.

Keep in mind, the render is gonna look exactly like how it looks in the workbench, so if any doors are open by deafult in the workbench, it will also look like that in the render (take a look at this example).

Exporting
Ok, so now that you have decided which vehicle you wanna use, it is finally time to export. Make sure to do any last modifications to the craft before exporting. When you are completely done, and happy on how the vehicle looks, is it finally time to do the exporting. Press F11 and give the export a name.

Export Folder
The export will be a .ply file and can be located here: AppData\Roaming\Stormworks\export
If you don't know how to get to this folder, press WIN+R, and then type in %appdata% and press "enter" or "OK". Then navigate to the "Stormworks" folder, and then to "export". Here you will find all the 3D model exports from Stormworks. Keep this folder in mind, we will need to navigate to it later while in Blender.

Now it's time for the importing!
Importing
Open up Blender. Press "Esc" or click anywhere to get rid of the welcome screen. Now, delete everything in the scene by pressing "A" to select everything and "X" to delete it, then press "Delete" to confirm the deleting.

Now it's time to import our .ply export from Stormworks. Press File>Import>Stanford (.ply)
Then copy the folder address for the export folder and paste it in on the top here, then choose your export file (in my case "tutorial.ply") and press "Import PLY"

Your computer might take some time importing the object, please wait and don't press anything before you see it has loaded in.
So it loaded in, but isn't the right way, we need to rotate it. Press "N" to open this little side panel, and here you can modify it's rotation. Type in 90 on the X rotation axis to rotate it. It should be pointing forward now, but the model is also flipped along the X axis, and to change that, change the X axis scale to "-1" instead of "1".
Also, you can rotate the your view by holding down the Middle Mouse Button, and move around by holding down Shift+Middle Mouse Button, and move in/out by holding down CTRL+Middle Mouse Button. If you suddenly deselect your object, you can press Left Mouse Button to select it again while hovering over it.
Texturing
Having a render of a gray creation is pretty boring, we should give it some colors. Luckily for us, Stormworks exports the texture of the creation, including parts, blocks and even paint blocks. We just need to tell Blender that this is the texture we want to use. To get started go to the shading tab.

Press "New" to give the object a new material.
While hovering over the shader editor, press Shift+A, and search for "Vertex Color", and then add the "Vertex Color" node. If you can't find the vertex color node, try searching for "Attribute", it does the same thing.

Select "Col" on the Vertex Color Node, and then connect the yellow "Color" dot on the "Vertex Color" node to the yellow dot named "Base Color" on the "Principled BSDF" node.
You should now see that your object got colors. (If not, make sure you are in the right preview mode)
Assigning a new materials to the windows
Ok, so everything works as expected, but, what's up with the windows? They look purple and blue, and the lights, those are yellow?? Well, these parts are a bit different and require their own material since the vertex color texture does not work with transparent blocks like the windows, and the lights have an emission shader, which also isn't included in the vertex color texture.

Making a new material
To make a new material, navigate over to the Material properties of the object, press the "Add" button, and press "New" to create a new material.
Rename the new material (probably called "Material.002") to "Glass"
Also, don't forget to save by pressing CTRL+S!!!

Selecting and assigning the windows to the new Material
Ok, now comes the hard part: selecting all the windows and assigning them to the Glass Material. First of all, you need to enter the edit mode, you can do so by pressing "Tab", you can also leave edit mode by pressing "Tab" again. Make sure the object is still selected. Now you can choose, either select them manually or by using this automated way. I will show you the automated way.
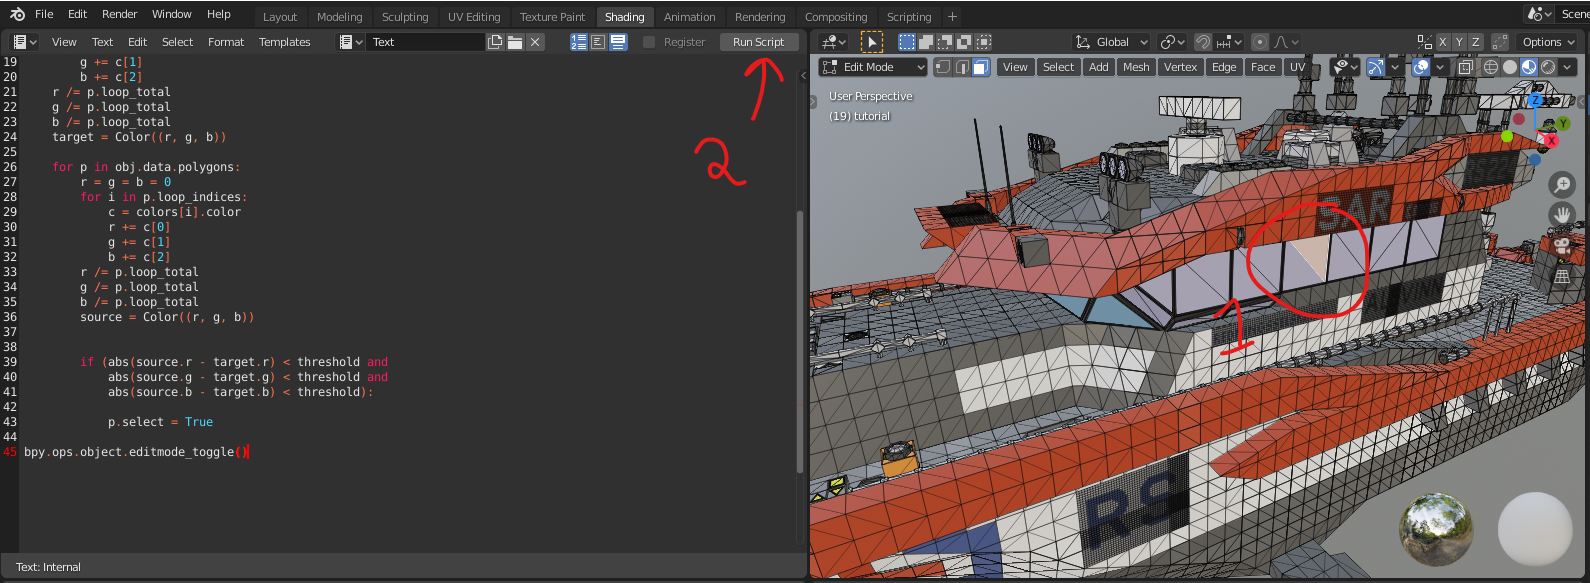
Ok, now press "3" on the keyboard to select faces. Pressing "1" will make you able to select vertices, and "2" will make you able to select "edges". A face is like a triangle or 2D shape used to build up 3D shapes. With "Face" selection enabled, press Left Mouse Button on either a purple or blue windowpane. With that pane selected, we need to run a custom script to automatically select all the faces with similar vertex color, in this case, the purple and blue ones.

Using a script to automatically select windows
Open up a text editor window (like this)
You might want to make the window bigger by dragging the right edge to the right.
In the text editor, press "New".
Now paste this code into the editor window.


import bpy
from mathutils import Color

threshold = .1
obj = bpy.context.object

bpy.ops.object.mode_set(mode="OBJECT")

colors = obj.data.vertex_colors.active.data
selected_polygons = list(filter(lambda p: p.select, obj.data.polygons))

if len(selected_polygons):
p = selected_polygons[0]
r = g = b = 0
for i in p.loop_indices:
c = colors[i].color
r += c[0]
g += c[1]
b += c[2]
r /= p.loop_total
g /= p.loop_total
b /= p.loop_total
target = Color((r, g, b))

for p in obj.data.polygons:
r = g = b = 0
for i in p.loop_indices:
c = colors[i].color
r += c[0]
g += c[1]
b += c[2]
r /= p.loop_total
g /= p.loop_total
b /= p.loop_total
source = Color((r, g, b))


if (abs(source.r - target.r) < threshold and
abs(source.g - target.g) < threshold and
abs(source.b - target.b) < threshold):

p.select = True

bpy.ops.object.editmode_toggle()

(I did not make that code btw, thanks to google and blender forums)
It should look something like this when you are done:
Now make sure you have selected a blue or purple face on one of the windows as I have done here. Then you just press "Run Script" and wait a few seconds and do not touch the computer before it is done.
You now see that all the glass that was purple has been selected, not the blue ones though because they ain't purple, but they are still glass, so you just need to repeat this one more time afterward. But first, make sure the glass material is selected and press assign. This will assign all the selected faces to this material instead of the main material with the vertex color.
Now you can deselect everything by double-tapping "A", the glass panes that previously were purple should now be white, as the glass material is just a white material right now. Now select one blue glass pane face, and press "run script" again. Then when all the blue panes are selected, assign them to the glass material as well, just like how you did with the purple ones.
Making a glass material and chaning the rendering settings
Okay, white looking glass is boring. Real glass is transparent. So now we have to make the glass material transparent by using the shader editor. Remember that you can add new shading nodes by pressing Shift+A while hovering over the shader editor.
Add these nodes:

  • Mix Shader
  • Glass BSDF

Setup the shading like this, and change the "Alpha" to 0, the "Fac" to 0.2, and the "Glass BSDF" color to something dark (or the color you want your windows) You can move around in the shading editor by holding the Middle Mouse Button.
You can mess around with these settings later on your own. But first, we need to do some other setup.
Go to the render properties and change the render engine from "Eevee" to "Cycles". This will make the render much more realistic but will require a lot of computer power.

[This next step is optional] In this case it will use a lot of the CPU, but if you have a powerful enough GPU, you can the change the "Device: CPU" to "GPU" and then go to Edit>Preferences>System>Cycles Render Devices and change that to either CUDA or OptiX. (I recommend OptiX if you have a supported Graphics Card)

We will now continue the tutorial. Now go to the View Layer Properties and enable Denoising, don't modify any of the settings inside it. This will make the final render MUCH better.
.
.
.
.
.
.
.
.
.
.
.
.
.
.
.
.
.
.
.
.
.
Change the preview mode (top right) to Rendered mode, to show how the final render will look like. Looking good already, but might be way too dark.
You can change that by going to the "World Properties" and changing the background color from gray to white. (Could also be other colors, but don't overdo it.) The render looks very good so far!

Setting the camera and rendering
Before we can render, we need to add a camera. We removed it at the start, but we can simply add it back in by pressing Shift+A in the 3D preview and pressing on Camera. Then you should find the perfect camera angle for the rendering by moving around the view. When you have found it, press CTRL+ALT+Numpad 0 to align the Camera to the view. (You can exit and enter camera view by just pressing Numpad 0.)

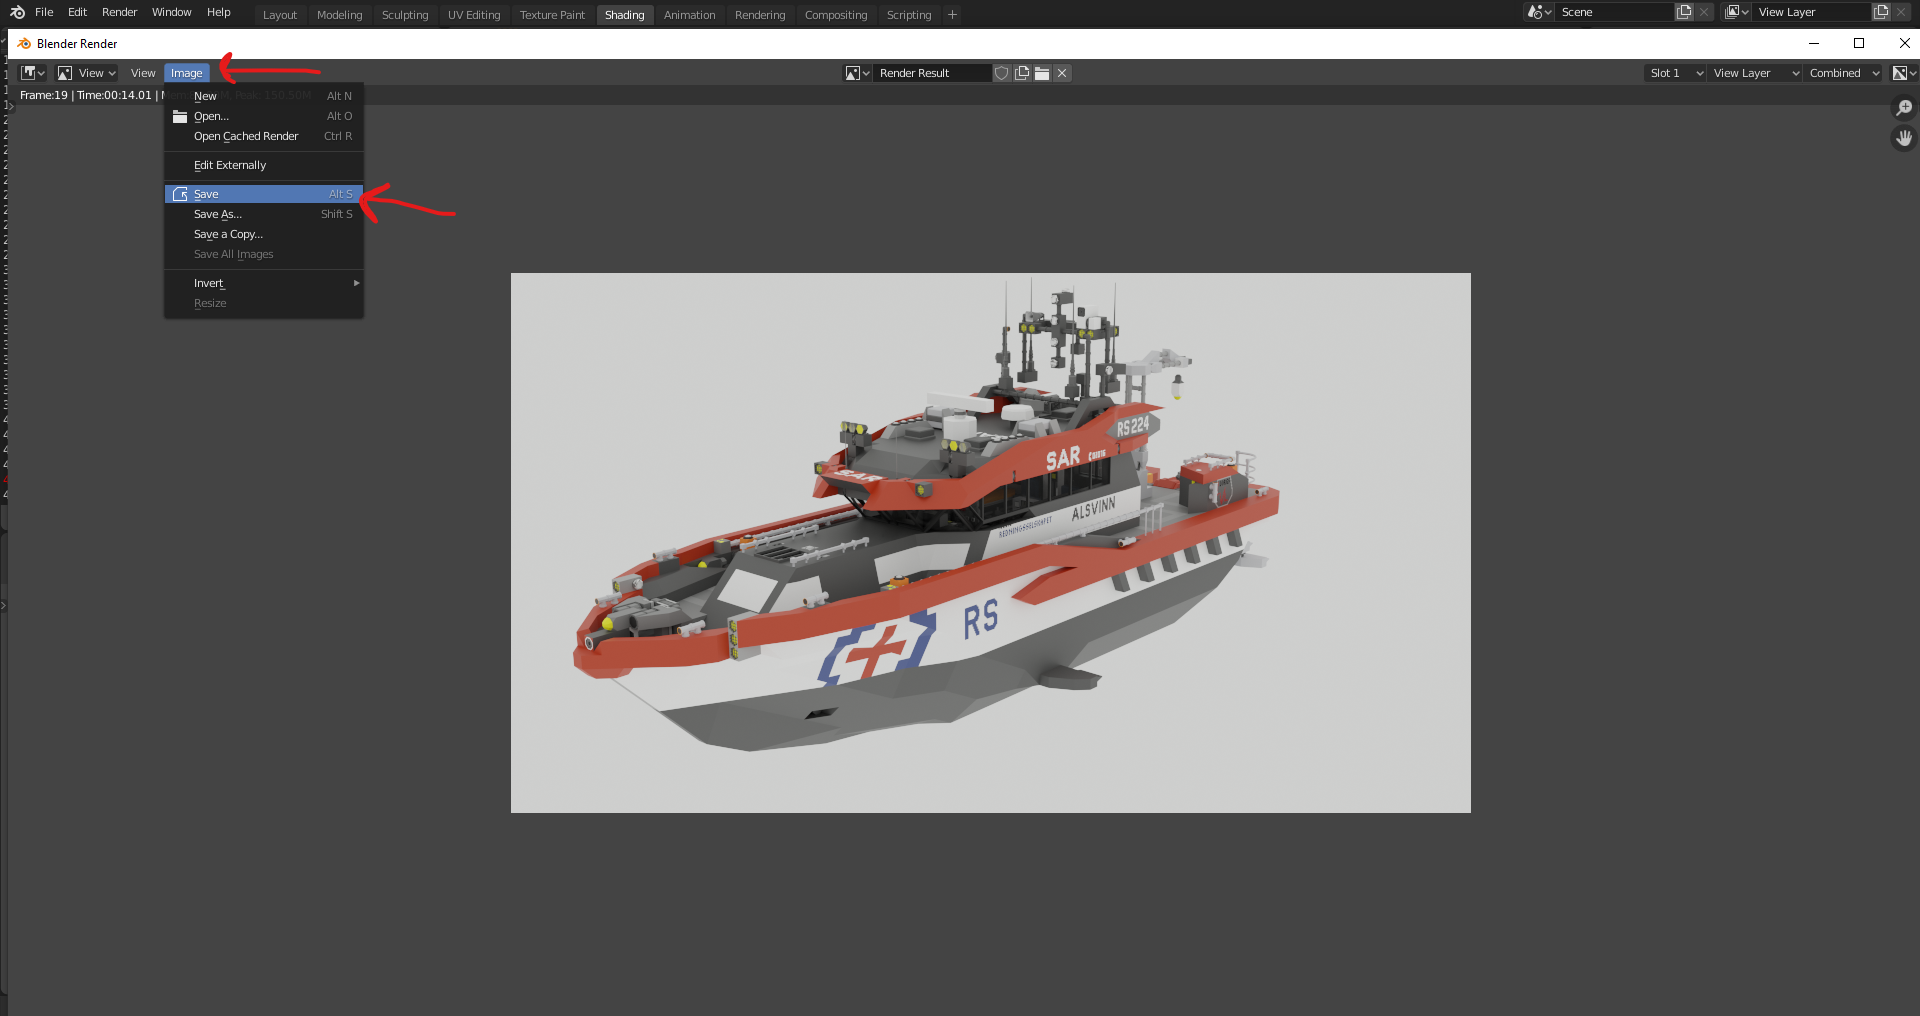
When you have found the perfect camera angle, and are ready for exporting a rendering, press F12. After some seconds or minutes (depending on your computer and rendering settings), Blender will construct a rendering for you. Please wait until it is done.

Now you can press Image>Save and save it where ever you want.
The end
Congratulation, you just rendered your very first Stormworks creation!

Hope you found this guide any helpful, if you got questions, found some typos, or got some tips I should include in my guide, please comment it down below or send me a DM on Discord: iogic#7623

Thanks to Lorgs for letting me borrow his super awesome RS 224 Alsvinn boat for this tutorial! https://steamproxy.net/sharedfiles/filedetails/?id=2001191668

And btw, try to learn some Blender. The renders look so much better with simply just adding an HDRI, some lights, and color corrections!


Also, Markers622 did a timelapse video of rendering a creation using my guide, Blender, and Gimp! https://youtu.be/kC9OAUVAXUo
61 Comments
gamesully 30 Aug @ 6:02pm 
is that last photo in the brick rigs brickville map? (might be city i forgot which one has the mountain)?
AE-88 13 Aug @ 6:04am 
Get a version of blender before version 3 since it works and has the components of the guide
AE-88 13 Aug @ 6:04am 
GUYS I FOUND THE SOLUTION
RedRobot 11 Aug @ 9:37am 
Neither. It says traceback error
Order of Glory 3 Aug @ 2:31pm 
I believe the script doesn't work anymore, it doesnt for me atleast.
RedRobot 28 Jul @ 1:26pm 
Nvm. Got the colour working.
RedRobot 28 Jul @ 1:07pm 
The colour isn't working. It all just turns into a metallic colour.
RedRobot 28 Jul @ 12:43pm 
How do I add a background in the blender?
Stormwork's Engineer 14 Apr @ 12:08pm 
i 3D printed my tank using this thx
willzwix1 5 Apr @ 3:11pm 
is there an opposite version of this?
where you import a model or something and it tries to make the colors and the blocks at close as possible to the thing you gave it, for example, a lego boat model
put that model into it and then it stormworks-ifies it so the hull has right shapes, cockpit window is represented best by the thing, and so on


if you know what TinkerCad is, it is like making a model and then pressing the lego block button on the top right, it tries to turn your model into a lego one (With steps, awesomely)