Talisman: Digital Edition

Talisman: Digital Edition

77 ratings
Mathematics of Talisman
By Mustardoish
Talisman is a game of chance, yet players have to make strategic decisions. This guide is intended as a list of mathematical results that may help in the decision-making process and to assign value to resources and skills.
3
2
   
Award
Favorite
Favorited
Unfavorite
The Basics
Almost everything in Talisman happens with the throw of one, two or three dice. It very helpful to get an idea of the ratios of the different outcomes.

A commonly used feature are the sums of dice rolls.


Naturally, the more dice are used, the less likely the extreme outcomes become.

An application of this could be in a situation like this: You are at one life and 6 fields away from the chapel for a complete heal-up. You can choose between a normal roll and using the riding horse. Which one is better? In this case it is the normal roll, as the chance of rolling a 6 is about 16.7%, whereas the chance for a 6 using the sum of two dice is slightly lower, 13.9%.

Another quite common scenario is to use the maximum or the minimum of a two-die roll.


Clearly, the outcomes are now strongly biased.
Movement
Perhaps the most notorious element of Talisman is the movement via dice rolls.
Getting the average speed is straightforward. A normal die has an expectation value of 3.5, so on average one would move 3.5 fields in the direction one wants to move. Having a riding horse does not change that much. It is just the sum of two independent dice, so the speed is 7 fields per move.

The average speed is however only have the truth. Much more common is the situation where one wants to get to a field a certain number of units away. It makes sense to keep moving towards that point with each roll, but unless the roll is exact, one overshoots. So one can potentially need many more throws than the average distance suggests.

I simulated the time it takes to get to a field starting a certain distance away. The means given are the averages of 100,000 runs.
There are eight situations analysed:
1. Normal rolls of D6 dice.
2. Normal roll, but with infinite chance of re-roll (i.e. cloak of feathers). I used the policy that whenever one is more than 6 steps away from the target and the dice roll was 3 or lower, the simulation re-rolled. Within a distance of 6 units, I would re-roll whenever the target was not reached.
3. Using a riding horse. These allow you to roll two dice. As the basic section above suggests, the best strategy is to use the horse when one is more than 6 units away, but then switch to regular dice.
4. Using the pet tortoise: In the menagerie in the city expansion one can acquire a pet tortoise (not a turtle, as it is land based). It allows one to move one step in any direction one wants to move. Naturally the optimum strategy is to use the tortoise when only one step away from the target, but otherwise roll normally.
5. Black Witch walk: Throw two dice and choose one. Here the best strategy is also obvious, choose the die that brings you closer.
6. Magic Carpet/Leprechaun: When you role a 6 you may teleport to your destination.
7. The walking stick: The stick allows you to add a +1 to your dice roll. Here the best strategy is slightly trickier. When you are further out, you would essentially always add a +1 to get faster to your target. If you close to the target but cannot reach it, you should also try to avoid hitting the fields 1 step away from the target. The reason is as follows. If you are one field away, you must roll a 1 exactly to hit the target, so a 1 in 6 chance. You cannot add 1 with the stick to hit the target. If you were 2 fields away, you have a 1 in 3 chance to hit the target, as you could either roll a 2 to get there directly, or roll a 1 and add 1 from the stick.
8. The clockwork owl: A relic that gives you the special power of reaching any point less fields away than your dice throw.

The simulations give the following results:


Clearly, for very long distances the magic carpet is best as you have a chance to move a very long way with the teleport. Similarly the riding horse scales very well (the slope of the line is small ) so it would speed to the general location of the target and then hone in before the other competitors are closing in. However, travelling-distances in talisman are not necessarily that large and finding the precise target can take a frustratingly long time.
The black witch is for small distances the same as the cloak of feathers, and for longer distances beats it even.
It is perhaps a bit surprising that the tortoise is such a strong contender for small to medium distances, <20 fields. This is particularly impressive when considering the cost of the pet (2gp, if lucky) with the trouble one has to go through to get the cloak of feathers or the clockwork owl. It should be taken into account though that the treasures have an advantage of tracking down moving targets, i.e. other characters.
Attack Rolls
When you attack an enemy, each of you throws one die. The dice throws are added to the respective values in either strength or craft. Assuming no fate is to be spend, what are the chances to win when there is a skill difference (including weapon and spell modifiers) between you and your foe?

The effective probabilities become:

Skill Difference
Win Chance (%)
Draw Chance (%)
Loss Chance (%)
-6
0
0
100
-5
0
2.78
97.32
-4
2.78
5.56
91.67
-3
8.34
8.33
83.34
-2
16.67
11.11
72.23
-1
27.78
13.89
58.34
0
41.67
16.67
41.67
+1
58.34
13.89
27.78
+2
72.23
11.11
16.67
+3
83.34
8.33
8.34
+4
91.67
5.56
2.78
+5
97.23
2.78
0
+6
100
0
0

Of course, the table is symmetric with respect to skill difference.

Now in practice, you often have fate available to re-roll *your* result. This shifts the odds in your favour. Given one always tries to win, i.e. re-roll a tie if a win is in principle possible, then the modified table looks like this:

Skill Diff
Win chance (%)
Draw chance (%)
Loss chance (%)
-6
0
0
100
-5
0
5.09
94.91
-4
5.09
7.41
87.5
-3
14.35
9.26
76.39
-2
26.85
10.65
62.5
-1
41.67
11.57
46.76
0
57.87
12.04
30.09
+1
74.54
6.94
18.52
+2
86.11
4.63
9.26
+3
93.52
2.78
3.7
+4
97.69
1.39
0.93
+5
99.54
0.46
0
+6
100
0
0

Clearly, especially around even skills, fate expenditure has a strong effect on shifting the odds.

Some characters, such as the warrior or the dragon rider, are capable of rolling two dice and choosing the maximum. This obviously shifts the odds in their favour.

Skill Diff
Win Chance (%)
Draw Chance (%)
Loss Chance (%)
-6
0
0
100
-5
0
5.09
94.91
-4
5.09
9.26
85.65
-3
14.35
12.5
73.15
-2
26.85
14.81
58.33
-1
41.67
16.20
42.13
0
57.87
16.67
25.46
+1
74.54
11.57
13.89
+2
86.11
7.40
6.48
+3
93.52
4.17
2.3
+4
97.685
1.85
0.46
+5
99.54
0.46
0
+6
100
0
0

And with fate, where it is assumed that the player blindly re-rolls for a win and does not settle for a draw, unless he cannot do better. In certain situations this is not rational behaviour of course.

Skill Diff
Win Chance (%)
Draw Chance (%)
Loss Chance (%)
-6
0
0
100
-5
0
16.67
83.33
-4
7.02
18.60
74.38
-3
18.75
19.83
61.42
-2
33.33
20.52
46.14
-1
49.38
20.83
29.78
0
65.97
20.91
13.11
+1
82.64
4.24
13.11
+2
92.28
2.31
5.4
+3
97.22
1.08
1.70
+4
99.31
0.39
0.31
+5
99.92
0.08
0
+6
100
0
0


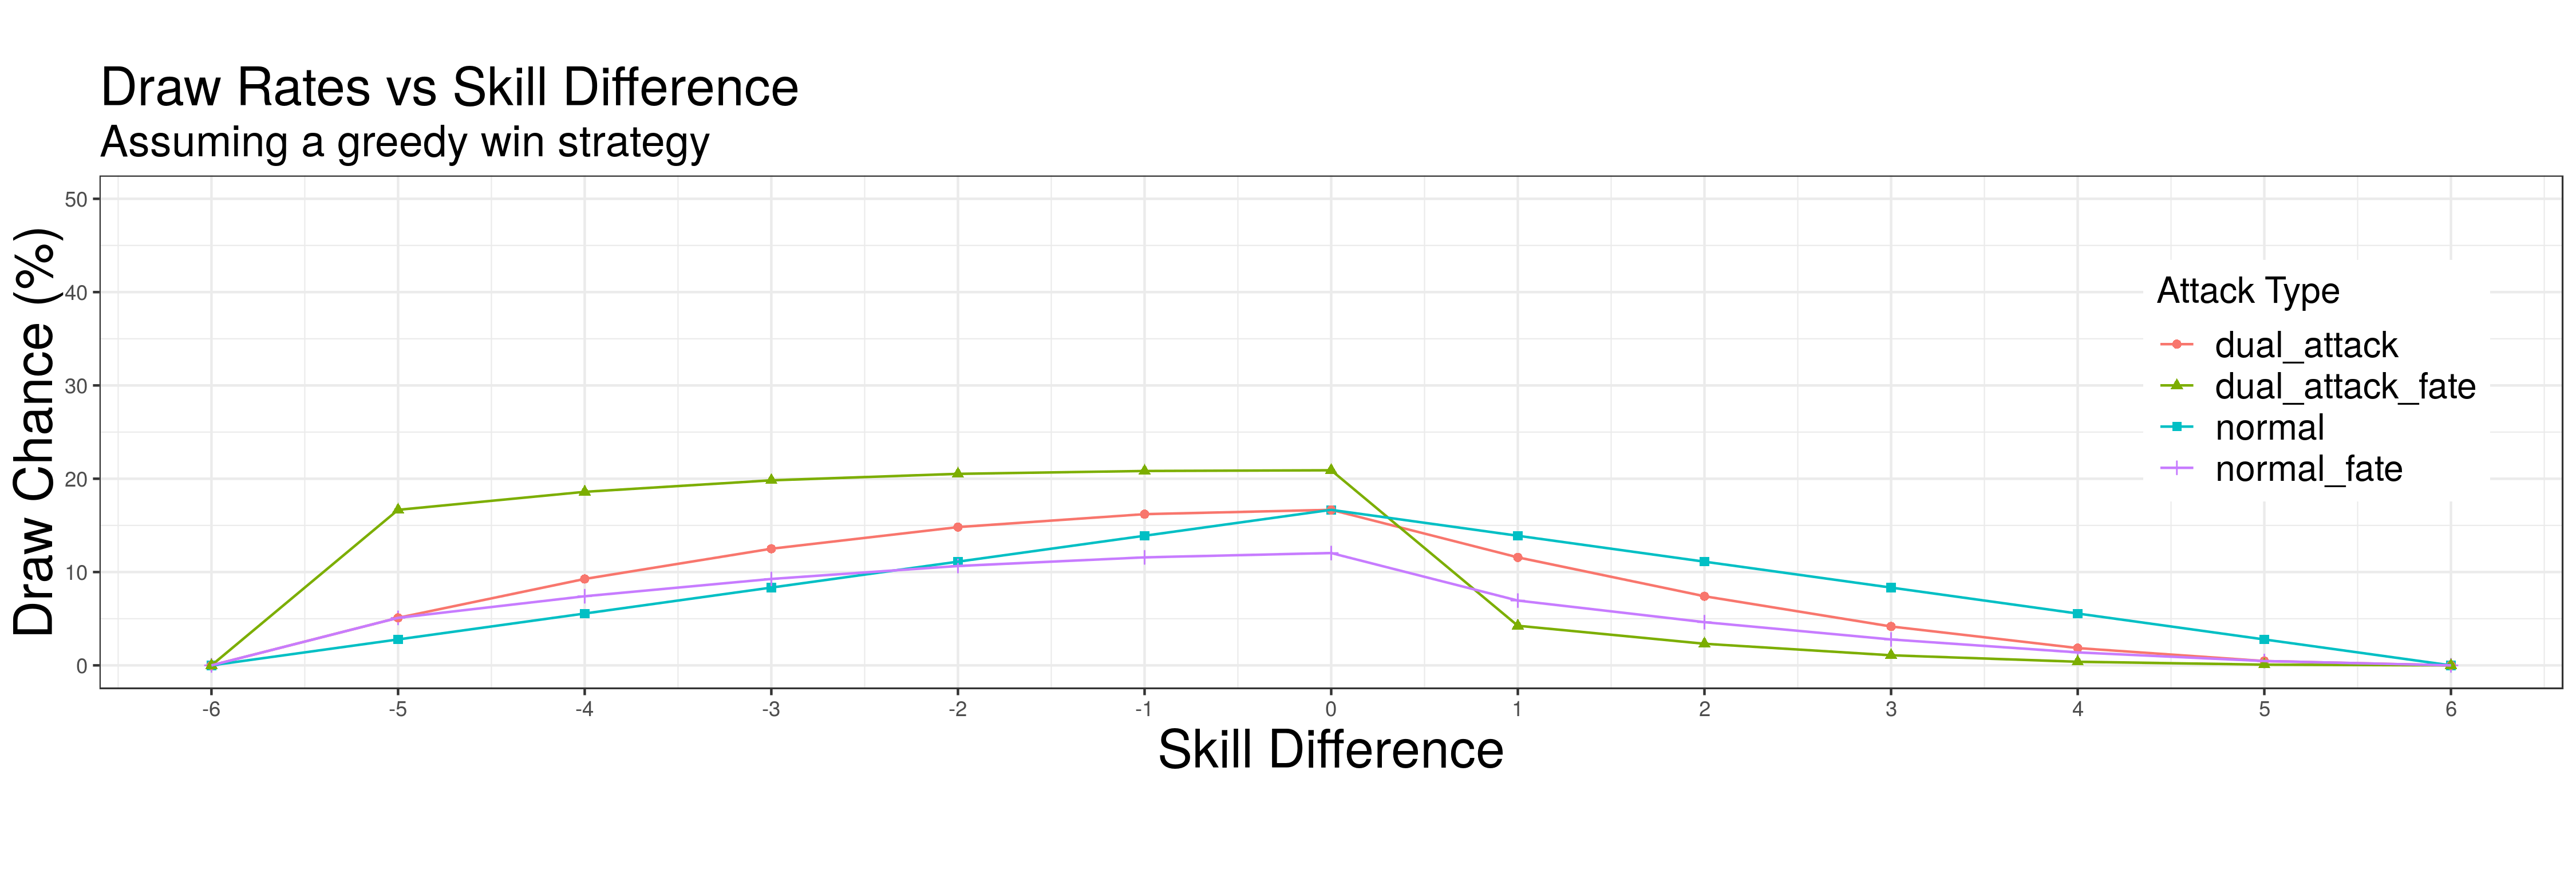
This suggests that dual attacks are about as efficient as having one fate to re-roll at every battle. It is interesting to compare the bounty hunters ability to change draws into wins with the warrior's dual attack. At equal skill differences to the opponent, the bounty hunter is more likely to win, but the warrior is less likely to lose.

A visualisation of the win chance for the given attack types


Bow vs. Axe vs. Flail
In the city expansion, you have the choice of buying weapons. They do have varying mechanics and the choice might not depend on the available money alone.


It is perhaps a bit more insightful to look at plot of the uplift, the difference in percent win chance compared to a standard attack at the same skill difference.


It is fascinating to see that bow and flail, while mechanically almost the same, are quite different. This is due to the special rule that upon throwing a pair of equal dice outcomes, the enemy is prohibited from rolling at all. Since doubles are not that rare, this really boosts the win chance.
It is also easy to see that weak characters can do proportionally better with the flail or bow than with the axe, though they are not mutually exclusive. On the other hand, strong characters that expect to meet mostly enemies lower-skilled than they are, get more value for money from the axe, which can even outperform the flail. This is to be kept in mind when equipping a character to travel into a region of choice and the distribution of enemy skill levels likely to be encountered.
Calculated risks
Given that we know the probabilities of the outcome of a fight, it is still not clear how to pick the fight.
Is it smart to only take fights with a chance of winning of over 50%?

The gambler's answer would be no. Rather than looking just at whether or not one would win, it is necessary to size the opportunity and the risk and weigh them against the odds.
Imagine you have no items, a very large number of lives and the game is still in its early phase. There is little opportunity cost for challenging compared to drawing more cards. The potential loss is small, as the worst outcome is a loss of one life, of which you have many. But the potential benefit of gaining a rare and powerful item might totally outweigh the cost.

The traditional formula for a balanced gamble is (sadly no good formula editor on Steam)

odds of losing = ratio ( potential reward to potential loss)

The odds of losing is the ratio of the probability of losing to the probability of winning. It is generally large when the chance of winning is small. The left hand side can be calculated using the tables above. The results of a stand-off can be neglected, as no one is winning or losing anything (except for opportunity costs, which should be considered). The right hand side is a lot trickier, as the value of things change depending on context. A naive rule of thumb could be that a life is worth 1gp, as you can heal for one gp. However, if you only have one life, the value is much higher, possibly infinite if you have no rebirth options. Also, the distance to the next healing option should be taken into account, as a longer distance means more opportunity to lose the remaining lives. So perhaps an agreeable rule of thumb for a life could be two gp. The value of items is also tricky, as it depends on the character wielding it. A spell book for a low Cr character has little value, but it can be tremendously powerful for a skilled character. The same is true for trophies and their value.
Having estimates of the numbers, one can say that if the right-hand-side is larger than the left hand-side, it is of positive value to attack. Otherwise it is a statistically bad decision to do so.

A sample calculation could look like this:
You are a wizard at Cr 5 and you have the opportunity to encounter a ghoul with an enhanced craft of six. You can force the psychic combat onto him.
You have four lives and no items, the ghoul has also four lives and a flail. You know that if you attack him and win, you would choose the flail, as it complements the weak physical stats of a wizard. What is the value of a flail? You can buy one for 5gp, so it is at least that. Given your situation, you might be willing to pay even more gold when offered. For your life you can choose a proxy value of 2gp.
So the right-hand-side of the equation is 5/2=2.5 .
From the table you get that the ratio of losing to winning is (ignoring fate) 58.34/27.78 approx 2.1.
In this case it is beneficial for the wizard to attack the ghoul, even if his chance of winning is less than 30%. The upside of gaining a flail outweighs the downside of having three instead of four lives.

Similar calculations can be used in all kinds of situations. Consider as objectively as possible, what potential loss of value you can inflict on another character. For a character with 30gp, losing 1 might not be that hurtful, but it might be for a poor character. The same goes for taking a competitors life, it can range from mildly inconveniencing them to being a death blow.
Deck Statistics
Not all board regions are created equally. With the expansions the choice of which region of the board is farmed is important. To compare the decks I counted the cards. For the base deck I did NOT take into account that the corner regions add a few cards to the base deck. The precise number of added cards depend on the number of corners being used. I also did not take any expansion into account that changes only the number of cards in the base deck. The base deck described here is purely the deck from the original game.

A word of warning. As the game progresses and cards are placed on the board or discarded, all the percentages change. For really strong optimisation it is helpful to count the cards and adjust the probabilities. Also, I counted the cards by hand from the collection screen. Chances are good that mistakes have been made :-)

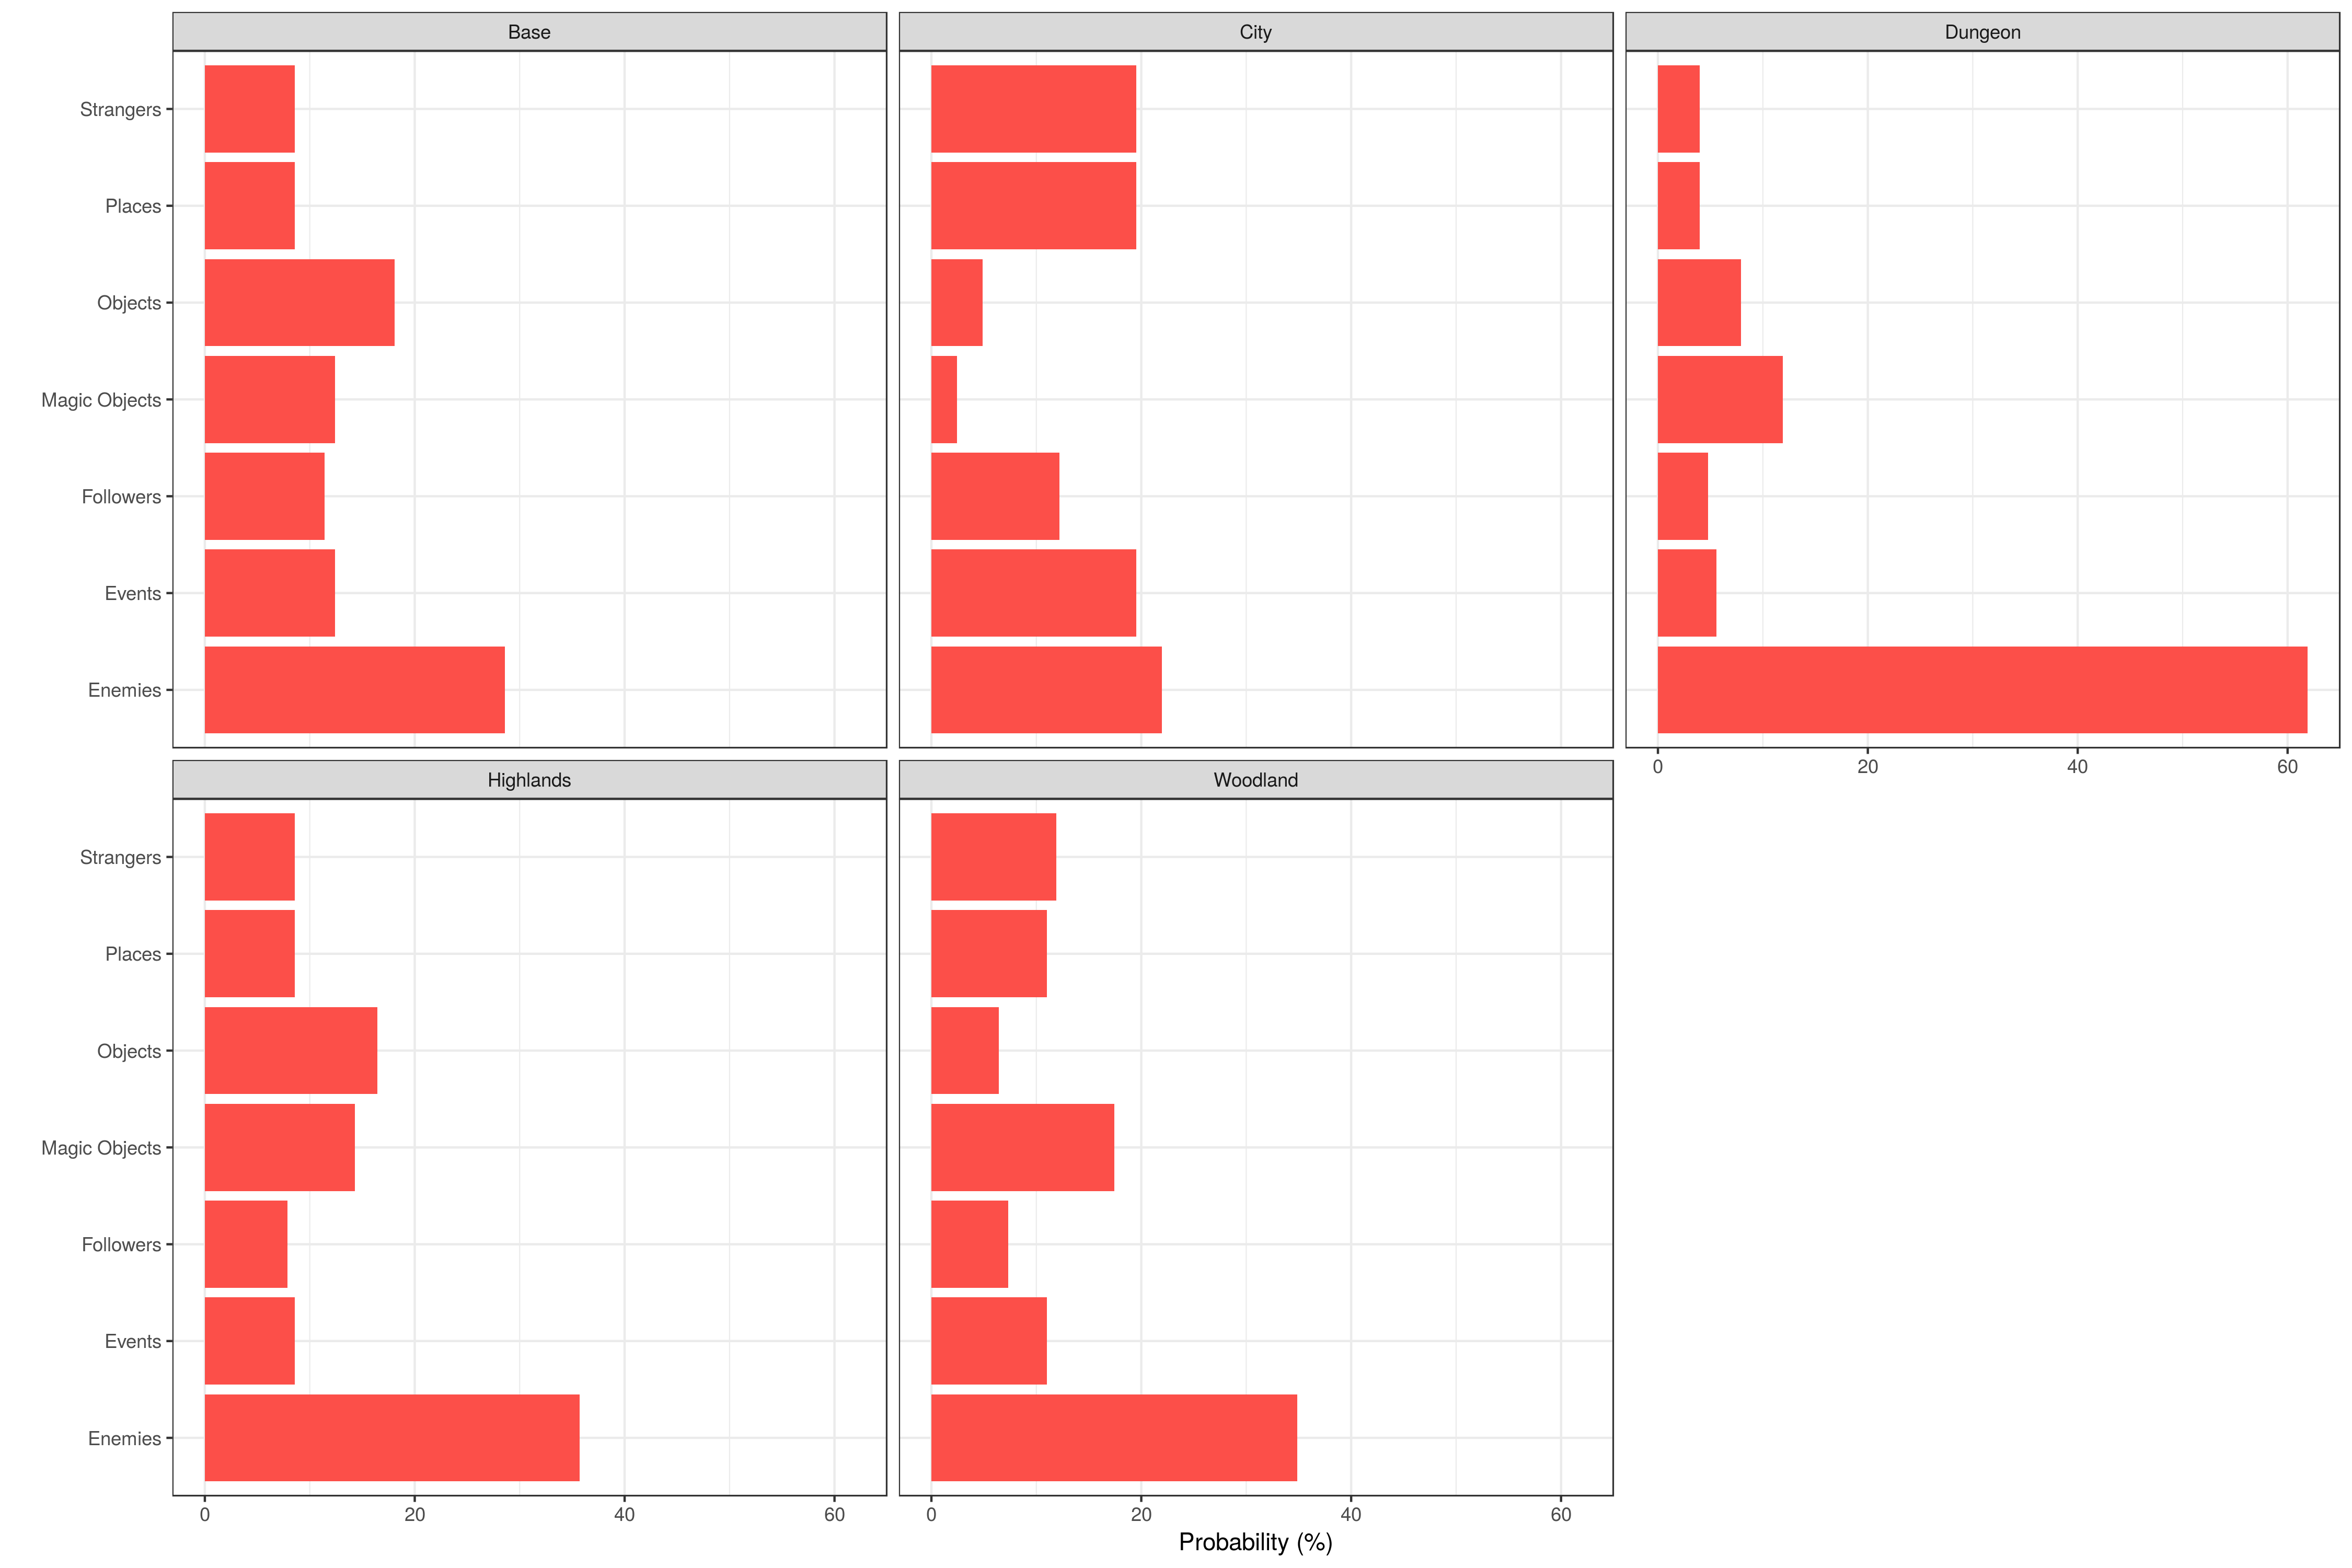
By looking at the distribution of basic cards, it is obvious that the decks are fundamentally different.


Most interesting is that the city has the lowest chance of enemy encounters, whereas the dungeon has the highest. The enemy encounter chance is an important number and we will use it later again.

Not only are the overall numbers of enemies different, also their distribution according to the enemy types varies between the decks. The probabilities are the ABSOLUTE probabilities of encountering an enemy of the type, i.e. the number takes into account that there are more or less enemies in certain regions. The plot suggests that there is about a 27% chance of drawing a monster when taking ANY card from the dungeon deck.


This can be quite handy. When you get a quest to hunt a dragon, it is not immediately obvious that the highlands are by default the best place to go to. Also note that the different enemy categories have very different propensities (and later we also see that their strengths vary in between the groups). So if you can choose between several wanted posters, a payout is a lot more likely for a spirit poster than say for example a cultist one, provided one leaves the city.

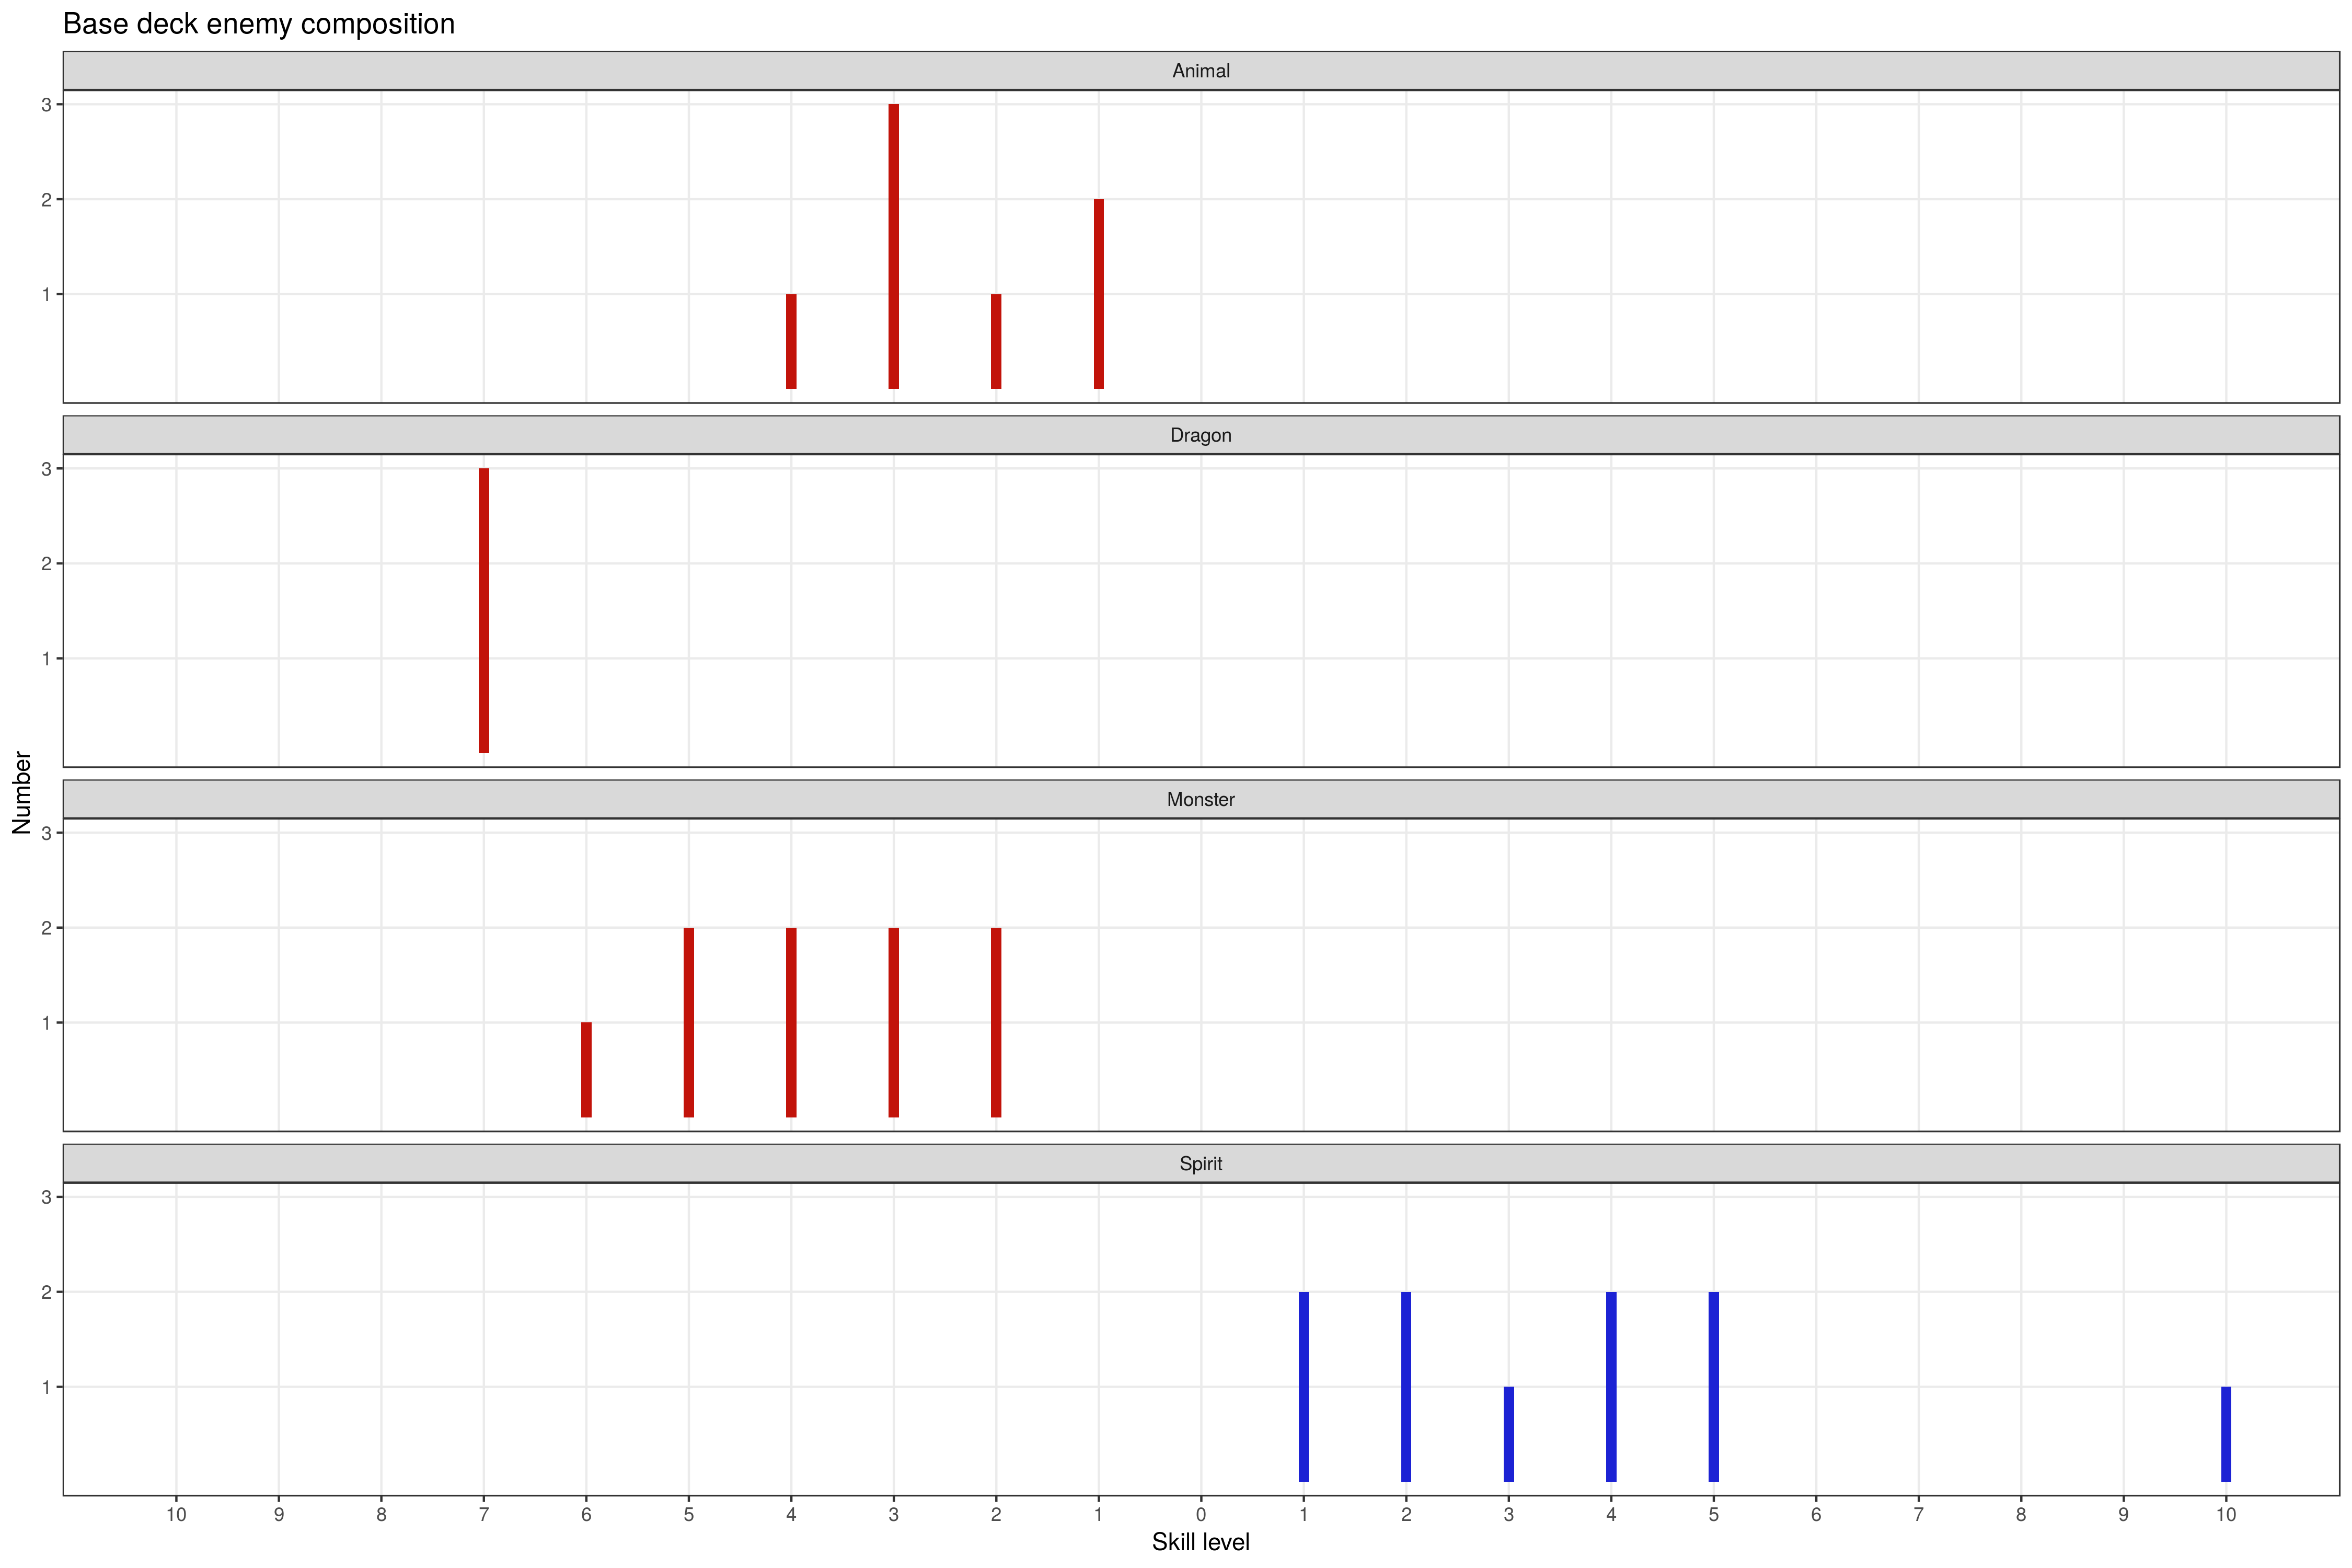
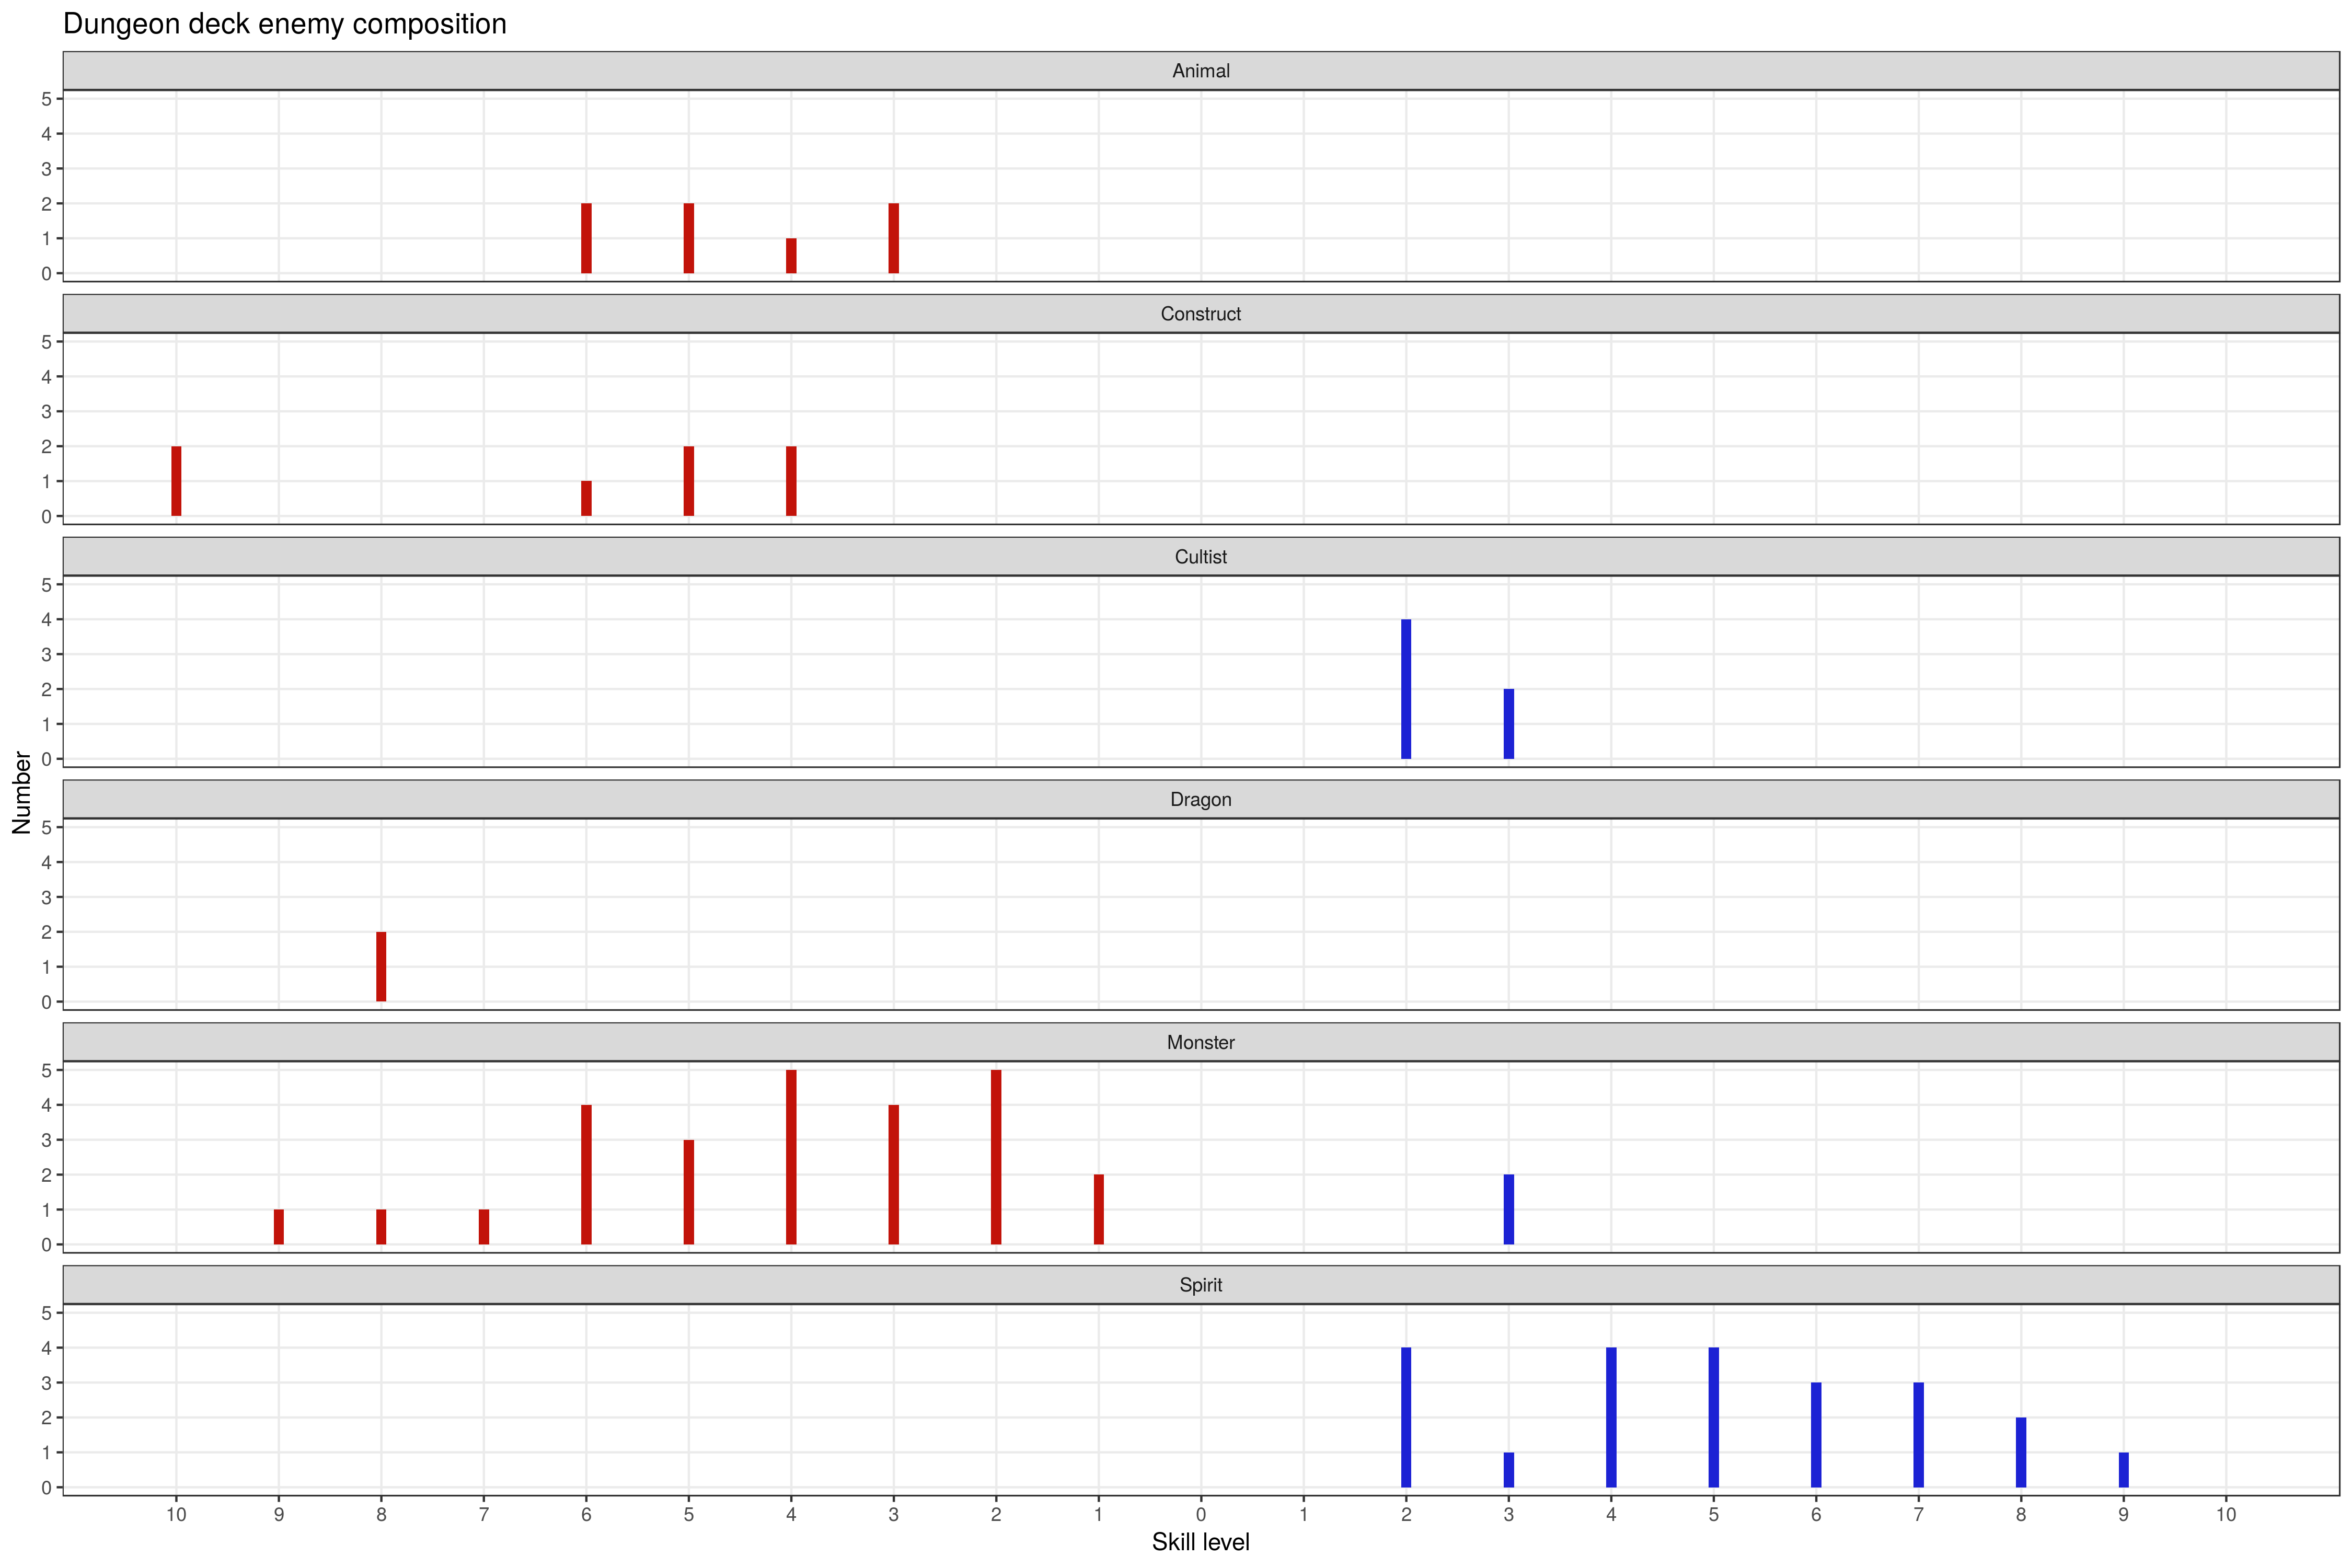
Lastly we can look at the different strength distributions of enemies in the different regions. For this visualisation I removed the enemies with unclear skill assignment, as well as those that have both strength and craft as skill. Naturally, some of the enemies have special skills that are completely hidden in the plots.


It becomes clear that there are generally more strength based enemies than craft based ones. This implies that strength is easier to level via combat than craft. Generally one can say that monsters are on average higher-levelled than animals. This is also useful to know when picking reward posters. As the reward is proportional to the strength of the enemy, it makes sense for a higher level character to pick a monster poster over an animal poster, provided he needs the money. The dungeon seems to be on average the hardest region when it comes to enemies alone, as their strengths are more broadly distributed, making it more likely to run into high level enemies.
Experience Gains
Experience gains are hard to quantify. There are quite a few cards that can give extra stats and weapons behave like stats upgrade.
A massive simplification is to assume that all experience gains come from fighting and trading-in the trophies . Thus the average number of strength or craft trophy points per turn played are a metric to give a very simplified view of how different regions perform. We completely neglect the effects of spells and fate to change outcomes.
The formula for the average trophy gain is

gain = Sum over creatures[]

It is important that the encounter chance not only takes into account the relative chance of fighting say a level 2 str-based creature vs a level 3 str-based creature, but also the absolute chance of encountering an enemy creature in the first place. We saw for example previously that the city has a low percentage of creatures in its deck, so we would naturally expect lower gain rates.
We can define a gain rate for each type of trophy, strength and craft.
Another metric to take into account is the life loss rate, which is calculated similarly, however with the loss chance instead of the win chance. Typically only one life is lost, so the multiplier is minus 1.

life_loss = Sum over creatures[]

When we calculate these values for each str/cr pair, we neglect that some creatures have alternative rules of engagement and that the losses are generally more complicated than just losing one life. We also neglect creatures with strength and craft trophies, as well as those that have no fixed skill set.

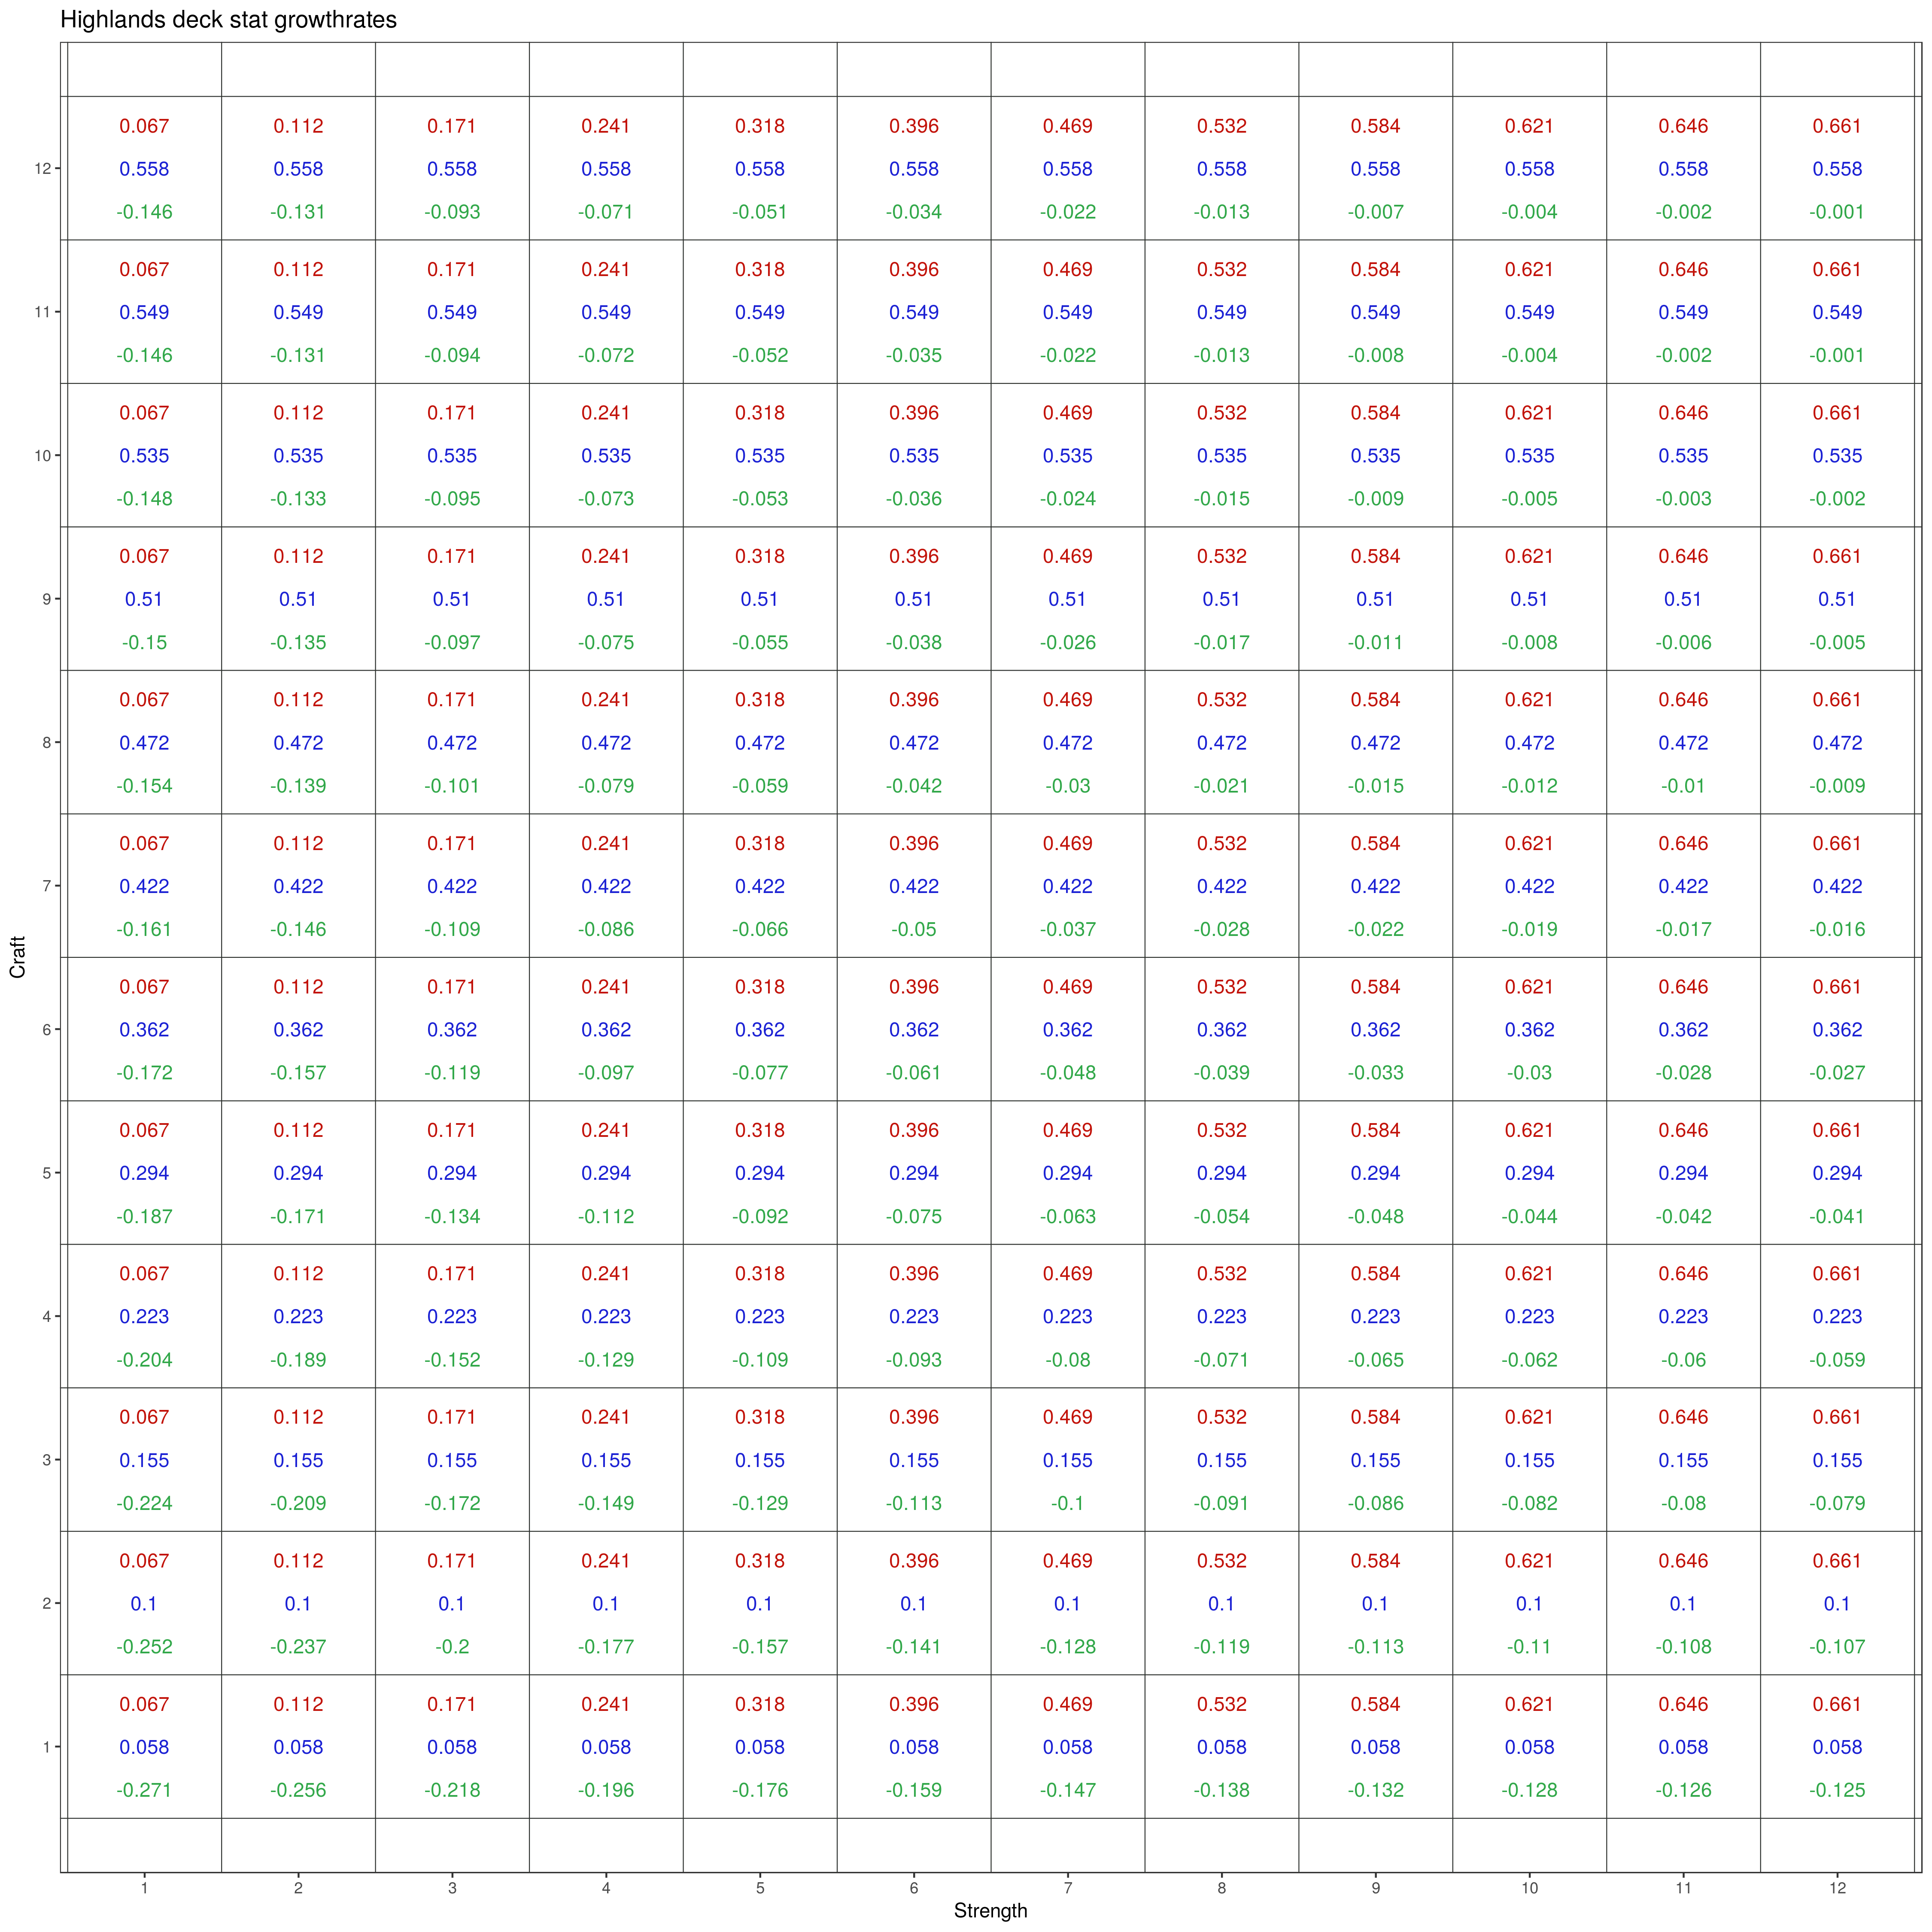
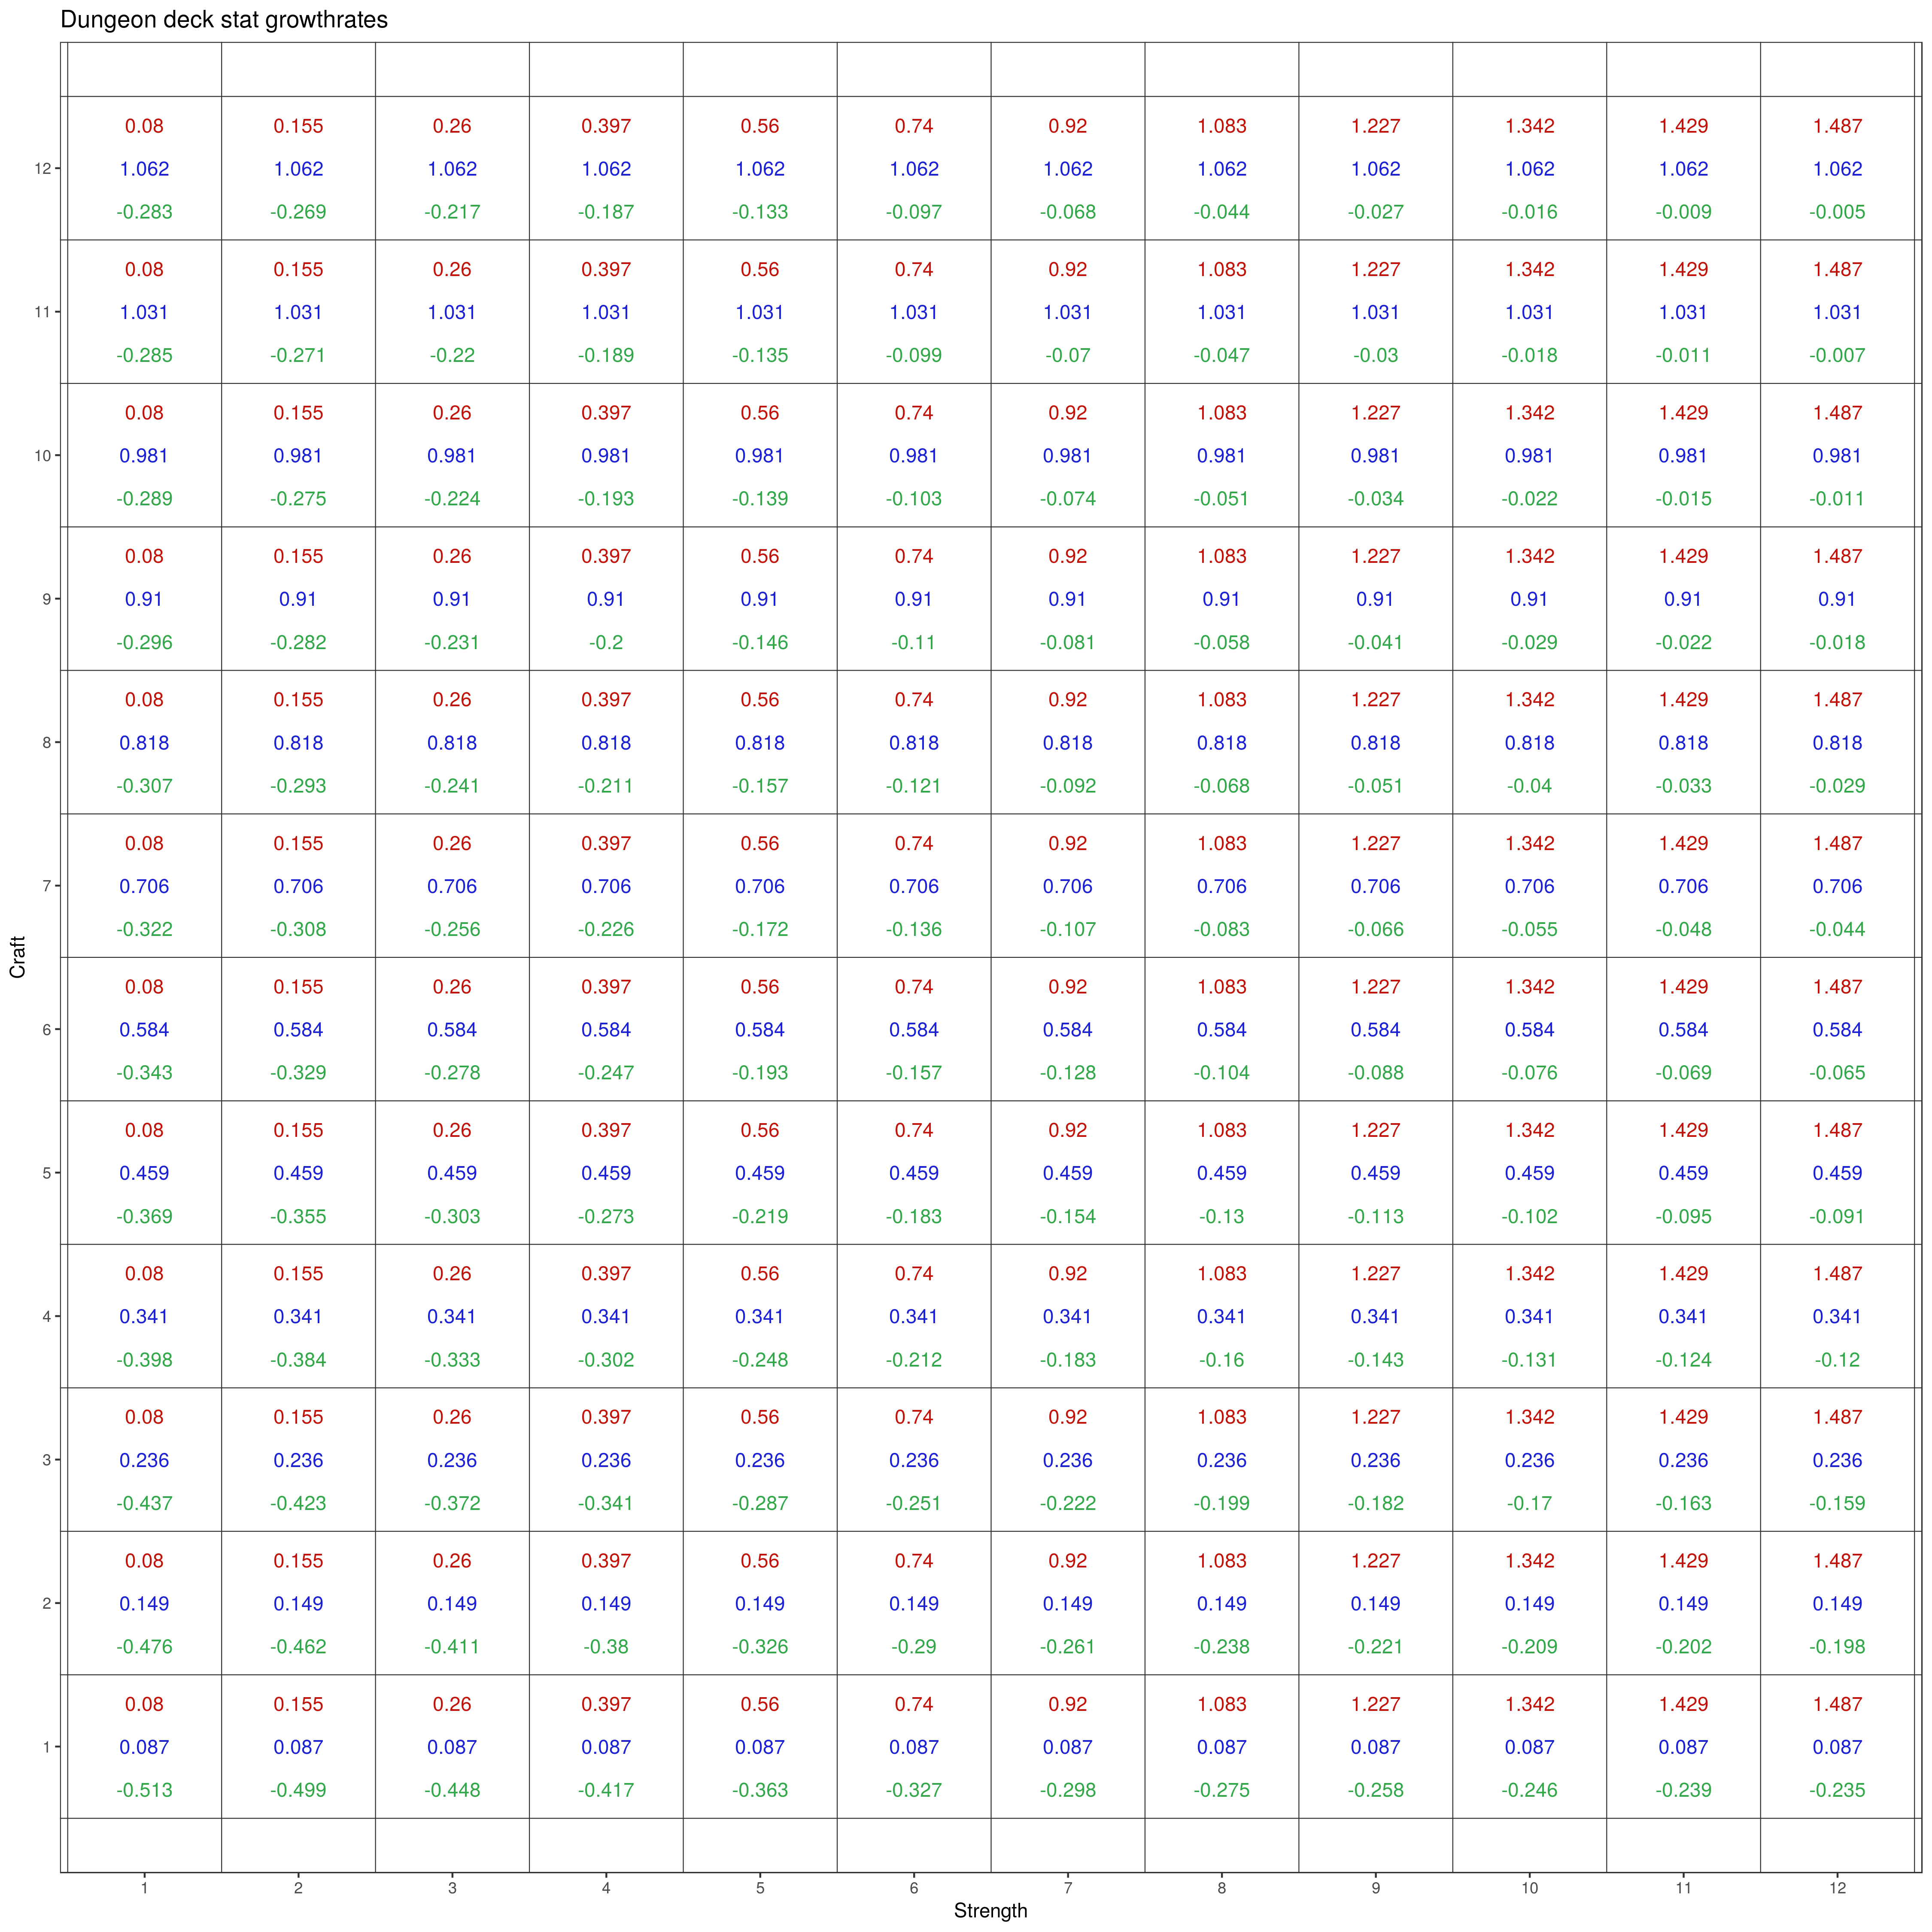
Calculating the averages over the decks gives the following plots. Each field is a combination of strength and craft. The red upper number is the average number of strength trophy points one is expected to get if one relies on the base probabilities of winning and losing. The middle number is the same for craft and the green lower number is the average loss of life.


It is not a big surprise that the dungeon has the highest growth rates, as it has such a high encounter chance. However, the life loss rates are also higher.

A convenient way to compare regions is to normalise the gains by the life loss rate. This number essentially tells you how many trophy points are traded on average per life point just by roaming and fighting monsters in the simplest fashion.

adjusted_rate = (trophy gain rate) / |life loss rate|

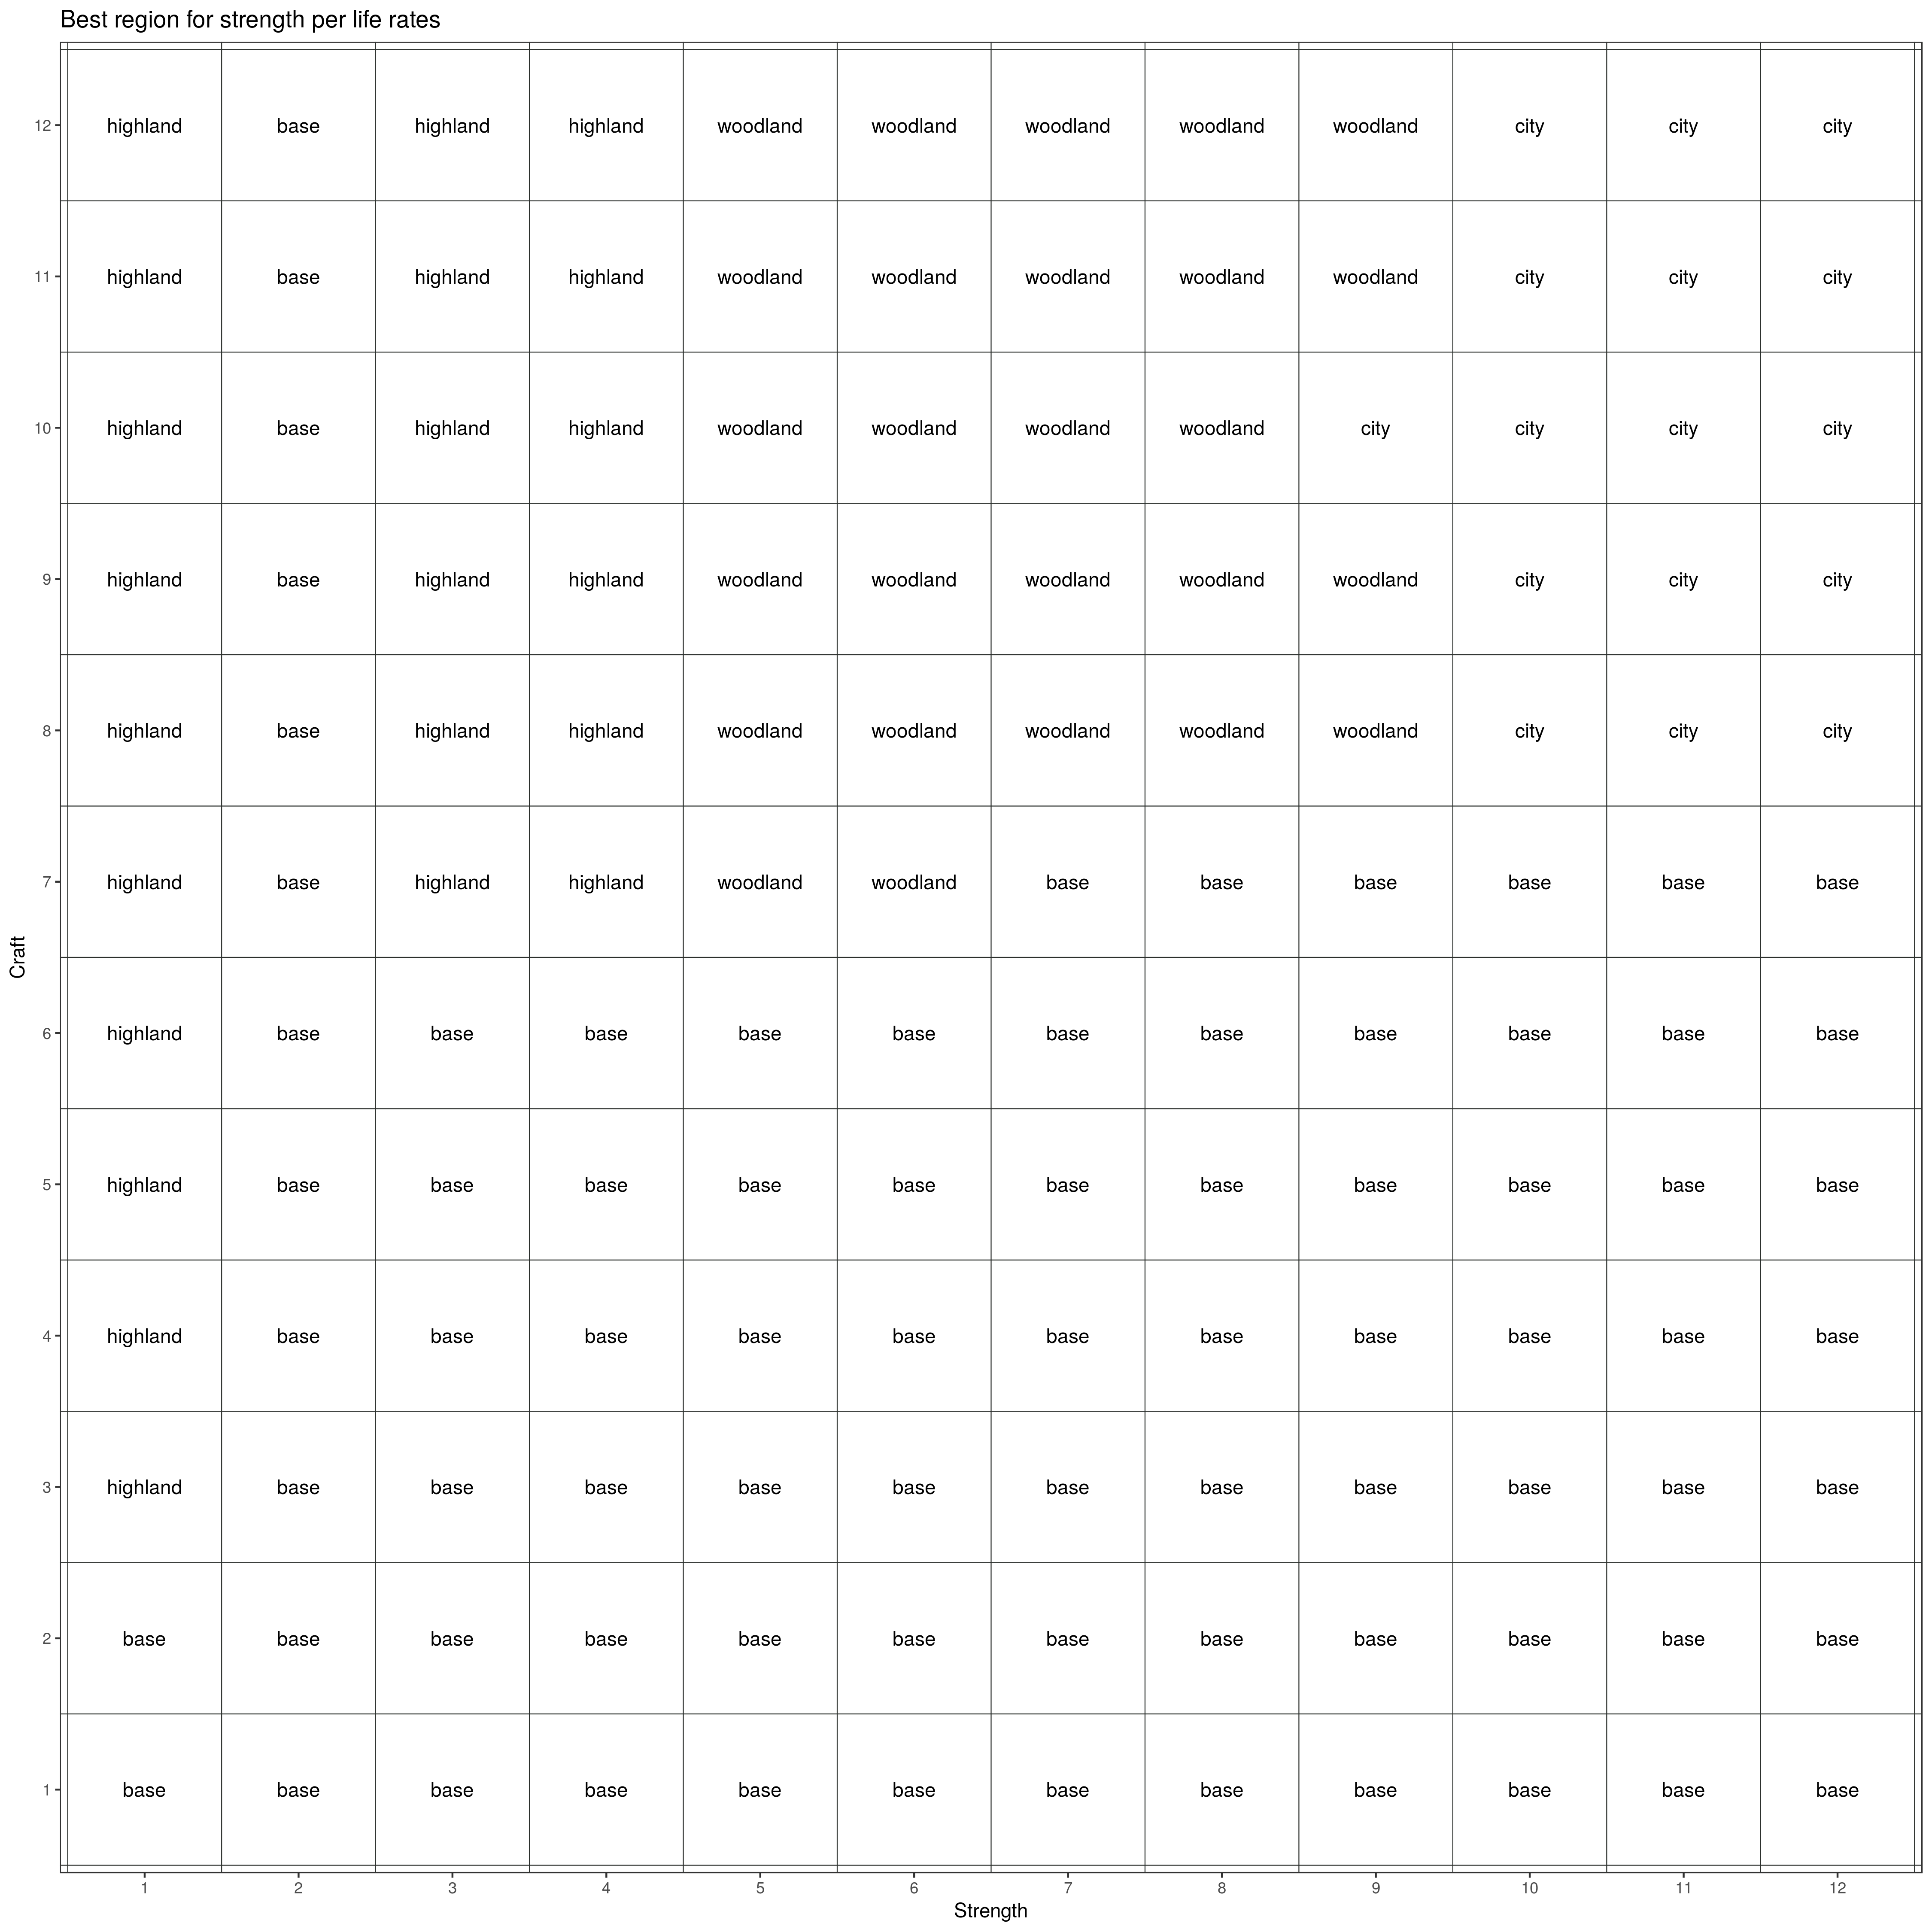
We can calculate the best region for the life adjusted strength and craft gain rates.


We see that the best choices under these simplified assumptions are identical for the the trophies. That is because the adjusted gain rate depends mostly on the overall encounter chance and the life loss rate, which combines life losses of strength and craft based fights.
Perhaps surprisingly, for high levels of strength and craft the city is the best place to go. This is because the life loss rate in combat is zero and one can farm trophies hypothetically indefinitely. This shows that these results should not be overestimated. However, it gives us a good idea of which regions are more useful. For low skill levels the base board seems good, whereas a bit of craft allows to make good use of the highlands (this can be seen as an indication that it might be good for strong strength characters to get a little craft to explore more efficiently). At medium ranges the woodlands are good. In this simplified view, the dungeon is practically always the least efficient way of trading lives for stat points, simply because it is so dangerous. As established earlier, it is sometimes in the gamblers best interest to trade a little risk for return.


In practice one can adjust the table a little to account for changing circumstances. If a character has spare fate, one can assume he has an effective craft and strength that is higher by one point. Similarly weapons may affect it as well and one has to guess the effective stats. This however completely neglects other board goals like fighting the eagle king or gaining destinies.

The basic tables, with all their simplifications, are perhaps not very useful in direct game play, but they can serve as a benchmark to compare it to other ways or strategies of levelling and the respective time investments.
Portal of Power
In order to progress to the inner region, you have to pass the portal of power. Here you choose one skill, strength or craft. Next you role two dice and are allowed to pass if the sum of the two dice is equal or less than your skill. If you fail, you not only do not pass, but also the relevant skill is reduced by 1.

There are in principle four different probabilities. The first is to make it through the gate on the first try. The second is to make it through the gate on the first try using fate to re-roll the larger of the two outcomes. The third is the chance of making it through the gate when one takes into account retries with the reduced skill. For example, a warrior uses a skill of 8 and fails with a chance of 27.78 chance. Then he can try again with a skill of 7 and failure chance of 41.67 %. For simplicity it was assumed that the skill is not capped at the bottom and can be reduced to 1, which has negative outcome with certainty. The last probability is the chance for succeeding with retries given a large pool of fate, so that even if the initial roll with fate was unsuccessful, subsequent roles can be fate augmented.

The resulting table of probabilities is this

Skill
Base (%)
Retry (%)
Fate (%)
Fate Retry (%)
1
0
0
0
0
2
2.78
2.78
7.41
7.41
3
8.33
10.88
19.9
25.84
4
16.67
25.733
35.65
52.277
5
27.78
46.363
52.31
77.24
6
41.66
68.71
68.05
92.73
7
58.33
86.96
80.55
98.586
8
72.22
96.38
89.35
99.84
9
83.33
99.396
94.907
99.992
10
91.667
99.95
98.148
99.99986
11
97.22
99.999
99.537
99.9999993
12
100
100
100
100

From the above table one can get a feeling of how much change in chance of success it is to add one more skill point. Here are the probability differences for the first tries only

Skill
Diff to next higher level (%)
Diff to next level wt. Fate (%)
1
2.78
7.41
2
5.556
12.5
3
8.33
15.74
4
11.11
16.67
5
13.89
15.74
6
16.66
12.5
7
13.89
8.80
8
11.11
5.55
9
8.33
3.24
10
5.56
1.39
11
2.78
0.46
12
0
0

Naturally there is a point of diminishing returns. For a determined player with skill level 6 but without fate, it could be very well advantageous to wait to gain that 7th skill point. On the other hand, if fate was available, an attempt at 5 or 6 to cross the gate might not be unreasonable.

The dwarf has only to roll one die. His results with fate and on first try are

Skill (Dwarf)
Chance with Fate (%)
1
30.6
2
55.6
3
75
4
88.9
5
97.2
6
100
Mines/Crypt
In the mines or the crypt you roll 3 dice and subtract either strength or craft. If that number is smaller or equal to 0, you have passed the test and may continue.

The chances for the skill levels are:

Skill
No Fate (%)
Fate (%)
Dward (%)
Dwarf Fate (%)
1
0
0
0
0
2
0
0
2.77
7.4
3
0.46
1.62
8.33
19.91
4
1.85
5.79
16.67
35.65
5
4.63
13.04
27.78
52.31
6
9.26
23.15
41.67
68.055
7
16.20
35.49
58.33
80.555
8
25.93
48.76
72.22
89.35
9
37.5
61.65
83.33
94.91
10
50
73.08
91.67
98.15
11
62.5
82.48
97.22
99.54
12
74.07
89.51
100
100
13
83.80
94.29
100
100
14
90.74
97.22
100
100
15
95.37
98.84
100
100
16
98.15
99.61
100
100
17
99.54
99.92
100
100
18
100
100
100
100

Clearly, it is harder to pass these tests than the portal of power, though failure is less punishing.
Temples
In the base game there is one temple where you roll two dice and get punished or rewarded depending on the outcome.
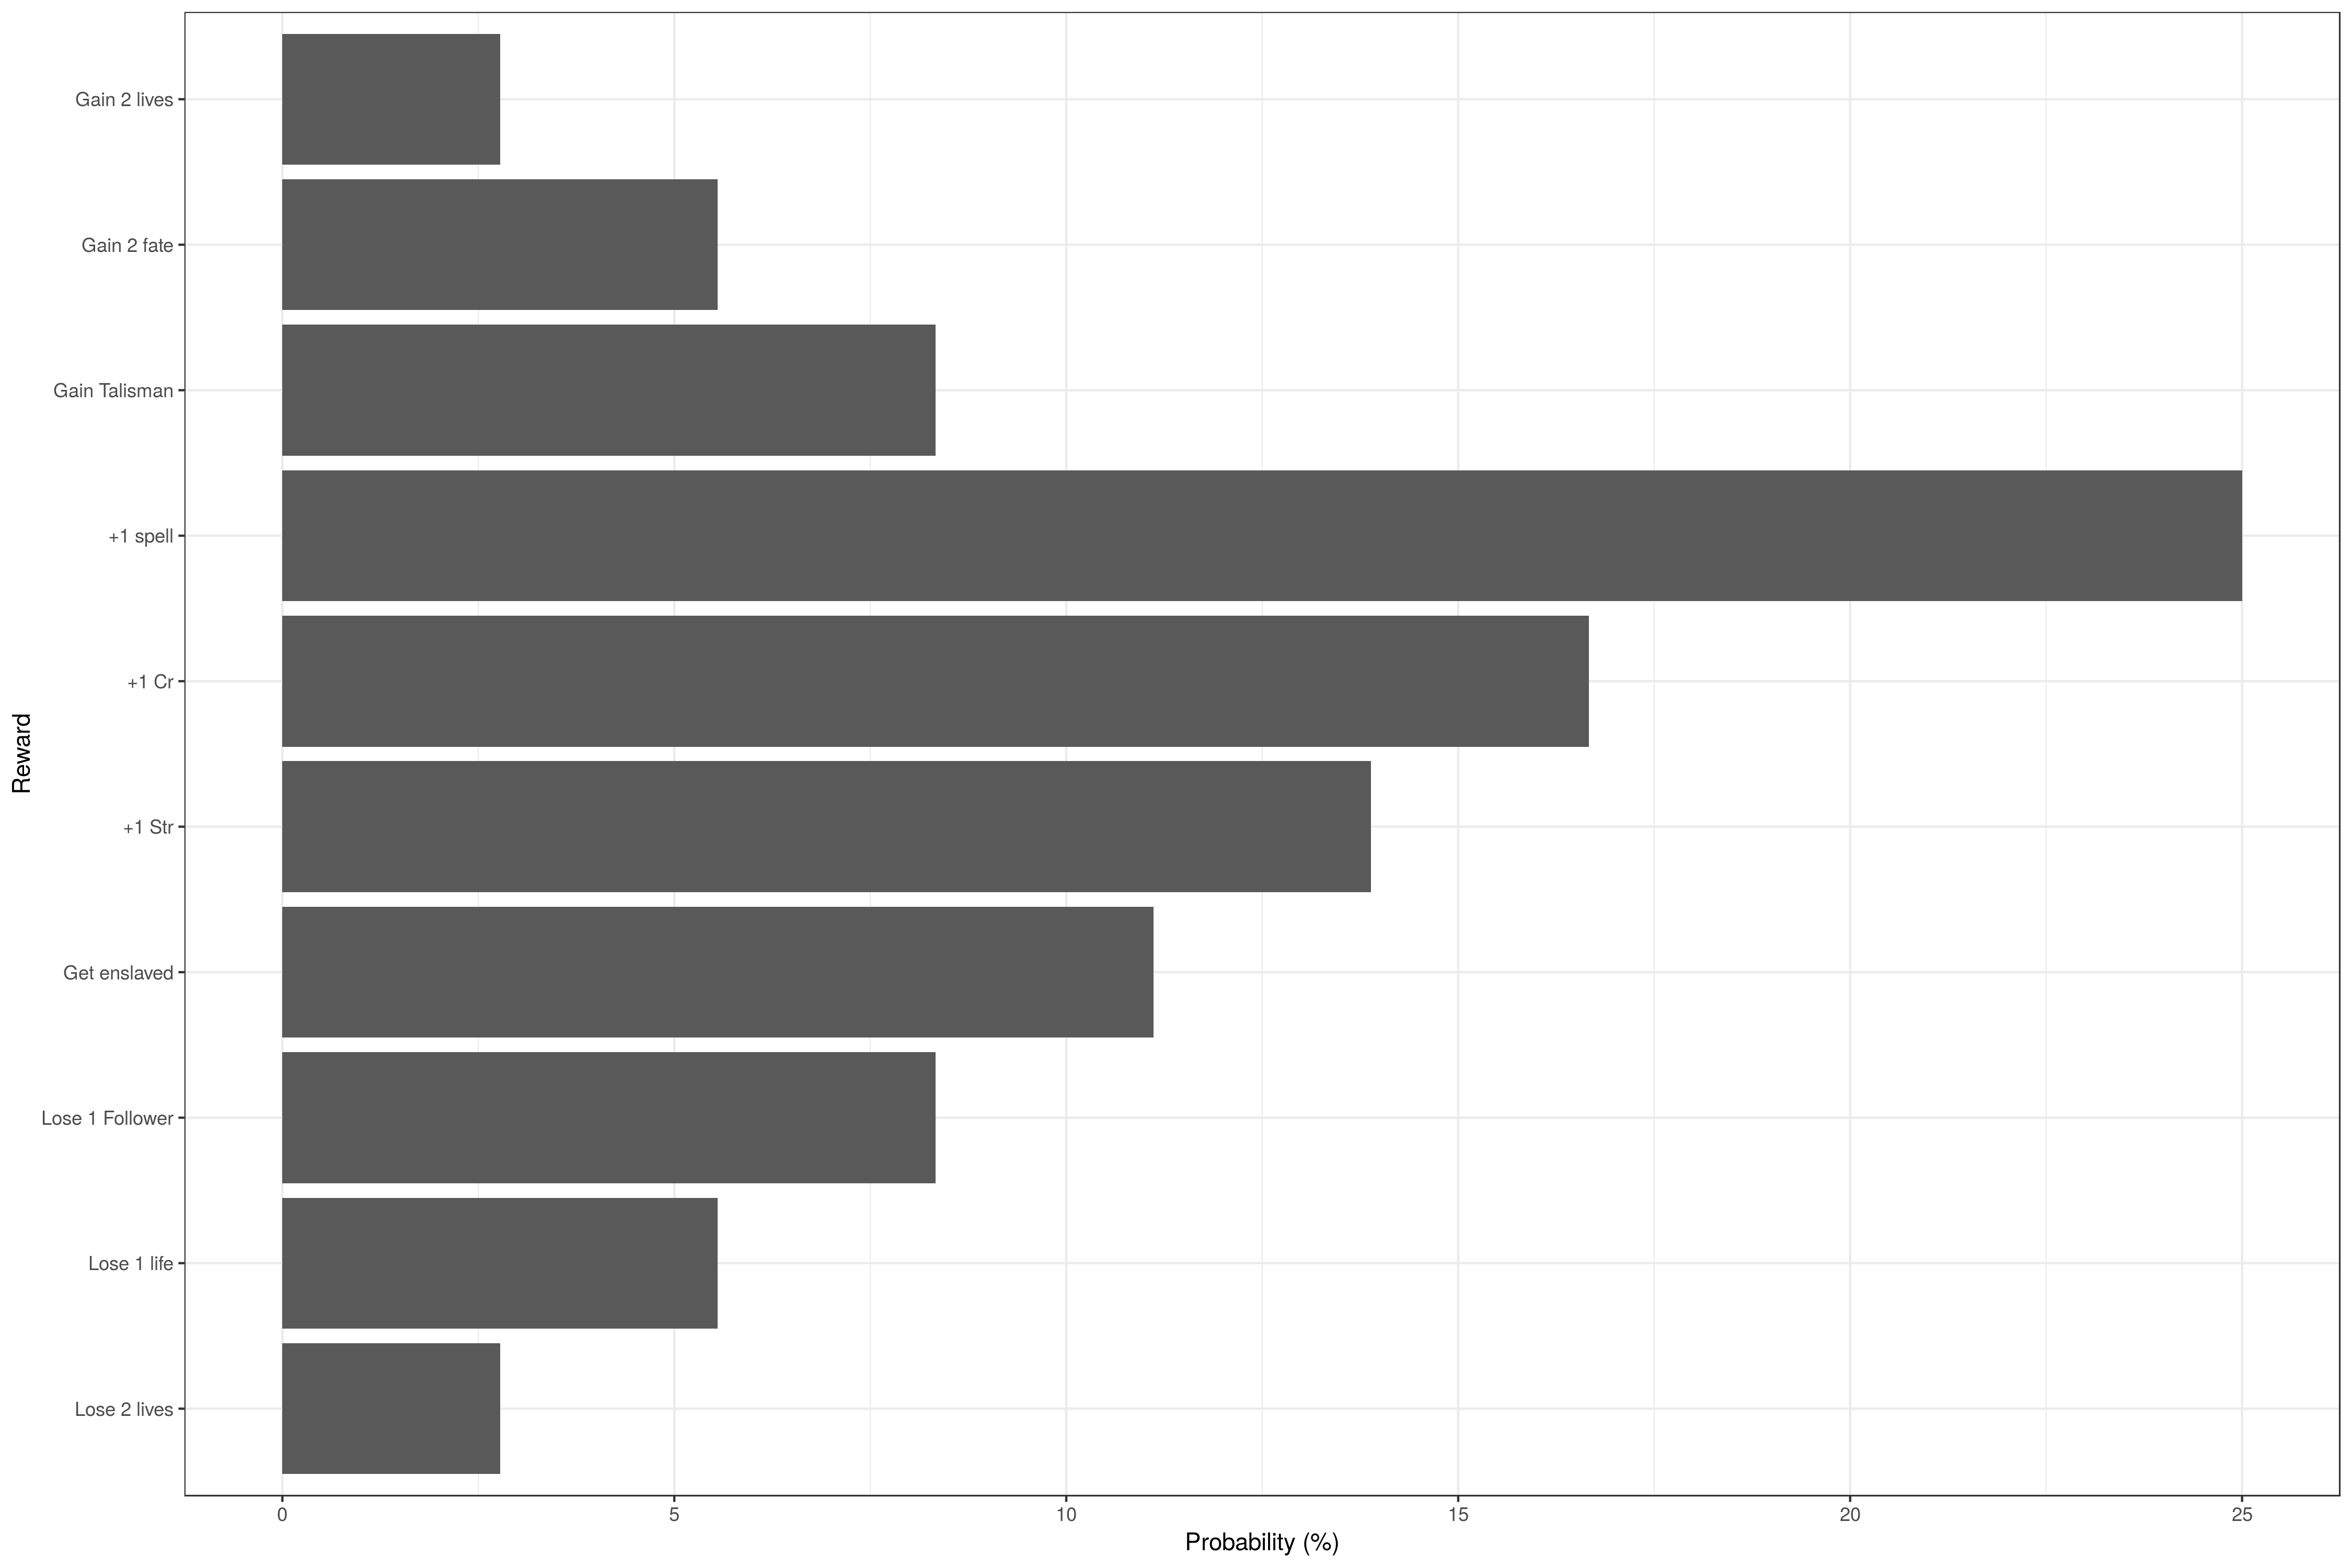
The outcome distribution without modifiers looks like this


Clearly, the temple is better for characters that want to improve their magical abilities, rather than their physical prowess.

There is a second temple available in the city expansion, which is called the High Temple. It works a little different, you pay up to three gold and for each piece you may roll one more die.

The outcomes are distributed as follows


When you pay three gold, there is about a fifty percent chance of having at least one of your stats improved. The negative reward, 'Lose all your gold' is quite tame compared to the standard temple, especially since you are unlikely to have much gold left to lose after praying anyways.
32 Comments
Mustardoish  [author] 9 Feb, 2023 @ 1:02pm 
Thats sounds fascinating. Try to record it and publish somewhere, that would be truly astonishing :-D
Daniel Oldback 9 Feb, 2023 @ 1:00pm 
I mean in the mean dice can fall on any side with the same chances. But from my game experience, during reroll, dice have something like 60% chance to fall on the same side. And the most odd thing that in the actual board game this chance still the same.
Mustardoish  [author] 9 Feb, 2023 @ 12:36pm 
@Daniel Oldback
Then, I'm afraid, I am not getting your point.
Daniel Oldback 9 Feb, 2023 @ 10:21am 
Actually, it is not a problem of digital edition of talisman, because it appears in the board game too
Mustardoish  [author] 9 Feb, 2023 @ 6:32am 
@Danield Oldback
Not sure that is true. While yes, there is seeding, any halfway decent seed has such high periodicities that you can treat it as practically random. Any claims that this is violated in this game will have to be proven
Daniel Oldback 8 Feb, 2023 @ 8:11pm 
You can count on math as much as you want, but you will get the same roll on re-roll anyway.
Mustardoish  [author] 27 Oct, 2022 @ 10:58am 
Finally found the image for the movement speeds again!
Mustardoish  [author] 25 Jul, 2022 @ 11:12am 
@Haunted Thanks, just keep in mind that these are very imperfect approximations, as all special fields etc are ignored
Vibes 24 Jul, 2022 @ 1:36am 
The whole where to find specific monsters and the best places to level in regards to losing health is SO GOOD. I always wondered if highlands or woodlands were better for leveling after gaining some stats in the outer region!!!
qoku 24 Jan, 2022 @ 12:23pm 
thank you very much