FTL: Faster Than Light

FTL: Faster Than Light

853 ratings
The *Advanced* FTL Captain's Handbook
By Dr Whom
So, you want to be a space hero?

If anyone remembers the Wing Commander manual - The 'Tigers' Claw' this is my attempt to provide one for FTL.


A guide in the form of a military magazine. Featuring artwork from the community, hints and tips on gameplay and some lore I made up. I have clocked over 400 hours of game-time on FTL and my chances for victory are much better now thanks to my experience. I have heard many negative comments about FTL being a game ruled purely by chance. I disagree strongly with this attitude and so i have decided to share my experience with those that may need it.

For those who are interested I have taken the time to record every jump from a random normal game with my favourite ship, the Kestrel B. I've often wondered how a game of FTL would look as a sci-fi story so here's my attempt. If you have negative or non constructive comments I urge you to keep them to yourself - I didn't FORCE you to read it after all.

I repeat that none of the artwork is mine and if any of the artists wish it, message me i will remove the pictures immediately.

UPDATED!!!!
11
6
17
2
6
2
3
3
   
Award
Favorite
Favorited
Unfavorite
Starting Out
Congratulations on your first command!

You've made it this far on determination, guile and courage - but this is just the start of the true challenges you will face as a Federation captain.

It is now your privilege to choose a worthy vessel. Some of you will have a limited choice, others will have a fleet to choose from, but we will assume that, like most captains, that you will start with the humble Kestrel cruiser. Take a good, long look at her.

Beautiful, isn't she? Take some time to name her and her crew - make a bond, they aren't just pawns, they need your care if you are to survive.

Take a look at her systems, notice the fearsome Burst Laser MKII and the fast, reliable Artemis missile.

The Kestrel only starts with the basic systems, but she can end up with everything from a teleporter to a cloak. With no immediate weaknesses from either systems nor crew, the Kestrel class cruiser makes an excellent addition to the Federation fleet and an ideal first command.

Now that you are familiar with the strengths and weaknesses of your ship and crew, you are left with the tricky task of assigning roles. Because crewmates get more skilled at their jobs the longer they do them, it's best to keep them glued to their original posts for the majority of the mission. Choose a crewmember to act as a pilot, weapons co-ordinator and engineer. Don't worry about your shield systems, they can work just fine on automatic until you hire more crew.

Now set that button to "normal" - the time for simulations is over, captain!
That First Sector
The whole of sector one stretches out before you - all those beacons - so little time! As you are now aware, your secret mission has the rebels hot on your tail - but you need to explore as much space as you can before getting to the exit beacon. This region is uncharted so this handbook can only help you so much here. Plan your route carefully or they will catch you, and the rebels' fleet will always make you regret an encounter!
Note the position of the exit beacon here - this captain will have no choice but to go toe-to-toe with an elite rebel cruiser! To avoid this situation, keep an eye on the rebel fleet as it advances. At the start of each sector you will have at least a couple of jumps before they even get within sensor range, so use those jumps to explore the left-most beacons first, you will never get another chance! Before you even make your first jump, it is advantageous to have planned the next three or four jumps.


If you ever want to find a shop, try to jump to beacons with many connected nodes, to maximise your chances of finding one.

Remember, the exit beacon may be as close as the middle of the sector, or as far away as the top/bottom right, but you can always get there with careful planning!

SECTOR ONE COMBAT: RULES OF ENGAGEMENT

Unfortunately you will have to face combat, it's just part and parcel of being on a dangerous mission. But by making the most of whatever situation you find yourself in, you will emerge victorious, or at least live to fight another day!

Luckily the Kestrel has formidable weapons and the ships in the first sector are relatively feeble - but never, ever underestimate a foe! Follow these simple rules to maximise sector one combat efficiency.

Rule number 1; if you have the choice whether or not to fight, take a good, hard look at the other ship. What are it's capabilities, strengths, weaknesses? What armament does it have? How much of a threat does it pose to your ship? There is no simple answer to any of these questions, but the main point is, don't be gung-ho! Only you, the captain, know's the capabilities of your ship, so learn what you can & can't handle.

Rule number 2; You can't pick every fight. If you find yourself in a fight you can't win, don't try! No shame in retreat, more shame in defeat! So target their weapons while your FTL drive charges to minimise incoming damage and get the hell out of there!

Rule number 3; Stop their guns! A ship with no offensive capabilites can do you no harm! Federal intelligence indicates that most sector one enemies can be neutralised in this way with just one full volley. So don't get stingy with the artemis! Once you have disabled the immediate threat target their piloting bay and shields to maximise your weapon efficiency. If the hostile ship has an attack drone and only one laser weapon, consider the attack drone a higher threat and disable it first.

Rule number 4; Break their shield! Time your shots carefully to cut through thick shields. Federal intelligence has offered this firing order to maximise shield penetration efficency:
1: Missile/bomb,
2: Ion weapon,
3: Laser,
4: Beam.

Other helpful hints
Stay in nebulas when you can. Not only does this tactic slow the rebel advance to a mere crawl, the only environmental danger you are likely to face is a plasma storm. Although Federal intelligence has been known to make mistakes...

Keep an eye out for cowardly slave traders. Whittle their hull down enough and they will always give you a new crewmember! If you have a teleporter later on you can get the extra help before the fight even starts!

Every now and again, a captain is faced with a difficult decision - should you help the burning space station or save it from giant alien spiders? Federal academy will have taught you that responsibility means making these tough calls. Your on-board computer will always highlight the best course of action in blue, and if you don't have a reccomended option - don't take the risk and move on - your mission is too important! Don't say we didn't warn you!

Missiles are a big threat - they render your shields useless so evasion is your best defence. Most missiles can also cause breaches &/or fires. A cloak or defence drone combats these nuisances!

Use asteroid fields to your advantage, strike while their shields are recovering from a hit.

Dont rush to upgrade your doors and sensors. Run a crewman into the rooms as and when they're needed!

By the end of sector one
The exit beacon is glowing magnificently before you, but take the time to check over your systems - are your doors at level two? have you upgraded your shields at least once (preferably twice)? Is your evasion 25% or above? if you have answered "no" to any of these questions, you will need luck on your journey ahead - and believe us at Federal high command when we say "luck favours the prepared".
Sector Two and Beyond


Congratulations, Captain! You have made it to sector two. Hopefully you will be doing well and your hull integrity will be 75% or higher - if so, aim to keep it this way! In many ways, the challenge of your mission really begins here. Federal intelligence reports that most enemy ships between sectors two and five will have at least two shield bars, and will boast several weapons systems, along with annoying systems like teleporters, medbays and drones. Although the combat advice given earlier is still valid, a good captain knows to be flexible and work with, not against a situation.


The main danger that captains face at this point is running low on supplies and crew. You will obviously want to be exploring as many beacons as you can, but this can drain fuel surprisingly quickly. Keep an eye out for stores, or merchants offering good deals, and keep your fuel level at 10 or higher. Never buy repairs unless you are below 75% hull and never buy missles or drone parts unless you rely heavily on these resources. Remember that hostile sectors have far fewer stores than friendly sectors, so if you can avoid it don't enter them if you are running low on anything.
The original armaments on your Kestrel cruiser will have been serving you well so far but you will eventually need to supplement your weapons if you are to continue having the upper hand in battles. Start saving some scrap (at least 75) once you have two shield bars, level two sensors and doors and around 30% evasion. This saved scrap means that once you find your dream weapon, system or crewmember, you have at least a chance of affording it. Other essentials are a teleporter system. Highly reccomended is the expensive, but valuable cloaking device and/or drone bay to counter those pesky missles.

The key to success here is to know your style and let it dictate what you want for your ship. Sell anything and everything that doesn't fit into your plan. Remember, it's not how many weapons you have, it's about having the RIGHT weapons for you. Never sell your Burst Laser MKII or artemis, you won't find a better replacement laser or missle system for the same power.


Stay cautious, don't take big or unnecessary risks and you will make it to sector 8!
The Dreaded Sector Eight
Heck of a job getting this far, captain! By now you must feel like a real space hero. But wait, what's that on the horizon?!

At some point we all wish we had joined the rebels right? Wrong! Time to put everything you've learned to the test.

We don't know what you might face out there in sector eight but we do know how to destroy a big ship or two.

Let Federal high command talk you through the basics of battling a behemoth.

A boarding party is a help for taking out weapon pods. Missiles are always a high threat, so we reccomend you target them first. Even without a teleporter, stop those guns - it's sector one stuff!
A cloaking device is invaluable for dodging salvos, drone/beam attacks, boarding drones, you name it - just wait for the best moment to use it. If you don't have one, we hope you spent the scrap on some engine upgrades or a defence drone!

Strong shielding can be a pain, but don't forget that ion weaponry, including the wonderful I-Bomb can make short work of even strong shields. Laser salvos or missles work just as well. If you don't have any missiles or bombs, fire all your weapons at once for maximum shield penetration - it might take a little longer but it's worked in the past, right?

Most importantly, keep on top of any damage - repair any system damage immediately, but keep your pilot in their seat at all times!

Keep calm and do the Federation proud! And remember, if at first you don't succeed - try, try again!


The Federal Armament Catalogue Vol.1
Hey there, gun freaks! If you're looking to drool over some tasty guns, you came to the right place!
Knowledge of firepower can make or break any engagement - so don't be left scratching your head next time you want to buy or sell a weapon, read this and empower yourself!


Weapons fall into five main categories, Ion, Beam, Missile, Bomb and Laser.
Each have strengths and weaknesses. Situations where they will get you killed or get you rich. It's up to you to decide how to use them, and in which combination but this catalogue will help you decide what's right for you.

LASERS

Most ships have 'em, most ships need 'em - lasers are simple but effective weapons relying on volleys to take down shields and systems.

Basic Laser - Power required 1, shots 1, damage/shot 1, low fire chance.
You can't buy this puppy anywhere, but why would you want to? It's main job is taking down a point of shields.


Dual Laser - Power required 1, shots 2, damage/shot 1, low fire chance.
Two shots, one power bar - that's more like it! slower to charge than the basic laser, but twice as potent! This weapon system will compliment any other weapon.


Heavy Laser I - Power required 1, shots 1, damage/shot 2, low fire & breach chance.
Not the greatest, but more powerful than the basic. Only deals 2 damage to zoltan shields or to a naked hull. Fastest laser around.

Heavy Laser II - Power required 3, Shots 2, damage/shot 2, low fire & breach chance.
Twice the punch of it's predecessor, for thrice the power! - only if you are short on weapon slots my friend!

Burst Laser I - Power required 2, shots 2, damage/shot 1, low fire chance.
Pretty much indistinguishable from the dual lasers. Watch that power consumption though!


Burst Laser II - Power required 2, shots 3, damage/shot 1, low fire chance.
Great weapon for the power used, buy it, don't sell it!


Burst Laser III - Power required 4, shots 5, damage/shot 1, low fire chance.
Wooo mamma! This is a great weapon, so many shots for one weapon slot - power hungry and slow though. Worse than two B.L.II's....


Hull Laser I - Power required 2, shots 2, damage/shot 1, low breach chance.
This weapon and it's big brother deal x2 damage to systemless rooms. Not bad in a pinch.


Hull Laser II - Power required 3, shots 3, damage/shot 1, low breach chance.
Bigger, meaner and better than the MKI.... But who wants to hit systemless rooms?


Ion Weapons

Ion weapons do no actual damage, instead they disable a system for a short time, depending on the ion damage this can be quite a while. Ion weapons are best against shields where the down time is significantly longer than the usual shield recharge rate. Ion weapons also deal double damage to those annoying Zoltan shields.


Ion Blast - Power required 1, shots 1, damage/shot 1
It's fast and cheap, and not too taxing on the power grid. What more do you want?


Heavy Ion - Power required 2, shots 1, damage/shot 2
A couple of these are all that's needed to take down even strong shields, just don't forget to use some REAL weapons too!


Ion Blast II - Power required 3, shots 1, damage/shot 1
Favoured weapon of the engi it's charge time is redonculous! A mere 4 seconds! if that's worth the 3 power bars to you then use it by all means.


Beams


Beams can be devastating, but shields are their main enemy. Most beams have high charge times but their real strength is their ability to hit multiple systems and rooms. If you can get through shields with ease, consider getting a beam weapon to really bring the hurt! It is worth noting that with careful planning most beams can hit at least three rooms. To 'hit' a room, only a tiny fraction of the beam has to touch it.

Mini Beam - Power required 1, damage per room 1, low fire chance
Ok, so it's not the best but it's standard equipment for basic stealth craft, which is pretty much the only place you will find it.


Pike Beam - Power required 2, damage per room 1
The longest and most common beam weapon, the pike is never a bad choice - but bear in mind a single shield bar blocks it and it can get interrupted if the shields come back on.


Halberd Beam - Power required 3, damage per room 2
This beast actually penetrates 1 shield bar, although the damage is halved if this is the case. This short but powerful beam is a favoured Zoltan weapon.


Glaive Beam - Power required 4, damage per room 3
The fabled Glaive beam is slow and costly but very effective. If you can get it operational you won't soon regret it. Can deal one damage even through two shield bars, a fearsome weapon.


Fire Beam - Power required 2, damage per room 0, high fire chance.
Shields stop this long beam completely, but it's effects can be devastating. Some captains just like to watch ships burn. Very handy when coupled with rockmen boarders.


Hull Beam - Power required 2, damage per room 1
Rarer than the pike or halberd. Like it's laser cousin the hull beam does double damage to systemless rooms, this does allow for some shield penetration.


Anti-Bio Beam - Power required 2, damage to crew 4
Favoured weapon of the slugs this insidious weapon damages only the crew of enemy vessels. Not the fastest way to kill a ship, but certainly profitable.


Well, that's all folks! Catch next weeks' edition for even more weapons of war!
The Federal Armament Catalogue Vol.2
Missiles/Bombs


Because both weapon types use the same ammo, we're lumping them together. They're a diverse bunch but nothing gets through shields better. Just don't run out of ammo!

Artemis - Power required 1, damage 2, low fire & breach chance
It's fast to load (although the rebels have a faster version) and for only one power bar it's the most reliable missile out there.


Leto - Power required 1, damage 1, low fire & breach chance
Faster, but weaker than the Artemis otherwise pretty much the same.


Pegasus - Power required 3, damage 2x2, low fire & breach chance
For a 20 second wait you get not one, but two missiles! perfect for getting past defence drones and saving ammo.


Hermes - Power required 3, damage 3, mod fire & breach chance
Slow but effective the hermes is a good weapon in a pinch, just dont rely on them.


Breach - Power required 3, damage 4, mod fire & high breach chance
The people's favourite. As it's name suggests this high power missle gives the enemy more than they bargained for. Laugh as they struggle to repair the hole before the air is sucked out.


Hull - Power required 2, damage 2, low fire & breach chance
Deals double damage in systemless rooms. A favourite of the rockmen it can be a good choice if low on ammo.


Bombs


Bombs actually bypass all defences bar evasion by teleporting into the targetted room! Talk about nasty! Only trouble is, they don't deal hull damage. Bombs are particularly versatile because you can target your own ship. Bombs damage personnel and systems, when they damage anything at all.


Small Bomb - Power required 1, damage 2, low fire chance
A versatile weapon that the mantis race is fond of. Great for taking out pesky systems.


Breach Bomb - Power required 1, damage 2, certain breach chance
Fast and effective, a great weapon for any ship. just watch your boarding party don't asphyxiate!


Ion Bomb - Power required 1, ion damage 4
Ah the Ion bomb, or I.Bomb. If you absolutely, positively have to disable a system, accept no substitute. It is slow though.


Fire Bomb - Power required 2, damage 2, certain fire chance
This weapon is scary, especially in the hands of the rockmen. Not the fastest way to kill a ship, but certainly the meanest.


Breach Bomb II - Power required 2, damage 3, certain breach chance
Bigger, badder and meaner than it's little brother this thing makes holes in ships.


Healing Burst - Power required 1.
This is another quirky slug weapon and very rare. It will instantly heal any friendly crew in the room in which it goes off. Handy for boarders or for ships with small med bays.
Federal Armament Catalogue - Update!
Hey there, Gun freaks! Did you miss me? Well I'm back for another life-saving, heart-breaking edition of the Federal Armament Catalogue. Giving you the know-how to blast some rebel scum!
We're going to be looking at some hot new additions to the Federations' arsenal, so come get some!


Flak cannon Mk I – Do you hate shields? Do you want them to go, quickly with no fuss? You need a Flak cannon my friend. Fire a load of pointy metal bits at them, and POW! Problem solved. The MK II is even better, but it's slower and takes more juice. Trust those Lanius to come up with a use for all that scrap!

Vulcan Chain Cannon – Patience is a virtue, captains, and this beast will reward you for it. Each shot gets faster, till nothing can stop it! If you are piloting a tank – get this sucka. It's like, all you'll need!

Chain laser – Hey, this one reminds me of the good ol' burst laser MK I. It Fires slowly at first, then gets faster, and faster and faster! Then you're looking at some serious hurt!

Charge laser (2, 3 and 4 variety) – Charge weapons are my personal favourite. Need one fast shot, no problem, need a volley of four? Hey, you're covered. Charge 'em up, knock down their shield, then pound those rebels with quick single shots. They also come in two flavours; regular or Ion.

Stun Bomb – Boarding a ship? Don't have a Mantis? Get a stun bomb to give YOU the edge in combat. Make a bet that you will kill that rebel before they can get to the med-bay.

Lockdown bomb – Tired of those Crystal aliens lording it over you with their lockdown power? Get some for yourself! The all-new lockdown bomb works just the same way as those kooky crystal freaks. Great for boarding or ship security.

Stun Ion – Some bright spark at the Federal Research Division had an idea: "what if your Ion blast MK I also gave the crew a nasty jolt?" Result; this bad boy. Really versatile this one. Nicknamed the "Peacekeeper" or "Baton", you'll find this non-lethal weapon used by slavers and police.

Swarm Missle – Gotta love those Rocks and their missiles. Trust them to think of a way to get past those annoying defence drones with not one, not two but three missiles! You can still fire just one if you want though...

Well, that's it for now – Let's hope you learned somthing!
Diversity Awareness
That's right folks - the Federation is made up of people of all shapes and sizes, and it's the duty of every captain to know the races that may or may not serve under them.

The Engi are a semi-robotic, semi-organic lifeform. Logical and eager to help they make great engineers.

Tragicaly some also believe that the Engi make great slaves. We're looking at you, rebel scum!
Their affinity with machines means that they can repair very quickly. They hate combat and are not designed for fighting (some that have studied the engi argue that an intelligent designer may have been involved).

Regardless of whom, or what created them the Engi are welcome members of the federation. If there is an Engi on board your ship, treat them with the love and respect they deserve.


The Mantis race is mysterious to say the least, but despite their unpronouncable names and chitinous exteriors, they possess a fierce warrior spirit and a never-give-up attitude that the Federation, in it's time of need, has come to rely on.

Where would we be without the mantis? Without boarding parties for the most part. Yes, these little dudes are handy in a fight, and fast too. It's just a shame those spiky limbs hinder their repair efforts. If there is a Mantis on board your ship, treat them with the respect they deserve, but love just confuses them. DONT FORGET TO FEED YOUR MANTIS REGULARLY!


The Humans are a mixed bunch, and by that we at Federal High Command mean they are all pretty much identical. Some have different hair, and fleshy bits on their chests, but that's about it. Humans can just about be trusted to run any post, just don't ask too much of them. With no strengths or weaknesses humans are versatile, but little else. They worship a god called 'Elvis' although some worship a god called 'God'. All we know is, they're all crazy.
If you have a Human on board your vessel, give them a pat on the back, if you can find it, and try not to feel too sorry for them.


The Zoltan are creatures of pure energy, although they find it helpful to manifest as a physical being. While they possess a frail stature these advanced beings can actually power systems with their own body energy, making them a worthy edition to any crew. They're sticklers for the rules and justice is very important to them.

The Zoltan possess some fantastic technology including a super shield. The Federation was only too happy to accept their alliegance. If there is a Zoltan in your crew, try to accept their patronising comments with a pinch of salt, and be glad they're on our side!


The Slug race is often misrepresented as being sly, slimy and underhanded. While of course they are slimy they only use their telepathic powers for good, and sometimes evil. But mainly good!

Their natural talents make them great traders and pilots, while their lack of obvious weaknesses makes them a perfect crewman to have around.

The slugs hail from a distant nebula sector. If you ask them about it, they will deny it and then blackmail you with a personal secret.

If there is a slug in your crew roster, give them everything you have right now to save time, and never, ever agree to play cards with them again.


The noble, proud Rockmen. These mighty allies were not always in the Federation, but years and years of war changed all that. Now their bloody-minded attitudes are responsible for sending wave after wave of Federal troops at problems, hoping they will go away. To the Rockmens' credit, sometimes this approach works.

Big creatures with big ships, our Rockmen are slow and ponderous yet immune to the risk of fire, making them valued members of Federation crews for many years.

Their strong stature is also responsible for them aiding Mantis boarding parties and ship security on board many Federation ships. If a Rockman makes up part of your crew, try not to carve your initials into them, or they will pull off your limbs and beat you to death with them.


Distant ancestors of the Rockmen, these beautiful and powerful creatures have remained almost a myth among the Federation. We have only recently begun to recieve detailed reports about them. They seem to be made entirely of a gem-like material known as crystalite and it is one of the most valued of all commodities in known space. They all possess a special power; the ability to grow and manipulate crystalite, making them very hard to fight. If there is a crystaline entity on board your ship – Federal High Command warns against breaking off parts of them to sell, you might end up with a crystaline suppository...


The Lanius are an enigmatic bunch, hailing from a distant, uncharted sector of the galaxy. Very little is known about them but they have been known to work with the federation from time to time. What Federal High Command can tell you is that they love scrap! They even found a way to weaponise the stuff. They might be hard to understand, but try your best to play nice and you might just be rewarded for it. They also suck the air right out of the space around them, so they tend to win any argument that goes on for too long... If you serve with a lanius crewmate, give them some space, they don't like company.
Droning On
Federal Intelligence has detected a growing love of automation in combat and the good folks at Federal High Command decided it was time to give these little helpers their just dues. Remember, knowledge is power, so get informed on drones; it can help to make or break any engagement.

Federal High Command knows that there is a lot of ground to cover here so please enjoy the light relief provided. Additionally, to simplify things, this subject has been broken into three categories;

Internal,
External Defensive,
External Offensive.

All drones can be powered and unpowered without destruction, and Federal Intelligence strongly recommends strategic use of this fact to get the most out of both your power grid, and the drones themselves!


External Defensive:

All external defensive drones orbit your ship and have a harder time defending larger ships!

Defence drone (MK I & MK II):

Aptly named; these drones are designed to shoot down incoming objects such as asteroids, missiles, hacking drones or even boarding drones or lumps of flak. Most captains wouldn't even consider NOT having one of these around and they form the backbone of many defensive strategies.
Unfortunately their AI is easily confused and two or more simultaneous projectiles often prove too much and it will only shoot down one. Bear in mind, captains, that if an enemy ship is using defence drones this is a good tactic to get past them. This tactic actually works best against MK II defence drones as they will try to shoot down your laser volleys too.

Shield Drones:

These orbit your ship and generate 1 point of zoltan super shield every 10 seconds or so (to a maximum of 5 points). Great for backing up your shield system and for periodicaly protecting against missles, mind control, boarders, boarding drones and even hacking drones (although hacking drones are sent out in quick succession at the start of any fight, so don't rely on a shield drone's protection from hacking). Shield drones are pretty power-hungry, but can really help out. Try cloaking just after gaining a shield point and if you remain cloaked for long enough, you can have two by the time you leave.

Hull repair Drone:

This pricey drone is probably the best defensive drone after the defence drone MK I. It will dart around your ship, repairing between 3 and 5 hull points per drone part used. It can be used in or out of combat (but it can be shot down) and can really give your ship massive staying power in any fight as well as significantly reducing repair bills. If you find one, keep it!

Anti-Drone...drone:

This funky little drone will orbit your ship stunning and eventually destroying enemy combat drones. Very handy in some situations, totally useless in others. It is worth mentioning that this is a very low power drone and isn't taxing on the system or power grid. It is unlikely to disable enemy boarding or hacking drones.


External Combat:

All external drones can be destroyed by conventional weapons and are not safe in combat.

The folks over at The Federal Armament catalogue really wanted to do this, but High Command put it's foot down as Combat drones are not technically weapons, they're, well, drones. A combat drone will act entirely on it's own AI and as a result, you cannot choose what they decide to target. Bear that in mind when considering using them.

Combat drone (MK I & MK II):

Any captain that has commanded an Engi A type will know about these. They attack faster than even the Heavy Laser MK I but don't pack much punch. Useful for two things; keeping a point of enemy shields down, or assisting in the destruction of an unshielded ship. MK II drones are exactly the same, except their faster rate of fire means that they can normally keep two points of shield off the enemy. Consider using a combat drone if you are struggling to penetrate enemy shields or damage ships – but for the amount of power used, almost any conventional weapon is better and at least then you can choose the target.

Beam drone, Heavy beam drone, Fire drone.

These behave in much the same way as a Combat drones, except they cannot penetrate shields. Very potent when combined with Ion weaponry. The heavy beam drone does more damage than the standard beam drone, at the cost of more power.


Internal drones:

Internal drones inhabit either your ship or the enemies' and can be attacked/destroyed by crew. They consume only one drone part unless they are destroyed.

System repair drone:

These are great for dealing with dangerous situations such as airless rooms and fires and, when powered, will automatically seek out damage and repair it. If you have a small or weak crew or a crew that cannot repair quickly, seriously consider getting a system repair drone to ease the burden.

Anti-personnel drone:

This is handy for engi crews. It's sole purpose is to fight off boarding parties. It's very tough and deals quite a bit of damage. Federal Intelligence would also like to note that it has proven useful against giant alien spiders too...

Boarding drone:

In design, it is almost identical to the anti-personnel drone, with one exception; it's fitted with retro boosters which allow it to fly over to, and breach enemy ships. Once inside, it will dilligently begin to wreck up the systems and crew on board. Very useful against unmanned ships as it will encounter no resistance. You cannot target where it will breach, but it is particularly dangerous if it breaches a system room. Bear in mind that boarding drones can be destroyed by defence drones and cannot pass through Zoltan super-shields.

Ion Intruder drone:

The perfect companion to the boarding drone, this behaves in almost the same way. It will breach the enemy ship and seek out systems. However, it will not fight crew and will not cause any hull damage. Instead, it will attempt to disable systems by charging up and releasing an EMP burst which is even capable of stunning any crew in the same room. When attacking an Ion intruder drone, try to only fight it while it is moving or charging up in order to avoid the EMP burst.

Well, that's it for now - We hope that helps you deal with drones!
Ship Recognition & Tactics Pt.1
The federation has many ships at it's disposal, not just the Kestrel. Federal intelligence has classified the following ships as common amongst the inhabited galaxy and we at Federal High Command want you to know how to handle them.

That's right - although a captain's instincts are valid in any situation, with some commands you have to go against your style to make up for a ships' weaknesses or to exploit its strengths. No matter which ship you use, take the time to learn the layout so you can deal with fires and boarders quickly and easily.

We at Federal Intelligence have listed some, but by no means all, strategies for the most common Federation ships in the hope that you can get to grips with different styles of command.

The Torus

The favoured ship of the Engi race, the Torus has the capability to hold any system.
The Engi's love of automation is not lost in the design of this ship, and immediately you can see that drones play a big part in this ships' strategy.
Until you get different drones and weapons, you will rely on the Ion weapon to disable systems such as shields and weapons while the drone deals the actual damage. It is worth mentioning that the charge time of this particular Ion weapon allows it to disable two systems at once.
To optimise crew efficiency, the augmentation heals your crew without them needing to go to the medbay, so they only need to leave their posts in the direst of emergencies!
As drones are unreliable and won't always target the systems you need to hit, focus on a strong defence; upgrade your shields and engine and get a cloak as soon as possible.
The ship is vulnerable to boarders so make the most of the healing augmentation and venting strategies.


The Osprey
Otherwise known as the Federation Cruiser, this ship has a very basic design. The layout isn't the easiest to deal with, and beam weapons can be particularly effective against this ship.
The artillery beam is a potent, but slow weapon that ignores all shields. So upgrading this fully as early as possible will let you drop the focus on weapons to focus on much needed defence.
The Osprey cannot support a cloaking field so it's a good idea to get a drone bay early on to counter missiles.
Make sure that you disable the artillery beam while boarding ships to prevent accidental death.
It is fitting that the iconic Federation ship should have the most diverse crew and indeed, you will find the variety very useful on your mission. Make sure you choose their positions carefully to maximise their strengths while eliminating their weaknesses.

The Gila Monster
If you like boarding ships then you will have your eye on this Mantis-made cruiser. This ship has some severe weaknesses though. While boarding is a powerful tool in any captains' arsenal, it is by no means to only path to victory. Make sure you don't try to board a ship unless victory is assured. This ship will let you make up for the odd retreat with higher overall rewards.
The weapons system is severely underpowered at the start but most captains prefer to rely on the small bomb to take out medbays or other systems which hinder boarding efforts.
A strong emphasis on defence and a large crew will combat the ships' weaknesses but it is strongly reccomended that the weapons system is upgraded in order to fight many of the ships you will face which cannot easily be destroyed with boarding parties. It is strongly reccomended that you upgrade the teleporter to level 2 to vastly improve the success rate of boarding efforts. In particular avoid early fights with zoltan cruisers and automated ships.

The Nesasio

Dubbed the "Stealth Cruiser" by many captains this ship starts with the fabled stealth technology. Unfortunately it doesn't have any shields.
The key to success with this ship is to time your cloaks well. Only use the cloak to avoid large volleys or missles, never use it at the start of the fight. This will require you to make a decision about which weapon you want to potentially hit your ship.
Be aware that firing weapons will shorten the length of your cloak. Don't worry about upgrading the cloak drive immediately, focus on upgrading the engine and saving for the expensive weapons and shields which you will inevitably need.
The standard weapons are very feeble so make the most of them. Federal Intelligence reccomends targetting their weapons systems with the dual laser, firing when the beam is charged. While their shields are down, cut through as many vital systems (the shields & weapons a priority) as you can with the mini-beam. Early on you should be able to disable most ships before they can fire another volley, reducing the damage you take. You should avoid fights with Zoltan ships and ships that have drone capabilities as your ship will take massive damage before it can defeat them.

The Bulwark

This rock ship is durable but relies soley on missiles. Although other weapons systems and drones are available for this ship, at the start you will need to think carefully and conserve ammunition. Federal Intelligence reccomends targetting weapons systems and pilot bays with the small, fast missile and hitting systemless rooms with the hull missile to conserve ammo and to reduce incoming damage.
A word on the rock plating. This augmentation is useful for reducing hull damage, but never rely on it to win a fight. Factor it out of the equation and then it is a bonus if you don't take hull damage from a shot. A good captain will always attempt to get through a fight without taking hull damage so think of this augmentation as reducing the cost of repairs, rather than helping to win a fight. Get new weapons as early as possible, even selling the hull missile if you have to, you do not want to be reliant on missiles/bombs entirely as you WILL run out.
The crew is a strong one, but slow. Make sure that you plan carefully, taking into account the halved movement speed of the rockmen.
Ship Recognition & Tactics Pt.2
Man Of War

This is not an easy ship to command, captains. The crew is small and the weapons are not very impressive.
Federal Intelligence recommends resisting the temptation to seek victory through the anti-bio beam, instead selling it at the earliest opportunity. Yes, you get more rewards by killing a ships' crew but the time and effort required to win in this way will often result in you taking considerable damage. If you are adamant about using the anti-bio beam, only use it against ships that cannot harm you and ships without medbays and low shields.
The slug repair gel is a useful augmentation while you have a small crew but consider selling it if you get an Engi. You may want to man (or slug) just the engine and pilot bay, venting all other rooms apart from the medbay and O2 unit. Functioning like this will reduce the need to rush to deal with boarders and fires. Make good use of the breach bomb, which is especially effective against mantis crews. Target their shields with it then finish their weapons system with the lasers.

The Adjudicator


Impressive Zoltan technology might trick you into thinking that this ship is an easy command, but don't be fooled. The Zoltan crew are weak and boarders, fires and breaches all pose a significant threat. However, incoming hull damage will be severely reduced, and missiles pose less of a threat, at least while the shield holds.
Use your weapons effectively. When targetting the beam, make sure that the beam starts with the shields and goes from there to maximise damage. Target shields or weapons with the missile depending on the adversary.
Aim to stop their guns before your shield is down in every conflict. Upgrade your engine early. The more shots you evade, the longer you keep the Zoltan shield. Prioritise on crew, engines and offence, although upgrading shields helps eventually. Avoid beam/ion weapons and drones as they will get rid of that precious shield very quickly. As Zoltans do not power subsystems, get a new pilot at the earliest opportunity.

We at Federal High Command hope that the information has proved useful. We are aware that other ship designs do exist but they generally require a basic mastery of the tactics already given for each ship. Besides, we like to think of our captains as independant thinkers, capable of devising strategies of their own.

There are legends of a ship made entirely of crystal, but Federal Intelligence has yet to encounter this ship. More information will be provided as and when it arises.
Ships' Log - USF Bolt Sector 1.
This is the first log entry for the USF Bolt - Red-Tail class Federation Cruiser. The crew is comprised of myself, the pilot, Jack Bale. The second and last human on board is the lovely Amie Rine who specialises on shield systems. The Mantis who we've nicknamed "Clicks" is on weapons duty and Zoran, the legendary Zoltan engineer is where you would expect him/her/it to be.

1 - Our mission; to get the vital data we carry to our base in sector 8 - If we survive that long. Our supplies are limited and the rebels, aware of our mission, are hot on our heels. We power and double check all systems before making our first jump as the crew of the USF Bolt. Our destination, a nebula which should hide us from the rebel fleet.

2 - The beacon is in a particularly beautiful area; a tourist spot. Not free from traders, however although 4 missiles for 1 fuel is a deal we are happy to turn down. We jump deeper into the nebula.

3 - We have been partly disabled by a plasma storm. To make matters worse, a rebel scout has been waiting for us. To think we thought we had given them the slip! We have to power down the shields and O2 bay just to power our weapons, but we get them before they can escape to warn the fleet of our presence. We use their scrap to upgrade our door systems and then head deeper into the nebula.

4 - An unshielded auto-scout awaits us at this beacon. We take out it's weapons before it can fire a shot. Victory. We use it's scrap to upgrade our engines, then head deeper into the clouds. The space clouds.

5 - Another plasma storm. Multiple incapacitated ships loom in the shadows, briefly illuminated by lightning. We take a risk to search the ships for survivors and equipment. Most of the hulks aren't even worth scrapping, but we find an Ion Blast MKII. We don't equip it just yet. We jump deeper into the nebula.

6 - Nothing at this beacon but a lovely view. We power up our systems after the storm and jump out of the safety of the nebula.

7 - A slave trader in a small rock ship offers us a slave. We attack the scum in the hopes of liberating their cargo. The ship proves a threat and despite diverting power from our O2 unit to the engines, we take a hit to the shield bay. Amie works frantically on the repairs trying to get the shields back online while our lasers pound the ship. They surrender soon enough and we take a slave in exchange for letting them live. A human male named "Ohm" is welcomed on board. Traumatised by his experiences with the slaver, he joins me in my piloting duties. We jump on in search of the exit beacon.

8 - We've been jumped by a well equipped rebel scout. No way to avoid this fight. We target their guns while their attack drone gives us grief. In the first exchange we take out their guns, but our weapons bay was breached! Ohm rushes to help Clicks repair the hole before it's too late. Their drones help to repair faster than us and before our weapons are back online, they get off another volley, this time taking out our O2 unit. Ohm rushes to fix this while we cripple the fleeing ship and destroy it. A victory but the ship's hull was damaged and Clicks and Ohm damn near asphyxiated. All systems returned to normal we upgrade the reactor and jump away.

9 - Into an asteroid field! To make things worse, a rebel auto scout is waiting for us here. Luckily for us it's unshielded and we destroy it quickly. This is no place to work on the ship, we gather the scrap and jump away.

10 - We've strayed too close to a red giant star! This could get ugly as an another auto scout has found us here and it's airless ship has no fear of flames! We target it's weapons and vent all unoccupied rooms. In the first exchange it starts a fire in our weapons' bay. It won't fire again, we got it's weapons good. We vent the weapons bay to quickly put out the fire, and destroy the ship. we harvest it's scrap but this isn't a good place to stop. We move on.

11 - A pirate in a Zoltan ship has hacked our engines, with evasion at next-to-nothing, this could prove fatal! With only 3/4 guns operational and a zoltan shield to take down we have no choice but to take some punishment before we can stop their guns. We're at 75% hull integrity by the time we defeat the pirate. Ohm has proven to be a great ship's hand - running around repairing things, allowing us to stay at our posts. We spot a store one jump ahead and decide to check it out.

12 - Not much of any use here! After a long debate we sell the Ion Blast MKII for 40 scrap and use it to upgrade our shields for the sector to come.

13 - At the exit beacon we are offered a trade, we pass up the terrible deal and leave the sector for the rebels.
Ships' Log - USF Bolt, Sector 2.
1 - We move into another Civilian sector ahead of the rebels. We aim for a distant nebula. It should take 3 jumps to get there.

2 - An asteroid field! We explore it despite the risk, we need the fuel. We find an abandoned mining site that yields 25 scrap and a drone part. Worth the risk. We upgrade our reactor and continue.

3 - We ignored a distress beacon but have run into a civillian being persued by a pirate. We move in to help. The pirates guns are no match for our new shields so they send some boarders our way. We vent the appropriate rooms and Ohm and Myself finish off the gasping soldiers. We finish off the pirate and as a thank-you the civillian victim patches some of our hull damage. We jump away.

4 - A store. We buy some much needed fuel but save most of our scrap for upgrades.

5 - We get to the nebula at last, straight into a plasma storm and the clutches of a waiting rebel scout! We make short work of the scout and gratefully power down our weapons and power up the O2 unit. We head deeper into the nebula...

6 - We've been boarded from a derelict. Ohm and Clicks fight to save our sensor room and with the help of some careful venting, all four boarders are killed. We jump away.

7 - We attack a ship hiding in the nebula like us, a possible smuggler. It's a feeble ship and we easily overpower it. The smuggler had military equippment, a MKI attack drone. We continue into the nebula.

8 - Another plasma storm, another rebel scout! This one has a cloak. Despite it bombing our pilot bay, we destroy it. We are now rich in scrap but with no stores around, we have nothing to spend it on. We need some new weapons. We jump deeper into the nebula.

9 - Another unmanned craft. It's worrying that the rebels have penetrated so far into uncharted space. We have no choice but to fight. This ship can cloak too, but we easily defeat it. We're running very low on fuel now, but we head on into the nebula anyway.

10 - Another auto-scout. This one guards a rebel station. We attack the weak ship to get to the station but it was a waste of time, the station was abandoned. We spot a store one jump away and head off.

11 - We sell the attack drone and a basic laser and replace it with a small bomb. That should tide us over in the hard fights to come. Especially against shielded ships. We also recruit a second mantis nicknamed "Gumpo" and restock our fuel, although it's still too low for our liking. We spend our remaining scrap on an engine and reactor upgrade and make our way to the exit beacon.

12 - Another trader, offering repairs. We decline as we are at 75% hull and leave the sector for the rebels.
Ships' Log - USF Bolt, Sector 3.
1 - We decide to visit Zoran's home-system. The Zoltan homeworlds. We spot few nebula in this sector so we decide to make a near straight dash for the exit.

2 - Our first jump lands us at the claws of a well-equipped mantis ship which attacks without provocation. We kill the small crew with bombs. A significant haul from this encounter. We jump to a nearby distress beacon.

3 - A single life form on the surface of a planet. We go down to investigate and discover a lone man in a questionable mental state. We bring him back aboard the USF Bolt with hopes of finding help for him, but it all proves too much. He detonates an improvised explosive, killing himself and damaging our hull. So much for being the nice guys. We jump away.

4 - A mantis outcast mistakes us for a zoltan ship and attacks with the help of extra boarders. We defeat the invaders with the help of Clicks and Gumpo and then destroy the ship. We get lots of scrap but are running dangerously low on fuel. We jump away.

5 - A Zoltan emissary gives us some co-ordinates before jumping away. Bemused we jump straight to them.

6 - A rebel trap! We should have known. We talk to the rebel and manage to convince him over to our way of thinking and change their ways. Zoran proved invaluable here, he has a way with words! The would-be opponent gives us a weapon and alot of scrap to aid us. All well and good, but we have only enough fuel for ONE more jump!

7 - We arrive at an empty beacon. With no apparent way to get to the exit and no fuel to do so, is this how our mission ends? We have no choice but to broadcast a distress signal and hope help finds us before the rebel fleet catches up.

8 - A rebel scout answers our message. Not quite the help we wanted! As soon as they realise they're outmatched they try to run and warn the fleet, but we destroy them. We get 3 fuel from the wreckage, we're back in business! We jump into the sectors only small nebula to escape the rebel fleet.

9 - An unshielded automated ship - easy prey. We gather 3 more fuel from it's wreck along with an anti-ship drone MKI. Still no way to get to the exit, there HAS to be one... we continue to explore the nebula.

10 - A rock fighter craft attacks us deep in the nebula, it's well equipped but we put it down quickly, we're shocked by their offer to surrender and destroy them anyway. I thought Rockmen had more courage. Our fuel crisis is now officially over, we have a substantial amount of scrap saved and with a connection to the exit beacon finally in our sights, things are looking up!

11 - This beacon is merely a sightseeing stop, we take the time to double check the ship's systems before moving to a nearby store.

12 - We buy a crew teleporter at last. Clicks and Gumpo volunteer for the boarding party and Ohm takes over on weapons. Clicks was a master weapons controller, but his mantis blood screamed for "real" combat. We move on to the exit beacon after upgrading our shields and reactor. with 3 shield bars and a mantis boarding crew, the USF Bolt is getting serious!

13 - At the exit beacon a trader offers us scrap for our useless drone parts, we gladly accept and use the scrap to upgrade our reactor once more before leaving the sector for the rebel scum.
Ships' Log - USF Bolt, Sector 4.
We move into the Engi homeworlds. Although the mantis threaten Engi space they are usually willing to help the Federation.

1 - We are still quite low on fuel so we make a long jump into the sector. It turns out to be a refuelling station - we get all the cheap fuel we can before jumping to a nearby distress beacon.

2 - Giant alien spiders are the cause of the distress. While giant alien spiders are no joke, we can't risk the mission defending every backwater station we come across, we make our apologies and leave the station to it's grisly fate.

3 - A well equipped rebel scout guards this beacon. Time to test the new boarding crew! Clicks and Gumpo were happy as spring chickens, disembowling the rebels with accustomed ease. You've never seen a mantis so happy. We strip the fallen ship and jump away.

4 - A small fleet of Engi ships seem to be holding a conference. We listen in. It sounds like they are frantically debating some problem. We offer to help, which shocks them somewhat. They decline, explaining that this is "a private matter". We shrug our collective shoulders and move on.

5 - We stumble into a pirate in hot pursuit of an unidentified ship, time to play "hero". Despite the fearsome weaponry, Gumpo and Clicks kill the tiny crew before they can so much as fire a missile. The unidentified ship was a transport and offers us store facilities as thanks. The weapons on offer aren't what we're looking for but we gladly buy his fuel and patch up some hull damage. We spend the remaining scrap upgrading our teleporter and pilot bay before jumping.

6 - A nearby planet sends us an encrypted Federation signal. We send an away party to investigate. They tell us the co-ordinates of a secret base that could help our cause a mere two jumps away. We thank them and move on.

7 - A distress beacon coming from a dense asteroid field. We investigate despite the danger and find a strange, crystalline ship. We take a weapon from it and leave the ominous stasis pod. It's only a MK I heavy laser, but we immediately swap it for one of our basic lasers.

8 - We arrive at the co-ordinates given to us, but they must have been wrong - there's nothing here! What a waste of time. We jump to a distress signal.

9 - It's an Engi ship, we move in to assist. It was a fiendish mantis trap - using an Engi ship as bait! Ohm takes out the gasping mantis boarders while our own boarding crew kills the imposters. We strip the ship and move on.

10 - Another exit beacon trader, another dubious offer refused. We prepare to leave the sector for good by upgrading our reactor. We hope the Engi give the rebel fleet some hell for us.
Ships' Log - USF Bolt, Sector 5.
Sector 5 belongs to the Zoltan race. Without further ado we set course for a nebula and jump.

1 - An asteroid field stands in the way of the nebula. The zoltan guard turn up before we can jump away, blaming us for tresspassing on vital mineral reserves. They attack before we can explain. Looks like we have to settle this the old fashioned way. As soon as their shield was down Clicks and Gumpo tore through the zoltans with ease. A shame the ship took some flak before then, but nothing serious. We jump away before more Zoltans show up.

2 - A Shy zoltan jumps away before we can communicate, at least we have the time to patch up the system damage before jumping into the nebula.

3 - Inside the nebula we detect a rogue planet, drifting through space. An ancient Zoltan hails us and says "Through luck or intent, you have discovered the great eye. Look into it's depths to recieve your just dessert" Sounds ominous. We pull the ship in closer, what's the worst that could happen? The great eye reads our minds and sees our exploits, as commiseration to the pain we have suffered thus far he grants us a strange healing bomb. I can't help but feel that we dodged a bullet as we set off on our mission once more.

4 - We leave the saftey of the nebula to visit a store. We patch some hull damage and get some fuel. We also sell the healing burst and a spare basic laser before retreating back into the cloudy arms of the nebula once more.

5 - More like into the loving arms of a plasma storm! Two other ships seem to be suffering too however, both pirate vessels. One carrying fuel, the other ammo. Mindful of our recent fuel debacle, we power up our engines and chase the fuel transporter. It's a delicate situation - we have to leave the ship intact if we have a chance of gaining the fuel. A job for Clicks and Gumpo! The mantis ship, not to be taken lightly had a large crew. Clicks has been killed, while recovering in our medbay, a bomb teleported in. There was no time to save him. Gumpo was spared, thankfully. Ohm helps to repair the damaged medbay then joins Gumpo in finishing off the enemy crew. Poor Clicks... He was avenged.

6 - An uninhabited beacon, we press on.

7 - We discover a ship in critical danger, before it fades into the nebula we lock onto a solitary lifeform and beam it aboard with our teleporter. A zoltan by the name of Yevon Si decides to join our crew as thanks for saving their life. Yevon Si takes Ohm's position in the weapons bay and Ohm, an accomplished fighter, takes Click's place on the boarding team. We leave the nebula.

8 - We encounter a mantis bomber that offers us to participate in a scientific survey. We accept but realise too late that its a trap! A substantial boarding party engages our crew while the poor USF Bolt gets pounded by bombs and missles. After a long and terrible fight we defeat the ship. We were nearly destroyed but we now have plenty of scrap for repairs. Luckily, despite the heavy ship damage no more crew were killed and the scientists used as bait reward us with a MKII defence drone. We repair the ship as best we can and jump to a store.

9 - We sell the drone and repair the damage - repair bill 80 scrap! Ouch! We buy a second Heavy Laser MKI for 55 scrap and spend the rest of our scrap hoard on reactor, engine and medbay upgrades. We move towards the exit beacon.

10 - An auto scout waits for us at this beacon. It can cloak but has no shield. Despite it's formidable weapons, we make short work of it and jump on.

11 - We come across a primitive planet being harrassed by a zealous rebel captain. We decide to help the aliens and protect their way of life. We defeat the rebels with ease and glean substantial rewards from the wreck. We repair the damaged systems and move on, secure in the knowledge that at least one planet is free from the tyranny of the rebel scum.

12 - A sight-seeing beacon, we move to the exit.

13 - Nothing here but the gateway to Sector 6, the tension is mounting on board the ship things are not going so smoothly anymore and the road ahead looks rocky.
Ships' Log - USF Bolt, Sector 6.
We enter a mantis sector. It's poorly charted and with little chance of help we just hope that we have enough fuel to make it through.

1 - A small rebel transport is nearby. We demand the surrender of their goods. They don't want to fight and try to escape while setting drones on us. We easily destroy their crew and liberate a Federation agent named "Will". The human joins our crew as thanks. We jump away.

2 - With 210 scrap saved we go to a store to stock up. We hire a mantis named Noemi and a cloaking system for the ship. We sell a looted hull smasher laser to pay for a reactor upgrade. The cloak is a welcome system on board the USF Bolt. Noemi and Gumpo perform some sort of mantis bonding ritual. Are they together or something now? Who knows, but nothing is laying any eggs in MY cockpit! Regardless of the intricacies of their relationship, the two mantises have formed a new boarding party.

3 - With the crew at full capacity we head for the distant exit. We stumble too close to a red-giant star where a mantis captain seems to have been waiting. "I love a challenge" he screeches before engaging our ship. We dispatch the mad captain and his crew easily and leave the danger of the star.

4 - A civillian ship seems to be in danger from a pirate ship. We move in to help. Although we dispatched the pirate crew quickly, the Civillian thought it best not to hang around. Playing hero doesn't always reap rewards...

5 - We decline another dubious deal from a dodgy dealer and jump to a distress signal.

6 - A human mining colony is suffering from a dangerous disease. Luckily our advanced medical unit can synthysise a cure, preventing a riot that seemed inevitable. The colony gives us some scrap as a thank-you. We leave feeling all warm inside.

7 - A mantis bomber attacks without warning. They seemed to be worthy foes, yet we defeat them without incident.

8 - A welcome sight, a store. we patch some damage and upgrade our shields to maximum capacity.

9 - This beacon is empty, yet the tension is almost palpable. We check the systems and make a jump to the exit beacon.

10 - Another trader, trying to buy our much needed missles. We tell him where to shove his "deal" and leave the whole cursed system for the rebels.
Ships' Log - USF Bolt, Sector 7.
Sector 7 is a civillian sector, but with the rebels hot on our tail we move off in search of the exit.

1 - This beacon lies in a nebula and it contains a hiding smuggler. We engage the ship, but it is surprisingly well equipped. Noemi dies from her wounds, despite being inches from the medbay - she will be missed, and avenged! Ohm and Gumpo finish off the remaining crew and the rewards almost make up for the loss, almost. We travel deeper into the nebula...

2 - We engage another smuggler and through what can only be called an error of timing, Ohm was killed during a boarding action. The scrap from the defeated ship is little consolation for the loss of a fine crewman. We did glean vital data about the sector from the ship however. Will joins Gumpo on the teleporter pad.

3 - Our next jump lands us in an ion storm, but we slip away from the hostile vessel lurking in wait with our cloaking field. We push deeper into the clouds.

4 - We encounter a heavily damaged Federation ship hiding in the nebula. Before we can make contact it begins to fade into the distance. Thinking fast, we teleport the crew on board. One of them offers to join us, the rest want to be dropped at the next station. The new crewmate is a mantis named, approximately, Eckman. We also salvage the ship for 41 scrap.

5 - Eckman has joined Gumpo on the away team, will joins me in the cockpit. We continue into the nebula where the smugglers data detects a possible ship. The data wasn't wrong - a black market weapons dealer spins a tale of the dangers of the nebula before pushing his wares. We decide to attack after analysing the dealers' ship. His prices were too high and it could have been a scam anyway. Our judgement proved correct, the ship fell easily and we strip the ship for useful materials.

6 - This beacon houses a small trading station. We sell some looted weapons before buying a shield charge booster, some fuel and repairs. With another store close by we decide to save the remaining 202 scrap and jump to another detected ship.

7 - A slug light cruiser demands a toll of 24 scrap. It may be cheaper to fight them, so we do. I hope the slug is wrong about us regretting the decision...The fight proved long and hard and we lost a fair amount of hull and ammo but the day was won, and to the victor, the spoils! We jump to the store.

8 - We hire another mantis, Monsvik to act as ship security. The merchant patches up our ship to 75% hull again. We decide to answer a distress call but experience has taught us to upgrade some systems first so we spend some scrap on the reactor, O2 unit cloak and engine. The rest we spend on missles. Grand total now 6 missles.

9 - The distress beacon was coming from an illegal pirate miner, crushed between two asteroids. We could have risked some hull blasting him free, but without a beam weapon we think it safer just to destroy the ship and loot the remains...What? They're just pirates.

10 - A connection beacon, nothing more. We move on.

11 - A storage cache guarded by a terrifying auto-assault ship. We attempt to cloak past it to get to the cache, but it spots us - no choice but to fight now! Normally a responsible captain shouldn't send a boarding crew into an airless space, but with a level two teleporter, nerves of steel and good timing, it's just possible to do some system damage and pull them back before they gasp out. With this tactic the heavily armed, heavily shielded automated ship didn't even manage to graze our hull. The station and the drone provided good rewards, including a Hermes missile system. We move to another detected ship.

12 - A heavily armed and shielded Zoltan ship lets it be known that we could buy some slaves. We don't want to fight so we opt out. Yeah, right! Even though we have maximum crew, we teleport a slave into our ship and prepare for battle! The Engi, Maxim leaps into action while will takes a backseat. We took some damage from the fight, but we won in the end. Will agrees to be dropped at the next station and we head to the exit with the rebels dangerously close.

13 - At the exit is an abandoned station with some scrap and a system repair drone. Very nice! We leave the sector to the rebels, we made it. Sector 8!
Ships' Log - USF Bolt, Sector 8.
We finally made it to our base. Admiral Tully takes our data and transmits it to the Federation captial ships' war room computer. We explain our mission. It's met with murmers of cynisism and disbelief. General Turzil of the Engi brigade speaks up "Intel suggests potential counter to rebel technology - Risk all or save none" We know the weakness of the rebel fleet, the flagship.
Tully responds with a new mission. We are to defeat the rebel flagship. In the humble USF Bolt!
They give us fuel and patch up some of the damage and send us on our way. It's all up to us now.

1 - We start to make our way to the flagship, but a rebel rigger picks a fight. With no missles to take out their medbay defeating them seems hopeless, we jump away.

2 - A resupply station, finally some missles!

3 - We jump straight to another supply station, we will need lots of missles to defeat the flagship.

4 - After some hairy exchanges with an auto assault ship we jump away and live to fight another day. We have bigger fish to fry.

5 - After tangling with another Auto Assault ship, we jump to a store

6 - Luck is with us! We find a coveted I.Bomb, we immediately replace our small bomb with it.

7 - We engage the flagship, it's all or nothing now! It truly is a monstrosity. The boarding team get to work on the weapons pods while we dodge as much fire as the flagship can dish out. After it's weapons are down, the I.Bomb gets to work on disabling the shields. The cloak proves annoying, but now that it's guns have stopped, the fight is ours. Eventually it's shields fail and we succeed in breaking off a large chunk. The flagship jumps away, we follow close behind.

8 - Our sensors warn us that it's power has been diverted to it's drone systems. We make good use of our boarding team as before and cloak whenever the drones swarm en masse. It's not long before the flagship, badly damaged, limps away once more. We persue with 100% hull.

9 - Regardless of the result of this last stand of last stands, the crew has done the Federation proud to get this far. Only a badly damaged flagship stands between us and victory, glory and above all, survival. The dastards have engaged some sort of hyped-up Zoltan shield. We cloak past the missles before we take it down. We send in boarders to disable their guns and the faithful I.Bomb and lasers do the rest. We breathe a sigh of relief as we watch the flagship crumble before us. We have saved the day. The rebels are defeated thanks to the valiant efforts of the crew of the USF Bolt. We are truly Space Heroes.

Would You Like To Know More?
There are two situations which can prove fatal to even the most heavily upgraded ship; Boarders and fire. Luckily there is one simple solution to both problems. Neither fire, nor boarders can survive without air. The Federal Tactical Division would like to offer advice to new captains about the best way to deal with these situations.

In this image we see a fire has broken out in multiple places on board this Federation Cruiser. The fires could be extinguished with crew, but it is faster and safer to simply put the fires out by opening some doors. Note that if a fire is in a systemless room and you have level 2 or above doors, it is safer to simply let the fire burn itself out.


Now the fires are out, all this captain has to do is close the doors, wait for the air to return and attend to the damaged systems.


Boarders can be trickier, but the solution is the same. First, Identify where the boarders are. This can be easy with functioning sensors, but as you see here the ships sensors are down due to the nebula. In this case look for a red fist symbol above your systems or flashing red security doors. This will tell you the location of the boarders, even if the sensors are down.

Then all you have to do is empty the air out of the room they are in, you can harrass them with crew to slow their progress if they are a long way from an airlock or in a weak system room.This tactic can ONLY be achieved with level two doors, and is especially effective with level 3 doors.


Once the enemy boarders are gasping for air, finish them off with your crew to let them gain some valuable combat experience. With some ships it is best to empty the room the boarders will break into too, but some ship designs prevent this from being strategically viable.


A Word on air management - a room is only hazardously depressurized when there are red and pink stripes. Crew can safely return to a room once it is pink, no matter what shade. Opening doors to adjacent rooms which are white will stabilise air pressure more quickly.

Some ships, such as the Engi B, are designed to function in a virtually airless environment and if you are low on crew, emptying the ship of air apart from occupied rooms can be a good tactic against both solar flares and enemy boarders.


Latest Reports
New reports from the front lines are flooding in all the time, every captain knows that new information is vital to the success of your mission, don't be left in the dark! So all you would-be-captains out there, don't forget to have a look!

Clone bay VS Med bay – The Great Debate.

The ethics of cloning aside, there are very real reasons why this debate still rages among the members of Federal Intelligence. Some claim that the clone bay is better because it allows a captain to send their crew on suicide missions, such as boarding manuevers, giant alien spiders and the like, without loosing their valued crew (although the crew normally aren't too keen on this!). However, some argue that the medbay is far more useful because you can keep said crew alive for longer and cure dangerous plagues. Ultimately, Federal High Command decided that there is no "right" answer, and decreed that each captain should use their personal judgement on the issue. However, the clone bay has been fitted to all "C" type ship variants, where medbays remain predominant among all "A" and "B" types. Please note that some skills will be lost in the cloning process, so if you keep loosing a crewmember, they will become increasingly worse at their post.

Hacked off – Special Report.

Federal Intelligence has reported that cyber crime is on the rise, and with it comes the latest threat; hacked systems. Hacking drones were first developed by the Engi and have since become prevalent throughout known space.

The effects of a successful hack will vary depending on the system or subsystem that has been targetted. It is a general rule-of-thumb that a hacked system will do the opposite of what it is supposed to do. For example; a hacked medbay will harm, not heal and a hacked teleporter will instantly return boarders to the pad.

No matter which system is hacked, the doors to the hacked room will be locked, forcing crew to fight their way in. This can be very useful for slowing crew progress through the ship, aiding (for example) boarding efforts.

Counter this threat completely by shooting down incoming hacking drones with defense drones.

####INCOMING TRANSMISSION FROM ENGI SPACE####

01111000 – 01001 - 0100 – 10101010111


Greetings fellow members of the Federation. The backup battery system has been recently released by the Zoltans and is proving popular with captains working within a budget. If you need more power than a reactor will allow, or lack the scrap to upgrade it fully, consider getting a backup battery to power that vital system as and when you need it.

0110011 – 011001 – 00011111

######END OF ADVERTISMENT########


Augment this!

Where would the captains' handbook be without the new kid on the block: Charlie Topper? We'd have less readers that's for sure! This week his column on Augmentations will keep you in the know about these elusive life-savers!

Hey, to all you captains out there! Augmentations are easy, it's all about synergy; patch that weakness, bolster that strength. Pick affordable augments that directly benefit your loadout and you can't go wrong!

See; my mate was recently posted on board a Lanius cruiser – Tough break - those SOB's eat O2! Got him an emergency respirator as a leaving present and thanks to that, the sucka's still around to mail me.

Had another friend, she was a great fighter, ended up on a Slug "B" type – those crazy fools didn't even have a med-bay. Not the best if you don't like suicidal boarding missions. Thing is, they had a reconstructive teleportation aug, fixed 'em up after each 'port... that's synergy friends.

I was talking to this captain at the slug bar 'Paradox' – He was lucky enough to work on board a type "B" stealth cruiser. They had a weapon pre-igniter for their Glaive Beam and that puppy was frying ships before they knew what hit 'em! Synergy my friends, synergy.

Well, I could go on, but we're all busy. So just remember – get the augment that's just right for your ship, or spend your scrap elsewhere!


Mind over matter:

One thing certain to strike fear into any captains' heart is a crewmember going rogue. Reports are creeping in of an insidious device of Slug origin, designed to turn your loyal crew into raging psychopaths. Have no fear though; these tips will help you to cope with this new threat.

1; If you have a mind controlled crewmember, harrass them with your crew to prevent them destroying systems. If they are attacking a system that can afford to take a bit of damage, let them wear themselves out until they snap out of it.

2; Mind control the mind controlled! If you happen to possess this system, you can always use it on your crew if they come under psychological attack.

3; Slugs are immune – their latent psychic powers are a great defence against this form of attack.

4; If you own a mind control device, use it on their pilot just before you fire a volley to make every shot you fire hit home.

5; If you own a mind control device, you can give enemy boarding parties more than they bargained for! Use it on groups of boarders to cause a quarrel.
Public Sector
We at Federal High Command realise that there are many captains out there with a wealth of experience, just begging to save lives by emparting some of their hard-earned wisdom to those less experienced than themselves.

The Public Sector is a space for these captains to have their voices heard. So, captains: simply post in the "comments" section with a brief and consise tip followed by your name and if Federal High Command deems it worthy of a mention, it will find it's way here.

Authors note I would like to add that there is a healthy modding community for FTL but the best mods that I have encountered by far are the "captains' edition" and "FTL infinity" - both mods were very fun and gave FTL a new lease of life for me so anyone looking to try any FTL mods should look into those first. Having said all that i did end up going back to vanilla FTL because it is really well balanced.

Remember captains; Fly safe and do the Federation proud!
150 Comments
kars10t 30 May @ 2:45pm 
good work i love the comics add more!!!!
rasicz 18 Aug, 2023 @ 5:18am 
This is fucking amazing
Wormweed 5 Mar, 2023 @ 9:29pm 
imagine reading this
Skoaden 14 Jun, 2022 @ 8:39am 
I didn't see you cover junk launchers and maybe a few other weapons.
Dr Whom  [author] 17 Apr, 2022 @ 7:13pm 
It depends on your ship (for example it won't be possible to have level 2 shields on a stealth cruiser by the end of sector 1) but with the kestrel (the recommended mode for the guide) what you quoted is far from impossible.

Also your pricing calculations are off. For example the 90 scrap for 25% evasion.

Getting an extra 10% evasion is free if you run into a ship that can't hurt yours because you can train your pilot and engineer to gold level. As for the reactor - you can play with power allocation to make up for a shortfall.

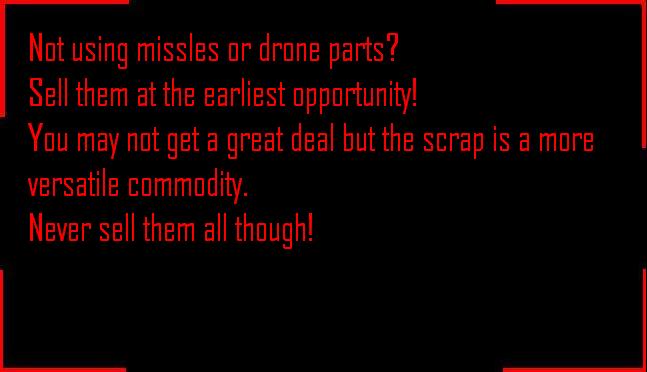
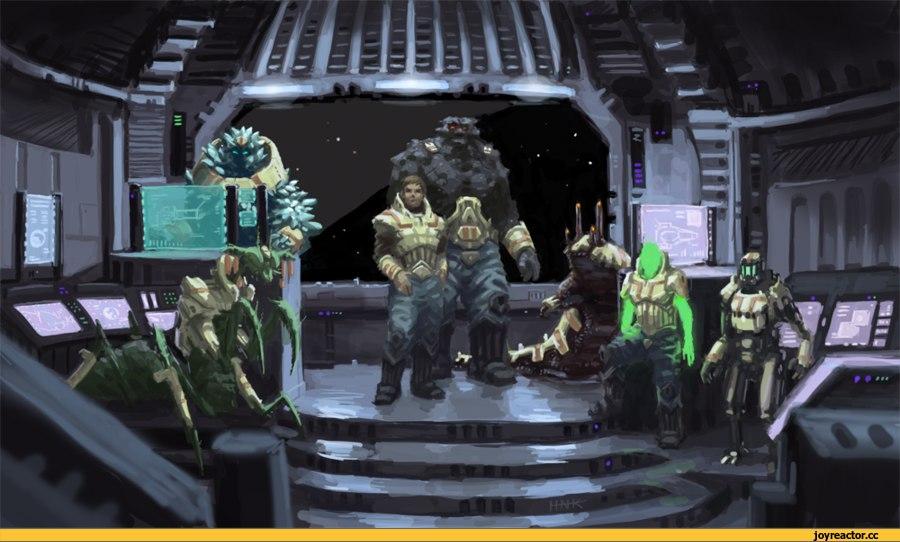
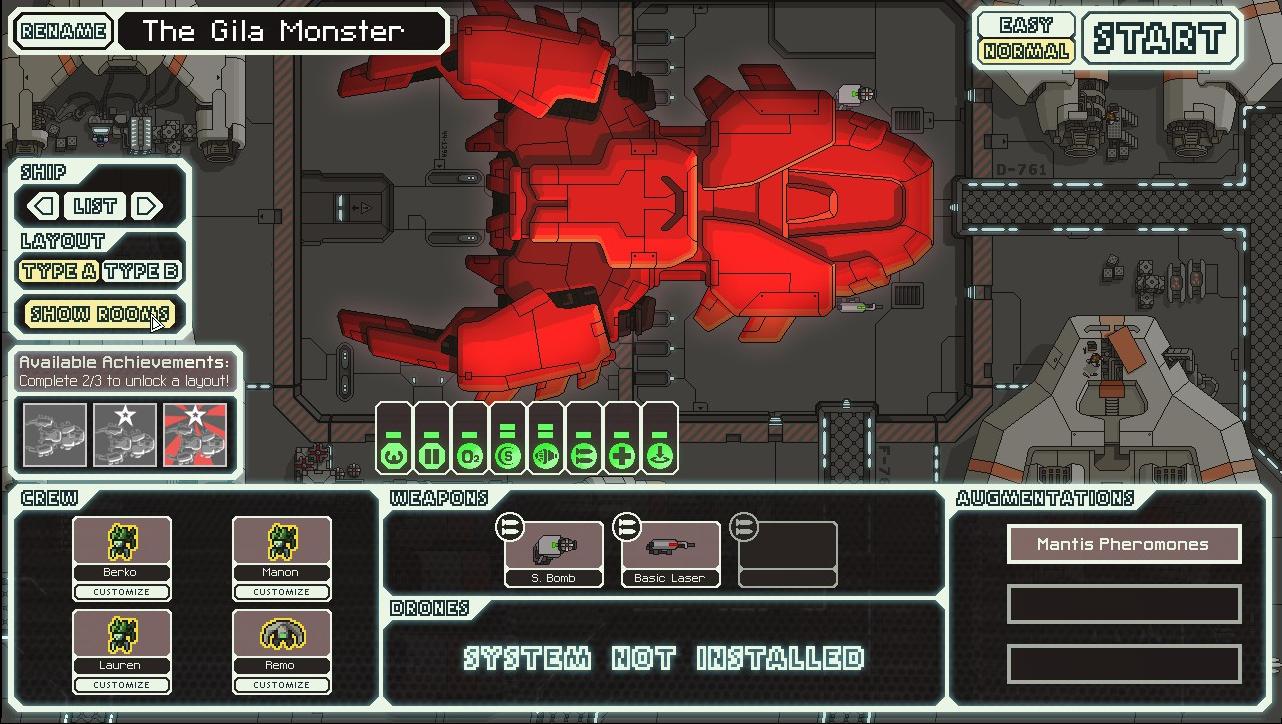
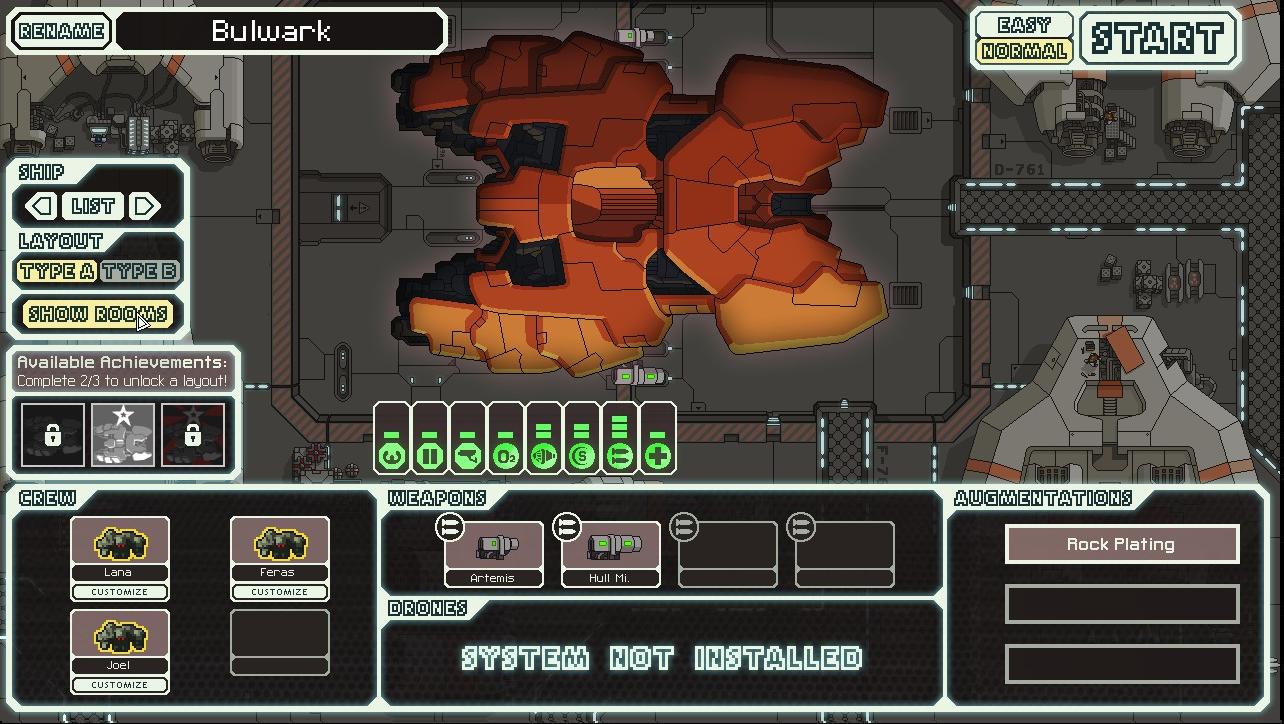
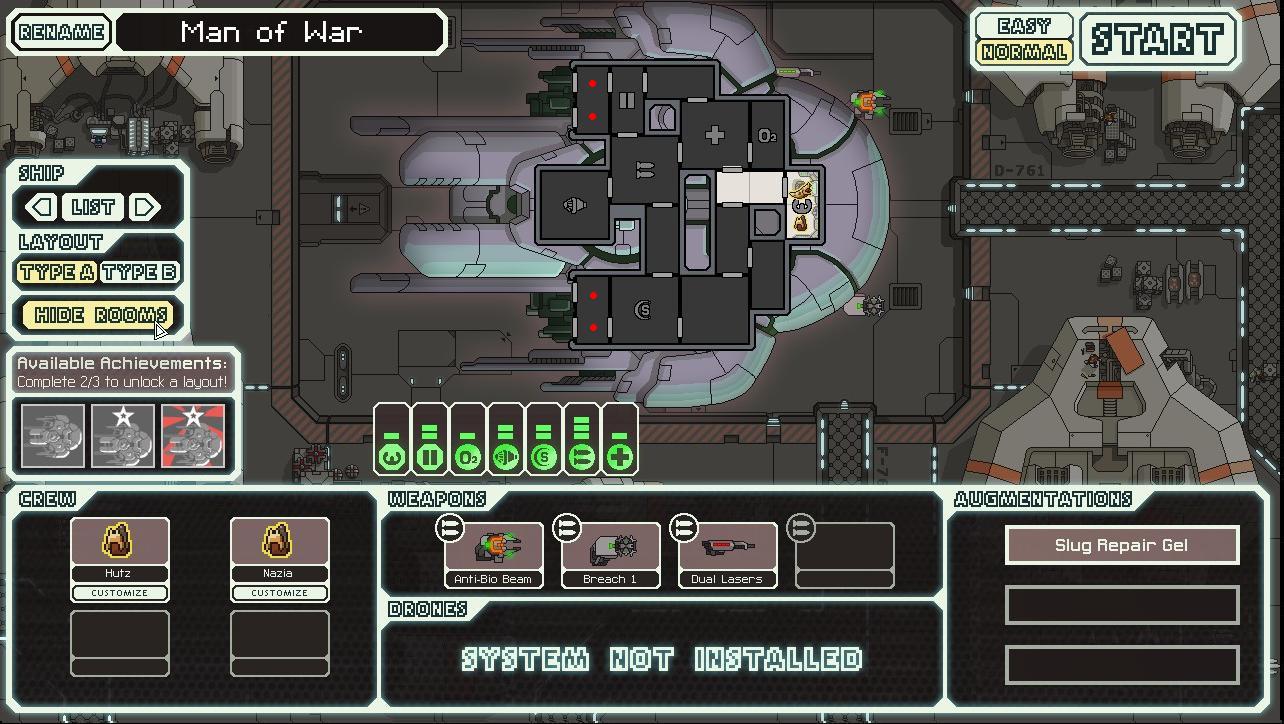
This guide is based on my experience after 500 hours or so, and it was very likely for me to have 25% evasion, level 2 doors and shields on my ship with nearly 100% hull on almost every run with most of the ships. Just read the Ship's log for sector 1 in this guide - it shows how I manage to achieve this.
dgxde 17 Apr, 2022 @ 11:25am 
Amazing guide!
newarkinvaders 16 Apr, 2022 @ 12:34pm 
The exit beacon is glowing magnificently before you, but take the time to check over your systems - are your doors at level two? have you upgraded your shields at least once (preferably twice)? Is your evasion 25% or above? if you have answered "no" to any of these questions, you will need luck on your journey ahead - and believe us at Federal high command when we say "luck favours the prepared".


How is this even close to possible ?

Evasion to 25% will cost like 90 spacebucks , shields up once 50 , doors to 2 .. 35 more . Then 65 for the reactor to run either or on the shields/evasion... Thats like 240 scrap through sector 1 .... How is that possible ?
Zing 12 Mar, 2022 @ 2:32pm 
This is seriously amazing
Dr Whom  [author] 14 Feb, 2022 @ 7:04am 
Thank you very much! Hopefully I can get inspired to write some more. I guess keep an eye on my profile just in case :)
crushy spike ceiling 12 Feb, 2022 @ 3:23pm 
massively surprised to see that ftl is getting this guide out of all games, since you'll rarely even find something this good on an official wiki. not disappointed though, this thing's incredible. really well made as well, i would buy a physical copy of this if it existed