War of the Vikings

War of the Vikings

175 ratings
The Ultimate War of the Vikings Guide
By Berserk
This guide is now updated for Beta version 0.8.1
This guide deals with everything from maps, to game modes, weapons, classes, duel strategies, combat mechanics, tips on how to swing faster, it touches on a little bit of everything. The guide may seem a bit overwhelming, be assured it is divided into easy to follow sections.
   
Award
Favorite
Favorited
Unfavorite
Basic Combat Mechanics
Melee
In melee you have 3 attack directions, 3 block directions, a dodge button, and a special attack button. In addition to that, movement and footwork plays a key factor in the outcome of a fight. You want to aim your swing at neck level with full charge allowing for instakills and decapitations. Attack up to perform a high attack from a spear, or attack down to perform a low jab from a spear.


Tri-Directional Attack
You can attack from the left, right, or perform an overhead attack using mouse gestures to control which attack is used. These attacks are then charged as you hold down your left-mouse button. If you slash at someone's neck (from the left or right) while your charge is in the red you can perform a decapitation instakill. If you don't get the instakill you will still output a lot more damage then if your charge is in the yellow persay. Be careful however as the charge will begin to go up and down after holding it for an extended amount of time. Consecutive swings after a charged attack recieve a speed bonus[/b]. You can further increase that speed bonus by turning your camera so that your weapon will collide with the enemy immediatly at the start of the swing. Block up to parry a high jab from a spear, block to either side to block a low jab from a spear

Blocking
Keep in mind that if an enemy strikes your parry, he has a slight stun in which he cannot block, if he strikes your shield there is no stun.

Parry
You can attack in 3 directions, you can parry in 3 directions. You can parry right, left, or up. Right and left parries are interchangeable when it comes to blocking right and left attacks, it depends on the direction you're facing. So long as the sword is between you and him it will parry (unless someone's lagging or they go around your parry). When you successfully parry you can perform a riposte, a counter attack, which means your swing will have additional speed. If you use an acceleration drag you can land the riposte before they can get their block back up. You can read about a few ways to make your hit connect faster in the footwork section. Keep in mind that there is a slight delay from when you press right mouse button and when your block is actually active. This delay is shorter than the shield delay. Currently weapons cannot break, that may change in the future.

Shield
Your shield only blocks one way, and that's simply from holding your right-mouse button. However you do need to turn your shield, when they perform an overhead lookup, else they might be able to go above your shield. A shield can be destroyed in 1 shot by a javelin.


To counter sidestepping, which will be discussed shortly, you need to turn the camera to the right or left. While the turn isn't as drastic as it is in a game such as Chivalry: Medieval Warfare for those who've played it, it is still needed to ensure a block. The shield will block projectiles regardless of it's state, active, inactive on your arm, or inactive on your back (press 4 as Thane to toggle whether or not the shield is in use). Keep in mind that there's a delay between the start of your block and when it's actually active and able to protect you, this delay is greater than the parry delay. There is also no speed bonus for blocking their attack with a shield, they recieve no penalty for being blocked. Shields are broken when you block a strike with no stamina.


Special Attacks
All special attacks require a large amount of stamina, have the ability to perform an instakill, and have a slow start where the opponent can react, and a pause at the end where they can counter attack.

Pro-tip from Moo: If an enemy performs a dodge-attack combo on you, by parrying the attack you will stun him long enough to land a special attack on him!

Lunging Stab
Your character model takes a step forwards, performs a long stab, holds a pose for a second, then returns to a controllable position. With this attack you want to aim for the head, it will instakill all opponents when it's a head shot. However, it can only instakill a Hirdman when it's a body shot, it will normally do 84 damage to a Thane and Huscarl as a body shot. Special attacks do require a large amount stamina. You can drag your mouse to slightly alter the course of the attack, necessary as the area of damage done by the attack is extremely narrow.

Overhead Chop
Two handed axes perform an extremely powerful overhead attack that will instakill all classes. Just like with the Thane's attack it has an extremely narrow hit area, leaves you vulnerable at the end of the attack, can be altered by dragging, and requires a lot of stamina. This attack will go through parries and will destroy a shield.


Spin Attack
This special attack is performed by 1 handed axes and will instakill all classes. While you can alter the course of the attack via dragging, I can't think of a reason you would want to. For comparison sake lets say that both the Lunging Stab and Overhead Chop will affect enemies in a radius of 5° in front of you, and within a short range. Using that scale the Spin Attack has an effective radius of 200° around you with the same basic range, with strength equal to the Huscarl's.

A good time to use this ability is after turning a corner, start it just before the enemy turns the corner and he won't know what hit him.

Kick
Perform a Sparta-esque kick on a target in front of you. If it connects it will cause him to stumble backwards enabling you to spam him to death through use of the dagger. Kick can only be performed while holding the dagger. You can kick people off ledges, cliffs, etc.

Push
This is a special attack unique to the Spear Warrior. You push the enemy(s) backwards giving you space to use your spear. They can be pushed off of cliffs, ledges, etc. This is a very useful mechanic.

Ranged

Throwing Weapons
Thanes receive 2 throwing axes capable of doing large damage, and Huscarls receive 4 throwing daggers capable of doing light damage. Press and hold middle-mouse button to get out and hold your throwing daggers, release to throw. They do have a relatively slow speed so you may need lead the enemy by a fair bit. Projectiles can bounce off the environment. They do not regenerate. It's a good idea to use them on an opponent and then follow it up with a forward dodge attack to initiate the fight.

Archery
Using the bow is extremely simple. Hold the right-mouse button to bring your bow up, continue holding it to charge the shot, press left-mouse button to fire. Easy as that. You want to fire when the charge bar is full, after remaining full for a few seconds your character will start shaking and the charge will go up and down. After firing the arrow you can continue holding right-mouse button to immediately get out another arrow. Each time you fire it consumes stamina, no stamina means no more shooting.

Damage done is dependant upon where the arrow strikes the opponent. Head shots deal more damage, fully charged head shots provide an instakill (+150xp). In addition to that fully charged arrows will travel through an opponent allowing for a collateral kill. I do not know if it will travel through 2+ opponents though. It should be noted that while the charged head shots will provide 100% chance of an instakill, you can fire an uncharged shot and as long as it hits skin (eyes, mouth, etc) on their head it will still instakill. This is easiest (but still hard) against archer, harder against thanes, even harder against Saxon Huscarls, and virtually impossible against Viking Huscarls.

Other Mechanics
Dodging
In War of the Vikings all 3 of the classes have the ability to dodge in 8 directions. Hold down w, a, s, or d, or a combination of two that are side by side as far as direction goes, and then press the left alt key to perform a dodge. You can press the left mouse button to combo the dodge into an attack. This attack does 30 damage. Perform a forward dodge attack to get the head start in a duel. When an enemy performs a special attack perform a backwards dodge attack, you dodge back, then step forward and attack hitting the enemy while is in the pause of his special attack. Those are the basic dodge attacks you may see a lot of people performing, then you get into some of the more advanced dodge attacks.

The advanced moves are about trying to get past the enemies block. Hold down W with either A or D as well to dodge to the forward and left, or forward and right respectively. Combine this into an attack combo and you can do diagonal dodge attacks. When the enemy is approaching you from the front you use that diagonal dodge attack to try and get around his shield. Which direction you choose is based on how close the enemy is to you. If he is very close perform a diagonal dodge attack to the right. The dodge attack animation has the swing starting from left and slashing to the right. This means that it will connect with opponents on your left side faster then on the right, making it ideal for when the enemy is close. If there's still a bit of distance perform a diagonal dodge attack to the left. While dodging turn your mouse 45 - 90° to the right. This way you should be looking directly at your opponent, you should be directly beside or a bit behind him.Your attack will be coming from your left and should hit him in the back assuming he isn't quick enough to turn and meet you. You can only perform this dodge attack combo when you have the Agile Fighter Perk.


Teamwork and Squad Systems
Not many people seem to be aware of the squad mechanic in this game. While in a match you can press the escape button ~> select squad ~> click on one of the squad names. The first person to join the squad becomes the squad leader (you must be a squad leader and win a map to unlock the Ragnar Lothbrok achievement). There can be a max of 4 people in each squad.

A good way to greatly benefit your team is to use the tagging mechanic. Hold down T while looking at an opponent to spot them, their name will show up and they will receive a red outline around their model to make them easier to spot, this will only be visible to squad mates however. There's power in numbers don't forget, try sticking with some allies to work together. Beware, there is team damage.

If your chat Message starts with [*DEAD*] only other dead people can read it

Experience and Score
You can earn experience for a large variety of actions. When you damage an opponent you recieve xp relative to how much damage you did. If you knock them down you get 100xp, if you finish them off (perform 50dmg on them while they're knocked down) you get 50xp. If you get an assist on an opponent you get 50xp. Reviving team mates is an excellent way of scoring some points. If they manage to stand all the way up after you revive them it will net you 200xp / revive. You need to spend 2 seconds reviving the person, it will then take them an additional 4 seconds to stand up. You can also bandage yourself by holding B, it takes 6 seconds, will regenerate you to full health, but does not provide xp. Killing a player you tagged will give you both Tagger Reward and Tag Kill xp.

If your action effects a squad mate you can earn further bonus experience. Reviving a squad mate will bring in 250xp vs 200xp on a regular team mate. When you tag an enemy for your squad to target you will receive xp upon your squad killing that opponent. You also get 15xp for successive kills, ie each kill in a kill streak (forgot to toss that on the graph).

In v0.8.1 xp does nothing as there are no levels. It does however translate into score which reflects your position on the scoreboard. Highest XP Possible is calculated for 1 kill, will not include xp from a 2nd kill (ie, multi-kill bonus not counted, nor xp for a 2nd kill). The max damage possible is 214.

Calculation:
Knockdown (100) + tag kill (20) + tagger reward (15) + squad wipe (200) + successive kill (15) + instakill (150) = 500 xp [(Archer max: Strong Arm (50) + Longshot (25) = 75) > (Melee max: Adrenaline Rush / Blood Thirst (50) + Agile Fighter (20) = 70)], 500xp + 75xp + 214xp, max xp = 789xp

Highest XP Possible for a kill: 789xp

Sprint Mechanic
In most games there's 2 ways to sprint.You press the sprint key (left shift) once to sprint, release, and then you press sprint again or perform an action to cease sprinting. Or you can hold down the shift key and stop sprinting upon the keys release. War of the Vikings however combines the two. If you tap sprint and immediately release you will use the former method of sprinting, however if you hold the down the sprint key you get the later method of sprinting.

When you sprint you put your weapon away, then take it back out when you stop sprinting. It takes about half a second to do this so wait till your touching the enemy to stop the sprint. Never sprint away from a battle, the enemies will tackle you, don't sprint into a battle, the enemies will tackle you.

Chasing, Knockdowns, Tackles
When your fighting an opponent and he starts to sprint away you receive a prompt. If you press E you go from your possibly stationary position and perform a tackle on him. He will then begin rolling on the ground where you can beat the crap out of him. Because of tackling you should not run away from, towards, or past an enemy. It's best to stop sprinting before arriving at an opponent. The game does have a chase mechanic built in, if you're looking at an enemies back you receive a fairly large speed bonus. The chaser perk will add another 20% movement speed when chasing and increase your tackle radius by 20%.


If you're sprinting and get hit by a projectile, or melee weapon, you get the same falling / rolling / sliding animation. The Juggernaut perk will negate that however. Likewise, if an opponent is sprinting at you, hit him with a projectile then beat him up as he slides to your feet assuming he does not have the Juggernaut perk. Keep in mind that if there's an ally between you and the enemy your tackling, that ally will also be tackled and knocked down.
Dueling
Going Around Shields
Going around shields in War of the Vikings can actually become fairly easy. Basically you want to combine footwork with turns. Or you can use dodging.

Dodging
If your a thane perform a front-left dodge attack combo and turn left so that your sword quickly strikes your opponents back, effectively dodging around the shield. Keep an eye on the distance however as this won't work if the distance is to great and he's backing up. Same for Hirdsmen. For Huscarl do that same trick but a front-right dodge attack combo as opposed to left. This compensates for the fact that the Huscarls attack combo will sweep from right to left, hitting them in the back.

Camera Dragging
Using your feet you want to try and edge around him a bit, start a Left attack, turn right, then walk sideways to the left and hit him in the back. Turn your camera left as you walk to the right around to his other side and perform a right attack into his back again. As your attack swings, move your camera quickly in the direction your attack is heading to ensure it meets the opponents back before he can react and turn his shield.

Footwork and Duels

Dodges aren't necessary for avoiding enemies strikes. A lot of battles can be decided by who has the better footwork, if you're standing still in a fight something is being done wrong. When on defence you need to maintain situational awareness. Are you backing up into a group of enemies? Is someone flanking you? Are you about to back off a cliff? Are you giving up too much ground? Etc. Some weapons and perks also have a high speed bonus on a consecutive hit. The 1 handed axe is very good at performing rapid attacks so long as they are landing and you have stamina.


Being on defence is not a bad situation to be in. It gives you time to look at your opponent and see how he fights. Is he spamming slashes? Is he patient? If your in a 1 v 1 situation you will most likely want to use the sword with no shield if you're playing Thane. The sword on it's own is better as it can block faster, and will stun the enemy upon parry as previously discussed compared to the sword + shield. If you're in a 1 v 2+ situation, a shield is the better option or you may not be able to block all their attacks. When they do swing at you parry it with your sword and perform a riposte. If they're using a sword on its own or an axe, you may want to do a light attack for speed, if they have a shield risk it and charge your attack so you can get a quick follow up afterwards. This is where foot work makes a huge difference, you want to be beside them either to the right or left depending on which direction your swing will come from, how you want to hit them, and how defensive they are:

Method 1 - if they are continually backing up so you can't close in, turn to the opposite side your attack will come from and attack, making it connect faster, however this method is easily blocked if they get their block up in time. For example turn left and use a right side attack.

Method 2 - if they aren't backing up then advance either to the left or right of them. Attack from the same direction you chose to flank, and turn your camera at the enemy. If you go to his left start your attack from the left. You want your attack to land on his back, and at the same time you want it to connect as fast as possible. Turn your camera and use your feet too position yourself where you feel you should be.


You can perform a "feint" by attacking, pressing the right-mouse button to cancel the attack, then attacking from a different direction in rapid succession. Likewise you can feint with your parry to make him think you won't be able to successfully block him.

This is all about practice, you can't master these strategies just by reading them. Your best chance of success is to continually put yourself in 1 v 1 situations and develop your own strategy. Don't forget about using dodge attacks to initiate battles, or a simple back or side dodge to give yourself some space.

Tricks
Desensitization Overhead

If the enemy is not using a shield, and your using a two-handed axe, this can work, even against decent players. This is best used in duel situations, the more people participating in the fight (including allies), the lower the odds of success are. Basically take your axe, begin an overhead attack, cancel, repeat, on the 3rd, 4th time, maybe more / less depending on the time intervals between the overheads, instead of overhead attacking perform a special attack.

Bandage Trap

To do this trick simply bandage, then when an enemy closes in to kill you, aim at his head and use a special attack, works with any class. Better players will rarely fall for this but it will always work against noobs. To increase odds of success, bandage somewhere that you would actually bandage if you were hurt, ie in a corner, behind cover, not in the open field.

Techniques

Mouse Dragging

Mouse dragging allows you to swing faster, for your weapon to connect with the enemy before their swing hits you. When mouse dragging you simply want to spam left and right attacks. Quickly move your mouse with the direction of the attack for an instantaneous connection. This is best used in combos. Start an attack from the right (charge the initial attack if you can but no charge works just as well), move your mouse quickly to the left, as soon as it connects begin an attack from the left and quickly move your mouse right. Repeat. Simple as that. Combining this with blood thirst, adrenaline rush, or hard hitter perks can truly make you a master of the battlefield.

Helicoptering

This is essentially the same as Mouse Dragging, only it's to the extreme. For this technique you want an extremely high mouse sensitivity. Bascially every time you swing you want to do a 360 degree circle. Because the sword possesses a cleave ability, one swing can go through multiple enemies, when surrounded this technique enables you to kill 2, 3, 4, 5, 6, etc, people in two or three swings assuming they are all circled closely around you. The technique also makes you extremely hard to hit, and when alternating the directions of attacks, spins, and if your moving it makes you near impossible to block as well as the game currently stands. So you can easily hit them, and they will struggle to hit you.
Weapons and Armour
Weapons and Shields
Ingame descriptions were used, some grammer / format corrections were made, ie: for the throwing weapons the ingame description is "mouse middle" when it should be "middle mouse button".
Melee
  • Sword: A basic Viking-era sword capable of delivering lethal slashing swings. Its special attack lets you stick enemies with the pointy end.
  • Bearded Long Axe: This weapon rose to fame as the preferred weapon of the Saxon Huscarls. The axe head has an extended lower portion that provides a wide cutting surface without adding much weight to the weapon.
  • Dane Axe: The Dane Axe is a dreaded two handed weapon capable of inflicting horriyfying and instantly fatal wounds to any opponent.
  • Field Axe: Although the design of early Vikings and Saxon axes clearly show their origins as wood cutting tools, later models like this field axe took on shapes more specialized for war and bloodshed.
  • Short Bearded Axe The axe head of the Short Bearded Axe has an extended lower portion which provides a wide cutting surface without adding any considerable weight to the weapon.
  • Norse Battle Axe The thin smile of the Norse Battle Axe became feared throughout Europe as rumours of the fighting prowss of the northmen spread like wildfire.
  • Boar Spear This spear, originally used for hunting boars, has proven itself equally useful for skewering humans in times of war.
  • Dagger: No official description available. My own: Very short, very fast weapon which can easily overwhelm an enemy so long as you maintain your stamina. Cannot block.

Ranged
  • Longbow: Strength: Damage and range; Weakness:Speed
  • Hunting Bow: Stength: Speed; Weakness: Damage and Range
  • Javelin: Has the ability to parry. Will instakill with any headshot.
  • Throwing Dagger: Throw this weapon at the enemy by using the middle mouse button.
  • Throwing Axe: Hurt your enemy froma distance by using the middle mouse button.

Shields
  • Round Shield: A large shield that deflects arrows and enemy attacks
Loadouts and Classes
Classes
Champion Offensive class, champions are good on offence and should lead the assault
  • Default Champion
  • Bloodthirsty Champion
  • Unstoppable Champion

Skirmisher Support and Recon class, have an eagle-eye of the battlefield and are able to spot out flankers while providing ranged support
  • CQC Skirmisher
  • Long Range Skirmisher

Warrior Balanced class; provide defensive structures on the battlefield able to hide behind shields while spears prod the enemies. Should provide support and backup to champions.
  • Default Warrior
  • Versatile Warrior
  • Spear Warrior

Loadouts
This part will most likely be deleted upon the release of character customization. Locked perks are not included in the perks area

Default Warrior
  • Melee Capabilites: Sword, Dagger, Round Shield
  • Ranged Capabilities: 2x Throwing Axes
  • Special Attack: Lunging Stab
  • Damage Output: Low to Medium Damage @ High Speed, Medium to High Damage @ Medium Speed
  • Damage Tolerance: Acceptable
  • Strengths: Solo work, Flanking to take out archers, Sword has the ability to spam, getting a kill replenishes stamina
  • Weaknesses: Landing consistent headshots is important
  • Perks: Agile Fighter, Adrenaline Rush, Chaser


Default Champion
  • Melee Capabilites: Bearded Long Axe, Dagger
  • Ranged Capabilities: 4x Throwing Daggers
  • Special Attack: Overhead Chop
  • Damage Output: Medium Damage @ Medium Speed, Very High Damage @ Slow Speed
  • Damage Tolerance: High
  • Strengths: Does not need headshots for high damage output, faster consecutive attacks
  • Weaknesses: No protection against arrows, axe is shorter than the Thane's sword
  • Perks: Agile Fighter, Hard Hitter


CQC Skirmisher
  • Melee Capabilites: Sword, Dagger
  • Ranged Capabilities: Hunting Bow
  • Special Attack: Lunging Stab
  • Damage Output: High Damage @ Slow Speed Ranged, Medium Damage @ Slow Speed Melee, Medium Damage at Medium Speed Ranged, Medium Damage @ High Speed Melee
  • Damage Tolerance: Poor
  • Strengths: Very fast fire rate, Sure Shot perk allows for faster follow up attacks if an arrow hits the enemy
  • Weaknesses: Very squishy, will often run out of stamina constantly during extended melee fights, cannot dodge-attack combo, arrows are slower compared to Hirdman
  • Perks: Sure Shot, Strong Arm

Long Range Skirmisher
  • Melee Capabilites: Field Axe, Dagger
  • Ranged Capabilities: Longbow
  • Special Attack: Spin Attack
  • Damage Output: Very High Damage @ Slow Speed Ranged, Medium Damage @ Slow Speed Melee, Medium Damage at Medium Speed Ranged, Medium Damage @ High Speed Melee
  • Damage Tolerance: Poor
  • Strengths: The axe gets great combos allowing for very fast followup attacks, Can instakill each class, can keep an eye on enemy movements
  • Weaknesses: Very squishy, will often run out of stamina constantly during extended melee fights
  • Perks: Agile Fighter, Strong Arm


Bloodthirsty Champion
  • Melee Capabilites: Dane Axe, Dagger
  • Ranged Capabilities: Javelin
  • Special Attack: Overhead Chop
  • Damage Output: High Damage @ Medium Speed, Very High Damage @ Slow Speed
  • Damage Tolerance: High
  • Strengths: Does not need headshots for high damage output, won't fall when shot while sprinting. Can take out large amounts of enemies and maintain sustained combat thanks to the Bloodthirsty perk
  • Weaknesses: No protection against arrows, won't hold a charge for very long, slower follow-up attacks
  • Perks: Chaser, Blood Thirst

Unstoppable Champion
  • Melee Capabilites: Norse Battle Axe, Dagger, Round Shield
  • Ranged Capabilities: 2x Throwing Axes
  • Special Attack: Spin Attack
  • Damage Output: Low to Medium Damage @ High Speed, Medium to High Damage @ Medium Speed
  • Damage Tolerance: Acceptable
  • Strengths: Solo work, Flanking to take out archers, Axe is easy to get around shields. Spam.
  • Weaknesses: Cannot perform dodge-attack combos
  • Perks: Hard Hitter, Juggernaut

    Versatile Warrior
    • Melee Capabilites: Dane Axe, Dagger
    • Ranged Capabilities: Hunting Bow
    • Special Attack: Overhead Chop
    • Damage Output: In Melee - High Damage @ Medium Speed, Very High Damage @ Slow Speed | In Range - Medium+ Damage at Medium Speed, Medium Damage @ High Speed
    • Damage Tolerance: Acceptable
    • Strengths: Solo work, useable for many strategic positions
    • Weaknesses:no perks supporting the bow
    • Perks: Hard Hitter, Adrenaline Rush, Agile Fighter

      Spear Warrior
      • Melee Capabilites: Boar Spear, Dagger
      • Ranged Capabilities: 2x Throwing Axes
      • Special Attack: Push
      • Damage Output: Low to Medium Damage @ High Speed, Low Damage @ Medium Speed, Low Damage @ Slow Speed
      • Damage Tolerance: Acceptable
      • Strengths: Excellent support class, provides incredible aid to all classes, defensive, push is great, Bloodthirsty perk further increases its defensive and supportive capabilities
      • Weaknesses: Poor in 1 v 1 scenarios, must stick with a team mate
      • Perks: Arendaline Rush, Blood Thirst, Agile Fighter

Maps and Gamemodes
Game Modes
Team Deathmatch
In team deathmatch players fight it out on either the Saxon team or the Viking team. The first team to reach 100 kills wins the map. A knockdown counts as a kill, even if you revive an ally the other team still gets the kill.

Arena
For those who have played Chivalry, Arena is the same as Last Team Standing. Two teams fight it out until one of the teams is able to win 5 rounds. A round is completed when one team has no living players left, you only get 1 life each round. You can be revived when you go down like in TDM.

Conquest
Each team spawns on an opposite side of the map with 4 or 5 neutral points leading towards each-each other. A neutral point can be captured at any time. Once the two teams have captured their points and meet at a central point the battle truly begins. Teams fight over each others front line objective. If one team is capturing the other teams front line objective then their own becomes locked. If the other team defends their objective then both front line objectives are open game once more and they must push to the enemies objective. Once a team captures a point they must defend that point for a short period of time before being allowed to move on to the enemies next base. The game ends when the extremely generous time limit runs out, or one team captures all the objectives.

  • Round Shield: A large shield that deflects arrows and enemy attacks.

Maps
Cliffs
  • Gamemodes: Conquest, Team Deathmatch, Arena
  • Description: Conquest and Team Deathmatch take place on the opposite side of the cathedral than the Arena map. Their side is much larger and progresses downhill from the cathedral passing some scattered houses and staircases until ultimately reaching a large cliff with a river. On the right there is a water-filled ravine with a small bridge crossing it to the 1st capture point. On the arena side it is a small map with a few scattered boulders and one large rock wall towards the ocean side allowing for a hidden side passage from one side of the map to the other.

Spooky Santuary
  • Gamemodes: Arena
  • Description: A very small square map with a raised structure in the centre. A small canel runs along the map and through the centre under the raised structure, the canal is about 1 man wide. It is a dark map, and slightly foggy.

Forest
  • Gamemodes: Team Deathmatch
  • Description: Large open forest perfect for archers. Riverside valley turns into a gorge after climbing some hills, both tops of the gorge are walkable and fallen trees cross over it. Gorge opens on a mini Stonehenge with cliffs leading to water past that.


Docks
  • Gamemodes: Team Deathmatch, Arena, Conquest
  • Description: A river travels through the center of the map dividing it in 2. In the center of the map is a bridge that goes over the river. On either side of the map are two shallow passes. One one area of the map atop a hill is a mighty wall, as you travel down the hill you pass other houses and at the bottom is one end of the bridge. Theres also a stair case taking you into another room with a hanging wooden platform. The other end of the map is slightly above sea level, it has a house and viking boat.


Gauntlet
  • Gamemodes: Team Deathmatch, Arena
  • Description: Very small, competitive map. boardwalks surround the map with two small areas on opposites of the map for teams to spawn. Much of the map is marsh with platformed areas, on one side of the center is a raised area. Blockades provide protection from archers in the center.

Crag
  • Gamemodes: Arena
  • Description: Very very very small map, good for melee, hard on archers. on one side of the map is a sheer drop, on the other side is a wall of rock. In the center of a map is a rock rising at an angle, walking off the top of the rock will also send you off the cliff. You can go around or under that rock to get to the other side.

Monastery
  • Gamemodes: Arena, Team Deathmatch
  • Description: Courtyard of a large monastery on the coast. in the center of the map are stairs going down into a smaller courtyard. Near the coast is a bridge going over this smaller courtyard and running along the coast. You can hear the church bells at periodic intervals.
Clans
North America
The Imperial Army (ia. |)
Clan Leader / Division Leader: AlphaSniper
Leaders URL: http://steamproxy.net/id/AlphaSniper
Members: 70
Recruiting: Always
Continent: North America
Website: http://www.theimperialarmy.enjin.com/
Additional Notes: Teamspeak 3 is required, you must be active. In addition to 54 in the Vikings division, we have over 120 members stretching from Chivalry, to Battlefield 4, Rome 2, Wargame, Verdun, and Planetside 2. All North American Tournaments occur internally in the army. We are currently undefeated on the Vikings competitive scene.

West Knights (wK)
Clan Leader / Division Leader: Sir Pink
Leaders URL: http://steamproxy.net/id/sirpink
Members: Sir Pink and more
Recruiting: decent humble people
Continent: North America
Website: http://steamproxy.net/groups/sirpinksfans
Additional Notes: Lov any game with stab stab.

Dat Saxon Life Doe [DSLD]
Clan Leader / Division Leader: The Horniest Lobster
Leaders URL: http://steamproxy.net/id/hugedick/
Members: 3 as of post
Recruiting: Yes
Continent:NA
Additional Notes: Mumble and mic required. Doesn't matter how many kills you get its how well you play as a team. That being said understanding of mechanics required. Obviously we play on Saxons in Ravens.

(dp)
Clan Leader: SneakyBadger & Sir Dagonet
Leaders URL: http://steamproxy.net/profiles/76561198067489220
Members: 12
Recruiting: Yes
Continent: NA
Additional Notes: We use steam chat for the most part, you dont need a mic. Looking for team players who respect each other but also others who are playing the game. We dont just play wotv but also wotr, so if you want to fight with/against us there we'd be more than happy. See you in Valhalla!

Line of Eld (Line of Eld / LoE)
Clan Leader / Division Leader: [Line of Eld] Cuthbert
Leaders URL: http://steamproxy.net/profiles/76561198002073999
Members: Five
Recruiting: Yes
Continent: The Canada one
Website: None yet

Killers In Lethal Alliance |ĶiĻă|
Clan Leader / Division Leader: |ĶiĻă| Retsnom McBoogerballs / |ĶiĻă| Baine
Leaders URL: http://steamproxy.net/profiles/76561198050934272/
Members: 3
Recruiting: Yes
Continent: North America
Website: http://kilas.enjin.com

Shield's of Ares (-SOA->)
Clan Leader / Division Leader: -SOA-> Yokon
Leaders URL: http://steamproxy.net/id/Yokon/
Members: 3 as of post
Recruiting: Yes, for hoplite styled players.
Continent: North America
Website: http://steamproxy.net/groups/Shieldsofares
Additional Notes: We're a friendly clan, looking for more hoplite styled players. We fight with shield and spear, and create a dominate presense on the battlefield.

Recondo [Recondo]
Clan Leader / Division Leader: Sam Houston
Leaders URL:
Members: 7
Recruiting: Yes, mumble required
Continent: North America
Website: http://www.recondo.enjin.com (inactive right now)
Additional Notes: Laid back group of pvpers, played every MMO that you can think of. Previous clan name and still on some games (Deadly Intentions)

Recursion [00]
Clan Leader / Division Leader: 00_AX Zoe
Leaders URL:
Members: 6
Recruiting: Yes, mumble required
Continent:NA
Website: www.recursion.tk
Additional Notes:multi game community started in planetside. Focused on competititve game play.

Ulfberht Vikings [Ulfberht]
Clanleader: Kale Hundr
Members: 9
Recruiting:Yes
Continent: NA

Europe
Saxon Shield Wall (SSW)
Clan Leader / Division Leader: wulfhlið
Leaders URL: http://steamproxy.net/id/sabatonsaboteurs/
Members: 60
Recruiting: Yes
Continent: Europe
Website: http://steamproxy.net/groups/Saxonshieldwall
Additional Notes: WotV-only clan, we use Razer Comms as our VoIP client. We always play as the saxons when playing as a clan.

The Sons Of Odin [TSO]
Clanleader: TheDongCopterKing-Tharos
Members: 10
Recruiting:Yes
Continent: EU
Additional notes: Always Plays Vikings. Wont Gank and always respects Duels.

Guard of Istiniar [IG]
Clanleader: Aeronwen
Members: 29
Recruiting:Yes
Continent: EU

Keyboard Warriors [KW]
Clanleader: Rage Metal Luca
Members: 37
Recruiting:Yes
Continent: EU

Rest of World
Australian and New Zealand Viking Army Corps (ANZVACs)
Clan Leader / Division Leader: Dead Koala
Leaders URL: http://steamproxy.net/profiles/76561198018875816/home/
Members: 21 as of post
Recruiting: yes
Continent: Australia and New Zealand
Website: http://steamproxy.net/groups/ANZVACs
Additional Notes: A group for all Aussies and Kiwis who aren't jerks and want to have fun
Tournaments
Upcoming Tournaments

-/-

Past Tournaments

1st Imperial 2 v 2 Tournament
Date: November 29th, 2013
Open to: Imperial Army Members
First Place: Gethon and Zeus
Second Place: Blaine and Shibby
Third Place: Shawk and Wololo

1st Imperial Duel Tournament
Date: December 6th, 2013
Open to: Imperial Army Members
First Place: Volud
Second Place: Zurrboat
Third Place: BobbyLastName

2nd Imperial 2 v 2 Tournament
Date: December 13th, 2013
Open to: Imperial Army Members
First Place: Blaine and Shibby
Second Place: Gethon and Albi
Third Place: Redneck and Zurrboat

Imperial North American 4 v 4 Tournament
Date: December 21st, 2013
Open to: North Americans
First Place: ia. | Beastacus, ia. | Blaine, ia. | ShibbyShawn, and ia. | Zeus
Second Place: ia. | Ballistic, ia. | Gethon, ia. | Volud, and ia. | ynnacnU
Third Place: Chimi, GeneralMike, [LoE] Memphystes, and [LoE] Picard

3rd Imperial 2 v 2 Tournament
Date: January 3rd, 2014
Open to: Imperial Army Members
First Place: Ballistic and Volud
Second Place: EarlJemmings and Zeus
Third Place: Grant and Redneck

2nd Imperial Duel Tournament
Date: January 9th, 2013
Open to: Imperial Army Members
First Place: Nameless Terror
Second Place: Beastacus
Third Place: ChopChops

1st Imperial 3 v 3 Tournament
Date: Friday, January 17th, 2014
Open to: Imperial Army Members
First Place: Alpha Team
Second Place: Bravo Team
Third Place: Echo Team

Arena Tournament
Date: Friday, January 17th, 2014
Open to: Europeans (Ping cannot exceed 135)
First Place: Tie between IG and SSW

1st Imperial 5 v 5 Tournament
Date: Friday, January 31th, 2014
Open to: Imperial Army Members
First Place: AlphaSniper, Wololo, Jim3030, Dave1616, NamelessTerror
Second Place: Bobbylastname, ShibbyShawn, Grim, MetalMaster, Zachyattack
Third Place: Brim, Gethon, Jack Wrage, Ballistic, Fusion
Special Thanks
Huge thanks to Egil Skallagrimsson from Fatshark for his huge help. He set aside a couple of hours to go over the guide with me and ensure it's factual for 0.6.0, something uncommon in developers these days. Big thanks to [DO] Hogar for his help with the archery sections. And a shout out to Anomaly, Flippy, DroltreB and Grim for Grammar and Spell checking. Also a shout out to Flippy for his acting abilities.


Written by ia. | AlphaSniper,
Leader of the Imperial Army
-----------------------------------
Guide will be updated as the game is updated.
Add me on Steam if your interested in joining ia.


Bonus Title
XP Bonus

Damage
=Dmg

Successive Kill
15

Strong Arm
50

Knockdown
100

Finish Off
50

Squad Wipe
200

Assist
50

Resurrect
200

Instakill
150

Longshot
25

Tag Kill
20

Tagger Reward
15

Blood Thirst
50

Adrenaline Rush
50

Agile Fighter
20

Sure Shot
15

Hard Hitter
15

Chaser
15

Multi-kill xp
25


39 Comments
Sgt. Salvador 30 Jun, 2014 @ 10:41pm 
V It's a trap!
jinxdory 24 Apr, 2014 @ 8:58am 
Hello! I have a code that upgrades war of the vikings to the blood eagle edition, the code is: OG4N5-YT2QC-C7LG2 please comment if you use the code
Snorri Nosebiter 31 Jan, 2014 @ 3:35am 
Great guide- it's gone a long way to preparing me for my first games.

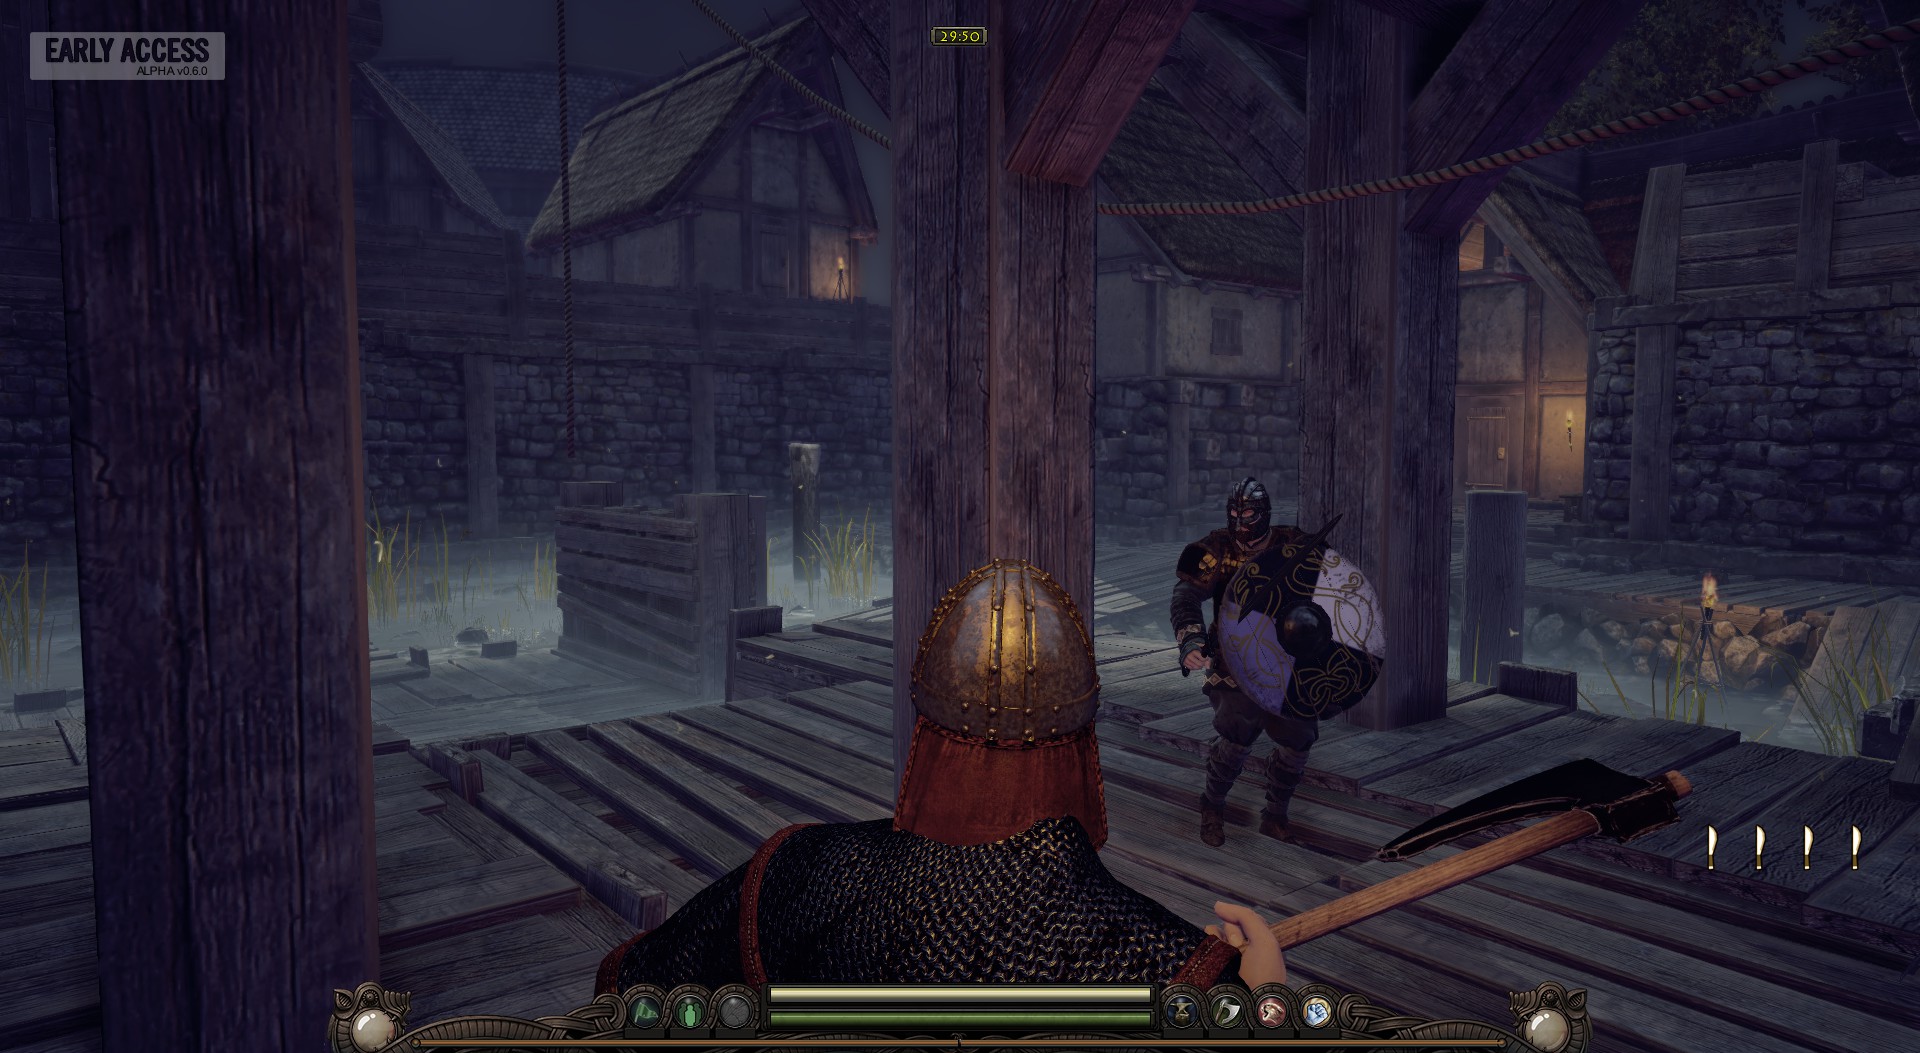
The combat seems to have a lot more in common with Chivalry than I expected, too.
Berserk  [author] 11 Jan, 2014 @ 12:12pm 
Updated Score Table and Added Tournament Section
Mолоко 10 Jan, 2014 @ 6:20pm 
Nice, hope the ping will allow us to fight against americans.
XA3 12 Dec, 2013 @ 6:28pm 
Sweet! After commenting here i thought of something, that might help the in-depth analysis.
http://steamproxy.net/app/234530/discussions/5/630799815338715699/
Berserk  [author] 12 Dec, 2013 @ 6:23pm 
Also max xp possible for one kill updated to account for max damage being 214 not 150~, and the blocking and attacking sections were updated to account for the spear.
Berserk  [author] 12 Dec, 2013 @ 6:18pm 
Changes for the new 0.8.1 update:
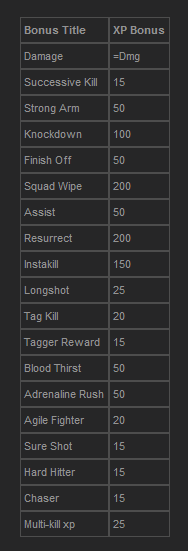
-Score table updated and values corrected
-List of weapons updated
-List of gamemodes updated
-New maps added to the list
-Supported gamemodes updated for all maps
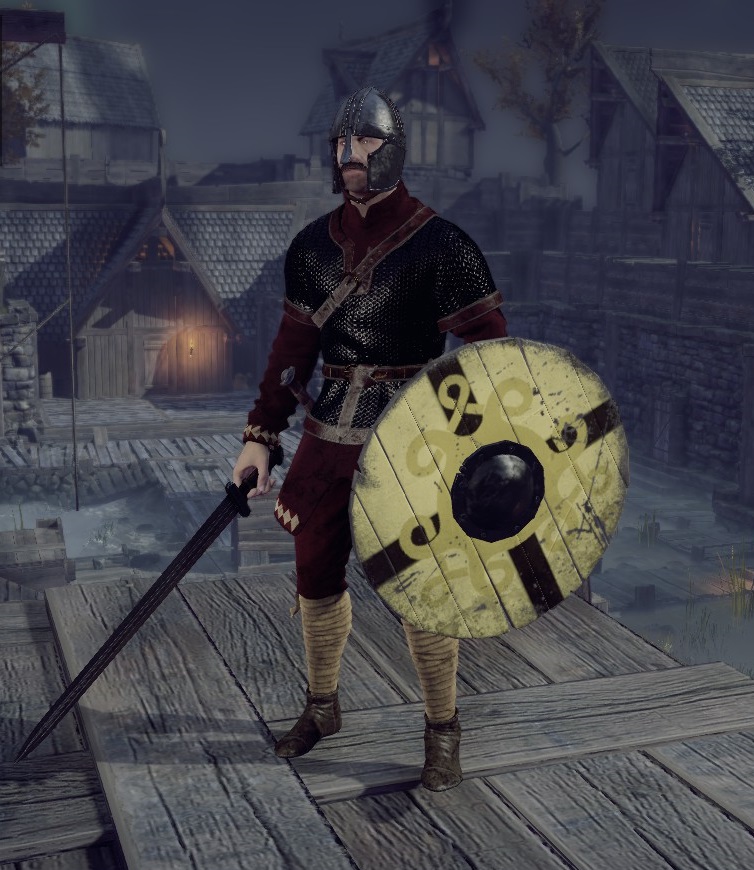
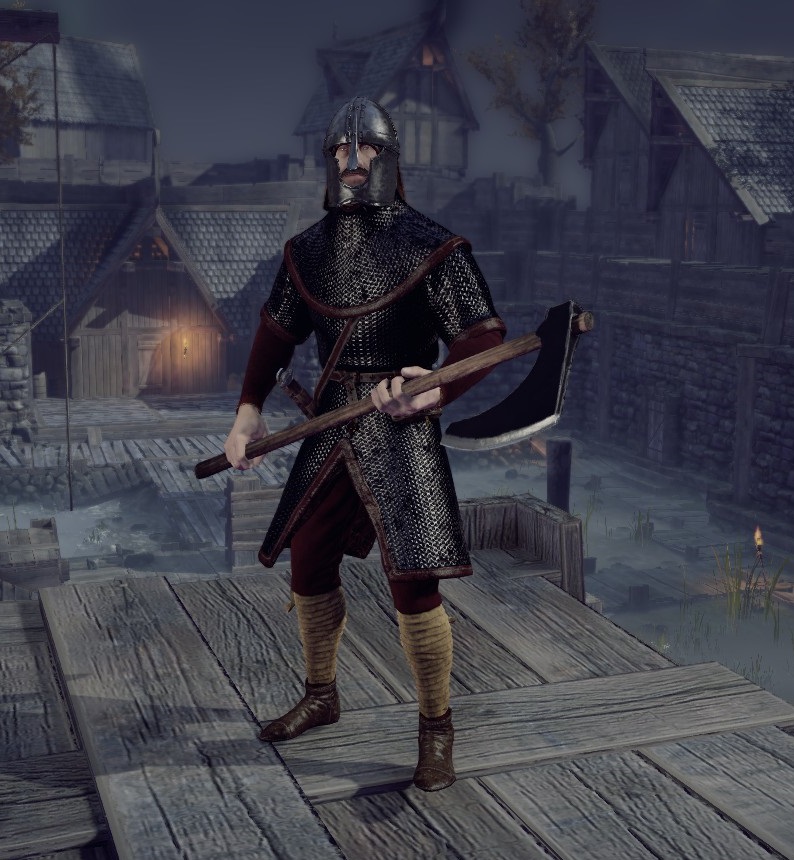
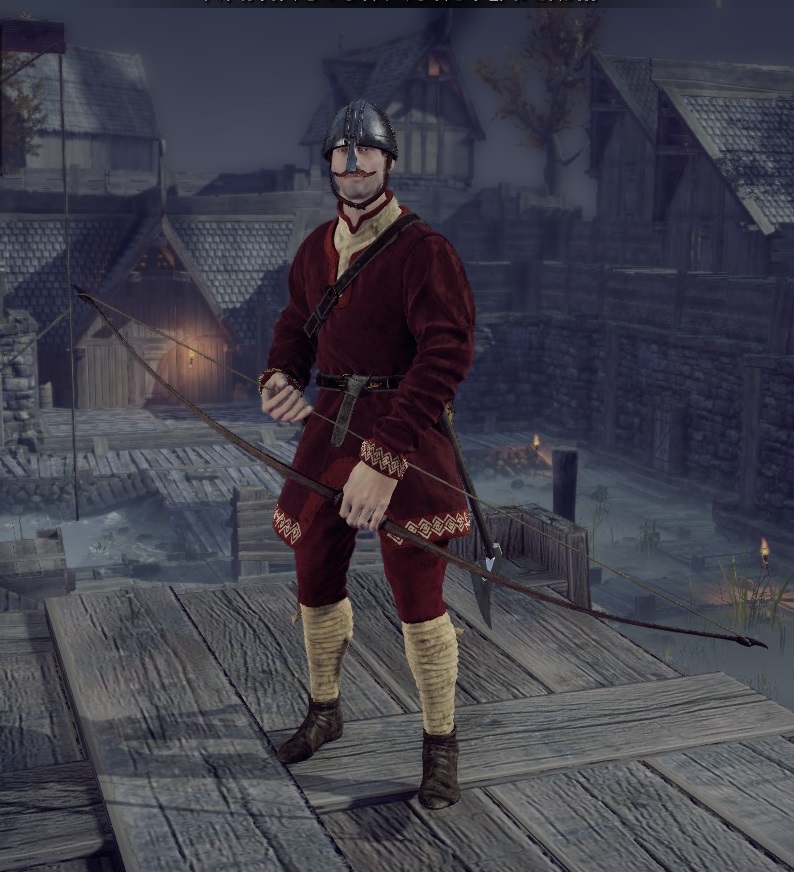
-Added a true class section under "Loadouts and Classes"
-Class section describes basic role of each class/archetype
-New Loadouts added and all loadouts updated
-Added perk list for each loadout (did not include locked perks)
-Rewrote tackle section
-Updated Special Attack area to account for kick and push
-Updated shield section to add that Javelin's can 1 hit shields
-Updated clan list
Berserk  [author] 12 Dec, 2013 @ 6:14pm 
I will be doing what you suggest, Never Go Full Retard, however I'm probably not going to do that until release because I really don't want to much such an in-depth analysis while the developers are still constantly tweaking the numbers.
Nifty4 9 Dec, 2013 @ 3:44am 
Thank you for this. Great job!