Pinball FX3

Pinball FX3

99 ratings
High scoring guide for the 5 minute challenges
By MuddyWolf
This guide explains with videos and text how to score high and collect all the stars in the 5 minute challenges on quite a few of the tables in the game. I also show the fastest way to upgrade the Wizard powers.
2
   
Award
Favorite
Favorited
Unfavorite
Introduction
Welcome! At the moment this guide is far from complete but I’ll share what I have.

Most of the strategies I use also work for the Survival Challenges and of course for the other two modes that allow upgrades (1 Ball Challenge and Single Player With Upgrades).

When it comes to the tables I haven’t done or done well on, you can always fall back on Shoryuken’s official pdf guides. You’ll find them in the guide section of Steam and on Zen’s official site too:

https://www.pinballfx.com/?page_id=7527


I haven’t played many 5 Minute Challenges on the Williams/Bally’s tables, but since these are also real life tables, there are many, more authoritative guides out there already. Start by checking out the tutorials made by Bowen Kerins, one of the best players in the world, on PAPA's youtube channel:

https://www.youtube.com/channel/UCp-cSoq5qVVyts7H8rQjV-w


Don’t be afraid to expirement though. On a lot of tables different strategies can go head to head. Then it depends on your playing style and/or the ease with which you can hit certain targets.
Wizard powers


No matter which table you pick, if you want to go anywhere on the leaderboards, you’ll first going to have to upgrade the Wizard power(-s) of a table. You can max out each Wizard power within 30 minutes or so. Maxing them out is not a very enjoyable experience but no pain, no gain I guess.

Right off the bat, the Multiplier Wizard power is the way to go for most of the timed challenges. The Slow Motion Wizard power is always useless and the Rewind Wizard power is pretty much useless during the timed challenges since you’re allowed to drain and tilt. Draining does end a Multi Ball and you can also fail Missions but the advantage of the Multiplier crosses that all out. When you’re playing for big scores you have to be prepared to practice and hope/wait for that golden game anyway.

You unlock the Multiplier Wizard power by playing the 5 minute challenge of a table and gather at least five stars. This is usually not very hard. Once you’ve obtained the Multiplier Wizard power of a table you’ve got to max it out. I’ve heard/read that some people actually play endless games to do this but I personally prefer a faster and much more boring approach.

I start by booting up a table and entering the Challenges Selection Screen. This is home base. You have to return here again and again for this upgrade trick to work.

I then load the 1 Ball Challenge with the Multiplier Wizard power equipped. I press Start and as soon as I'm on the table I activate the Multiplier Wizard power until it is completely depleted. I then Pause and Exit To Challenges. Once there, I load the table again and do the exact same thing. Over and over.

When the Multiplier is at Level 1, you need only 15 upgrade points to get to Level 2. This means three Restarts as you can see the in the clip below. To get to Level 3, you need 25 upgrade points. The amount of upgrade points you need to climb to the next Level keeps going up. So put on some music to ease the boredom.

Here's the trick in action:


So pay attention to these screens...

Before upgrading:


Inbetween:


After upgrading:


I'm going out of my way to explain this simple trick in detail because I've talked to a lot of players who've told me this trick doesn't work for them. They have to finish their games to upgrade otherwise their upgrade progress is not saved. I know what they're doing wrong but it can be hard to explain in a quick chat, especially if there's also a language barrier.

So to make it 100% clear, here's how not to do it:


Pay attention to these screens...

Before upgrading:


Inbetween:


After upgrading:


As you can see, the game only remembers the first play on the table (5 upgrade points) and forgets the two restarts.

*Bonus tip
If you are sure you understand all of the above, you might want to use the 5 Minute Challenge or the Survival Challenge to upgrade your Wizard powers. The game doesn’t let you 'Continue' these modes so there won’t be a Restart dialog box when you reload the table. Every second counts :) Thanks to Kroevian for this tip. If you want more indepth information about the ins and outs of upgrading the Wizard powers, read the comment section of this guide. Kroevian went the extra mile and explained it in more detail (and probably better) than I do here. Cheers mate!
Passive upgrades


There are six Passive upgrades:
  • Bumper Score bonus
  • Multi Ball Score bonus
  • Skill Shot Score bonus
  • Ball Save Time bonus
  • Distance bonus
  • Combo Time bonus

I thought there was no sneaky way to upgrade the Passive Wizard powers. However, Kroevian, the same friend that gave me the bonus tip for upgrading the Wizard powers using the Time Challenges, reminded me that you can use the Rewind Wizard power to help you upgrade some of the harder Passive upgrades. Difficult Skill Shots and Combos for example. You can keep upgrading them during a single game until the Rewind Wizard power is depleted.

However, to reap the rewards of maxed out Passive upgrades, you do have to equip them.

You’re allowed to equip two Passive upgrades per game. The Multi Ball upgrade is usually the first one you want to equip. Most timed challenges revolve around Multi Ball. The second upgrade depends on the table and your strategy.

Unfortunately, I don't remember all the Passive upgrades I've used for the games in this guide.
When I watched back these clips, the most important upgrades I used for certain strategies where easy to spot but others weren't so obvious. Especially with strategies not based on Multi Balls. I suggest doing some research yourself on this front.

You also might wonder why you’d want to equip the Ball Save upgrade if you’re allowed to drain as often as you like. That’s because sometimes (but not always) a Multi Ball/Mission starts with a Ball Save that can be prolonged with the upgrade.

On a couple of tables, certain Passive upgrades have been crossed out. I’m guessing because Zen figures they could be exploited by experienced players. Here’s an example of this on Attack From Mars. The Combo upgrade can’t be selected:

Cheaters
Every score in the game that ends in 000.000 is a cheated score. Zen knows about this hack. They first acknowledged it in May 2018 but so far, they haven’t done anything about it. There are more hacked scores in the game but they are harder to spot, especially if you don’t know a table very well. Experienced players can find points in places you wouldn't even think to look so don’t judge too fast!

Here's the thread on the official forum about the 000.000 hack: https://forum.zenstudios.com/showthread.php?19259-Cheaters-kthula666-Ardenwolfe-and-!!!!!!
If you care enough, leave a protest post in the thread.

And here's a screenshot of the Walking Dead's current 5 minute challenge leaderboard:


I've crossed out the names of the cheaters because I'll probably get into trouble with some kind of privacy law otherwise. But you can check them out in-game for yourself. They're on the rankings of almost all of the Zen tables, in all modes.
The tables
Okay, here we go. I didn't pay any mind to franchises. I've put them all in alphabetical order.
Adventure Land


Passive upgrades: Equip the Skill Shot upgrade and the Multi Ball upgrade.

The Skill Shot upgrade is essential on this table since a Skill Shot plus Super Skill Shot nets you 30 million points right at the start of a game. The ball almost always bounces the same way so you can learn the Skill Shot by heart. The final ramp/target you have to shoot to make the Super Skill Shot does vary. The target I have to shoot for in the clip is the easiest to hit so you might want to restart a few times.

I used the Sky Eye Multi Ball to score. I set this score not long after the release of the table and as of writing, this is still the number 3 score on the overall rankings so it seems the Sky Eye strategy is pretty solid. (What looks to be the number 1 score is cheated: 222.000.000.)

Alien: Isolation


Passive Upgrades: Equip the Skill Shot upgrde and the Combo(?) upgrade.

Both the Plunger Skill Shot and the Super Skill Shot are very hard to pull off consistently on this table but they do net you 9 million points and the table doesn’t score that high so it’s worth the practice.

I decided to stay away from Multi Ball and try to see how far the Missions would take me so I picked the Missions that are the easiest and fastest to complete:

-Fire Hazard
-The Lure
-First Friend

I can’t remember exactly which passive upgrade I used besides the Skill Shot upgrade but I believe it was the Combo upgrade. No matter, my score could and should have been higher, if only I had made better use of the Multiplier Wizard power.

I played most of the games in this guide when FX3 was pretty new and I really had to learn to use the Wizard powers properly. The strategy itself is okay. As of writing, this is the number 3 score on the overall rankings. (What looks to be the number 1 score is cheated: 245.000.000.)

American Dad


Passive upgrades: Equip the Skill Shot upgrade and the Multi Ball upgrade.

This table allows you to Stack. Meaning you can play multiple Missions/Modes at the same time. Making good use of this feature is very helpful for setting a nice score. But first you’ve got to ‘heat up’ the ball.

For the Multi Balls I decided to play, red is the best color. It raises the worth of the Jackpots. You change the color of the ball by shooting the Threat mini orbit (the spin thing). You start up the Multi Balls by lightening up the letters in the Left Orbit (McFreely Orbit) and the Right Orbit (Air Guitar Orbit).

I went for the Left Orbit first but before completing the letters and starting up the McFreely multi ball, I also made sure that I had already lit up most of the letters in the Right Orbit so that I could activate the Air Guitar Multi Ball once I got the first Multi Ball going.

During the Multi Ball, I just tried to raise the Jackpots worth as high as I could by shooting the various lanes and ramps. In the meantime, I started up some Side-Missions that netted me some nice points too. Near the end of the game, I really started collecting the big Jackpots by shooting the spin thing (Threat mini orbit). This resulted in a couple of 50+ million Jackpots.

Attack From Mars


Passive upgrades: Equip the Multi Ball upgrade and the Bumpers upgrade.

This strategy is built around the Bumpers (Super Jets) and the Total Annihilation Mode.

To start up the Total Annihilation Mode, you need to shoot each ramp and orbit 3 times (excluding the Lock Ramp). You can check your progress by looking at the lamps in front of the ramps/orbits.

If you keep your left flipper up while launching the ball, the ball won’t stop at the Bumpers. It will instead complete the orbit. If you immediately shoot one of the ramps/orbits after you receive the ball, you will light up that particular ramp/orbit completely with one shot, shortening the road towards Total Annihilation.

Once you’ve managed to shoot all the ramps and orbits 3 times, Total Annihilation will start automatically. It’s a four ball Multi. Shots towards the Bumpers increase the Jackpot value You can collect the Jackpot by shooting the Lock Ramp. Wait as long as you dare/can before collecting the Jackpot. Let it grow. The jackpot's worth resets once you score a jackpot.

Every time the ball enters the orbit towards the Bumpers you’ll receive a Total Annihilation Award. So if you manage to get a flow going, don’t forget to press the Multiplier button when you enter the orbit towards the Bumpers. There’s a sweet spot there so you only have to press the Multiplier button for a second or so.

Boba Fett


Passive upgrades: Equip the Bumpers upgrade and the Multi Ball upgrade.

The start of the clip shows a small table trick. If you manage to make a Skill Shot and you get to the reward screen with the scrolling icons, pause the game and see if the icon/reward is to your liking. If not, you can resume and let the icons scroll for a little while longer, and then pause again. This trick comes in handy too during normal games on the table. It can give you easy Extra Balls.

I picked the icon that immediately starts up an Imperial Assignment. I then selected the first Bounty Mission. This Mission has got 5 difficulty levels. The higher the difficulty level, the bigger the reward. You can choose for yourself on which difficulty level you want to play. I chose to play the mission on the hardest difficulty level.

The aim of the Mode is simple. Hit all the lanes/ramps/orbits on the table. If you’re having problems, you can pick up some Rockets at the Skill Shot reward screen. If you have Rockets, you can clear a lane/ramp/orbit without having to shoot it by pressing the Launch button on your joypad/keyboard. Very useful if you find a particular shot hard to make.

Best of all, even after you’ve beaten the Mission you can play it again if you like. Which I liked. I played it 3 times in total. Starting up an Imperial Assignment isn’t that easy though. The Empire Orbit shot is a nasty shot to make. It takes some practice.

After every successful completion, you have to make a Lock Shot into the ship. Don’t miss this shot because you’ll receive the points for the mission you’ve just played only if you complete this shot successfully. After locking three balls, a Multi Ball will start. The reason for equipping the passive Multi Ball upgrade.

Bob's Burgers


Passive upgrades: Equip the Combo upgrade and the Bumpers upgrade.

Not much to say about this strategy. I basically spammed the h*ll out of the Burger Wars Mode with the Combo upgrade equipped. The Jimmy Pesto Lane shot on the right is a bit tricky but the Cross Ramp is a fairly easy shot.

I equipped the Bumpers upgrade because nine out ten times, that’s where the ball ends up if you fail the Pesto Lane shot.

As of writing, this is the number 3 score on the overall rankings. What looks to be the number 1 score is cheated (340.000.000).

Captain America


Passive upgrades: Equip the Skill Shot upgrade and the Distance(?) upgrade.

I chose to play all 3 Red Skull/Baron Zemo Missions. The Red Skull Ramp on the right is a tricky shot so if you’re new to the table, you’ll probably find the Adhesive X Mission the hardest to deal with. You have to shoot the ramp twice during this mode.

I play the Missions in the following order:

-Adhesive X
-Sparring
-Death Ray

The passive upgrades don’t really matter that much if you choose to follow this strategy. I picked the Skill Shot upgrade for some easy points but I can’t even remember the other upgrade I equipped.

Cirqus Voltaire


Passive upgrades: Equip the Multi Ball upgrade and the Bumpers upgrade.

There's not much to explain. My strategy was The Juggler Multi Ball. To start it up, shoot the Left Orbit six times. When you start up a new game and you shoot the Left Orbit for the first time, you'll meet Sideshow Sam. He hands out Random Rewards. During a 5 Minute Challenge the Reward isn't that random. It will always be Popcorn Mania, which isn't worth much unfortunately.

During the Multi Ball you need to shoot the orbits to score Jackpots. The Juggler multi ball is cycled. Meaning, the first shot is a Jackpot, the second shot is a Double Jackpot and the third shot is the Super Jackpot. After that, the cycle starts over.

Beware. The Super Jackpot is timed. If you don't hit the orbits within a couple of seconds when it's lit, your next orbit shot will result in a normal Jackpot instead of a Super.

Clone Wars


Passive upgrades: Equip the Skill Shot upgrade and the Combo upgrade.

The strategy itself is okay. I decided to go for the Missions. It’s not a number 1 strategy but it will certainly get you the stars. The first Mission I picked is very hard, while the second Mission is the easiest on the table. While activating the Missions, I tried to collect some points from the Liberation Hurry-Up too.

I should have maxed out the Multiplier Wizard power first though. I had depleted all my resources already when I completed the second Mission. This alone costed me 25 million points.

-Attack On Kamino
-Liberation Hurry Up
-The Monster

Deadpool


Passive upgrades: Equip the Distance(?) upgrade and the Bumpers(?) upgrade.

I could have played this one a little better. I picked the first three Missions to score but I didn’t have enough time to complete the third Mission. You can increase the difficulty level of the Missions on this table by shooting the orbits a few extra times instead of going right straight for the Mission Ramp when it’s lit.

I played all three Missions on the easiest difficulty setting but the higher the difficulty setting, the more points you are awarded for the Missions. I think I could have completed at least one Mission on a harder difficulty setting (preferably the second mission) if I hadn’t gone for the third Mission. So I should have focused on two Missions instead of three.

Both passive upgrades have a (?) behind their names because they don't play a big role when you choose this strategy. Decide for yourself which ones you want to equip.

As of writing, this is the number 8 score on the overall rankings. The first 3 scores on the rankings are cheated although the number 3 didn’t use the infamous 000.000 cheat. He likes to switch hacks from time to time. He’s one of the best cheaters in the game.

DOOM


Passive upgrades: Equip the Skill Shot upgrade and Multi Ball upgrade.

I’ll probably revisit this table in the near future. Not only is it one of Zen’s greatest original tables but my strategy is in dire need of an update. I only put this clip in the guide because the strategy is good enough to collect all the stars and because my playing is not bad at all. Especially the multi ball at the end. Usually it’s the other way around, but in this case, it’s not me, but the strategy that sucks.

I decided to go for two Missions and one Multi Ball.

-To Hell And Back
-The Pit
-Experimental Multi ball


*Tip
You might have noticed while playing the table that the ball sometimes changes into a pixelated mess. I thought it was a bug at first but after talking with the table designer, I found out that it’s actually an Easter Egg. He put in three ‘Secret Areas’. Only one of them is well known. If you know how to open the other two Secret Areas please leave a note in the comment section of this guide.

Here’s how you ‘open’ the first Secret Area. It will net you some points too.

Droids


Passive upgrades: Equip the Skill Shot upgrade and the Bumpers upgrade.

I’m not a big fan of the Multi Balls on this table so I decided to go for Mission Play. I played them faster than I thought I would, leaving me with some extra time near the end that I failed to utilize. I also ignored the Skill Shot. The base worth of the Skill Shot is 500.000 points so maxing out the Skill Shot upgrade is well worth it. In theory. The problem is the difficulty of the shot. You need to hit a lit rollover at the top of the table, which takes more luck than skill in my opinion.

I chose to play the following Missions:

-Mission 1: Fix C-3PO (Completing this mission is also the table achievement.)
-Mission 5: Immobilize The Sandcrawler

Earth Defense


Passive upgrades: Equip the Multi Ball upgrade and the Skill Shot upgrade.

This whole strategy is built around the Airstrike multi ball. During the Multi Ball you can increase the value of the Jackpots by shooting the Left and Right Ramp and/or hitting one of the Sink Holes. I mainly went for the Left Ramp. I find it the easiest ramp to hit on the table. After you max out the Jackpots value, it will be awarded with the next ramp or Sink Hole shot you make. So keep your thumb near the Multiplier button and try to count the shots you still have to make. If you want to collect the jackpot before its maxed out, you can do so by shooting the centre ramp.

Remember to shoot the Captive Ball once in a while to prevent the Invasion Multi Ball from starting up automatically. The Invasion Multi Ball overrules just about every other Mode and Multi Ball on the table, including the Airstrike Multi Ball. 20 seconds before the Invasion Multi Ball starts, a voice shouts out ‘Hurry up!’. This is your cue. Don’t miss it. You don’t have to wait until the voice warns you though. Shooting the Captive Ball sooner resets the timer too.

Family Guy


Passive upgrades: Equip the Skill Shot upgrade and the Multi Ball upgrade.

I just picked the Giggity Giggity Goo! Multi Ball and ran with it. I don’t know if it’s the best strategy for the table (looking at the current standings on the leaderboards, I’d say probably not) but I don’t like the table enough to search for a better one. This table reminds me of a much stronger Zen table, Butters, which didn’t make it into FX3 due to licensing issues unfortunately.

The reason my score turned out okay was because I managed to keep the Multi Ball in play for so long, not because of a series of great shots. The Giggity Giggity Goo! Multi Ball is fine for collecting the stars though. Once you’ve found the sweet spot on the flipper, the Giggity Giggity Goo! Target is not that hard to hit. Starting the Multi Ball for the first time is also the table’s achievement.

Fear Itself


Passive upgrades: Equip the Multi Ball upgrade and the Distance(?) upgrade.

A true Zen classic and one of my personal favorite tables in the game. I built my whole strategy around the Chaos Multi Ball. This is the best strategy for scoring big on this table in the Time Challenges.

To start the Chaos Multi Ball, you have to light up the word Adrenaline in the Magnetic Loop. (It’s written on the left, just behind the Spinner.) It takes 5 Loops in total.

The problem is getting the ball into the Loop. There are several ways to accomplish this but the best way to get going right at the start of your game is to use a trick. You make a Skill Shot on this table by launching the ball into the Loop. This is much easier than getting the ball into the Loop once it's in play because the ball enters the Playfield at a perfect angle. A Skill Shot doesn’t light up Adrenaline letters however.

But if you nudge to the left after launching the ball onto the table, when it’s about to cross the blinking Skill Shot arrow, the nudge will cancel the Skill Shot. You will be rewarded zero points when you land the ball into the Loop. Instead you will receive something much more valuable; The first two letters of Adrenaline. If you manage to make/fake a Double Skill Shot, like I do in the clip, you’ll even collect four Adrenaline letters right at the start of your game.

After leaving the Loop, the ball will come at you from the Left Orbit. For the next ten seconds, an arrow will be blinking in the Right Orbit. Shooting the Right Orbit while this arrow is blinking will land the ball into the Loop again. (If you fail to shoot the Loop within ten seconds, the arrow will stop blinking and the ball will land into the Bumpers area when you shoot the Right Orbit.)

Once Adrenaline is completely lit, a second ball will be launched from the Sink Hole. Again, you need to shoot the Right Orbit to land it into the Loop. A third ball will then be launched, shoot that one into the Loop as well and the Multi Ball will start. Try to shoot the second and third ball into the Loop as quickly as possible. The faster you start up the Multi Ball, the higher the worth of the Jackpots will be.

You score the two Normal Jackpots by shooting the Left and the Right Ramp. Once you’ve collected these, you have to shoot a ball into the loop again to collect the Super Jackpot and start a new cycle.

This strategy definitely takes practice and it probably sounds terribly complex, but it’s by far the highest scoring strategy on the table. No other Mode/Mission comes close.

Fish Tales


Passive upgrades: Equip the Multi Ball upgrade and the Skill Shot(?) upgrade.

I put a ? behind the Skill Shot upgrade because it really doesn't matter which upgrade you equip besides the Multi Ball upgrade. For the Time Challenges, the only strategy that makes sense is to spam the Caster Club Multi Ball.

So practice the Lock Shot well. It’s the most important shot on the table.

The goal of the Multi Ball is pretty straight forward. You need to collect three Normal Jackpots before the Super Jackpot becomes available. Shoot the Left Orbit to collect Normal Jackpots. Shoot the Captive Ball to collect Super Jackpots. Don’t forget, before you can collect a Normal Jackpot, you have to lock at least one ball in the Caster Club. After locking a ball, you have 15 seconds to collect the Jackpot. If you fail to do this, the ball will be released and you have to try again. (This is not required for the Super Jackpot.)

Also, the Multi Ball remembers your progress. So for example, if you lose your Multi Ball while the Super Jackpot is flashing, the next time you start up the Multi Ball, the Super Jackpot will still be there. After you score the Super Jackpot and lose your Multi Ball, you’ll have to start the cycle over and score three Normal Jackpots to reach the Super Jackpot again.

Every cycle is worth more than the previous one.

You can go for Double Jackpots too as you can see in the clip but the Super Jackpot should always be your priority. Collecting a Super Jackpot for the first time is also the table's achievement.

Hurricane


Passive upgrades: Equip the Skill Shot upgrade and the Multi Ball upgrade.

Clown Time is useless during the Time Challenges since the points you score get added to the End of Ball Bonus. Best to just focus on Multi Ball, Mystery Rewards and the Jackpot when it becomes available after you’ve lit all Hurricane Letters.

Shooting the Left Drop Targets activates the locking mechanism for Multi Ball at the [bJuggler[/b] (Middle Lane). Shooting the Right Drop Targets activates the Mystery Reward also at the Juggler.
Shots up the Right Ramp reward you with Hurricane Letters. Once they are all lit, you can collect the Jackpot, again at the Juggler.

Directly after a Multi Ball, the table will got into Multiplier Mode (nothing to do with Zen, this is the table’s own Multiplier Mode). For a limited time (measured by how long you managed to keep the multi ball alive) the points you score are multiplied by 2X, 3X or 5X. The multiplier count is randomly chosen by the table. The best thing to do is to immediately go for a Mystery Reward.

At 3:04, I lost my first Multi Ball and went for a Mystery Reward. I was rewarded with 2 million points but multiplied by 3X and then doubled with Zen’s Multiplier Wizard power, resulted in 12 million points.

Iron man


Passive upgrades: Equip the Distance upgrade and the Skill Shot upgrade.

I played this game without much preparation so none of my passive upgrades were maxed out. I would have gone for the Skill Shot if they had been. It’s not worth millions but this is a very low scoring table so every point counts. I didn’t bother with the Multi Ball upgrade at all since I decided beforehand that I would go for Mission Play.

There’s a downside to Mission play though. You can’t pick Missions manually on this table. When you lock the ball in the Mission Sink Hole, one is chosen randomly.

I was dealt the following Missions:

-Mandarin Electro Blast
-Mandarin Vortex Beam
-Mandarin Flame Blast

Jurassic World


Passive upgrades: Equip the Skill Shot upgrade and the Bumpers upgrade.

This table has got its own Multiplier called Jurassic Rage. When you shoot the orbits, tiny footprints light up in front of them (or in case of the Left Orbit, in between the Bumpers) . Once you’ve lit them all up, for a limited time, all scoring on the table increases. I did my best to incorporate this Multiplier into my game by activating the feature just before starting up missions.

At 5:20 for example, I shoot the mission sinkhole twice but before shooting it for a third time, to start up the Mission, I first made a Right Orbit shot that lit up the last footprint. Directly after this shot, I went for the Mission Sink Hole and played the whole Mission with the Jurassic Rage Multiplier active.

There’s also a Triple Skill Shot to be made so equipping the upgrade is well worth it.

I picked the following Missions to play:

-Scene 2: Mosasaurus Feeding Show
-Scene 6: Part Raptor
-Scene 1: Raptor Training

As of writing, this is the number 2 or 3 score on the overall rankings. On top is the biggest cheater in the game.

Masters Of The Force


Passive upgrades: Equip the Multi Ball upgrade and the Ball Save(?) upgrade.

I’m not 100% sure, but if I remember correctly I played this game with the Ball Save upgrade equipped because it prolonged the Multi Ball Ball Save. The Skill Shot upgrade is crossed out on this table but that's okay, Illusions Multi Ball is where the points are. You can basically ignore every other Mode/Mission. Just practice the Lock Shot and hope that The Cube is on your side during the Multi Ball itself.

During the Multi Ball you have to lock balls in the Cube to score Jackpots. The first ball you lock will award you a Normal Jackpot, the second ball you lock will award you a Super Jackpot, the third ball you lock will award you a Double Super Jackpot. Then the Cube will release one ball and for a very limited time you have the chance to score a Triple Super Jackpot

So…Jackpot – Super Jackpot – Double Super Jackpot – Triple Super Jackpot.

You can also earn a Triple Super Jackpot with two balls in play. In the clip, starting at 3:32, you can see how to do this.

After you’ve scored the Jackpot(-s), you’ll have to hit the Right Orbit a couple of times to prep the Cube for Jackpots again.

Pasha


Passive upgrades: I don't remember.

I played/recorded this video shortly after FX3 was released. Not so much because I wanted to set an immense score but to see if 5 minutes was enough to complete a Wizard Mode Run on the table. That’s also the reason why I stopped recording after I beat the Wizard Mode. I’m not sure if I even had passive upgrades equipped. I did have the Multiplier Wizard power equipped but it was at level 1 I think. Just enough to double the points awarded for beating the table.

Still, completing a Wizard Mode Run is probably the best way to score high. You have to finish three Missions that are basically Mini Games and a Wizard Mode that is basically a Multi Ball to accomplish this.

I played the Missions in the following order:

-Defeat The Guards
-The Treasure Map
-The Magic Carpet
-Wizard mode

As of writing, this is the number 3 score on the overall rankings. The three 'scores' at the top were set by cheaters using the 000.000 hack.


*Tip
If you’re new to the table, the Treasure Map mission can be really frustrating. It’s hard to find the correct rhythm. Here’s a clip that might help.

After completing the Treasure Map mini game, I just keep on flipping as if I’m still in the mini game. The only other thing you have to remember is to always start flipping with your LEFT flipper when the ball enters the mini playfield. If you try to start up the rhythm with the RIGHT flipper, the ball will drain almost immediately.

Portal


Passive upgrades: Equip the Skill Shot upgrade and the Bumpers upgrade.

A multi ball strategy would probably have been the better choice as Mission Play is not easy on this table, but I gave it a shot anyway.

I play the following two Missions in its entirety:

-Test Chamber 1: Advanced Portal Training
-Test Chamber 6: Excursion Funnel Training

And I fail to complete Test Chamber 5: Hard Light Bridge Training before the timer runs out.

I did manage to make the Skill Shot plus Super Skill Shot, which nets you 18 million points when you’ve got the Skill Shot upgrade equipped while maxed out. I needed to nudge to get the ball lined up for the Super Skill Shot. This nudge (at that particular spot) is practicable and comes in very handy during normal play too.

Return Of The Jedi


Passive upgrades: Equip the Skill Shot upgrade and the Multi Ball upgrade.

This table has four different Multi Ball Modes. I chose to play the two that can be started up simultaneously because you need to shoot the same ramps to activate them. The R2-D2 Multi Ball and the Endor Multi Ball. To activate them you need to shoot the Left Ramp, Left Cross Ramp and the Right Ramp multiple times.

There’s no special ramp order so you can just shoot the ramps that you find the easiest to hit. Once the Multi Balls start, balls will be diverted to the left (R2-D2) and to right side of the table (Endor) after shooting the ramps.

I missed the Skill Shot unfortunately but it’s worth equipping the upgrade. A Skill Shot plus Super Skill Shot scores a couple of million points when you’ve got the upgrade maxed out.

Rome


Passive upgrades: Equip the Ball Save upgrade and the Multi Ball upgrade.

I find this table pretty slow and dull when played in Classic mode but it lends itself surprisingly well for the Time Challenges. The strategy is straightforward. First activate the Romulus Multi Ball by shooting the Romulus Sink Hole 7 times. Once you’ve done this, shoot up the Right Ramp to start up the Multi Ball.

You collect Jackpots during the Multi Ball by shooting the Captive Ball. After 4 hits, the Super Jackpot becomes available at the Janus Sink Hole. After you collect the Super Jackpot, the Multi Ball ends.

Immediately start shooting the Romulus Sink Hole to activate the Multi Ball again. Once you get this shot down, it’s quick and easy. I managed to start up the Multi Ball 4 times in 5 minutes. I also managed to scr*w up collecting the fourth and final Super Jackpot in the dying seconds of my game. I recommend not doing this.

As you can see in the clip, the Multi Ball has a very long Ball Save. This Ball Save, made even longer by equipping the Ball Save upgrade, basically enables you to play the entire multi ball with a safety net on. This is great because you can let balls drain to make room for clean aim shots at the Captive Ball. It also makes collecting the Super Jackpot at the Janus Sink Hole a lot easier.

Son of Zeus


Passive upgrades: Equip the Skill Shot upgrade and the Multi Ball upgrade.

I decided to focus completely on the Titan Multi Ball. 5 shots up the Left Ramp makes the Volcano Mini-Playfield accessible. To lock balls, you need to shoot them up the Mini Volcano Ramp. Hitting the three Targets on the Volcano and/or spinning the ball around it, increases the Jackpot worth. Once the Multi Ball starts and the Volcano changes into Chronos, every shot up the Left Ramp is a Normal Jackpot and every shot into the mouth of Chronos is a Super Jackpot.

Starting up this Multi Ball is also the table’s Achievement.


*Bonus tip
I played this game shortly after the table pack (Carnivals & Legends) was released. I wasn’t aware at the time that the table hides a Secret Skill Shot. If you manage to launch the ball with enough speed to land in the Left Outlane without hitting any other Target first, it nets you 30 million points when you’ve got the Multiplier Wizard power and the Skill Shot upgrade (maxed out) equipped. 30 Million points is enough to collect all the table’s stars.

Here’s a visual example:

Star Wars: A New Hope


Passive upgrades: Equip the Skil Shot upgrade and the Combo(?) upgrade.

Directly after the Secret Skill Shot, I start shooting the Right Ramp to fill up the Inlanes (you need to fill them all up before you can play Missions) and to lighten up the letters Cantina to enter the Cantina Mini Game. I decided to go for the Mini Game first. I could have scored a lot more with this Mini Game but I was still learning how to best use the Multiplier Wizard power.

My strategy was a mix:

-The Cantina Mini Game
-Scene 3: It's Too Big To Be A Space Station
-Scene 1: Diplomatic Mission (Only the first half of the Scene.)

In all honesty, this isn’t the greatest strategy for this table. If I’ll ever return to the table to try to better my score, I’ll probably play a combo of Multi Balls. That’s where the really big points are. The scores at the very top of the rankings are proof of that.

The Empire Strikes Back


Passive upgrades: Equip the Multi Ball upgrade and the Skill Shot upgrade.

This is a pretty complex table with lots of different Modes and Multi Balls. The best strategy is probably combining the Jedi & Sith Multi Ball. You activate those by shooting the Mini-Orbits next to the Vader Target in the middle of the table. I personally picked an easier route to moderate success. I used the Cloud City Multi Ball to set my score. You start it up by shooting 4 balls up the Right Ramp into the Cloud City Spinner.

Don’t forget, The Right Ramp is a Diverter Ramp. Only when the 'Cloud City' light is flashing on the Right Ramp will your ball be taken to the Spinner. At the beginning of a game, shoot the Force Target twice, then the Right Ramp once (the ball needs to fall into the Sink Hole beneath the Rollovers), then shoot the Force Target one more time. This should light up 'Cloud City'. You can see me do this at the beginning of the clip.

During the Multi Ball you score Normal Jackpots by shooting balls up the Right Ramp into the Spinner. The Spinner also increases the worth of the Super Jackpot. Hitting the Stormtrooper standing on the table earns you the Super Jackpot. Each time you collect the Super Jackpot, its value resets. You can increase its worth again by scoring more Normal Jackpots(/Spins).

The Force Awakens


Passive upgrades: Equip the Skill Shot upgrade and the Combo upgrade.

Never say never, but this score is almost unbeatable. I played a good game and on top of that, I got extraordinary lucky on the BB-8 Mini-Playfield. I managed to dodge so many nets that halfway through, I felt I could just stand still and they would still miss me. Normally I already have a hard time collecting the Extra Ball. (To collect the Extra Ball, you need to dodge 10 nets on the Mini-Playfield).

I started my game with a Super Skill Shot which is worth 12 million points and then went on to activate and play the first Scene/Mission ('The Scavenger'). I made use of the Combo upgrade to bump up the value of the various ramp and lane shots. After completing the Mission, I immediately went for the Left Ramp again to start up the second Scene/Mission ('BB-8 Is Being Chased').

During the first part of the Mission you have to dodge nets while controlling BB-8. This is when the magic happened. To complete the Mission you have to play two more phases. I played both of those alright. I didn't take too many risks. I knew the game was in the bag so all I had to do was not scr*w up too badly.

After completing the second Mission, I started up the third Scene/Mission (‘The Getaway’) with the same attitude. It also consists of multiple phases. The Timer ran out during the first phase but I still managed to score some nice points.

A golden game. Too bad there are three cheaters in front of me on the leaderboards.

Theatre Of Magic


Passive upgrades: Equip the Multi Ball upgrade and the Skill Shot or Combo upgrade.

Some people can rock the Magic Multi Ball like crazy on this table. Unfortunately I'm not one of them so I went for a combination of the Magic Multi Ball and the Tiger Saw Multi Ball instead.

My main focus was on the Tiger Saw but I also set up the Magic Multi Ball, so that when I lost my second Tiger Saw Multi Ball near the end of my game. I could switch to the Magic Multi Ball immediately. You can see me setting up the Magic Multi Ball at around 3:30 in the clip.

Even with little time left, this extra effort gave me some valuable points because if you manage to shoot the Trunk within 5 seconds or so after the Magic Multi Ball starts you receive a nice bonus of 400 million points. (At least, if you have the Multi Ball upgrade equiped and you press the Multiplier button at the right moment).

To start up the Tiger Saw Multi Ball you need to make one ball Vanish first. You do this by shooting the Captive Ball three times. An arrow will then begin to flash in the Left Orbit. Shoot the Orbit to make the ball Vanish. Every time you start up the Tiger Saw Multi Ball during a game, it takes more Captive Ball shots to light up the Left Orbit and thus to make the ball Vanish.

After the ball has been locked/vanished, you get to launch another ball. Shoot the Right Orbit with that ball to start up the Tiger Saw Multi Ball.

The aim of the Multi Ball is simple. Shoot the Captive Ball to collect Jackpots. Every successful shot increases the value of the jackpots until they max out eventually.

Thor


Passive upgrades: Equip the Ball Save upgrade and the Bumpers upgrade.

This is a nice strategy. I went with mission play and the MJOLNIR Table Multiplier.

I started with setting up the MJOLNIR multiplier. You do this by lighting up all the MJOLNIR Targets on the right side of the table. When all the Targets are lit up, the Target Bank disappears and is replaced by a Sink Hole. If you shoot the Sink Hole, all your scores on the table will be multiplied by 2X for 30 seconds. I didn’t make the Sink Hole shot right away though. I activated a Mission instead.

The Missions are not numbered so you can pick and choose. I picked ‘The Destroyer In Asgard’ mission. Only when was I about to complete it, did I activate the 2X Multiplier by shooting the MJOLNIR Sink Hole. This really boosted the Mission’s completion bonus.

Normal mission value = 15 million points.
X2 (MJOLNIR Table Multiplier) = 30 million points.
X2 (Multiplier Wizard Power) = 60 million points in total.

I then played the easiest Mission on the table, ‘The Brothers Duel’, but not before lighting up the MJOLNIR Targets once again.

*Tip
To beat the first Mission I played (‘The Destroyer In Asgard’) I used Lightning Strike Combos. You perform one by shooting the ball up the Green Ramp. When the ball is almost out of sight, press the Start/Launch Button. Instead of being returned to your Left Flipper straight away, the ball will end up in the Bumper Area, where the Upper Left Flipper is. You then get one clean shot at the Ice Mini-Orbit on the right side of the table. Make that shot and just when the ball is halfway through the Mini-Orbit, press the Start/Launch Button again. This will make the lightning strike. Don’t worry, it takes some practice but it’s easier done than said.


Venom


Passive upgrades: Equip the Skill Shot(?) upgrade and the Distance(?) upgrade.

The passive upgrades are not that important for this strategy so equip whatever you like. The aim is to complete the Wall-Crawler Mode twice. That's the whole strategy. Learn the sweet spots where you have to use the Multiplier Wizard power during the Mode and try to be as quick as you can.

You activate the Mode by lighting up ‘VENOM VS SPIDERMAN’ behind the Venom Sink Hole on the Upper Mini-Playfield. You do this by shooting the Left Wall-Crawler Mini-Orbit and the Right Wall-Crawler Mini-Orbit multiple times.

This is a very difficult table so don't expect to complete the Wall-Crawler Mode twice in a 5 minute game the first time you go for it. But completing it once already gives you a very nice score.

There's one mode you can add to this strategy. You can insert the Goo Ball Mode inbetween the two Wall-Crawler Modes. I almost managed to do this once but then I failed completing the Wall-Crawler Mode for the second time.I didn't fail because I ran out of time though so it's certainly possible.

Extra Ball
And that’s it for now. Thank you for reading/watching and a shout out to all my Steam pinball friends. You guys/gals rock!

Guide feedback is certainly appreciated but please take it easy on me, this is only my first Steam guide and English is not my native language.

-Update 16-01-2020: Added Cirqus Voltaire.


24 Comments
B0NTR4G3R 14 Feb, 2021 @ 7:43am 
I see this is a 5min guide. May I suggest this for 'Masters of the Force' table when in tournament mode..
https://steamproxy.net/sharedfiles/filedetails/?id=1919178609
MuddyWolf  [author] 22 Jan, 2020 @ 12:26pm 
@peremptor
Agreed. I know a lot of people like to collect the table rewards (artwork, flyers, etc) and that's fine but it shouldn't interfere with the actual gameplay.

Thanks for the kind words btw :)
peremptor 21 Jan, 2020 @ 10:51pm 
Awesome guide Muddie thanks... yeah its a real pain to upgrade the tables if you want to max them out asap I rather they get rid of it or at least give us classic variants for all the leaderboard modes.
MuddyWolf  [author] 8 Dec, 2019 @ 4:54pm 
Yeah. You could easily write a guide too. And I would read it.

Thanks for all the help with mine though.
I've removed the 'only on Williams/Bally's tables' again. Unless somebody from Zen's steps in, It remains guesswork why some upgrades have been crossed out.
Kroevian 8 Dec, 2019 @ 4:46pm 
Well maybe I should just write my own guide on how to level everything to the max instead of derailing your excellent guide about getting highscores... :D
Kroevian 8 Dec, 2019 @ 4:46pm 
To get a quick overview of the tables with missing upgrades you can look on the "Table Mastery" tab in your profile section. If the total mastery points limit is below 200 there are upgrades missing. It's 10 missing mastery points per upgrade (which equal the 10 levels of the upgrades). So a table with 1 missing upgrade has a limit of 190 mastery points. 2 missing upgrades equal 180 and so on.
Kroevian 8 Dec, 2019 @ 4:46pm 
I found tables like "Secrets of the Deep" and "Earth Defense" (among others), which lack an upgrade for the bumpers because, well, they simply don't have any. "Paranormal" has no upgrade for combos so I'm assuming, there is no point system in place for consecutive shots.

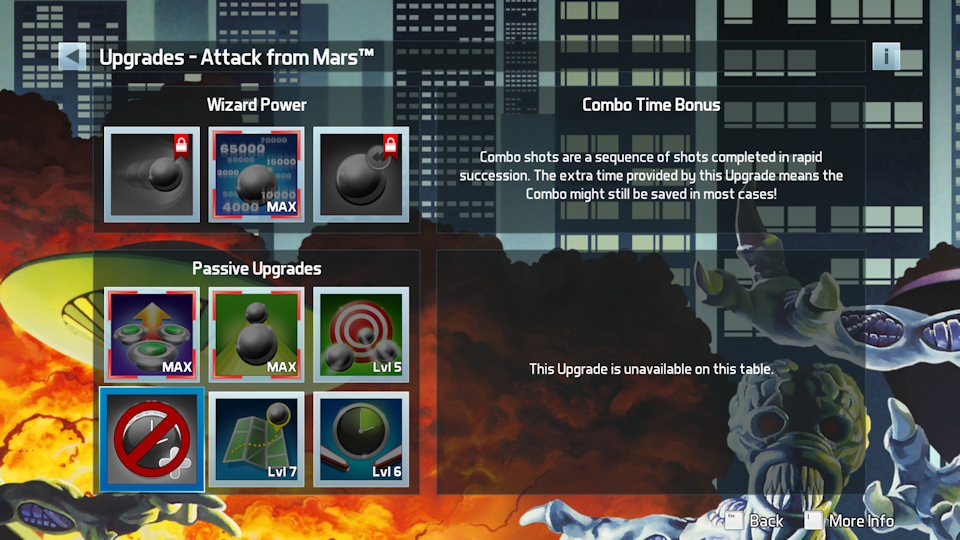
Most of the williams tables are missing upgrades as well. Most common is a missing combo upgrade, closely followed by missing ball save (which apparently excludes the 'grace' save after launching a ball). "Championship Pub" also has no bumpers and "Fish Tales" has no skillshot. "Attack from Mars" has no combo upgrade as well so I'm assuming they aren't needed (or even possible) for reaching the wizard mode. I guess its simple lane and ramp shots instead.
MuddyWolf  [author] 8 Dec, 2019 @ 4:21pm 
Haha! You’re right. I just didn’t unlock the Skill Shot yet on Masters Of The Force. So it’s really only the Williams/Bally’s tables? Since you’ve maxed them all out you probably know. Attack From Mars certainly has combos though. Making six combo shots is one of the requirements for reaching the Wizard mode. At least I think it is. Right now I’m not sure of anything ;)

I’ve done a tiny update anyways. If there are Zen tables with crossed out passive upgrades, let me know.

Thanks!

Btw
Credit where credit is due :)
Kroevian 8 Dec, 2019 @ 3:44pm 
Alright, looks god to me. I'm glad you found the feedback useful. You didn't have to mention me that much though. ;)

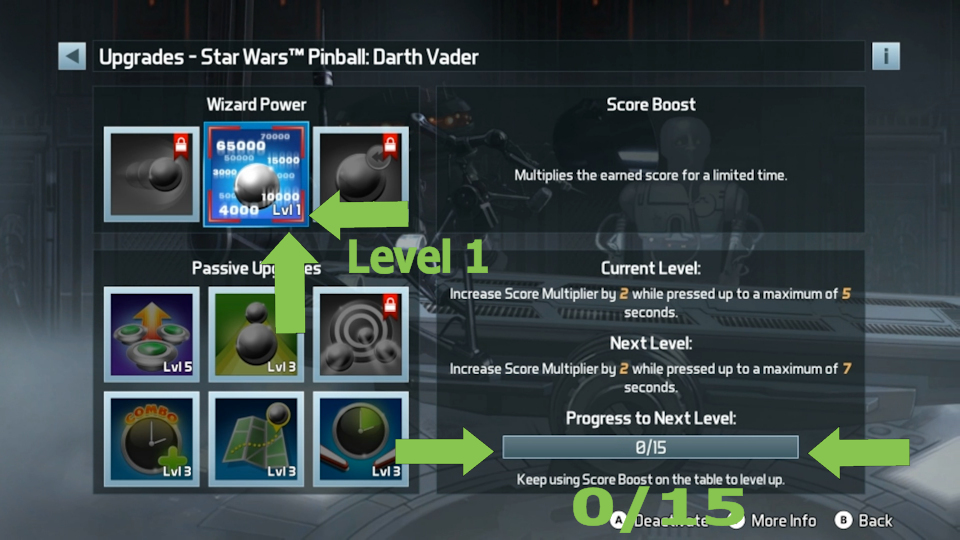
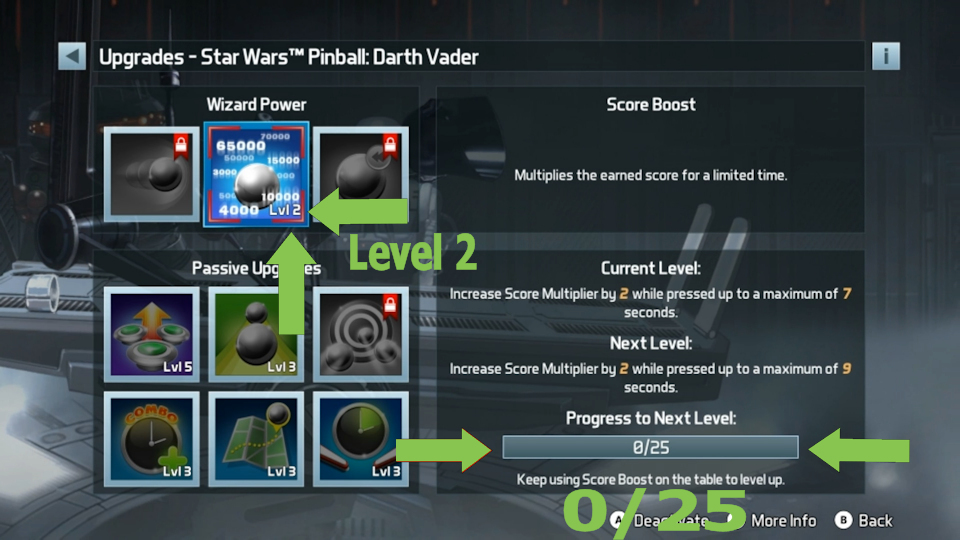
Also I agree with what you said about keeping it simple. I took somewhat of a deep dive because I spent a lot of time figuring out to max things out as fast as possible. First and foremost this guide aims to help players get the most points for their upgrades, which limits the interesting (scoring wise) upgrades to basically 2 per table. That eliminates the need to max out everything for a good ranking on the leaderboards.

Concerning the crossed out upgrades, I'm confused now. You sound so sure but I just checked and the Masters of the Force table has not only a skillshot but also a passive upgrade for it in my game.
MuddyWolf  [author] 8 Dec, 2019 @ 1:33pm 
@Kroevian
Thanks a lot for your help man! I added most of the tips you supplied. I kept it simple when it came to upgrading the Wizard powers though. I understand what you mean but this is the part of the guide that is mostly meant for new and casual players. I don't think I'll help them by going that deep into the inner workings of the game. I fear I'll only confuse them.

Concerning the crossed out upgrades. Finally something I'm sure of. lol. Just check out Masters Of The Force. It has a Skill Shot but it is crossed out in the Passive Upgrade section.