100% Orange Juice

100% Orange Juice

Not enough ratings
Poppocalypse Now - A Star Devourer Guide
By Tekkahedron
Need some help getting those Co-op achievements? This guide might be of some use to you!
   
Award
Favorite
Favorited
Unfavorite
Introduction
Value Judgement
Defeat Star Devourer on hyper difficulty without using any characters with a positive attack value.

This guide covers strategies that can be used to help you earn the Value Judgment achievement. While geared towards hyper difficulty, the same principals apply to lower difficulties and hyper runs not trying to earn the achievement.

This achievement is pretty straightforward. Just win without using any characters with a positive attack stat. Anything 0 or less is fair game, even if the character gains ATK through other means. In addition this boss had two main methods of victory which I will go into more in a later section.

Contraband
All Positive Attackers


If any unit on your team has an attack of +1 or greater, you cannot get the Value Judgment achievement. This includes units with multiple forms, like Tomomo (Casual), but not ones who's abilities boost their stats, like Kae. The attacker bonus does not affect this achievement. These units can be a big help after if you are just looking to grind hyper for EXP, especially evasive attackers like Suguri. Her high evade combined with her explosive hyper destroys this boss.

Units affected by this are:
  • Kai
  • Suguri
  • Marc
  • Yuki
  • Hime
  • Sora
  • Peat
  • Tomomo
  • Seagull
  • Store Manager
  • Shifu Robot
  • Flying Castle
  • Sherry
  • Star Breaker
  • Tomato & Mimyuu
  • NoName
  • Miusaki
  • Yuki (Dangerous)
  • Tomomo (Casual)
  • Mira
  • Islay
  • Sumika
  • Ellie
  • Alicianrone
  • Sora (Military)
  • Suguri (Ver. 2)
  • Marc (Pilot)


Cards

Good news! No cards will specifically disqualify you from earning the achievement. Some are less helpful than other (traps are still terrible), but otherwise, you are free to bring whatever you think will help you and your team win.

Know Your Enemy


HP: 75 | ATK: +1 | DEF: -1 | EVD: -1 | REC: —

Players gain 2x chapter star bonus. When damaged, gain +1 DEF until end of chapter. Deal +1 battle damage per 200 stars held and gain 5 stars for each battle damage dealt. Hold 1000 stars: win the game. 0 stars: lose the game.


Oh boy that's a lot of text. Lets go over this slowly so we can digest all that.


Players gain 2x chapter star bonus.
The stars gained passively between turns is doubled, due to the fact that Star Devourer will constantly be raiding your collective wallet. It will help you get star normas but also makes sure that you always have stars for the boss to steal.


When damaged, gain +1 DEF until end of chapter.
Multiple battles will make it harder to deal damage to the boss. This also includes effects like Long-Distance Shot. It would be best not to use these if you or one of your teammates that has not gone yet is planning to attack the boss.


Deal +1 battle damage per 200 stars held and gain 5 stars for each battle damage dealt.
This is the scariest part of the whole paragraph. This ability boosts the damage dealt by Star Devourer in battle, not its attack. The hit calculation still uses it's +1 ATK stat, but any damage dealt will be increased by 1 for every 200 stars the boss is carrying. Blocking becomes more and more useless as the game goes on, as it guarantees that you will take at least 1 damage and the bonus damage. Dodging will be your only option late game unless you are taking steps to steal your stars back, as the bonus damage will KO most units outright.

In addition, Star Devourer will steal 5 stars from the players for each damage it deals in battle. While this sounds more annoying than dangerous, it feeds the damage boost over time and leads into the next ability.


Hold 1000 stars: win the game. 0 stars: lose the game.
And there's its end game. If Star Devourer ever gets 1000 or more stars, the players will immediately lose the game. On the flip side, if she runs out of stars, the players will win the game. Your team can build around this weakness as an alternate win condition or ignore it and beat her up while taking steps to avoid her bonus damage.


TLDR
  • Boss has very high health and decent ATK, but low DEF and EVD.
  • The boss deals more damage the more stars it has.
  • Boss damage from combat steals your stars.
  • The boss getting 1000 stars makes you lose.
  • You win by reducing the bosses HP or stars to 0.
  • These factors favor evasion, big damage, and star stealing while discouraging blocking.

Boss Cards
The boss starts with an random assortment of cards depending on the difficulty. On Hyper difficulty, all bosses start with two level 1 cards and three level 2 cards. Every 5 turns at the end of the chapter, a random card is replaced with another random card that is one level higher. The deck cannot have duplicates and upgrades stop after chapter 40.

Level 0
Nap
This card doesn't appear in hyper, so don't worry about it. It only serves to weaken the boss on lower difficulties.

And now for some good old-fashioned filler text! Did you know that tables in steam guides size themselves based on images over the text? This can be counteracted by having at least one cell in the table ramble on for a bit to size up the other ones. However, if you have only one cell and it only has a little text in it, it makes the images huge! How annoying!

Level 1
Elusive
On the bright side, everyone gets to draw a card. On the downside, Star Devourer and Big Poppo will be able to steal 20 stars from the players just by passing by. The warp can also be annoying as it can separate your attackers from the boss or put your supports in the line of fire.
Poppo Tax
The boss will steal 5 stars from anyone further away than 2 spaces from it or Big Poppo. The red flashing squares will show you what spaces will be affected. All you need to do is get close to Star Devourer or Big Poppo to avoid this card. The warp afterwards is annoying as it will usually separate you from the boss.
Snatcher
Star Devourer discards one of your team's cards and gains 5x the card's level in stars. Not the worst thing to happen, as most of the cards you would want to run are going to be levels 1-2. Discarding a hyper can be annoying though and you can't count on the CPUs to not bring dumb stuff like Star-Blasting Light.
Star Mania
Behaves like a Holy Night for the boss. This is bad news for you, as it shortens the length of the game and makes it a tiny bit harder to steal all its stars. The first one is painful, boosting Star Devourer's stars by 5 each turn, but each one after only boosts the bonus stars by an additional 1.
Tithe
Similar to the previous card, but hits the opposite area and steals more stars. Any unit within 4 spaces of the boss will suffer the effects of this card. This one is easier to avoid but can be much more devastating if everyone is clustered around the boss. You may have to sacrifice a turn of damage to avoid the cost.
Ubiquitous
This one can be really annoying, as it causes the boss to jump the player that is farthest away; aka probably your support/defender who is trying to avoid the boss. Your attackers will be left with Big Poppo to deal with and will have to find Star Devourer all over again. Also it steals 25 stars from your team.

Level 2
Greed
Avoid fights with the boss and Big Poppo this turn if you can, as the they will steal even more stars from you when they land hits. Characters with high evade may still be able to fight Star Devourer, but you may want to burn a Rainbow-Colored Circle just in case. Battle space Poppos aren't affected by this.
Highway Robbery
Try and be in front of the boss at the end of the turn, or you risk feeding it a ton of stars. Dive for a warp panel if you have to.
Poppoformation
This card is just as dangerous as any of the hyper cards, especially when Star Devourer has a bunch of stars. The debuff lasts until your next battle, after which it is removed. Try to remove the debuff against an encounter space Poppo or Big Poppo if you can. Most of the encounters have a low chance of KOing you and Big Poppo cannot hurt you, but will steal a bunch of stars.
Sky Restaurant Poppo
Places a healing trap on the Star Devourer's and Big Poppo's position that steals 10 stars per HP healed. Landing on the trap with full health will make it go away without costing you stars.
Temptation
Just don't play cards this turn. Easy.
Warp Phenomenon
A triple random warp that deals 1 damage to and steals 5 stars from all players within one panel of the boss after each warp. Nothing you can do here but hope for good RNG.


Level 3
Death and Taxes
Like Tithe, but with only a 2 panel range and a much more dangerous effect. Being KOed by this is very dangerous for your team, so try your best to get away if you are at risk. This deals damage off of your stars, not the bosses, so keeping your star total low can help against this card.
Poppo Galaxy
Evade teams don't care all that much due to the fact that this can't KO you, but you shouldn't let yourself get hit by this anyways if you can safely avoid it. Use guardian shields to soften the blow.
Poppocalypse
AVOID FIGHTS THIS TURN! All enemy units get a big attack boost and the encounter Poppos gain the boss's star stealing passive. Evade characters will be at a huge disadvantage this turn and you risk getting team-wiped. While not an easy task, remember that you are safe on home and warp panels, but not necessarily on warp move panels.
Ransom Note
The first gift to be discarded is free, but every note after costs an additional cumulitive 10 stars. If your hand is overfilled and you don't mind losing it, you can wait until the end of the turn to discard the gift for free. This does not increase the cost. Annoyingly, if you are already KOed when this is played, you will be immediately KOed on revival unless you manage to discard it. Getting KOed with it in your hand will cause you to drop it.
Value Judgement
If you are going for the achievement, this either does nothing or heals you all and gives you some of the boss's stars. You want Star Devourer to get this card, as it helps you and takes up a slot that could be filled by something much more terrifying. If you are playing hyper for funsies, keep this card in mind when constructing your team. Offset your attackers with negative ATK supports and defenders to help counteract this card.

The Accomplices
Special Units

HP: 12 | ATK: +2 | DEF: -1 | EVD: -1 | REC: 4

Deal no combat damage but steal 3 stars per damage dealt. When defeated, gain 10 REC and give 25 stars and 3 wins.

Big Poppo is summoned at the beginning of the match at Star Devourer's location and will wander around attacking players. Although it can't deal damage, it has high attack and can steal a lot of stars if you aren't careful. Big Poppo is useful for safely removing the Poppo Transformation debuff if the player doesn't mind potentially losing a bunch stars. The boss also has a number of cards that require the players to be close to or far away from it or this Poppo to hit, so keep an eye on the flashing red spaces to avoid the skills. Fighting Big Poppo is generally more trouble than it's worth, so don't be starting fights with it unless its health is low or you need to remove the Poppofication debuff.


Encounter Units
HP: 4 | ATK: +1 | DEF: -1 | EVD: -1 | REC: —

HP: 4 | ATK: -1 | DEF: +1 | EVD: -1 | REC: —

HP: 4 | ATK: -1 | DEF: -1 | EVD: +1 | REC: —


The encounters for this boss are all different versions of Marie Poppo with lower health and one of their combat stats increased to +1. Although they have more health compared to the usual encounters, most of them are easy to take down. Attackers should try to farm them for wins whenever possible. Beware the Poppocalypse card, as it buffs all of their attack for a turn.

Helpful Units
Kae


Kae hits hard and has decent enough EVD to possibly survive the counter attack. Her REC is good, even with the attacker REC debuff. Although she will die a fair amount, she also gets back up reasonably fast and can be revived inexpensively. As for role, attacker is a no-brainer. Kae needs the priority the role provides in order to get her attack boost. Rainbow-Colored Circle boosts her attack as well as her EVD, making it a must include card for everyone on the team. I'm on Fire is also useful as it gives a big damage boost for a small price and low level requirement.


Tsih


Tsih is a safer version of Kae with more setup required. Her high evade allows her to avoid Star Devourer's bonus damage passive with ease. While holding a gift, she gets +2 ATK, which can deal tons of damage to the boss if used in conjunction with the attacker's stat boost and Fury ability. Stealth On stacks even more damage on there as well as giving her immunity to targeted effects. Attacker is a great class to choose for the priority and extra damage, but support can also work too for the revive and extra dodge chance. Make sure to ask your teammates to bring gift cards, especially Windy Enchantment. Rainbow-Colored Circle is important as well.


Tequila


Tequila can be an effective damage dealer on star-stealing teams. The pirate crew members summoned by Do Pirates Fly in the Sky? can deal a huge chunk of damage to the boss and his passive paired up with Dark Side of Business can steal a ton of stars. However Tequila is a huge liability on teams that don't keep the boss's stars low, as his chances of evading are almost nonexistent. Play Tequila in any role except attacker, as it prevents you from taking advantage of his amazing avenger passive. Go with what your team is missing or which ever bonus stats interest you the most. Remember that avenger's attack boost does not stack with Tequila's passive!


Nath


Nath needs battle cards to charge up, which actually makes her more vulnerable due to active extension reducing EVD. She can however be very useful on star-stealing teams as an attacker due to her hyper. Another Ultimate Weapon simultaneously keeps your star reserves low while chunking the boss for huge amounts of damage. Nath requires support from her team in both role selection and deck construction, but can do a lot of work if people are willing to play around her strengths. Keep her alive so she can stack up.


Sweet Breaker


Sweet Breaker's hyper Melting Memories can stop the first card action that the boss will take that turn. Preventing a key Ransom Note or Highway Robbery can save your bacon. Since it costs a percent of your stars, it is always playable as long as you have at least 1 star. She can be played in any role, although I suggest support for the extra EVD and utility.


Marie Poppo


The main reason to play Poppo here is her hyper Ubiquitous. Stealing stars from Star Devourer reduces her damage and can even make her lose the game if she runs out. Poppo is extremely vulnerable and becomes a walking punching bag late game when the bonus damage starts to stack up, so avoid combat at all costs. Support or defender is the way to go here, although an argument could be made for avenger. Try and get normas as fast as possible to power up Ubiquitous and stay out of trouble.


Aru


An amazing support for this boss due to her high EVD and the card advantage she provides. Aru's hyper Present for You! will help your attackers get the cards they need to deal damage, steal stars, and stay alive. Best when paired up with multiple Kae or Tsih.


Natsumi


Natsumi does a great job keeping your allies alive in the early and mid game, but falls off late game when the bonus damage becomes too high to block. She is great on teams that aim to keep Star Devourer's star count down, but less useful of teams that rely on dodging.


Chicken

Although extremely frail, Chicken has extremely low revive rolls and a positive EVD stat. Chicken can eat a Ransom Note for it's team and gets right back up within a turn or two. Support is your best bet here, as Chicken's low stats limit it's usefulness in the other roles. The EVD boost support gets from leveling up also lets it survive terror rounds much easier.


Kiriko


Warning: This build is pure jank and should not be attempted by anyone.
Kiriko's forgotten second passive may be of use against this boss. Whenever she plays a battle card, she gains +1 ATK and +1 EVD at the cost of 1 max HP for the rest of the match. HP becomes useless as the match goes on, thanks to Kiriko's -1 DEF, so being at 2 HP only puts you at risk against some of Star Devourer's damaging cards. Rainbow-Colored Circle makes you nigh unhitable while I'm on Fire boosts your damage immensely. Go attacker for damage and priority or healer for EVD and utility. Pair up with Aru so you never run out of battle cards.

Disadvantageous Units
Negative EVD


Dodging is extremely important in the late game where Star Devourer's damage boost makes blocking suicide. These characters become irreverent once the stars start stacking up unless they have some sort of amazing hyper or passive or your team keeps the boss's star count low.


Tanks


Tanks are great at reducing damage via their high defense, but Star Devourer's bonus damage goes right around that, making it difficult for tanks to do their job. Many tanks, Robo Ball and Nanako especially, get destroyed when blocking. Nanako at least has her +1 EVD to fall back on, but Robo Ball will need to depend on its hyper and defender shields to even stay alive, let alone contribute. Fernet and Kiyoko also become a liability the more stars the boss collects. Tanks can work in star stealing comps, but require a support from a defender to work.


Iru


Poor evade, worse defense, and a hyper that deals a small amount of damage while boosting Star Devourer's DEF to titanic levels for a turn. She doesn't even get to take advantage of her preemptive strike passive, which would have boosted Star Devourer's defense anyways.


Marie Poppo (Mixed)


This version gets her own special mention due to her hyper actively sabotaging your team's efforts to catch the boss. Subspace Tunnel makes this already hard to catch boss even more difficult by causing your teammates or the boss to warp. She also suffers from negative EVD and really doesn't aid your team in any way that another character can't do better.

Cards of Note
Dark Side of Business
The bread and butter of star-stealing teams. This card lets you attack the boss's star stash directly, reducing its damage and keeping it further away from victory. If you can land big enough hits, you can even use this to beat the boss by stealing all its stars. Everyone should bring three of these if you are planning to do this.
Rainbow-Colored Circle
This is the single best defensive card against Star Devourer, as successfully evading an attack will negate her passive damage bonus. A must have on evade teams.
Tactical Retreat
Great for when you mess up and get slammed on a Highway Robbery or Poppocalypse turn. Keep in mind that you are sending those stars directly to the boss. Attackers cannot use this card due to their priority passive, so you may want to pass on this card if your team has a lot of them.
Mimic
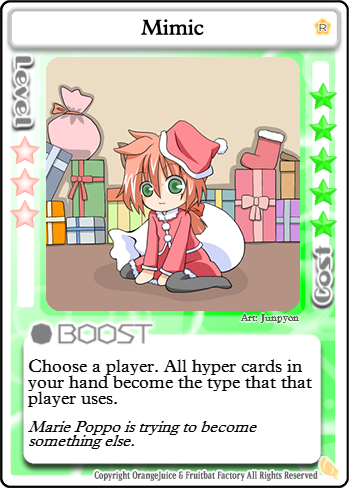
Bring a few of these if one of your characters has a particularly powerful hyper that you are basing your strategy around, such as Ubiquitous. This card lets other players convert their hypers into that hyper and therefore lets your team get it off more often. Don't bring too many of them, as multiples tend to be dead cards. Bad on teams with lots of duplicate characters.
Passionate Research
Every player should bring this card if one or more characters on the team rely on their hyper, like Nath or Marie Poppo. The more hypers you draw, the more likely you will be to win. If a character with a less impressive hyper draws this, they should hang on to it as Ransom Note fuel rather than use it so others have a better chanse of drawing hypers (unless you are running Mimic).
Forced Revival
Restoring Light has a long cooldown and it can be tough to get around this map to revive people, so this can be used to supplement it and allows non-supports to revive players. Especially useful on evade teams for reversing bad luck as they don't really care how much HP they have.
Party Time
Expensive, but can save your team from a Poppo Tax or Poppo Galaxy. Do not play this on a Tithe or Death and Taxes turn unless you really like losing and tilting your teammates. Better when played later in the turn order due to the following players getting caught in front of the boss.
Windy Enchantment
Helps you catch up to the boss quicker or escape a card effect. Every player should bring this if there is a Tsih on the team.

Example Teams
Stealing from a Thief


This setup uses Dark Side of Business and Ubiquitous to rob Star Devourer of her stars. Kae and Tequila can both deal massive Dark Side of Business hits. Tequila's hyper Do Pirates Fly in the Sky? is a good funnel for all of those stars and deals heavy damage to the boss if you are lucky. Poppo exists to give the team shields when they need them and to use her hyper Ubiquitous to steal large amounts of stars. Poppo needs to avoid combat as much as possible due to her huge health pool and poor defenses. One bad encounter with the boss can set your team back immensely. Lastly, Natsumi keeps everyone alive with her hyper and the support passive healing.

Mimic is an amazing card to bring here, as Poppo's Hyper is a free way to get to the boss through all of the warping effects and steal a ton of stars. Bringing too many will make it harder to draw useful cards though, so don't bring too many. Other useful cards are Dinner, Nice Present, Passionate Research, Princess's Privilege, Rainbow-Colored Circle, and Extend.

Tequila can be any role other than attacker or can be swapped with a second attacker Kae. Poppo can be swapped for Sweet Breaker or Aru if you find that she is feeding too many stars to the boss for her hyper to be worth it.


Nanorabbit


This team aims to knock out the boss via constant combat while avoiding as much damage as possible. Star Devourer's damage bonus will KO players outright in the later game, even if they block. Therefore, this team takes advantage of their high evade stats to negate the passive entirely and slow down the boss's star collection. Avoid fighting Star Devourer when Poppocalypse or Highway Robbery is active, as you will be unlikely to dodge, take a ton of damage, and feed it ton of stars.

Each player should pack as many gift cards and Rainbow-Colored Circles into the deck as possible. Although Windy Enchantment is by far Tsih's best gift, you will need to take whatever you can get. Rainbow-Colored Circle will help keep you all alive in sketchy situations. Other cards can include draw support like Nice Present or Passionate Research, utility cards like Nice Jingle, Forced Revival, or Party Time, or damage boosting battle cards like I'm on Fire. Healing is less effective here due to the dodge-or-die nature of of the comp, but Dinner can save your team after a poorly timed Star Galaxy.

The Tsihs need to be attacking as much as possible, even if they don't have a gift yet. Neutral or +1 attack is still plenty to start dealing damage to Star Devourer or farming wins from encounter spaces, as most of the units have reduced defense and/or evade rolls.

Aru's job is to stay safe, gather stars, revive people, and complete normas. Two of the three gift cards prevent Tsih from completing normas and they should not be dropping them to level up. At level 3, Present for You will help your team dig for gifts and other good cards. Restoring Light is great for reversing a bad EVD roll as the reduced health isn't usually relevant and you can do it from across the map.

If you want to live a little dangerously, Kae can also fill in for Tsih. Her burst damage is much higher and she does not need to find a gift first, but she is much easier to KO due to her lower EVD. Her recovery is a little lower as well though, so she doesn't stay down as long as Tsih.


Oops All Poppo


Four dealer Poppos can take down Star Devourer surprisingly fast without even dealing any damage to her. This is due to sheer number of Ubiquitous that the players will draw, which are capable of draining all of the boss's stars. Early game, it is extremely important for the Poppos to level up as quickly as possible. Avoid battles with the boss and Big Poppo, as doing so will cause the boss to gain stars. Since all players are dealers, Ransom Notes can potentially be passed to one player in order to minimize the number of stars spent and Poppo casualties. Once the team has reached level 5, unload with Ubiquitous and drain them dry.

Defense, mobility, and cards that draw more cards are important for this team to put in the deck. Rbits and Reverse Attribute Field are good for the whole game, but Tactical Retreat is an amazing option for the early to mid game. While it does give the boss stars, the cost is much more attractive on turns where Star Devourer is buffed, such Highway Robbery turns. Dash!, Lost Child, and Windy Enchantment all allow the players to escape the boss more easily after using Ubiquitous, allowing the team to steal stars from the boss more safely. When combined with Poppo the Snatcher, the player has the potential to steal a large number of stars by looping around the boss multiple times. Nice Present and Passionate Research are mandatory, while a case can be made for Princess's Privilege or two for the late game. Lastly, Here and There can be used the separate the boss from one or more of your teammates.


Raidboss, Meet Raidboss


This team wants to get Nath set up and use her destructive power to take down the boss. Dark Side of Business serves both to keep the bosses stars low and give Nath stacks of Active Extension. Apart from the massive ATK and DEF she gets from her stacks, Nath can also benefit the team with her hyper Another Ultimate Weapon. This card is less expensive in coop, deals a massive amount of damage, gives nath a stack, and keeps your star total low in case someone gets KOed. Natsumi goes defender here in order to give Nath shields to help her survive early or late if the boss amasses too many stars. Aru backs them both up with card draw. Finally, Kae serves as an alternative source of damage and secondary user of Dark Side of Business.

As mentioned before, Dark Side of Business in important to keep Star Devourer's stars down. Whether you want to go all in and try to suck all the stars out of her or play a few to keep her damage low is up to you. Every player should bring Passionate Research and Nice Present, as everyone but Kae depends on their hyper to help to the fullest. Your team may want to run Mimic in order to allow Kae to take advantage of her teammates powerful hypers. Rainbow-Colored Circle helps Nath get stacks early and helps the rest of the team avoid Star Devourer's attacks. I'm on Fire is a cheap source of stacks and damage. Finally, Dinner will help keep the pressure off of Natsumi and Aru for healing and let her give out more shields.

Kae can be substituted for another Nath if desired. Kae offers a more consistent source of damage and decent EVD, but two Naths can do a lot of work if Natsumi and Aru can get them set up.

Conclusion


Thanks for reading!

Let me know if you have any suggestions or if you felt this guide was missing something. There wasn't a lot of info out when I first started writing this, but I tried to make it as accurate as I could.


Images: 100% Orange Juice Wiki[100orangejuice.gamepedia.com]

6 Comments
Curious Mando 18 Oct, 2020 @ 2:36pm 
man, this poppo really did hallucinate. A storms a brewin . STOP EATING THE MUSHROOMS! DONT DRINK THE WATER! PHLE POISONED IT TO MAKE YOU fORGET!

I dont even remember how i got there
Jackling 15 Jul, 2020 @ 4:37pm 
Also for oops all poppo it can be good to use the hypers to norma faster if you can't get wins or stars fast enough. This isn't a bad idea as you are likely tor reshuffle the deck once or twice and for every hyper in hand, one hyper is not reshuffled into the deck, thus less hypers overall. Also they fixed Ransom Note, you discard it on KO and can't draw it while KO'd.
Anita Coffee 30 Dec, 2019 @ 4:13pm 
This guide helped me beat hyper Star in SP mode, no joke. I played Kae & had an Aru. Kae can really do some damage.
Vinnis Vidya 4 Sep, 2019 @ 10:47pm 
here's something cool:
poppocalypse effects friendly poppos, too.
playing marie poppo turns her from a defenseless child into a wind of destruction in one boss card
risbolla 31 May, 2019 @ 8:57am 
thanks for the helpful tips and tricks now i will beat nova ingester on hiper
Tekkahedron  [author] 30 May, 2019 @ 4:34pm 
Sorry, I got a little excited about this particular boss. It's mechanics were really clever and stirred up the little game designer in me. Fernet should be coming soon.