Railway Empire

Railway Empire

203 ratings
Switches and Signalling
By ameinild
This guide is all about switches! To run a successful railway empire, you really want to familiarize yourself with how switches can impact your railway. This guide will help you understand:

- Why switches are so important
- How switches should be used around stations
- Some good switching solutions for different purposes
- How to plan and build ahead from the very beginning
2
4
2
   
Award
Favorite
Favorited
Unfavorite
Switches and signalling
Historically, switches has been an integral part of railway signalling, interlocking and traffic management for a long time. To ensure a proper flow of goods and passengers to and from your cities, switches need to be put in place to make your railway network flexible.

Basically, you should consider putting a proper switching solution around all your city stations, since these are part of the main track. This is exactly how things are done in real life as well. So from now on, when you think of a city station, you should always think of the switching arrangement on both sides as an integral part of the station itself.

This also means that you should plan way ahead, and be prepared for your station upgrades from the very beginning. This is important, since you need to build part of your switching solution in advance, as the game will only allow you to build advanced switches when the track geometry is almost straight.

Rural stations for raw goods often don’t need the same type of flexibility as city stations, so these can work very well when just connected with simple switches etc. Therefore, this guide will have its main focus on city stations and the switching solutions around those.
Why switches are important (and why you need many of them)
Switches are absolutely essential to make sure trains can come in from one track at your station, and depart to another track. This is because the trains can’t magically jump between tracks (in stark contrast to the locomotive “magically” changing direction at stations, but that’s another story!).

As long as your stations has only 1 track, it’s manageable, but as soon as you upgrade to 2- or 4-track stations, the situation gets much more complicated. This is further complicated by the way Railway Empire allows (or rather does not allow) you to build advanced switches, so to build a proper switching solution, you need to plan ahead and “reserve” some space for future switches.

When you think about a railway switch, you might think of a single switch, or maybe a crossover switch such as this one:


The single crossover is what I call a “1-2 switching solution”, as 1 track from either side (top from left, and bottom from right) can go into either of the 2 tracks, but if you’re coming from top right or bottom left, you cannot change track.

These are good for a number of purposes, but to really get things going, we’re going to focus on the most effective switch you can build in Railway Empire and how to use it: The double crossover switch. The double crossover (or diamond transversal) switch is shown below, and this type of switch is very space conserving and effective (in a railway context).


This double crossover switch is a “2-2 switching solution”, because it allows total interchangeability between the 2 tracks from either side. And the brilliant thing is that it doesn’t take any more space than a single crossover switch. You could have used two single crossovers to get the same result, but these would take up twice as much space.

The double crossover is really what you want to start using right from the beginning, and you should plan ahead to use these at every city station you have. And when done in the right way, these switches can be built quite easily, but there are some pitfalls you want to avoid - I’ll come back to that.
Going from a 2-2 to a 4-4 switching solution
Before we go any further, it’s important to understand exactly why this type of switch is so good - and why you should learn to use it. For this, we’ll use the example of a 4-track station - the largest station in Railway Empire, and the ones you ultimately want in your cities.

As mentioned above, the double crossover is a 2-2 solution that will allow trains to come from and depart to any of the two tracks in either direction. But how is this done when we have four tracks and want a full 4-4 switching solution?

Since we can’t switch between more than 2 tracks at a time, we have to arrange a series of double crossovers to form a full 4-4 switching solution. As a matter of fact, we need five of them in the pattern pictured here:


That’s it! Now you should start to see why a proper switching arrangement requires proper planning as well, since it can take up quite some space, even when using the most effective solution available.

But are all these switches really necessary you might ask? Yes, in fact they are. The next picture shows each of the four tracks in a different color, and their path out of the station. As you can see, all 5 double switches are used, and remember: This illustration only shows the way out of the station, you need the same possibilities when coming in as well.


The 4-4 switching solution is the most space consuming, but also the most flexible switching arrangement. In fact, it’s also part of the game itself - if you choose Buildings and scroll down you can see for instance “Large station + Signalling” and “Terminal station + Signalling”. These both have the above 4-4 switching solution laid out as part of the building.

But there are also situations where you can do with less than a full 4-4 solution, and the next part will focus on these alternate solutions, how to build them, and how to set up proper signals as well.
A bit about logistics
As mentioned in the beginning, the main focus of this guide is city stations where the main tracks are running. Here I will define the terminology used.

Main tracks - the main railway lines that connects your cities. Should primarily transport passengers, mail and consumer goods. Main lines should always be double tracked with directional signalling.

Side tracks - side tracks are used for transporting raw goods from farms and raw material sites into the cities. Side tracks can often be single tracked, but occasionally double tracks should be used for holding areas so that trains can pass each other.

Directional signals - these should be used when you have double track, and want trains to be able to run in both directions at the same time (which is what you normally want). All your main lines should have directional signals, and also when you create a side track for train passage on single tracked lines. Remember that any switch terminates a directional signal, so be sure to place directional signals at both sides of the switch if necessary.

Line Blocks - when you divide a long section of track with stop signals, you have effectively created several line blocks. This means that more than one train can enter the same line at one time. I'd recommend you put line blocks on your double tracked main lines. It's quite easy with a Ctrl+Click (insert multi-signal).
Some good switching (and signalling) solutions
So now it’s time to give some examples of good switching solutions that I use often. These are just examples, they can be varied quite a bit, and possibly expanded even further if you like. I’ve also indicated the recommended signalling, so that your railway will be running smoothly.

1-2 / 2-4 / 1-2 solution (3 double crossovers)


This is a really flexible solution that allows raw goods to be delivered from both sides without interfering with the main track running in the middle. If you’re unsure about the connections you want to make to the city, but doesn’t fancy the full 4-4 solution, this is a really good option.
Recommended for: Raw goods delivered from both sides (track 1 and 4), mainline running in the middle (track 2 and 3).
Limitations: Trains can’t go between track 1/side track A and track 4/side track B from either direction.


1-2 / 1-4 / 2-4 solution (4 double crossovers)


This solution is recommended when you have a city where you know that all raw goods will come from only one side. The layout can also be mirrored, so that track 1 and 2 on the station goes to main track, and track 3 and 4 goes to side tracks.
Recommended for: Raw goods delivered from one side (track 1 and 2), mainline running on the other side (track 3 and 4).
Limitations: Trains from side track A can only go to track 1 and 2 on the station.


4-4 solution (5 double crossovers)


The full 4-4 solution absolutely has its uses. I recommend to use this when you have a 4-track station that you want to split into 2 main tracks (for instance to go to 2 different cities). If you know that raw goods are coming into you city, I’d recommend one of the other 2 solutions on the other side of the station.
Recommended for: Splitting into 2 (or more) mainlines.
Limitations: Geared for raw goods coming from the other side. Requires a decent amount of space.


1-2 / 4-4 / (1-2) solution (5 double crossovers + 1 (2) single switches)


This is an expanded variant of the 4-4 solution that adds 1 side track for raw goods on either (or both) sides - up to 2 main tracks and 2 side tracks in total.
Recommended for: Splitting into 2 mainlines and having up to 2 tracks for raw goods.
Limitations: Trains from side track A (B) can only go to track 1 and 2 (3 and 4) on the station. Requires a decent amount of space.

Constructing and upgrading along the way
Now the above switching solutions are all shown with a fully upgraded 4-track station. But the solutions are equally viable using only 2-track and even 1-track stations.

When you build a new station, it’s perfectly fine to build a 1-track station, but as mentioned you need to consider which switching solution you want to use on either side. Build it so that the station building is next to track 1, because then tracks are added in the right direction when you upgrade the station.

If you’re going for the “1-2 / 2-4 / 1-2 solution”, you can create a temporary smaller version first, and upgrade it later. Basically, you’ll want to create this “1-2 / 2-3” solution as shown:


To create this, first create your rail line from track 1 with a straight section long enough for the 2 double switches (or 3 if you plan on using a larger solution like the 4-4). Now create parallel tracks that are the same length, but be aware of one thing.

You must stop the tracks a little bit before they would connect the tracks of an upgraded station.

This is because when you upgrade the station to 2 or 4 tracks, you need a little bit of space between the buffer stops to connect them. If they’re too close, you’ll have a problem connecting them later when you upgrade, so be sure to make a little gap.

Now, to make the switches, start on track 1 close to the station, but right where track 2 also starts (in the “upper right corner” of the crossover). Make the first crossover from track 1 to track 2, and make it as short as possible. Now after you have created a single crossover, there will be some switch marks that easily makes you create the inverse crossover for a full double crossover.

Next, create the second double crossover between track 2 and 3. Again start in the “upper right corner” and first make a single crossover from track 2 to 3, then the inverse for a full double crossover.

Now there will be buffer stops terminating track 2 and 3 into the station (for a 1-track station) or only at track 3 (for a 2-track station). This is no problem at all, since trains can go to all tracks from track 1 and 2, because of the switching solution you made.

And it makes is easy to upgrade to all 4 tracks later, because you have the straight track of rail outside, and can easily make a 4th parallel track and create the remaining crossovers, depending on the final switching solution you want to make.
Examples from the game
In this section, I'll provide some examples and explanation related to this guide from my Campaign playthrough.

Chapter 2 - The early days


This is the intersection I built between Baltimore and Washington in the beginning of Chapter 2. The stations have the following switching solutions around them:

Baltimore
North end: Space is very sparse here, so there is only room for 2 double crossovers (2-2 solution) at the end of track 1,2 and 3,4. Each double track goes on to a separate bridge - the left goes to New York, and the right goes to all the farms north of Baltimore. So you need to manage your tracks in Baltimore accordingly.
South end: Full 4-4 solution. Right main line continues towards Pittsburgh (and potentially down to Norfolk. Left line goes directly to Washington. Notice the "extra" track on the intersection between Baltimore and Washington. This is to let any train from Baltimore enter any track in Washington (again because of space constraints).

Washington
East end: 1-2/2-4/1-2 solution. Only middle tracks ("main line") continue to farms to the south.
West end: Only 2 double crossovers, like north end of Baltimore. Right side goes to Baltimore, left side goes towards Pittsburgh and Norfolk (merges with right track from Baltimore). Because there is no full switching solution west of Washington, I have to focus on track management in Washington as well, since trains going to Pittsburgh or Norfolk need track 1,2 and trains going to Baltimore or New York need track 3,4.

This turned out to be a pretty effective solution altogether, and with effective track management, you can route your trains wherever you want without too much hassle.

Chapter 3 - Over the Mississippi


This is how I started in Toledo in Chapter 3. I built a Terminal Station and a full 4-4 switching solution with additional side tracks (the "1-2/4-4/1-2" solution).
The upper side track goes to farms north of Toledo, and the lower side track goes to farms in the south.
The upper main track splits to Grand Rapids and Chicago, and the lower main track goes southwest, and splits later to Indianapolis and Louisville.
The relevant farms are then connected to these other cities as well, and after a year I have 16-20 trains running.

Chapter 4 - Civil War


This should come as no surprise - Louisville as I made it at the start of chapter 4. Full 4-4 switching solution at both ends with additional side tracks.
I let the supply stations be at both ends, which I think works OK. I also upgraded the warehouse to the signalling version, but I experienced quite a bit of congestion around the warehouse.
I think I need to experience more about how to layout the entries and exits to a warehouse to optimize the flow.
39 Comments
chrizzieboy123 14 Mar, 2023 @ 1:01am 
sadly the game doesn't always like this and instead lets trains wait if front ofthe station when you are using this system. i would recomment either using prefab signalings or give every track an independent platform. :cheech:
King of the Desert 1 Mar, 2023 @ 1:33pm 
me too
Daniel_USA 30 Jan, 2023 @ 2:51pm 
how are you making crossings? i always get red when trying to cross 2 tracks.
The_Smooth_Lefty 28 Aug, 2022 @ 10:06am 
Great guide this, signals can be confusing.
Oh for Fox Sake 18 Apr, 2022 @ 9:54am 
NICE! Great guide for people wanting to play realistically.
TheAmazingFrank 6 Apr, 2022 @ 12:59pm 
i cannot comprehand this
Mario L. 14 Jan, 2022 @ 2:12am 
I usually run two separate pair of lanes, and have usually a 1-2 connection in each pair. This allows for a complete separation of the passanger/mail pair from the standard freight pair (mass freight, needed for production in the city in huge amounts, I usually try to deliver to a warehouse next to the city with direct connections.
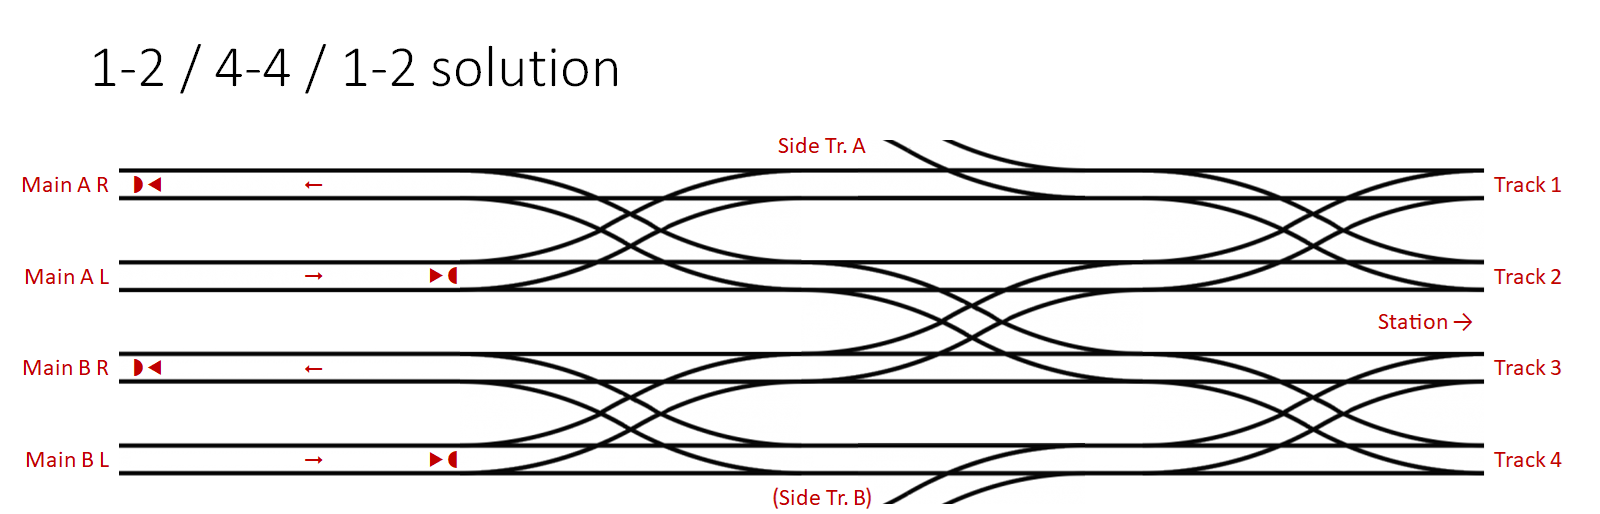
Can switch to 2-2 connection in case the utilization of the platforms is highly uneven, like in end stations.

Advantage is that freight trains never cross the passenger lanes - which they do frequently with the switch concepts proposed here. When turning around, they have to cross them. Considering the number of freight trains usually needed (at least in my experience), this would likely create some significant delays for the fast trains.

Not sure which version is best, wil lhave to try, maybe the full switch works better than I would expect :) Would be nice to have some way to really compare efficiency of different solutions...
Timmy ♥☮☯ 12 Jan, 2022 @ 10:20am 
giving me massive headaches. terribly implemented. thanks for the guide! gotta give this a try :)
goemerick 28 Aug, 2021 @ 6:41am 
This is great for some maps and cities, but I found that ghosting trains in game play is much faster, especially dealing "CLOG" Broken down trains that happen frequently in this game. :D thanks for taking the time to help people with this well planned out tutorial.
toosimple08 7 May, 2021 @ 10:56pm 
What about transporting processed goods from city to city? Such cargo trains will still block the passenger trains if both are running on the main inter-city lines.