Starbound
70 értékelés
Dungeons: From Beginner to Less of a Beginner
Készítő: FlynnLikesTrees
An absolute beginner's guide to creating your own custom dungeons and adding them into the game. Covers some basics of creating Starbound mods, how to use Tiled, and patching vanilla files to add your own content.
3
   
Díjazás
Kedvenc
Kedvenc
Törlés
A Few Notes Before Starting
  • JSON is a new language for me, so I don’t have much to say about it aside from these two conclusions I’ve reached so far. First, any time you’re manually editing files use a text editor with syntax highlighting like Sublime Text or any other that supports JSON. Second, before launching Starbound, throw your code into a syntax checker; I use jsonlint.com. It only takes a second to do, and it should catch any game-crashing errors. Waiting for Starbound to reload because you missed a comma gets tiresome really quickly.

  • You’ll need to have unpacked the game assets in order to use the vanilla assets. Even if you’re planning on using modded materials, liquids, and objects, there are still assets in the vanilla files you will need. It also gives access to very handy dungeon templates the Chucklefish was kind enough to include. There’s lots of guides out there for how to unpack assets, here’s a link to the one I used: https://community.playstarbound.com/threads/how-to-successfully-pack-and-unpack-pak-files.66649/

  • And lastly, you’ll of course need to install Tiled to actually design dungeons. Get it here: https://www.mapeditor.org/index.html
Modding Essentials
If you want to make your own mods for Starbound, there's one very simple thing that you have to know in order for it to work properly. Any files that you create need to be placed inside folders with the same paths as the vanilla assets. Basically this means that if you're making a microdungeon, you would look for them in the vanilla assets under Starbound/assets/packed/dungeons/microdungeons. Your dungeon will therefore be saved to Starbound/mods/yourMod/dungeons/microdungeons. Keeping all of your new mod files organized in the same way as the vanilla makes it easier to keep track of your work, especially if you plan on making an large amount of content.
Welcome to Tiled
Well hello there, nice to meet you, new around here? Never used Tiled before you say? Cool. Let’s get started.

Version
Let’s start off by assuming that you’re using version 1.2.2, because that’s what this guide will be written using. If you happen to be using 1.2.1, don’t. If you’re in 1.1 that should work. If you have a higher version than 1.2.2 you’re in the future friend, I hope the elephants are still alive. The reason this is important is because the syntax Tiled uses in saved files changed somewhere between 1.1 and 1.2.2, and was no longer compatible with Starbound. For the sake of learning, I’ll show you what the difference was.

What Starbound Likes:
"properties": { "parameters":"{ \"defaultSwitchState\" : true }" }, "propertytypes": { “parameters":"string" }
What Tiled 1.2.1 Likes:
“properties”:[ { “name” : “parameters”, “type” : “string”, “value” : “{ \"defaultSwitchState\" : true }” } ]

Lucky for you and I, version 1.2.2 introduced an option to save files in the Tiled 1.1 format, hooray! Make sure you do this when you save your project by choosing the filetype JSON map files [Tiled 1.1] *.json. You may need to enable this option by checking Preferences -> Plugins -> enable libjson1.dylib

Tiled Basics
Go ahead and launch Tiled, and start by opening up MicrodungeonTemplate.json. It should be located at /Starbound/assets/packed/dungeons/microdungeons. I highly recommend starting from this template and not starting from a blank file, until you’re familiar with everything in this guide. You should be seeing something like the screenshot below, though the arrangement may be a bit different (and without my annotations).


Alright, let’s go over what it is we’re looking at:
  1. That’s your dungeon. Not much to look at right now, but it is called a template. Standard looking toolbar across the top.
  2. Tilesets: These are all of your materials to choose from. Since we started with a vanilla template, all of the vanilla materials, liquids, and objects have already been imported. Opening the dropdown menu ( ▼ ) shows all of the available tilesets. Down at the bottom of this panel there’s a small icon with a wrench which says ‘Edit Tileset’ if you hover on it. Clicking this button opens a new tab in Tiled which shows you the tileset in it’s own window. This can be useful when you’re trying to find a specific material or tile in a large set because you can zoom in on the tiles easier. (FU for instance has a tileset of about 400 materials, have fun finding fungalstone among several hundred 8x8 sprites).
  3. Layers: Exactly what it says, these are all the layers in the file. I’ll go into more detail on them later, for now just know that only materials and liquids go in the layers front and back, and those are the only layers you put them in.
  4. Properties: Shows important stuff about the current material you’re using, or the object you have selected. Will be very important later.


Getting into details on the most useful tools:
  1. Stamp Brush: For drawing the selected materials or liquids. Pro-tip: right click on a material in your drawing to switch to that material. Post-pro-tip: right click and drag over an area to copy the entire area to the stamp.
  2. Bucket Fill Tool: Fill in an enclosed section of the drawing with the selected material. Pro-tip: after selecting an area with right click + drag, you can fill an area with the selected pattern.
  3. Eraser: Yup.
  4. Select Objects: Yeah.
  5. Edit Polygons: Use for positioning the ends of wires.
  6. Insert Rectangle: Rectangles are used for assigning properties to an area of the dungeon, such as quest locations or NPC spawns.
  7. Insert Polygon: Aka. draw a line, this is for making wiring connections within the dungeon.
  8. Insert Tile: This replaces the stamp brush tool on object layers.
  9. Random Mode: This is a very useful tool, especially when combined with the bucket fill. Enable random mode, select multiple materials, and then fill in an area. Magical.


As you see there are two different types of layers, tile layers (blue) and object layers (purple). There are two more types of layers in Tiled, but we won’t use those. The order of the layers is important and should always be like this because it determines the render order in-game. Many of these layers are self explanatory so I’ll just touch on a few of them.
  • As mentioned before, the front and back layers are for materials and liquids. Intuitively ‘front’ is for blocks in the foreground, and ‘back’ is for blocks in the background.
  • Mods are for defining surface variations such as grass, snow, sand, tilled, etc.
  • Wiring doesn’t have to be confined to the two layers already added, if you make dungeons with very complex wiring it might make your life easier to add additional wiring layers.
  • I have yet to find a vanilla dungeon that used the ‘outside the map’ layer.
  • Anchors etc is used for adding in special objects that define how the dungeon spawns during world generation. This will be explained in more detail shortly.


There is one tileset that is particularly important, the Miscellaneous set. These are materials and objects that control the spawning behaviour and player interaction within dungeons. Each of them has a description that appears in the properties panel which gives a basic description of their purpose. The pink tile for instance says “Paint onto the background layer to not change what the world generator put there”. Pretty explicit. Read them all, and then let’s take a look at what’s going on in the template we opened.

Dungeon Template
The microdungeon template comes set up with content in three layers, back, front, and anchors etc. You’ll notice that all the content comes from the miscellaneous tileset.


The front layer just has a chunk of the brown ‘Sv’ tiles if you’ve read the miscellaneous descriptions you know this just puts in the default biome material. By using these, your dungeon could be spawned in different biomes without looking out of place (ie. a nice big hunk of obsidian in the middle of a surface desert, unless that’s the feel you’re going for).

The back layer has that same chunk of ‘Sv’ tiles, so the background is also filled with default biome blocks. The pink area around it tells the game to not affect anything in that area. If you want to see what it does in action, go underground and force a surface dungeon to spawn with /placedungeon.

The anchors etc layer just has a few objects scattered around it. These tell the game how to position the dungeon when it is spawned during world gen. The two objects used in this template are air and solid, which will ensure your dungeon is spawned nearly flush to the natural surface so that it looks as natural as possible. If you open up the underground microdungeon template, you’ll notice that there are only solid anchors surrounding the dungeon area. It’s a good idea to take note of the amount of anchors and their general position. If you start making dungeons without using the templates it’s best to use anchors in similar positions. Too many anchors reduces the chance of your dungeon appearing in game because SB cannot find a suitable location. This is especially true if you make a dungeon larger than the 60x60 template.
Adding Tilesets
This belongs in the previous section but I hit Steam's word count limit ^

If for some reason there are no tilesets when you opened the template, or you didn't open the template like I said, you can add them manually via Map -> Add External Tileset. The vanilla tilesets are all found under Starbound/assets/packed/tilesets. Creating and adding custom tilesets is not part of this guide, but will be in Pt.2 when that happens.
My Little Dungeon
At this point it’s time to start drawing an actual dungeon. Don’t be too ambitious, minimize the amount of things that can go wrong until you get the hang of debugging your dungeons. I’m going to make a small building with a wired door, a single loot chest, and an npc.


Here’s what I’ve come up with. From left to right the images show: all layers, front hidden, and back hidden. You’ll see that I’ve changed some of the ‘Sv’ tiles from the brown version, to the green and red versions. This just tells the game to put in a different biome material. For instance in a lush biome the three tiles would likely be dirt, cobblestone, and clay. Remember to make sure that all of your objects have been placed in the object layer with the Insert Tile tool, and not the stamp brush. Some of the objects have been flipped to face the other direction, which can be done by checking ‘Horizontal’ in the properties panel. Images of vanilla assets that have wiring nodes all display where those nodes are, so to connect them simply draw a line with the Insert Polygon tool. The two wires seen here are different colours, simply because they have been drawn in different wiring layers. There’s no real reason for this except to show that different layers can be assigned different colours to make them easy to distinguish; click on the layer and set the colour in the properties panel. Finally, you’ll notice a 1x1 red square inside the house. This was drawn in the monsters & npcs layer with the Insert Rectangle tool and you guessed it, it’s for spawning monsters and NPCs. One tile translates into one entity being spawned, so a 2x2 square would spawn 4 entities, etc.

Bringing it to Life
At this point if we spawned in our dungeon, we get a nice vacant building with no loot. This is because placing a chest, and setting a spawn location for an NPC isn’t enough to fill the chest and spawn the NPC. To do this we have to add custom properties to these objects telling the game explicitly what to do with them. Start by switching to an object layer, and then selecting the red NPC spawn location. Hit the plus ( + ) button at the bottom of the properties panel to add a new property. Enter the property name and type (in this case, ‘npc’ and string), hit OK, and then edit the property’s value to a race of your choosing. If you want to spawn a specific type of NPC and not just a general race, you can add a second property ‘typeName’ and set the value to the character you want. The vanilla NPC types can be found in /Starbound/assets/packed/npcs. As you can see I’m spawning in the Novakid bartender.


Loot is added in a similar method. Select a storage object and add a property with the name ‘parameters’ of type string. This time the value of the property is going to be :
{“treasurePools” : [“basicChestTreasure”]}
This tells the game which preset loot pool to use to put items in the chest when the dungeon is spawned. And that’s all it takes to bring your dungeon to life. There are many, many more different custom properties that can be used so I’ve included a collection of all the properties I know of to date along with a description of what they do and how to use them.
Custom Properties in Tiled
This is undoubtedly not a comprehensive list, I have yet to find convenient documentation showing all object properties so the only way to find out is by sifting through vanilla and modded dungeons and learning by example. If you know of any I’ve missed here, feel free to add them as comments and I’ll add them with credit. (Sorry for posting as images, but tables are tedious to format on Steam)

Getting Your Dungeon into SB
Now that you have this sweetas new dungeon, it’s time to get it into the game and check it out. There are a few ways of doing this depending on your intention, so we’ll go through all of the options. You can spawn your dungeon in with admin commands, add your dungeon to a specific biome (or biomes) or you can add it to specific types of planets. No matter which method you use though, first you’ll need to make a .dungeon file to go with your .json.

Basic .dungeon Format
Every folder containing a set of .json dungeons must also contain a .dungeon file describing to the game how to handle dungeon spawning. This file is what is called upon by the /placedungeon command. The most basic form for this file is shown below in the left column, with some description of what each line means.


I'll drop the code in here again to make it easier for copy&paste since that's what you want:
{ "metadata": { "name": "filename", "species": "generic", "rules": [], "anchor": ["dungeonname"], "gravity": 80, "maxRadius": 200, "maxParts": 1, "protected": true }, "parts": [{ "name": "dungeonname", "rules": [ ["maxSpawnCount", [1]] ], "def": ["tmx", "dungeonname.json"] }] }

Advanced .dungeon format
When it comes to spawning in single dungeons, or from a collection of stand alone dungeons the basic format above will suffice. It’s possible to create more varied dungeons by connecting dungeon parts together. For example, there could be one anchor dungeon that is a building with five floors and an elevator shaft. Instead of drawing the contents of the five floors directly in the anchor dungeon, they can be drawn as separate dungeons and added to the anchor as parts. Now instead of just having the same five rooms every time, you could make 10 different rooms, and suddenly you have one dungeon that has 30240 unique variations (10*9*8*7*6 = 30240, just incase you think I’m joking). To keep this guide to under 20 pages I’m going to leave an example of this out, but if there is enough interest I can put together a second guide with more in depth examples.
/placedungeon
This is the quick and dirty way of getting your dungeon in-game. Before moving on to any of the other methods, you should jump in the game and try this way. If there is anything wrong with your dungeon this will allow you find it immediately. I recommend having a character other than those you use for actually playing the game; I have an admin character dedicated to testing mods. I do this because I want to be certain that if I accidentally break my character, or the planet I’m on it’s no big loss. To get your dungeon, give yourself admin rights with /admin and then place your dungeon with /placedungeon <filename>, where <filename> is whatever you called the .dungeon file, NOT the name of the json file from TIled. Keep in mind the dungeon will spawn at the location of your cursor. If everything goes well, your dungeon should appear after a few seconds. If it doesn’t, this is where you pause your game and check the game log which can be found at /Starbound/storage/starbound.log.

Debugging v1
100% of the time my dungeons failed to spawn it was because I had syntax or spelling error, in which case the log will say something about about JSON failing to validate or throwing an exception. If it says “segfault encountered”, this is also a caused by a spelling mistake but it’s such a bad one the game really did not like it. Usually the game crashes instantly in this case. These errors are unfortunately not very useful in finding what the problem is, start by running you .json and .dungeon files through a JSON validator, and looking for any spelling errors. If we’re trying to spawn mysupercoolmicrodungeon but in the metadata you accidentally wrote mysuppercoolmicrodungeon, that’s going to be an issue.

Something else to look for in the log is for any lines that say an object failed to be placed. This isn’t a huge problem, but it’s not ideal because if you spent time designing a masterpiece you want it to appear in all its glory. This error is probably due to one of two reasons: either your object is overlapping tiles in the front layer, or the object isn’t place in a way that the game would allow normally. Solve this by going into your dungeon in the game and try to manually place the object where it was supposed to be. The Spawnable Item Pack is a useful mod to have so you can quickly grab objects with needing to use admin commands, otherwise just use /spawnitem <itemname> . Once you think you’ve resolved any bugs you can force the game to reload assets with the /reload command, and try spawning your dungeon again. Note that your game will fully freeze after the reload command. This is normal, and it will unfreeze in slightly less time than the game takes to load on start up.

Rinse and repeat until there are no issues. (And for the record, this dungeon was the first I managed to spawn without errors on the first try, helps to read my own advice I guess)

Biome Based Dungeon
The files for controlling biome generation are found in the biomes folder. Imagine. There’s a lot of content in the .biome that you don’t need to know about, except for the sections that manage dungeon spawning. Since the example dungeon created earlier was a surface microdungeon, I’ll show you how to add it to the forest surface biome. In a surface biome there are a few different parts of the .biome file that add dungeons, which are identified at the end of the “distribution” line below. The keywords to look for are mainBiomeMicroDungeon, mainBiomeEncounterDungeon, randomEncounter, and ultraRare. ultraRare is related to underground dungeons in surface biomes, which is not the type of dungeon we’re trying to spawn. Encounter dungeons are the very small dungeons such as merchants or groups of bandits, which is also not the type of dungeon we’ve created. This leaves mainBiomeMicroDungeon for us to use, which is once again a pretty obvious description of what it is.

Within your mod folder, make a biomes folder, and then a surface folder, and finally make a file called forest.biome.patch. The content for the patch file is below, keep in mind that “mydungeonpack” is once again the filename of your .dungeon file. At this point your mod should have three files, something like mydungeon.json, mydungeonpack.dungeon, and now forest.biome.patch. The only thing left for you to do is launch the game, and search through planets until you find one that contains your dungeon. Your dungeon will only spawn on new planets, any planet you have already visited will not have it because the world was created before your addition.

forest.biome.patch File:
[ { "op" : "add", "path" : "/surfacePlaceables/items/-", "value" : { "mode" : "floor", "priority" : 1, "variants" : 1, "distribution" : "/biomes/distributions.config:mainBiomeMicroDungeon", "type" : "microdungeon", "microdungeons" : [] } } ]
Planet Based Dungeon
The alternative to making a biome patch to spawn your dungeons, is to patch the terrestrial_worlds.config file. This file controls world generation, and sets the spawning of larger dungeons like the glitchcastle and apextestfacility. It’s very important to note that if in your .dungeon file you set “protected” to true, that will only be applied if this is how you add your dungeon to the game and NOT if you use the biome patch method. I’ve made many attempts to get around this but haven’t found a way yet. It’s also very important to note that any errors in this patch will cause the game to crash before you even reach the main menu.

The patch itself is simple, it just adds your dungeon to the list of possible surface dungeons. If the planet you want to add your dungeon to doesn’t already have surface dungeons, you’ll need to use the second patch which first adds them. Open up the vanilla terrestrial_worlds.config file, in the root of the vanilla assets to check if the planet you’re using already has dungeons. To make your dungeon spawn less often, reduce the number 1.0 to something lower. If you read through the vanilla file you’ll see that certain planets have dungeons that have 4.0 instead of 1.0, making them more common. For instance Glitch dungeons on volcanic planets are more likely, but it’s still possible to find Floran villages.

terrestrial_worlds.config.patch for Planets with Surface Dungeons:
[ { “op" : "add", "path" : "/planetTypes/forest/layers/surface/dungeons/-", "value" : [1.0, “mydungeonpack"] } ]
terrestrial_worlds.config.patch for Planets without Surface Dungeons:
[ { "op" : "add", "path" : "/planetTypes/tabularasa/layers/surface/dungeons", "value" : [] }, { "op" : "add", "path" : “/planetTypes/tabularasa/layers/surface/dungeons/-", "value" : [1.0, “mydungeonpack"] } ]

Once again, double check all your files for errors, and then boot up SB and try to find your dungeon in the wild.
Go Forth and Multiply
Hopefully at this point you're not feeling overwhelmed and totally disinterested from making dungeons. Feel free to post any questions here, or come find me in the FU discord channel (@OrangeJuice), but please keep in mind that if you tell me you have an in-game error and you don't include a log I will not answer you. Pet peeve. Copy your log into https://pastebin.com/ and include a link to it with your questions. Thanks for reading, and I'll see you in Pt.2!
17 megjegyzés
Not So Serious szept. 12., 11:09 
This was real helpful for getting started, thanks!
FUS aug. 20., 6:26 
First try unpacking the game files again, don't close the console window what appears, it'll close by itself once it's done.
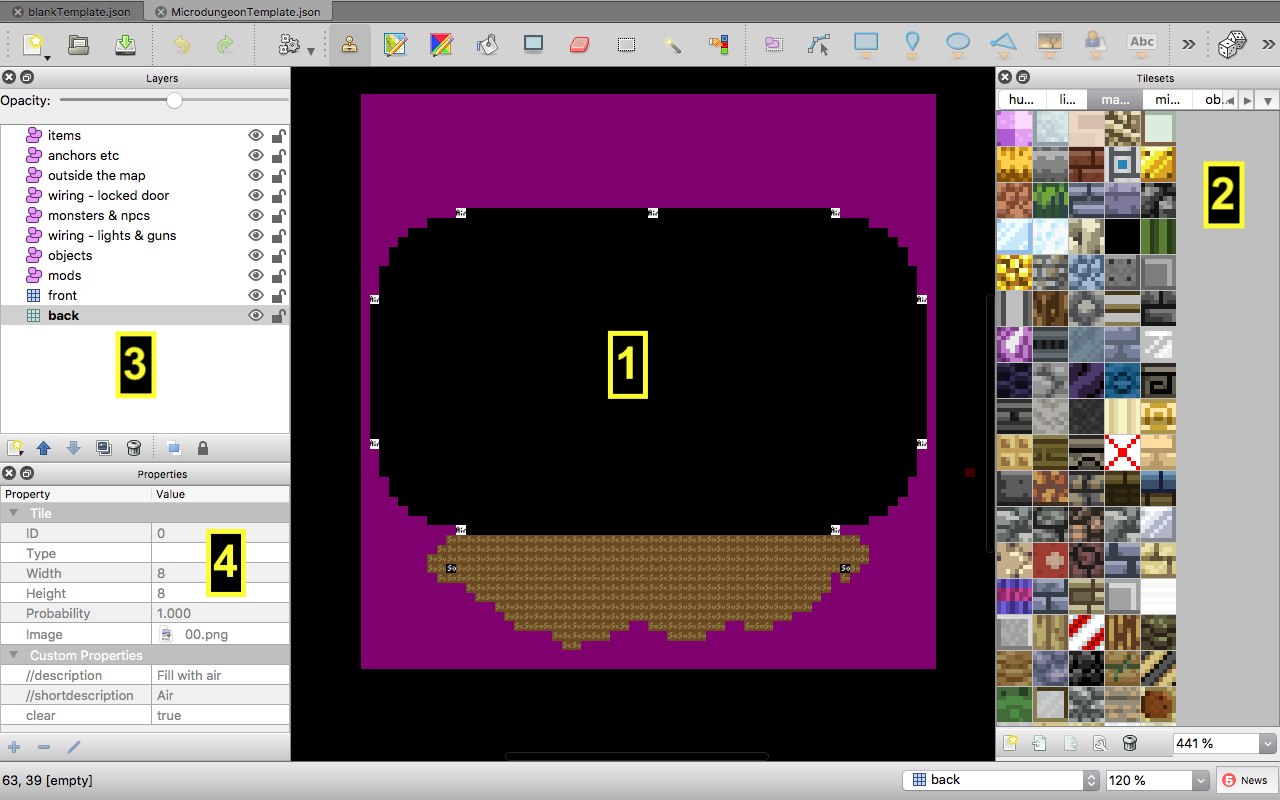
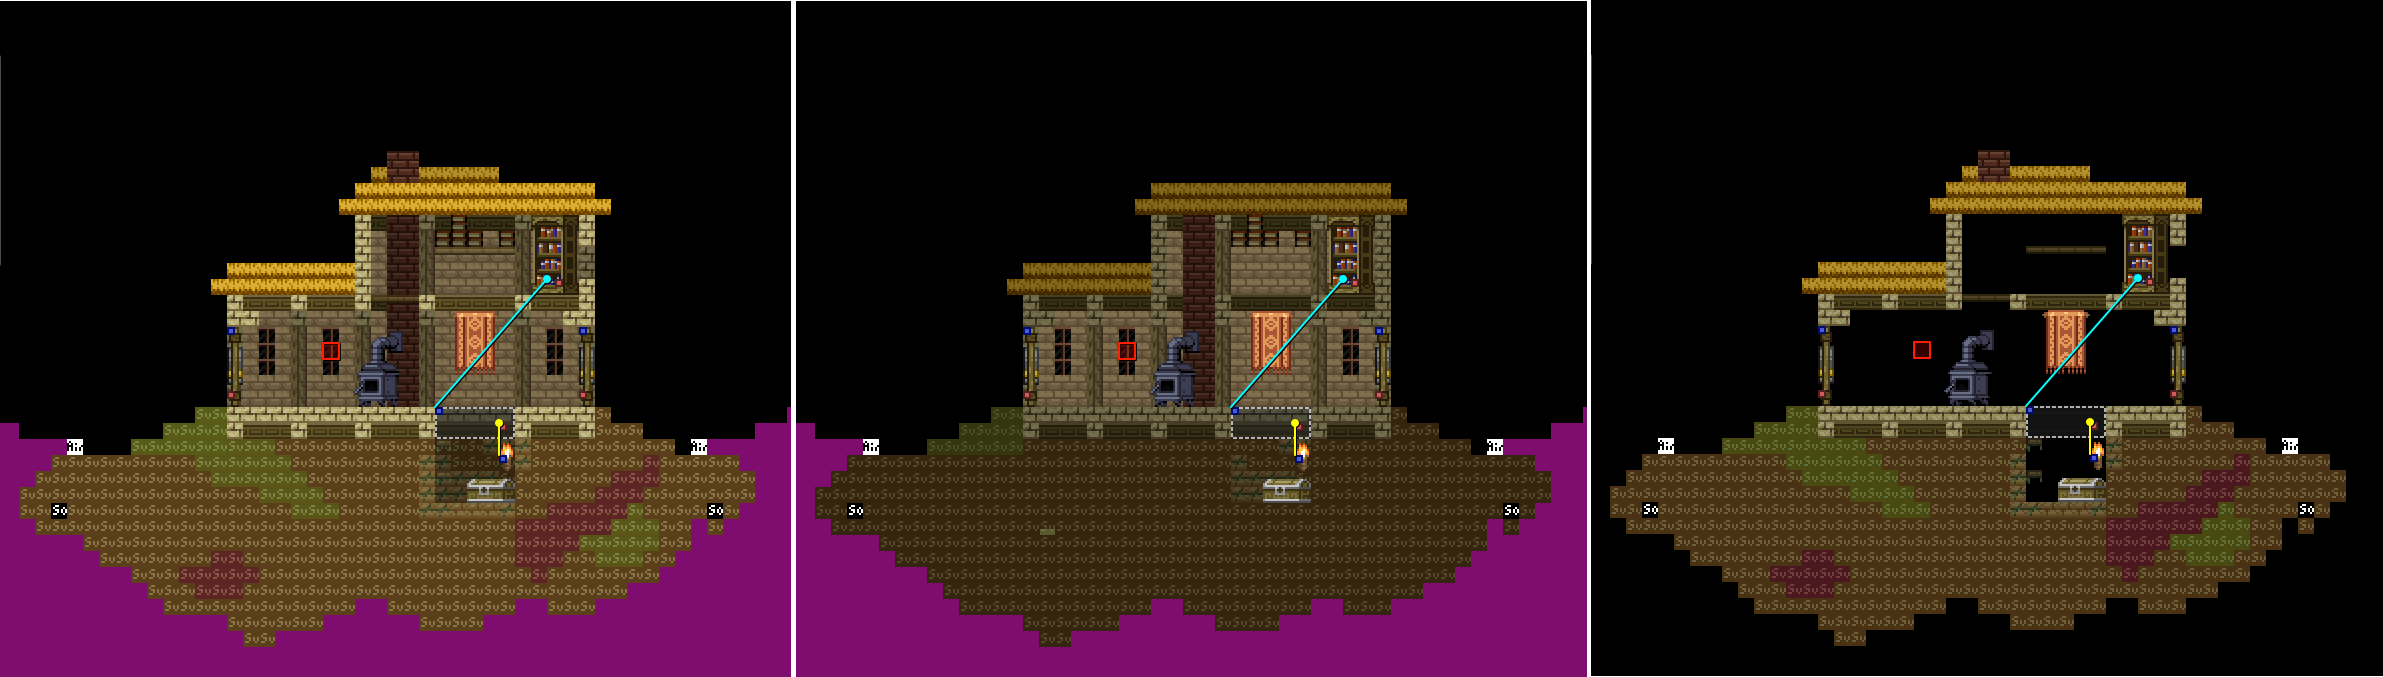
Second, all the dungeons you're building must be located inside those unpacked files, within the dungeons folder to be specific, so: Unpacked>Dungeons>Your dungeon folder, otherwise Tiled won't be able to find any assets for it.
Mipes The Slump God júl. 18., 18:47 
i dont know if this is an ingame error and i dont know how to put a log so sorry
Mipes The Slump God júl. 18., 18:46 
It says it cannot find the files for any furniture items and they are missing from the unpacked files did i do something wrong?
Mipes The Slump God júl. 18., 7:53 
*it
Mipes The Slump God júl. 18., 7:53 
i couldnt find any files
Mipes The Slump God júl. 18., 7:51 
i have tiled 1.11.0 and none of the stuff works do i need just version 1.1?
Admiraal Recht "Barrel" ápr. 1., 4:59 
what is the armor used in the thumbnail?
FlynnLikesTrees  [készítő] 2023. okt. 9., 23:09 
@Mojeshtam probably! But that's way beyond anything that I've tried to do
Mojeshtam 2023. okt. 9., 14:07 
Is there a way to make a map that replaces the tutorial that also has the cutscenes and added events?