Starbound

Starbound

397 ratings
Starbound + Frackin’ Universe Guide to Automation [Part 1]
By FlynnLikesTrees
A beginner's guide to automated resource production, using Frackin' Universe's crafting stations, recipes, and item networks!
4
2
2
5
2
   
Award
Favorite
Favorited
Unfavorite
Disclaimer
First, I play Starbound with the modpack used for the official Frackin’ Universe server, aka. very heavily modded. If you want to do the same keep it in mind that using this modpack will almost certainly require you to start a new character. Most of this guide is about using FU features, but it’s entirely possible I’ve grabbed something from another active mod (such as the Recycler, which comes the Calistan Race Mod). If I know I’m using something not from FU I will try to say so but it may not be totally obvious to me and I’m not planning on starting a new character with only FU installed anytime soon.

Modpack: https://steamproxy.net/sharedfiles/filedetails/?id=1101449362

EDIT: I've cut down my mod list to make modding easier, which meant wiping my previous universe and players. This means I won't be adding the missing images in the later sections until I rebuild those factories, sorry for the delays.

Second, not all of this is the most efficient way of getting items. Not even remotely close in some cases. But if you play survival, enjoy building, and don’t spawn in items, it can be a pain to make enough advanced plastic for 10000 plasteel walls. In that case, sitting in an organic soup bath and making a coffee irl while your factory produces what you need is great. Plus, it’s fun to design and build factories.

Third, if you’re totally unfamiliar with item networks and setting up ITDs make sure to read the Getting Started sections instead of skipping to the more interesting parts. I explain steps in detail in the first few sections that I’m not going to repeat as the guide moves on to more complex setups.

And finally, be aware that there is apparently an issue with Starbound that causes a memory leak when your powered network gets too large, especially if you're using the 64 bit version. If you try to build a factory that is too massive it might end up eating all of your computer’s memory. So far none of the builds I describe in this guide have caused this to happen for me, maybe it's because Macs are just better for gaming.
Getting Started Pt. 1: Wiring
Item Transference Devices (ITDs) are the backbone of any automated system, you will never have enough of them. Craft them at an Electronics Center - all you’ll need is copper, iron, glass (in various combinations) and a teleport core. Teleporter cores are the least common ingredient here, so keep an eye of for them in your travels and later in this guide we’ll sort out any shortages.

Storage bridges will be needed to move items in or out of any container, crafting station, etc. that doesn’t have red/blue wiring nodes. Storage bridges have their own wiring nodes which then act as input/output for the container they’re placed next to. The general rule is to put storage bridges at the bottom left corner of the container, and make sure they aren’t placed directly beside any containers aside from the one you want it to access. Two or three spaces between them and any other containers is probably best if you have the space.

Terminals aren’t necessarily that useful in factories, but they allow withdrawing items from anywhere in an item network so might be handy if you get into very large factories. I use them in my ship where my cargo is in a different room from my crafting stations.

[image: ITD, Storage Bridge, Terminal]

Now we just hook up these three parts, et voila! you have an item network. If you have no idea how to do this, I’ll very quickly go over how to set up a system for sorting crafting materials and liquids into separate containers. What you’ll need: three containers, three storage bridges, two ITDs, and one terminal. ITDs have three wiring nodes: red is output, left-hand blue is on/off, right-hand blue is input. Storage bridges have an input and an output, terminals just have an input.

Arranging the components:
  • Place one container (C1) somewhere convenient like next to a teleporter, and put the other two (C2, C3) somewhere out of the way (but not too far away).
  • Place a storage bridge at the lower lefthand corner of each container.
  • Place an ITD (ITD1, ITD2) near each of the storage containers, C2 and C3. Keep in mind the wiring nodes for ITDs take up more wall space than the ITD itself, be absolutely certain no two wiring nodes are overlapping.
  • Place the terminal somewhere convenient like next to your crafting stations.

Now the wiring:
  • Connect the output of C1 (C1-out) to the inputs of ITD1 and ITD2.
  • Connect ITD1-out to C2-in, and connect ITD2-out to C3-in.
  • Connect C2-out and C3-out to the terminal input.

[image: basic item network wiring setup]

Last step, configuring ITDs:
  • Go ahead and open up the menu for ITD1. ITDs have 5 inventory spaces as well as input slot, output slot, and sorting options. Putting items in the inventory slots allows us to sort according to those items. To make this ITD move all crafting materials, add any crafting material to the first inventory slot and under the heading “Item 1” select category.
  • In the ITD2 menu, add any liquid to the first slot and this time set Item 1 to sort by type. From this point on, instructions to filter items will be worded “filter liquid type” or “filter coal exact”, etc.

[image: ITD configurations]

Now go dump a bunch of items in C1 - you’ll see that any crafting materials and liquids will get moved out but any other items will stay behind. By adding more containers and ITDs, or less specific sorting instructions you can keep all the random junk you pick up organized.
Getting Started Pt. 2: Resources
Now that you know the basics of setting up an item network, it’s time to figure out what you can make. The idea with this guide is to take advantage of any infinite material sources. There’s a few different sources that we can use that are inexhaustible. Strange seas are one of the best sources as they’re easy to find, come in a number of different forms, and are easy to gather from. Other infinite material sources are water generators, atmospheric condensers, and when properly set up, plants and farm beasts.

The better you know the crafting recipes the easier it will be to figure out if it is possible to automate production of an item. Building a lab directory to see how to get certain materials as output can be helpful, as can looking at the FU GitHub repository. In particular, you can find exactly what materials are collected by atmospheric condensers on different planets (look under FrackinUniverse/objects/power/isn_atmoscondenser/isn_atmoscondenser.object), as well as centrifuge, extractor, and smelter outputs.
Getting Started Pt. 3: Setting Up Power
Chances are you’re going to need at least a few watts of power in all you factories. Depending on the factory scale and type of crafting stations you choose to use, you might need 10W or you might need 250W, so you’ll have to build your setup accordingly.

Here’s a few pointers I can give:
  • Solar and wind power are great because they don’t consume any fuel, but keep in mind they don’t have constant output so you either need batteries that can provide enough discharge during the night. Otherwise you won’t be able to constantly run machinery, and might need to add switches to make your factory run at its best.
  • In my experience solar panels don’t work at maximum efficiency on Strange Sea planets, though this may have just been me being unlucky and landing on a planet that wasn’t sunny. Either way it’s something to keep in mind.
  • Don’t use Alternator Generators after setting up your first sifter. Sure they’re cheap and can run on water (recent update removed water as a fuel source) but you will need an unholy amount to run anything useful. Later in this guide I’ll run you through an easy setup to automatically fuel a Quantum Reactor that also only needs water as an input and gives you 20x the power.
1. Hydro Trays: Food, Resources, Lights, and More
Have you ever tried growing things in hydroponics trays only to watch them consume all your precious seeds and give you a paltry sample of the resources you wanted? Yeah me too, but this has an incredibly easy work around and it can be a useful setup to include in any other factories.

The only components needed for the simplest form are an even number of hydroponics trays, half that amount of water generators, and two ITDs. This setup can be expanded to as many hydroponic trays as needed. You may also want a container, storage bridge, and one more ITD to setup a deposit container.

Arranging components:
  • Get all of your hydro trays placed down, they have built-in input/output nodes so storage bridges aren’t needed. The trays are short so if you want to conserve space you can pack them in pretty tightly on platforms without restricting movement.
  • Same for water generators, they have their own output node. (No power or material input needed)
  • Place the first two ITDs, probably somewhere in-between your trays and water generators.
  • If you want all your produce in one place instead of checking each tray, add another ITD, a container, and a storage bridge.

Configuring ITDs:
  • The first ITD is for moving water. Open the ITD menu, and under input slots type “1” into the space that says "---". Click the “+” button. Under output slots, enter slot 2. You should now see that it says your input slot is 1 and output slot is 2. Check the image below, this is important and from this point on I’m assuming you know what I mean when I say “Use input slot 1 and output 2”, etc. Input slot 1 means the first inventory space in the water generator, which is where water is placed. At the bottom of the menu window, select even split.
  • The second ITD is for moving algae. Under inputs slots, use slot 2. Use output slot 3. Again, at the bottom of the menu select even split.
  • Finally, if you are setting you trays to empty into a container, you need one ITD set to ignore slots 1, 2, and 3. To do this add input slots 1 to 3, and then hit the red “I” option, it will turn green meaning the ITD will ignore the selected slots. From now on this will be written, “Ignore slots 1-3”, etc.

[image: ITD configuration]

Wiring:
  • Water generator outputs to ITD1 and ITD2 input.
  • ITD1 and ITD2 outputs to each hydro tray input.
  • Each hydro tray output to ITD3 input, ITD3 output to storage bridge input.
  • Each hydro tray uses 2W of power, this can be easily produced with a small solar/wind setup and a couple batteries. Connect the power to the same blue input on the trays that your network item connects to.
  • Easy. Done.

[image: basic hydro tray setup]

Something to note is that crops have different growing times, which means that if you stick to a 2:1 water generator to hydro tray ratio you may find some crops will run out of algae. You can either add more water generators and connect them to the existing ITDs, or you could grow algae in one of your trays, and then use another ITD to move produced algae into the fertilizer slots of the other trays. The setup would be: Remove algae tray output connection to ITD3, connect algae tray output to ITD4, ITD4 ignores slots 1-3 and filters algae exact to output slot 3, and then connect ITD4 output to all other tray inputs.

Now that you have hydro trays not just devouring all your seeds, what should you grow? Depends on what you need, but they can be sources for a lot of things. For resources you can produce silicon, cotton, silk, mutavisk silk, and even more algae for example. This is also a good way to produce cooking ingredients that stack without decaying like rice, wheat, and sugar. If you want to grow perishable food just swap out the container used above with any refrigerated storage so the food won’t rot. Plant some oonforta seeds and give yourself an infinite source of lights for exploring caves and dungeons. Keep an eye out for more unusual plants on tougher planets and remember to break down seeds into genes once you have extras, you never know when you’ll discover something new.
2. Fantastic Beasts and How to Feed Them
Now that we can easily set up automated hydro trays we can use that system to make sure there’s is always food for farm animals, expanding the amount of crafting materials we can produce. The system will work as follows: hydro trays to produce the food, extractors to turn the food into animal feed, which is then moved to a feeding trough. A farmbeast harvester turret makes the animals drop items and a grabber picks them up.

What you’ll need:
  • Hydro trays: 1 tray for 6-8 animals seems to produce enough, I haven’t worked on optimizing the amount because it’s not difficult to set up.
  • Water generators. Like before, one generator per two hydro trays is the minimum.
  • Extractors: I use MKII for speed without needing power, one produces enough feed for at least 10 animals but it doesn’t hurt to use two.
  • Feeding Trough
  • Incubators
  • Farmbeast Harveter Turret: Again one is enough unless you’re going really big.
  • Grabber: If you have the materials to make a v3 grabber it will allow you to use less wiring and give your animals a bit of space to move, other wise you can use multiple v1 or v2 grabbers.
  • ITDs: a total of five. Two for setting up hydro trays, one to move food to extractors, one to move prepared food to the trough, one to move materials from the grabbers to storage.
  • A container and storage bridge.
  • And a few other things that aren’t necessary but are a nice touch: a switch or lever of some sort, a red strip light, a trinkian ship light, and a NOT Switch.
  • Seeds and eggs. Corn seeds if you plan on raising herbivores, meatvine bulbs for carnivores, or currentcorn/automatoes/other robotic food for robots.

Arranging Components:
  • Set up the hydro trays as before, they don’t need to be directly beside your animal pen just within wiring range.
  • Add the extractor/s near you hydro tray array along with two ITDs.
  • Build a pen to keep your animals in, I recommend making it set down into the floor, with high walls and almost totally sealed across the roof. Copperbeaks can jump really high and like to escape.
  • V3 grabber’s have a range of 12 tiles, so make your pen 25 tiles wide and put the grabber on the wall in the middle, with an ITD nearby.
  • Put the farmbeast harvester turret in the centre of the roof if you’re using one, or at the sides if using two.
  • Add the incubators and a feeding trough on the floor of the pen.
  • This is optional but I would highly recommend it: on the floor or wall above the turret place a switch, red light, green light, and NOT switch.
  • Put your storage container and storage bridge in an easy to access location.
Configuring ITDs:
  • ITD1 and ITD2 will use the same setup as before to move water and algae into hydro trays.
  • ITD3 will move food type to output slots 1-3. Keep in mind that perishable food will rot in ITDs, but you can use one of the FU foods that don’t rot like miracle grass, as long as the type is “food” and not “prepared food” or “cooking ingredients”.
  • ITD4 will move prepared food type, ignoring slots 1-3.
  • ITD5 will just move everything.

[image: ITD configurations]

Wiring:
  • Connect the water generators outputs to the hydro tray inputs through ITD1 and ITD2 like before.
  • Connect the hydro tray outputs to the extractor inputs through ITD3.
  • Connect the extractor outputs to the feeding trough through ITD4.
  • Connect the grabber output to the storage bridge input through ITD5.

[image: base farm setup]

And here’s where we use the switch and lights you definitely followed my advice to use:
  • Connect the switch output to the green light input.
  • Connect the switch output to the NOT switch input, and the NOT switch output to the red light input.
  • Connect the switch output to the farmbeast harvester turret input.
  • What this setup does is allow you to turn off the turret at any time. This is important because the turrets will MURDER YOUR BABY ANIMALS and harvest their bones, so leave the turret off anytime you are hatching new animals for your farm. The lights will switch between red and green so you can easily see if it is on or off, totally unnecessary but way cool.

[image: turret wiring setup]

As for the resources you can produce now: copper ore, iron ore, scorched cores, cryonic extract, poison samples, static cells, AA batteries, milk, eggs, plant fibre, sharpened claws, and a couple others. Be sure to check out merchants you meet throughout the universe as they sometimes sell eggs that the Terramart doesn’t.
3. Not Enough Teleporter Cores You Say?
Whether or not it’s an issue already, continuing to make more factories will eventually start to drain your supply of teleporter cores, and you’ll be needing those for more ITDs. Fortunately they can be crafted by two methods. The first uses durasteel, batteries, graphene, and quantum processors. At the lowest material level this means you need durasteel, lead, carbon, methanol, iodine, poison, gold, copper, silicon, and protocite; none of which are too difficult to find but that isn’t the point of this guide. Lucky for us the second recipe just needs 15 diamonds, which can be used to buy teleport cores at the 2-Stop-Teleshop.

So now we need to secure a source of diamonds. If you have a lab directory placed somewhere near a blast furnace or arc smelter just check what materials give diamonds as output - it should tell you that coal, carbon, and pure carbon will all have a chance to output diamonds. What outputs pure carbon? Carbon. What outputs carbon? Coal. What outputs coal? Oil. Where can we find unlimited amounts of oil? Strange Sea planets. Oil in fact can be centrifuged to produce coal and carbon. By looking at the FU source files you could up with something like this complicated little chart which tells me I will need a lot of centrifuges. Processing 10,000 oil will give you around 15 diamonds, enough for one teleport core. I did say this wasn’t always efficient.

[image: diamond production from oil]

What you’ll need:
  • First and most important you have to find a Strange Sea that has an oil ocean. Keep in mind that there are two layers of liquids on most Strange Seas so there may be oil under the surface. Also remember that some of the liquids will kill you, quickly. Don’t swim in those. Black tar or liquid iron would also work, but would require extra steps to produce as much oil.
  • Pumps: Unless you’re very far into the game and have a huge supply of densinium, I recommend using titanium pumps since they’re the next best. Four is a good number to start with, but if you want higher production you can increase that number as high as you want.
  • Centrifuges: Any will work, but the higher tier you use the faster they process and the more resources they produce. Keep in mind that if you use gas centrifuges you will also need a pretty large power supply. 10 lab centrifuges should be the minimum.
  • Blast Furnace or Arc Smelter: To keep the wiring more straight forward two would be a good idea, but you could do it with one. Once again using the higher tier will make your production faster and more efficient but at the cost of higher power requirements.
  • Powder Sifter: Optional, but you will be producing a huge amount of ash, so you might as well dump that into a powder sifter and turn it into useful materials as well.
  • ITDs: A total of 5. One for oil, one for coal and carbon, one for pure carbon and carbon, one for contaminated water, and one for furnace products.
  • Power Supply: Running a large number of centrifuges and furnaces will require a decent amount of power even if you’re not using the highest tiers. 10 centrifuges will need 200-300W, and two furnaces will need 44-80W. Given that you’re building this factory on top of a sea of oil, a room full of combustion generators will work and give you 10W each. Or read the next section for a simple quantum reactor setup.
  • There’s also a couple other components you can add in to turn some by-products into more useful materials. The centrifuges will be producing about as much contaminated water as coal and carbon, which you can put in a centrifuge and turn it into research. Smelting carbon will produce a ton of ash which can be processed in a powder sifter to make a number of different materials. I’m not going to explain how to set up either of those parts, but you should be able to figure it out.

Arranging components:
  • Pumps attach to vertical walls, and can either be submerged or above the liquid surface as long as there are no obstructions between the pump and liquid. Put ITD1 somewhere nearby.
  • Set up a wall of centrifuges. Make your life easier by orienting them all the same so the wiring is easier to understand by looking at it. ITD2 and ITD3 go here.
  • Put your two furnaces, ITD4 and ITD5.
  • As always, a container and storage bridge.
  • And the last thing you may want to add: a safe room with a pool of organic soup so you can relax while your factory does its work.

Configuring ITDs:
  • ITD1 outputs to slot 1
  • ITD2 filters coal exact and carbon exact to output slot 1
  • ITD3 filters contaminated water exact, ignoring input slots 1-3
  • ITD4 ignores input slot 1
  • ITD5 filters carbon exact and pure carbon exact to output slot 1. If you don’t have pure carbon on hand, just throw a bunch of carbon into a furnace and you’ll get some soon.


[image: ITD configuration]

Wiring:
  • Connect the output of all pumps to ITD1 input (If you want to keep your wiring clear, run the pump outputs through repeaters across the row. This is a good habit to get into early)
  • Connect ITD1-out to each centrifuge input
  • Connect each centrifuge output to ITD2-in
  • Connect each centrifuge output to ITD3-in
  • Connect ITD2-out to the Furnace1-in
  • Connect Furnace1-out to ITD4-in
  • Connect ITD4-out to the storage bridge in
  • Connect ITD3-out to the storage bridge in
  • Connect the storage bridge out to ITD5-in
  • Connect ITD5-out to Furnace2-in
  • Connect Furnace2-out to ITD4-in


[image: diamond factory setup]


[image: diamond factory wiring setup]
4. Grownup Power-ups
Before getting any deeper, we need an easy way of producing large amounts of reliable power. Putting water into a gas centrifuge produces a steady supply of deuterium, which can then be used to run quantum reactors. In keeping with the theme of this guide, once you’ve installed this system it will run totally on it’s own, and produce some nice materials for you at the same time.

What you’ll need:
  • Water Generators: 2-4
  • Gas Centrifuge
  • Quantum Generator: 1-4 depending on power requirements
  • ITDs: Minimum of 2, 1 more if you want to move all by-products to a single container (in this case the by-products will be methanol, algae, oxygen, hydrogen, and contaminated water)
  • Storage Bridge + Container: again only if you want to gather by-products

Arranging Components:
  • This is a pretty small system so just put everything in a room together

Configuring ITDs:
  • ITD1 outputs water exact to output slot 1
  • ITD2 outputs deuterium exact to output slot 1, with even split enabled
  • ITD3 (if you choose to use) outputs water exact with inv. logic and deuterium exact with inv. logic. Inverted logic means the ITD will sort the opposite of what is inserted, so in this case it will move anything that isn’t water or deuterium.

Wiring:
  • Connect water generator outputs to ITD1-in and ITD3-in
  • Connect ITD1-out to centrifuge input
  • Connect centrifuge output to ITD2-in
  • Connect ITD2-out to each quantum generator input
  • Connect ITD3-out to the storage bridge input


[image: reactor wiring setup]

With up to four quantum generators running with output from just one centrifuge, this arrangement will provide you with 400W+ of power which ought to be enough for most builds. This setup is great because you can throw it down in any base on any planet in about 5 minutes. If for the sake of immersion or amusement you want to cater your power production to the planet you’re building on or the type of factory you’re building, take a look at the different fuel sources that can be used by quantum reactors. For my greenhouse build I use erithian fuel cells instead of deuterium, since the main ingredient erithian algae is grown in hydro trays in the main greenhouse.
5. Late Night Double Feature
This guide is getting pretty long now, so congrats if you’ve made it this far. Now that we've gone through a few setups you’re hopefully getting the hang of wiring and item networks. I’ve added screenshots of a couple of my survival play-through factories in this last section, with a brief description of how they work but I’ll leave the finer details for you to work out.

Advanced Plastic Factory

This was my favourite factory to figure out because there are multiple recipes for crafting advanced plastic. This factory is designed to produced milk, salt, methanol, and alien juice which are all you need to craft advanced plastic. An alternative design could have used coal, copper, oil, and silk. I don’t use manufacturing stations here, instead I just craft the items at a bio-chem lab as they are produced which means a couple wind turbines supply all the power needed. Low power requirements means this factory can be built quite cheaply and early in the game.

[image: advanced plastic factory layout]

Electronics Factory

This is a bit of a sprawling beast that grew as I realized the types of things I could produce. Using atmospheric condensers opens up a lot more production options, and their output varies depending on what planet type they are on. I call this my electronics factory though it makes much more, all together it produces: research, shadow gas, AA batteries, cryonic extract, scorched cores, poison samples, static cells, graphene, carbon plates, liquid iron, bioluminescent spores, cell matter, copper wire, glass, gold bars, silicon boards, iron bars, hydrogen, nitrogen, oxygen, salt, silver bars, helium-3 gas, spare parts, volatile powder, poop, oil, deuterium, and koanite. And copper bars, lead, iodine, meat, corn, and currentcorn but those are consumed by the factory to produce the higher grade materials like graphene.

[image: electronics factory layout]

The wiring is quite unoptimized, but at this point I would need to replace and reset all the ITDs to improve it. So that won’t happen. This is why it helps to have a bit of a plan ahead of time. Four manufacturing stations are used because silicon boards and graphene both have a manufactured item in their recipe (copper wire and carbon plates respectively).

[image: electronics factory wiring]
Fin
Well that’s all the thoughts I have for you for now, feel free to post questions and I’ll do my best to answer them when I’ve got time. If there’s anything you feel is missing or think could be added in more detail let me know and I can make some additions, and maybe a part 2 eventually. Check out the FU Discord if you need general help with FU, there’s usually lots of players around. Thanks for reading!
39 Comments
TerminalMindset 3 Mar, 2023 @ 3:14pm 
i Made the sorting system it always leaves one in C1
Shodan2072 23 Aug, 2021 @ 9:38am 
@Katorone I've tried every different configuration of that I can think of, it doesn't work for some reason... the first ITD always takes almost a full stack, except just under the amount I've specified, so if I put 11 items in the first ITD, it takes the whole stack bar 10.
Quetz 28 Jun, 2021 @ 3:02pm 
@shodan2072 What I'd try is this:
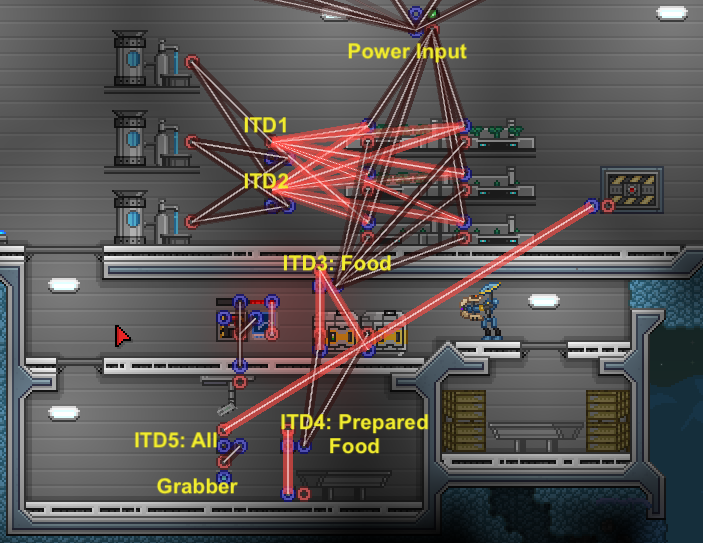
- ITD from source chest, taking 11 items to a stack splitter
- ITD from the stack splitter, take 10 back the source chest
- ITD from the stack splitter, take the last 1 to the destination inventory
- A 2 second timer to activate the first ITD should be all you need.
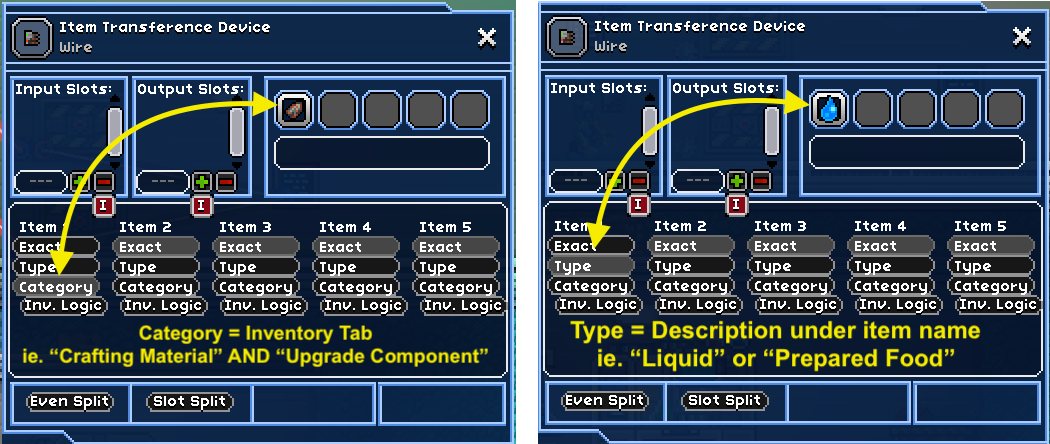
I haven't tried this, so I'm not 100% sure this will work. This relies on the filter slot of the ITD. When putting 11 items in the filter slot, the ITD will take 11 items at a time. The 2 second timer will send a pulse that makes the ITD work once on every trigger.

I'm not 100% sure how the ITD handles a filter slot with just one item in it. So you might need to work on some timing shenanigans to make sure the 3rd ITD triggers last.
Shodan2072 22 Mar, 2021 @ 12:54am 
Does anyone know how to create a wiring setup that drops a single unit of an item from a stack to a specific inventory every two seconds?
Whyyme 1 Mar, 2021 @ 11:24am 
Love this!! please make more guides like this
annoy 5 Jan, 2021 @ 12:23am 
The wiring in this game can be a mess, but it's not like the wiring was made to carry both electricity, items and automation around all on one layer.
KwispyBagel 9 Jul, 2020 @ 5:09pm 
is there somewhere that explains the purpose of all the ITD items in simple terms?
Duelcon 4 Jul, 2020 @ 12:38pm 
I did receive diamonds and Pure Carbon from the arc smelting of Carbon (Though the rate was very low)
Marlyn 22 May, 2020 @ 4:21pm 
as a heads-up the rates for diamonds in the blast furnace are bugged - they don't drop anymore from carbon or coal due to being nerfed to less than 1% and the prob function used for the furnace only goes in whole number increments from 1 to 100

(Though I don't think carbon ever gave diamonds either, but it doesn't give pure carbon anymore)
CrimsonKnight3 4 Dec, 2019 @ 6:07am 
@orangejuice Glad I could help ruin your day >.< haha on the flipside your guide is very well made and you give a good platform for people to build on and come up with their own ideas :) Just need to figure out how complicated an automated diamond setup will be without an oil ocean now lol