Momodora: Reverie Under the Moonlight

Momodora: Reverie Under the Moonlight

253 ratings
All Achievements Guide
By unserious
Tips, tricks & videos to help you get every single one.
6
   
Award
Favorite
Favorited
Unfavorite
Blind Playthrough
I recommend doing a blind playthrough first, on either Easy or Normal difficulty.
Doing Hard first is not a good idea.

The only things you need to know when playing through here is that we will want to collect all secrets and explore everything. That's it. Come back to the next parts (contains spoilers) once you've reached the end of the game or beaten it!


With that said, here are some tips if you want them:
There is an item you can buy called Ring of Candor that tells you when a room has a secret in it (there will be a sound, also a vibration if you are using a controller).
You can buy it for 400 early in the game, or later for 350 or even 200 at other vendors (only item that can be gotten cheapr at other shops as far as I know).
Money isn't really a problem so buy it when you can and equip it at all times when exploring.

It really helps when you want to find everything.


The types of items to collect that aren't story related are Health Upgrades & Bugs.
Both of these alert your Ring of Candor. The bugs are really small, but still visible.

Try to collect all of these, and try to visit all rooms on the map.

Finishing Up On Your First Savefile
!Spoilers from here on!
After beating the game, or reaching the final boss room, let's do as much as we can on this savefile.
But before we try to 100% the map, let's look at what else we can do first.


You need to pick the Dirty Shroom in the Subterraean Grave area (cat power needed):

Then bring it to the Imp girl, located near the beginning. Unless you have the shroom she will say she has no business with you.


To do this you will first have to find the secret item; Soft Tissue.
In the savespot right before the bossfight in the upper right monastery, there is a secret hollow wall.


Go down the ladder and use cat power to get the Soft Tissue.


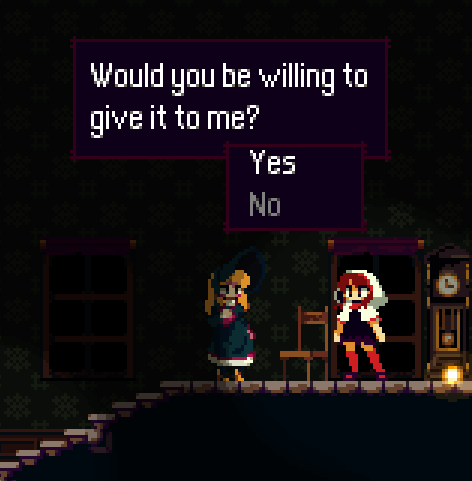
Use the warp and select Monastery. There should be a woman in the same room as you.


Talk with her and choose yes.


Save your game. Prepare for a boss fight! Go right, down the ladder and through the previously locked door. Defeat the boss and you will get the achievement.


While this is easier said than done, it's time to collect everything else.
Note: 100% of the map doesn't count until you enter the final boss room, so aim for 99% here.

You can use these guides if you want.
All bugs:
https://steamproxy.net/sharedfiles/filedetails/?id=639015004
Compare your map to this:
https://steamproxy.net/sharedfiles/filedetails/?id=642031075

Go into your inventory and check if you have the item Sealed Wind. It's found in the Royal Pinacothea area, you should have it by now if you have explored most of the map and picked up everything you see. You'll need it for the next part.

Go to Karst City, and find this small windmill. Equip and use the Sealed Wind - it will unlock a small passage right beneath you. Use the cat power to get down there.


We are doing all this because you will need to upgrade the leaf if you want to have a different ending for the game and the achievement that comes with it.


So, if you have all 20 bugs, bring them to the bunny. Collect all the health powerups and 99% of the map. It's time to go to the final boss and defeat it (again) with your upgraded leaf.
Once you walk into the room you should get the 100% map achievement, and when you defeat the boss this time you will get the true ending and the corresponding achievement.

On to the next part!


A Second Quick Playthrough
This part concerns these two:


You can get both of them in a quick run-through.

The idea is to start a new game on Easy, and NEVER use your weapons outside of bossfights.
You instead will run and roll through enemies and never hit them. Jump over them, whatever it takes.
At the same time you will aim to never die, and just try to beat the game as fast as possible.

Easy means there are less enemies on the map, and you will have more HP for boss fights.

Notes on doing this:
  • Enemies who die by touching spikes does not count. This happened twice in my playthrough and the achievement still worked.
  • If you accidentally hit an enemy, just exit using your menu and load your save - just to be safe.
  • Restarting the game or exiting using your menu does not count as a death. It only counts if you press "try again" after dying. This makes the no-death part much easier.
  • You do not need to get the true ending for either achievement, you can just beat the game without doing the leaf upgrade.
  • Ignore other things, like bugs or upgrades, this is a quick playthrough!!

Since it helped me, I suggest watching a speedrun on 0.75 speed, and follow what the player does when moving around in the map. You don't need to do damageless, or anything fancy. Only follow the path the player chooses. It really speeds things up.
>>Example Speedrun<<

Derelict Frida Boss
The trickiest part of this run probably is the boss fight against the ghost crow you fight in the Subterranean Grave Area.
There is an enemy in this room which will fly around and throw it's weapon at you, at the same time the boss will sometimes spawn ghost dogs.
You will have to aim to kill Frida without harming the surrounding enemies, best way is to use the bow and hide in a corner, and just spam it. Duck to avoid the laser attack, move to the other side if Frida gets to close. Try to ignore the flying enemy, while jumping to shoot in the air to avoid hitting the dogs.

Small update: People are saying in the comments that killing the ghost dogs DOES NOT count as failing the Pacifist run. Also, if you jump before entering the boss room and dash forward to avoid touching anything but the ground floor, you will not spawn the flying enemy.

If you are still having trouble with the boss, this video might help:
>>Somebody doing the boss on pacifist<<
(Relevant part is at 35 minutes)


These two are the last achievements you will get if you don't wanna put in some extra effort.
The last one takes a bit longer and is the hardest.
On to the final part!!
Last Achievement Info
So, the last achievement is here.


It's a little daunting, but it's not as hard as you might think if you know what to do.
If you don't care about getting all achievements this is probably the best place to stop. Otherwise, let's look at what we need to do to get the last achievement.

Now, the only problem is that we need to beat the game on Hard before Insane difficulty is unlocked. This just means we will just have do two very similar playthroughs, with very little collecting.

The reason I said "Don't play Hard first" is because the way you play this game on those modes.
If you beat a boss without taking damage you get a bonus item, these are powerful and make subsequent bosses easier. Final boss is super easy with the right items.
This is not something you want to do on your first playthrough.

So, if you are up to the challenge - first we beat the game on hard, then on Insane.
Again, I am going to refer to a speedrun to demonstrate.
>>Momodora Speedrun on ADGQ<<

They explain many tricks in this run (I will mention the most important ones in the guide).
Note: The biggest thing to pay attention to here is just watching it and seeing what they do for the boss fights. When they use items, where they stand, what weapon they use.

The goal is to beat most boss without taking damage.
This unlocks special items, that make the later bosses easier.
Play it safe, take your time and avoid all projectiles and try to keep using your arrows to hit the bosses.
Just like other achievements, you don't need the good ending for it to count! That means no 3rd phase on the final boss!
Hard/Insane Playthrough Part 1
Again, follow the speedrun I linked to. These notes are for those who are having trouble.

Opening Forest Area:
Your bow can take out enemies from a long range, this is really helpful to avoid damage.
You should be trying to do long range kills on enemies for most of the playthroughs.

Do not bother with health upgrades.
Collect money from chests/enemies when you can, we will need some for later.

Caterpillar boss
While you can take some damage on Hard, it's best to aim for no damage, this makes it easier later and prepares you for Insane difficulty (where you can't take any damage at all ever).

Summoning the blue fairy helps. It deals damage in a wide area.
I personally never needed to use it for my playthroughs, but it might help you early on.
To do it, you need to press up up, down down, left right (easiest to do on a keyboard).
Fairy has one use and refills at save points as if it was an item.

Something that applies to all bosses: The boss item should drop as you gain control of your character after the boss dies. If there is no shiny item to pickup in the area you fought the boss, then you took damage somehow.

Defeat the caterpillar boss and equip the pearl, this is the first item that boosts your arrows.
You can poison yourself if you hit touch the green smoke, but it boosts your overall damage greatly.

Karst Castle
Make your way around the locked door, unlock it and save. Buy the item Crystal Seed from the vendor. It will be very useful for the rest of the game, since you can use it to boost your damage for every boss from here on out.
It costs 80, if you are playing on Insane, you will need even more money for later (700) but on Hard this is the only thing you need to buy.

Giant Witch Fight 1
Before every boss fight you should arrange your equipment so it's optimal. That way you don't have to menu every time you die.

You can skip cutscenes by pressing the menu button + the ranged attack button at the same time. On keyboard it's shift+D. It's a little hard to do, but makes it faster to get back to the fight if you died.
Knowing how to do this is important for later.

If you follow the video you shouldn't have any problems. If you stand in the very middle and jump to do an aerial attack you won't get hit by the orbs that the witch summons from the air. If you attack on the ground you move forward, that's why you should jump.
Look out for a pink effect on the ground, that's the indication that you need to move away and avoid the orbs coming up from the ground.

If you take damage on Hard, intentionally die and start over. You need to do this one damageless. This is another important fight, as it unlocks the Bakman Patch.
It can be used to kill enemies from a distance, so make use of that when making your way around the map! Very useful for the rest of the game. It also unlocks a shortcut later.

Subterranean Grave
Follow the speedrun, but open any chest you see for money if you are playing on Insane.
Grab the key and make your way around to the boss area, but first make the tiny enemy blow up the wall so you can go down and save.

It's in this room you have the vendor that sells the Necklace of Sacrifice.
This is a really good item on Insane difficulty, since it's activated at all times due to your low health.
It's not worth it on Hard though.
You will need to get this as soon as you can, and if you are having trouble, maybe farming enemies to get the 700 required is a good idea. Otherwise you can come back and get it a little later.

Derelict Frida Boss (Ghost crow thing)
The boss is pretty easy, start by activating your Crystal Seed, followed by two Bakman Patches as the boss starts. Then just hide in the corner and shoot your poisonous bow. Duck to avoid the laser, and run behind the boss if it corners you or charges up the bigger unavoidable laser attack.

Again, we really want that no-damage item, it's really strong.
It has short range, but hits hard.

Whiteleaf Memorial Park
Make your way down the path, speedrun shows the way.
This time we are going to do the hardest boss on the game (in my opinion.)

Giant Witch Fight 2
Equip all your best items and save.
Since this boss is near a savepoint, you can activate the Crystal Seed, then attack the bell to refill, then quickly run to the right and activate the Bakman Patch to do some extra damage. That means you have two activations for this fight!
Again, the speedrun I linked shows how this is done.
This is the only fight we need to do that trick, all other bosses are so quick we don't need double activations.
This boss drops a useless item, so if you are on Hard, you are allowed to take damage here.
Probably the hardest boss on Hard/Insane. This boss has many different attacks.
The speedrun shows good strategies, follow them and try to find a consistent method that works for you.

Backtracking
Follow the speedrun, backtrack to the forest and get the Warp power.
Teleport to the Monastery and make your way down to the Cinder Chambers.

Cinder Chambers
At the savepoint closest to the boss, when going to the right use your bow to kill the enemies from a distance. Then jump down the hole and defeat the pyromancer boss. This one is really easy as long as you keep your distance.
The Pocket Incensory item you get for taking no damage should be equipped. It adds even more damage to Bakman Patch(!!) and it makes opponents stagger from the flame damage.

Forlorn Monastery
If you are playing on Insane, don't forget you will want the Amulet of Sacrifice about now. It really boosts your damage. You can see that the effect is active due to the red aura around you when it's equipped.


For Insane playthroughs, the two best passive items right now are Amulet of Sacrifice + Pocket Incensory.

Pardoner Fennel Boss (Woman in white dress with red sword)
What you want to do here is walk into the boss area, use the Crystal Seed and then the Bakman Patch.
Then walk forward, quickly skip the cutscene (menu button + ranged attack button). Use your dash to avoid the lightning and spam arrows to kill the boss. See the video for more info how it's done.

This boss drops an item you don't need (Tainted Missive). So you can take damage here on your Hard playthrough. It has some uses for the Insane so it's convenient we will get it either way there.
Note: Tainted Missive makes you lose some health in exchange for increased damage for a while. This does not prevent your fight from counting as no-damage (atleast from my experience).

Note: In the speedrun I linked, they do the true ending, but we don't need to do that so ignore anything regarding that. It's easier to not do the true ending, after all.
Hard/Insane Playthrough Part 2
Duquess Lupair and Magnolia Boss (Knight & Rogue)
Make sure you have the Pocket Incensory equipped for this fight.

This might be hard to follow/notice in the video so I'm going to provide a screenshot how to do it.
Place yourself here:
Eat the Crystal Seed & Tainted Missive if you have it. Then activate the Bakman Patch then walk forward. Quickly skip the cutscene (again, menu button + ranged attack) and then spam the item button to use the second Bakman as fast as possible. Then you can either melee or use the Sparse Thread to finish off the knight.
The Rogue is very easy, just jump and keep moving around until it shows itself. Then shoot it.

The item you get for no damage is the final piece to the puzzle. Heavy Arrows boosts your arrow damage a whole lot.
If you are on Hard, equip Pocket Incensory + Heavy Arrows.
On Insane, use Amulet of Sacrifice + Heavy Arrows instead.

Final Castle
Use the Bakman Patch to skip half the castle (see how it's done in the video).
When it comes to the flying mini boss that clones itself - the real one is the one that flies the lowest!

Final Boss
Should be a pushover. Now you unlock Insane mode. Start a new savefile for the last time on Insane. Just follow this guide again. It doesn't take that long.
Or you will unlock the final achievement, and you're done with this game!


Hope this guide helped people, thanks for reading! Personally I liked this game a lot!
9 Comments
lol 22 May @ 12:47am 
good guide:praisesun:
Bowie 3 Feb @ 10:51am 
Yes it does, i've just find out :p
Bowie 3 Feb @ 9:37am 
Does the imperishable achievment counts in a ng+ save file?
Brewstice 20 Nov, 2022 @ 4:32pm 
How do I know I'm playing on an Insane save file? It's been so long since I've played this game, and I can't tell if I'm already omw to insane. I have an item that tells me I'm trying to not get hit in any boss fight, but I still can't tell whether or not I'm doing it right.

Bosses don't kill me in one hit exclusively, but they leave me with just a little bar of health.
pixeline 20 Aug, 2021 @ 5:04pm 
Unsure whether the author is still alive, but to those who went into the comment section: not only is ARCX95 right about the dogs, you can actually prevent the scythe girl from spawning by mid-air dashing to avoid touching the platform. This, along with the dogs not counting, makes the fight trivial. I know this beacuse the dev is badass enough to tell people on steam discussions about this trick instead of patching it. To add, hitting enemies doesn't count, so you can push enemies around and onto spikes as much as you want. Finally, there are a bunch of places where the traps kill enemies, meaning not all your munny has to go from chests, if any. My favorite spot is in the room to the right from the room you get teleported when choosing cinder chambers as your destination
{-o-} loki coyote 21 Nov, 2020 @ 12:59am 
Heh, Rogue not Rouge...
Thanks for putting the guide together.
ARC95 3 Jul, 2020 @ 11:39pm 
Just a heads up, the wolves that Derelict Frida summons do not count, you can kill then and still get the Pacifist achievement, i killed them and still got it. The cat lady that throws her weapon on the other hand, she most likely is a regular mob so people should not kill that one.
Dark_Axe 8 Feb, 2019 @ 10:45am 
:rdora:
Dark_Axe 8 Feb, 2019 @ 10:45am 
thanks