DX-Ball 2: 20th Anniversary Edition

DX-Ball 2: 20th Anniversary Edition

Not enough ratings
DX-Ball 2: Game Editor Guide
By Zephyr
Learn how to use the official DX-Ball 2 board-set editor, to create and play your own board-sets. This guide will cover everything you need to know about the Game Editor and its functions.
   
Award
Favorite
Favorited
Unfavorite
Introduction
So you bought your copy of DX-Ball 2: 20th Anniversary Edition and want to wrap your head around the official board-set editor? If so, you've come to the right place.

The board-set editor is an amazing tool, covering everything you need to not only create and play your own custom board-sets, but also assemble your very own brick-sets and background-sets, allowing you to create entirely new art styles for the game. Your custom board-sets can also be shared with the community through the Steam Workshop, adding to the growing library of DX-Ball 2 custom board-sets submitted by board designers all over the world.

You may think of the board-set editor as a low-res pixel art tool. Get creative, load a brick-set and paint some creative board designs! Let's have a closer look at how to do just that.
Let's get started
The DX-Ball 2 Editor, or Game Editor, is the host application that covers all the editing tools for the game, including the Image Assembler, the Workshop Helper, and, of course, the board-set editor itself.

When you launch DX-Ball 2: 20th Anniversary Edition from the Steam client application, a dialogue box will appear on the screen with the options to launch the game itself or the Game Editor. Take a deep breath and savour this moment of anticipation. Then, select the option "Launch Game Editor" and press the "Play" button.

Once the Game Editor is open, you will be presented with the board-set editor itself in the main window, and a retro-looking control panel with various options in a separate window.

The main window comprises the menu bar, canvas, hint panel, tools panel, and the palette. Let's have a closer look at that below:

 
The complementing sidekick, the control panel window, covers all the technical details for your board-set, divided into a Board Set section and a Current Board section:

 
The Board Set section takes care of all the controls and settings pertaining to the board-set itself, while the Current Board section contains some controls for navigating between your boards, selecting backgrounds for your boards, and behold: a move tool for shifting the position of your board designs on the canvas. We'll be digging into all of these treats just below.
Preparing the art
At this very point, everything in the editor will be pretty much black and blank. You may feel the urge to command "let there be boards!" But for the sake of orderliness, we're going to make some small preparations first. Just hold on.

Step 1: Set the number of boards for the board-set
As you may have noticed, the Total Boards setting is displaying a mere 1 by default, indicating that the board-set currently has only 1 board. That's not exactly the definition of a set, so let's start by increasing this value. If you type a "10" in the input field, the board-set editor will add 10 slots to your board-set. You can add a maximum of 1000 boards if you feel insane, but the game itself is gonna cap that at 128 boards when the set is loaded, which is also the perceived optimum for a complete board-set, if spending three days straight clearing bricks is your thing.

Note: If you create or load a board-set with multiple boards and then reduce the number of boards in this field, any boards that exceed the new value will be deleted and lost forever. Well, okay. Not forever. You can undo this action with the "Undo" command in the Edit menu. Nifty.

Step 2: Widescreen boards or standard boards?
Introducing: widescreen boards. The new board-set format that lives up to modern screen standards. Checking this option will add six more columns to your board-set, allowing you to create boards that fill the screen on displays with a 16:9 aspect ratio. If you create your board-set in the standard board-set format, which was the format of the original DX-Ball 2 and its official board packs, your boards will be displayed with pillar boxes on the sides of the screen:


Note: Board-sets created with the official DX-Ball 2 Game Editor are not backwards compatible with the original version of DX-Ball 2, regardless of the chosen board-set format.

Step 3: Skipping between boards
This is a required step. You're not allowed to skip it. But once you have added more slots to your board-set, you'll be able to skip through the set by clicking the forward ">" and backward "<" buttons under the Current Board section. We're making progress here. The first "<<" and last ">>" buttons will skip to the first and the last boards in the board-set, respectively. Alternatively, you can also skip through your boards by using the arrow keys on your keyboard. You can even jump to any specific board in the board-set by typing in its number in the navigation input field. It's pretty magical.

Step 4: Loading a brick-set
I know you're itching to create your first board right now, and yet there is more torment to read through. But there is a reason for that, and that is because you cannot create any boards before you load a brick-set into the palette first. So take a deep breath and click the "Select" button for the Brick Set loader:

 
If the file browser does not target the "Board Pack 1" directory, or you are unable to see any image-set files, all hope is not lost. Just navigate to the directory of your DX-Ball 2: 20th Anniversary Edition installation and dig all the way into the "Board Pack 1" subdirectory. For most users, this should be located under "*\Program Files (x86)\Steam\steamapps\common\DX-Ball 2 - 20th Anniversary Edition\Boards\Board Pack 1".

Once you're in, look for the image-set files named "BrickSetJim", "PhilippeBrickSet", "SeumasBrick" and "AnniversaryBricks". As you would guess by the file names, these are brick-sets. We are so close. Open any one of your choice, and the respective brick-set will now be loaded into the palette in the main window. Amazing, isn't it? Or maybe you didn't like those bricks, in which case you can always load another brick-set. Find your favourite and go crazy. It's board design time.
It's board design time
It's board design time, indeed. The moment you all have been waiting for is closing in. To start creating your own board, simply click on any desired brick in the palette, and then click within the grid of the canvas to fill in any of the empty slots with the selected brick. You are even given two swatches for the creation process, one for each mouse button. That's handy. But we'll only have access to the left swatch right now. Also, clicking on any empty slot in the palette will assign the Eraser tool to the swatch (more about that below).

Tools of the trade
Aside from providing a swatch for both the left and the right mouse button, the tools panel situated beneath the canvas will bestow your mouse with concise creation abilities, making your board-set creation process a sweet breeze. The tools panel is divided into two sections: one for the left mouse button and one for the right mouse button. For the left mouse button, we have the Draw tool assigned by default, companioned by the Select tool on the side. As for the right mouse button, we even have four different tools to choose from: the Draw tool, the Eraser tool, the Eyedropper tool, and the Fill tool. The latter three tools are also available to use with the left mouse button through their corresponding keyboard shortcuts (more of that "read below" stuff again). By default, the right mouse button is assigned to the Eyedropper tool. That's why the right mouse button swatch isn't available just yet. But it will be, just below.

The Draw tool
The Draw tool lets you draw your design onto the canvas. Pretty straight forward. If you happen to have the Select tool assigned to the left mouse button while reading this, pressing the "D" key on your keyboard will switch you back to the Draw tool again. That's the power of keyboard shortcuts. In order to use the Draw tool with the right mouse button, simply click the pencil icon in the right pane of the tools panel (or press "B" on your keyboard). Feel the power of two swatches in one hand.

The Select tool
The Select tool is a blessed convenience that allows you to perform precise copy, cut and paste operations on your boards. Dedicated to the left mouse button, this tool allows you to draw rectangular selections across the canvas, highlighting selected slots with a yellow outline. If you're the kind of person who likes to push buttons, it's the "M" key on your keyboard that will select the Select tool. Once you have created a selection, pressing "Ctrl + C" on your keyboard will copy everything within the selection to the internal clipboard, including any empty slots, while pressing "Ctrl + X" will also cut out the data from the canvas. This data can now be pasted anywhere else on the canvas by simply making a new selection wherever you desire, and then pressing "Ctrl + V". With a little practice, you will become a professional board design surgeon in no time.

Want to flex those Select tool skills of yours? By pressing and holding the "Shift" key while drawing, you can create multiple individual selections anywhere on the canvas. And if you really want to excite, pressing and holding the "Ctrl" key instead will allow you to make those selections fully free-form. You can also edit a selection by pressing and holding the "Alt" key, which lets you draw rectangular deselections, while pressing and holding "Ctrl + Alt" allows you to draw free-form deselections. Alternatively, you can also deselect everything at once by pressing "Ctrl + D".

Anything else? How about instantly erasing any number of selected bricks by pressing the "Delete" key on your keyboard? Sheer convenience. And if you press "Ctrl + A" first, which will select the entire canvas at once, you can wipe out all your bricks in one move. No need to even reach for the "Clear" option in the Edit menu. But wait – there's actually more! By using the navigation buttons on the editor's control panel, any bricks (and empty slots) enclosed within a selection can be moved around on the canvas independently. Even your mom would be impressed.

The Eraser tool
The Eraser tool operates in the same way as the Draw tool, erasing bricks as you click on them or draw across them. Click the eraser icon in the tools panel (or press "E" on your keyboard) to assign the Eraser tool to the right mouse button. Your right mouse button swatch is now an eraser. To use the Eraser tool with the left mouse button, press and hold the "Alt" key on your keyboard while clicking or drawing.

The Eyedropper tool
The Eyedropper tool lets you put eye drops on your left... No, wait. The Eyedropper tool lets you quickly assign any brick already on the canvas to the left mouse button swatch. Click the eyedropper icon in the tools panel (or press "I" on your keyboard) to assign the Eyedropper tool to the right mouse button. To use the Eyedropper tool with the left mouse button, press and hold the "Shift" key on your keyboard while clicking on the desired brick on the canvas. Clicking on an empty slot will assign the Eraser tool to the swatch.

The Fill tool
The Fill tool lets you fill any empty space on the canvas, or replace a group of identical bricks – all in just one click – using the brick assigned to the right mouse button swatch. Click the paint bucket icon in the tools panel (or press "G" on your keyboard) to assign the Fill tool to the right mouse button. To use the Fill tool with the left mouse button, press and hold the "Ctrl" key on your keyboard while clicking on an empty slot or a group of identical bricks. Conveniently, the fill is now made with the left mouse button swatch. These are great keyboard options, right?

That's a neat palette of bricks
The palette supports brick-sets with up to 207 bricks, almost enough to build a small house. Any number beyond this will not display in the palette. A brick-set consists of 7 different types of bricks: "AlmostInvin", "Invin", "Multi", "Explo", "Hidden", "Zapped" and regular bricks (more about what this means two sections below). Special brick types are also indicated in the palette by a small capital letter icon, i.e. "A" for "AlmostInvin" bricks, "I" for "Invin" bricks, "M" for "Multi" bricks, "E" for "Explo" bricks, "H" for "Hidden" bricks, and "Z" for "Zapped" bricks. When a brick is assigned to the left or right mouse button, the respective brick in the palette will also be marked with a left or right mouse button icon, like the one seen on each of the swatches. The more you know.

Moving your entire board on the canvas
As mentioned twelve headlines and two sections earlier, you can shift the position of your board on the canvas at any point by using the move controls in the control panel window. Click the "Up", "Down", "Left" and "Right" buttons to shift the position of your design on the canvas. The bricks will even wrap around the edges if they clip, letting you seamlessly move your design around on the canvas. No need to redraw that board you spent thirty minutes on, just because your design was one line off. It's a life saver, really.
What's on the menu?
The menu bar is the exclusive club where all the neat stuff is hidden, so let's dig a bit deeper and see what more is on this plate. It's time to place your order for more knowledge:

File menu
It all begins and ends with the File menu. Let's have a look at the essential features that hide within this expandable drop-down list:
  • New – Selecting this option gives you the opportunity to start anew with absolutely nothing. Just make sure to save your current board-set before you take this step.
  • Open – Load any of your previously saved board-set files. It really opens up to new possibilities.
  • Append – If you ever wanted to combine another board-set with the one you are currently working on, this feature is made for you.
  • Save (Ctrl + S) – Don't let all your hard board design work get lost. Save it.
  • Save As – When you want to create a new file from an already existing board-set.
  • Exit – All that has a beginning must have an end. This is where you end your board design session.
Edit menu
The Edit menu is where things get hardcore. Your board designing is a serious art and therefore requires serious tools:
  • Undo (Ctrl + Z) – Did you ever make a mistake that you truly regretted? With this feature, you can undo them all.
  • Redo (Ctrl + Y) – There are times when you either go too far back or you're just not sure if the choices you made were all that bad after all. In this case, you can redo your actions.
  • Cut (Ctrl + X) – Get your board-set scissors ready. You are allowed to cut out any board you want, but only the last cut will be stored on the internal clipboard.
  • Copy (Ctrl + C) – Copy your entire board to the internal clipboard. (But be careful to not replace the cut).
  • Paste (Ctrl + V) – Whether you copied it or cut it out, whatever is on your clipboard will be pasted exactly where you paste it.
  • Insert – Ever wanted to add a new board right in the middle of your board-set? Use this command to insert a blank board exactly where you want it.
  • Clear – Why erase every brick on the board by hand when there is this tool available?
  • Select All (Ctrl + A) – Makes a selection of the entire board. (This operation is only available when using the select tool).
  • Deselect All (Ctrl + D) – Deselects any active selection on the canvas. (This operation is only available when using the select tool).
View menu
Next up, we've got all the fancy options that make your board design process a more creative and visual experience. Let's have a look at the view menu:
  • Show Grid – No more guessing where to place your bricks for the perfect symmetrical design. With the grid view on, you can easily count the positions between your bricks. Or you can switch it off to better enjoy the sight of your creation.
  • Show Background – They are the perfect complement to your finished designs, but they can be a bother when you want a blank canvas to draw upon. On or off, any time, your choice.
  • Show Hidden Bricks – They can hide, but they can't hide.
  • Animate Bricks – View your board exactly as it appears in the game, or just watch the palette throw a party for you.
Tools menu
The tools menu is a doorway to expanded features, and also a resting place for the left and right mouse button tools:
  • LMB Draw (D) – Selects the Draw tool for the left mouse button.
  • LMB Select (M) – Selects the Select tool for the left mouse button.
  • RMB Draw (B) – Selects the Draw tool for the right mouse button.
  • RMB Eraser (E) – Selects the Eraser for the right mouse button.
  • RMB Eyedropper (I) – Selects the Eyedropper tool for the right mouse button.
  • RMB Fill (G) – Selects the Fill tool for the right mouse button.
  • Image Assembler – Opens the Image Assembler tool.
  • Workshop Helper – Opens the Workshop Helper tool.
  • Save Icon – Let's you export a 48x48 pixel art interpretation of your current board. This is also how charms are made.
Would you fancy an Image Assembler?
The Image Assembler is an image-set creator and editor. It is a tool that allows you to create your own brick-sets and background-sets for use with your custom board-sets, if you so desire. If you don't have any custom brick or background images available, don't worry – you can load any of the default image-set files from the game, which is also the best way to see for yourself how all this works. In the image below, we have loaded 'BrickSetJim' as an example (take note of the cute little preview window on the side).


The buttons that define your buttons
Bricks, buttons – what's the difference? Perhaps not so much in visual terms in this case. But before you give in to the temptation of pushing the buttons of the Image Assembler, let's get into a proper explanation for what they all do:
  • Add – This button lets you add images to your image-set. Be astonished.
  • Replace – In a set with many images, you may want to change a certain picture in the set without disrupting the order of the other images. This is the button to push for such operations.
  • Up / Down – Position your images in exactly the order they were meant to be.
  • Remove – Remove that which does not belong in your image-set. Your best friend when it comes to keeping things clean.
  • Save – Clicking this button lets you export the currently selected image as a PNG file.
  • Save All – Export every image from the image-set, all at once. Just make sure to make a little folder or something to put them into first.
  • Load Set – Opens a window that allows you to browse and load any image-set file. Usually a good place to start.
  • Save Set – Functions pretty much like a "Save As" dialogue box. Save your image-set as a new file, or replace the existing one. Just be careful not to replace anything unintentionally.
  • Clear Set – This button will remove every image in the set and let you start anew.
  • Append Set – A magical feature that allows you to combine multiple image-sets with your current one, turning them into one large image-set. Use with consideration.

Image dimensions and formats
The Image Assembler supports images of the BMP, JPG and PNG formats. You can load 32-bit images, but transparency is not supported. Also note that the game will render all graphics in 16-bit colour depth. The images you add for your bricks should be 48x24 pixels in dimensions. Any more or less will be resized in-game to fit the required dimensions, so keep your dimensions proper.

The basics of a brick-set
There are a few things you need to know about brick-sets. As we covered earlier in the section about the palette, there are 7 types of bricks, of which 6 are special brick types. These distinct brick types are defined in the Image Assembler by their names. The game recognises these particular names and will render the brick types accordingly. In other words, if you name a brick '
"Hidden", the game will render that brick as a "Hidden" brick. Take a close look at the brick names that are highlighted in the following image:


"AlmostInvin", "Invin", "Zapped", "Hidden", "Explo" and "Multi". Any brick that is not named correspondingly will be rendered as a regular brick in the game. So, what do all these odd brick names mean? "AlmostInvin" is the brick that takes one hit before it turns unbreakable; "Invin" is the brick that pretends to be invincible when the fireball is not around; "Zapped" is what you get when Mr. Invin surrenders and becomes a breakable softie; "Hidden" bricks are very shy and prefer to not be seen; "Explo" bricks tend to be explosive by the slightest touch of a ball; while last, but not least, the "Multi" brick will usually take three hits before it breaks. You can add as many of these special bricks to a brick-set as you like. Just remember that your "Explo" bricks and "Multi" bricks must be ordered sequentially, while each group must also be separated by at least one brick of a different type (or the groups will merge together). If your set features multiple "AlmostInvin" and "Invin" bricks, make also sure that your "AlmostInvin" bricks come before their corresponding "Invin" bricks, and that the "Invin" bricks are followed by their corresponding "Zapped" brick. To define a brick's type, simply click inside the "Name" field and change the brick's name (e.g. "BlueBrick1.png") to the name of the desired brick type (e.g. "Invin"). Click anywhere in the list to apply the name change. Ta-da.

The basics of a background-set
A background-set is an image-set in its most basic form. It's really just a collection of images grouped together into a single file, so feel free to add seamless tiles of any number and any pixel dimensions, to create your own background-set to feature in your board-set. (Be cautious to not infringe anyone's copyright if you are not creating your own background images).

Be cautious about saving changes
If you make any changes to the game's default brick or background-sets, any board-sets relying on the respective image-set files will display an error message in the game and render the board-set unplayable. The game always looks for a checksum in the board-set file, in order to ensure that the associated image-set files are identical to the ones that were used when the board-set was last saved. If this verification fails, the game will display an error message when trying to load the corresponding board-sets.

If you need to revert any changes you made, you can restore the original files by running the game file integrity verification tool found in the Steam application client. If any changes are made to a custom brick-set or background-set that was previously used in one or more custom board-sets, the updated image-set files will have to be reassigned for that board-set in the board-set editor (that means loading the updated image-set file(s) and then saving the board-set). Remember this if you mess things up.
Getting ready for the Workshop
Now then, did you create a work of art yet? Probably not, as you're still reading this guide. But once you get to it, chances are you will find yourself immersed with a desire to share your creation with the world, for others to mercilessly destroy it with a paddle and a ball. Whenever this would be the case, you'll be glad we had a look at the Workshop Helper.

Creating your Workshop item
In order to make your board-set available on Steam, it has to be assembled into a Workshop item. That is what the Workshop Helper is for. However, the Workshop Helper is not interested in mere files; it wants a folder. So before we get started, we need to create a Workshop item folder.

The game has already prepared a suggested starting point for you in the Documents folder of your user account. Seems there's a folder in there named "Longbow Digital Arts". Let's open that, and behold: another subdirectory, named "DX-Ball 2 - 20th Anniversary Edition". That seems like a good place to get started. Once you're in there, create a new folder. This folder will be your Workshop item folder, so make sure to name it something that will help you remember what it is.

Now that your Workshop item folder has seen the first light of its digital life, you will need to add the contents of your Workshop item into it. If your custom board-set only makes use of the game's native brick and background-sets, all you have to put into this folder is the board-set file itself. On the other hand, if your custom board-set uses a custom brick-set or custom background-set, you will need to add the corresponding image-set files into your Workshop item folder as well. All good?

Now we get to the exciting part of launching the Workshop Helper. Woo. Do you remember where it's located? It's right there in the Tools menu of the Game Editor's main window. So let's get this baby launched like a rocket and see where it takes us.

Using the Workshop Helper to upload your Workshop item
The Workshop Helper window is pretty straight forward and easy to use. It's a lovely little tool that does exactly what it should. Since you already created your Workshop item folder, we're good to go now. Let's find out how this thing works:


Not too scary looking, is it? Let's add the Workshop item folder to it right away. Click the "Select" button for the Workshop item folder loader, and you're set. It will automatically add the name of your Workshop item folder as the title of the Workshop item, but you can change that to whatever you want your Workshop item to be named on Steam. Before you do that, though, you should probably add a preview image for your Workshop item first, because this tool does have a habit of reverting the Title and Description fields if you do that last. The Workshop Helper might suggest a non-existing file named "preview.png" in the Workshop item folder, but the name and the location of your preview image is not important. The preview image should optimally have the dimensions 1280x720.

Once you're set, we're ready to upload. Just hit the "Upload" button and watch the magic happen. After a few seconds, your upload will be completed. A button inclining you to go to your Workshop item's page will also light up. Exciting. Let's click that and go check it out.
We're online
Great. We're online. If you want to make any changes to your item, you will have a few options in the right-hand panel on your Workshop item's page. You may want to check the Change Visibility option to make sure that your Workshop item is also made visible to the public. Once it's public, other players will have the ability to subscribe to your item from the game's Workshop page on Steam. This is how your uploaded board-set is made available for others to download and play. Yay.

You can also subscribe to your own Workshop item to test how it appears for others. However, in order to make the uploaded version of your board-set display in the game, you will first have to move the Workshop item folder to a different location, as DX-Ball 2 prioritises the local board-set files. Once this is done, your subscribed board-set will appear in the game with a cloud icon before its name.

Updating your workshop item
Not happy with the files you uploaded? You could delete them and start over. Or you can simply make an update to your Workshop item. Simply update your files in the Workshop item folder that you created previously, and feed it again to the hungry Workshop Helper. The folder will now contain a text file with a unique identifier for your Workshop item, which was added there after your previous upload. The Workshop Helper will use this identifier to locate your Workshop item on Steam, which in turn allows you to publish updates to your Workshop items. You can also update the preview image for your Workshop item this way. Updates you make will also download automatically for subscribers.

Anything else?
Well. It seems you have finally reached the end of this guide. Now get creative and show us your best board designs.

8 Comments
wirehost 10 Jul, 2022 @ 9:32pm 
i made maps, tysm
Machielovic_NL 19 Sep, 2021 @ 8:40am 
I tried to make a background with a tetris image for my tetris tribute board but it does not work any tips? Also my board set first had 5 levels and while going to "test board" I could test the levels in succession now I added a sixth and now you can test the first then it jumps back to the editor after the first level, so weird!
Superjustinbros 27 Dec, 2020 @ 9:44pm 
I think this guide could be updated to explain the functionality of the special brick types highlighted above (Zapped in particular puzzled me for a sec until I saw the other guide you posted), as well at the "perm" and "switch" brick types from the classic brick set.
MI_T_P 24 Dec, 2020 @ 9:45am 
Anyone knows about switch brick and what script it is?
Kry 28 Jun, 2019 @ 5:10am 
@youyoumu You probably don't have a thumbnail for the board. Without it the upload will fail.
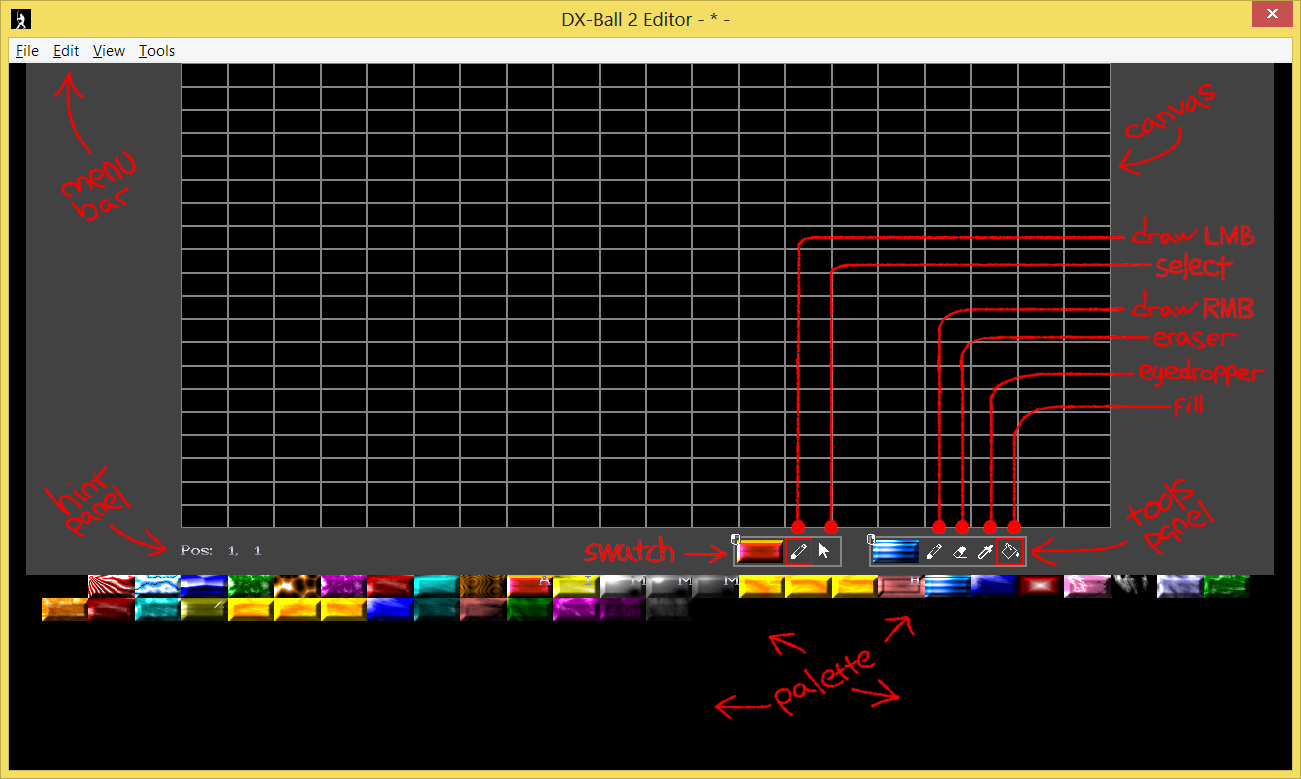
Take a screenshot of any of your levels in your board set. If your screenshot is in a folder named for example "Captures" Then in the workshop helper go to "Preview image:" go to the "Captures" folder and then select your screenshot if it's PNG. Then it may work.
Xane M. 2 Feb, 2019 @ 5:25pm 
This is a good guide! One thing you might want to add is that anything you upload to Steam Workshop (including preview picture) must all add up to under 1MB or it'll fail. I ran into that problem a couple times until I found out my preview picture unfortunately couldn't be 720p.

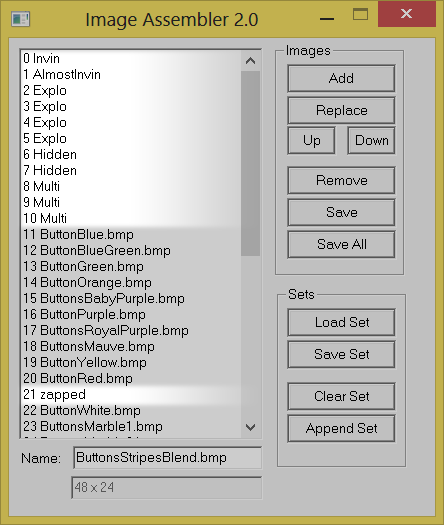
Also, I think I read the game accepts over 128 boards in a set now, but I might be mixing up memories, and I'd never make a boardset that big to test it. :steambored:
youyoumu 2 Jan, 2019 @ 12:10am 
I try to upload it to the workshop but I uploading a file I always getting this message.
'Workshop upload failed! File not found. Make sure the selected preview file is accessible. '
What did it go wrong?
McDude73 8 Dec, 2018 @ 11:03am 
You had to make me search up what Sprudel was since it caught my attention.
:P