Dead by Daylight

Dead by Daylight

117 ratings
Understanding The Hag: An advanced guide
By Croquedead
After maining The Hag for over a year and having way too many hours playing as her, I figured I might as well share my thoughts when I play this killer in order to help whoever wants to have a better understanding of this killer. What differenciate this guide from all the others is that this is a more "advanced" guide, destined to people that already know the basics and have already been able to have some success with this character. This is no beginner friendly and if you really want to know the basics, check out The Hag Guide video that is posted at the very bottom of the guide in the shoutouts section. With that out of the way, it is time to get started.
   
Award
Favorite
Favorited
Unfavorite
Terms and Concepts
Like I already said, you should have already checked the guide posted down below in the shoutouts section. Just in case you need a reminder of a couple terms that will be used and that are known by the Hag community, let's recap most of them.

ITH
Refers to "Instant Teleport Hit". This is when you spam your teleport key when a survivor is about to pop one of your traps in order to teleport before they go through the phantasms and prevent them to react. This is a very powerful trick that is part of how to use the traps, which is not something will we cover a lot as trap usage should already be mastered before you are reading this.

This trick is used not only to hit people, but also to bodyblock them in some occasions, especially in doorways or hallways.

Cam swing
Also called cam flick by others, this is part of The Hag's base kit. When a trap pops from the ground, the survivor's camera will swing in order to face the phantasm. This is used to make survivors go in certain directions you want them to go to or to make them smash walls and slow them down.

Especially useful when you are not already in a chase and thus not reading to ITH, this gives more time to catch up and get a hit and can also be used for mindgames and preventing them from going certain paths.

Web
A web is all the traps you have put on the map. This is the area you control. This term will be used extremely often as the web is going to be the #1 biggest part of this guide as a lot of Hag players struggle to set-up a good web and this is absolutely crucial in order to do well against good survivors. This wasn't very explored in depth in The Hag Guide video and will now be our main point of interest.

This is my speciality and the number #1 reason I wrote this whole thing.

Trap AOE
AOE stands for "Area Of Effect" and in the case of The Hag, it refers to the trigger range of the traps you put. When a survivor stands in the AOE, the trap triggers.
The Mindset
A different killer
The Hag is drastically different from the rest of the cast as unlike any others, she doesn't want to initiate chases by herself. When playing her, you need to set-up traps on the map and form what is called a "web" which we will come back to later. Where should you trap? Well, for starters, try juking spots like pallets, windows as well as crossroads (commonly used paths by the survivors). Not only will your traps help you drastically in chase, but they will help you start multiple chases at the same time and create the biggest pressure known in the game: having multiple people chased at once.

Of course, such an achievement will only be made by the strongest Hag players with countless of hours on her. Their experience allows them to completely control the map and win every game, assuming they don't make too many mistakes. As you can see, The Hag is mainly considered a Top Tier killer because her power allows her to achieve such a high skill cap that the biggest factor that will determine if wether or not she will win is her own skill. A Hag that lost a match probably did some major mistakes, which I recommend reviewing so you can learn from those mistakes. Losing is surprisingly more useful than winning and when one starts playing Hag, they will lose A LOT. This means, they should turn those mistakes into their favor for the next matches.

As I already pointed out, you do not want to initiate chases most of the time and actually "hide" from the survivors. You want as many traps on the field as possible before they know your identity. Do not trap the entire map, just a little more than half of it will be enough.

Repair the web
As the match goes on, you want to put more and more traps as you start losing them after downing people in chase with them. Do not necessarly put your traps at the same spots, this will actually depend a lot more on what the trap was doing. If it was for a single pallet that is now broken, placing a trap there may be worthless. However, placing a trap at a crossroad right next to it is definitely the right thing to do.

You see, when the pallet is gone, the survivors will not go to that loop as they see the pallet being gone (unless that pallet was not in the open and hidden by objects, in which case trapping there might not be a bad idea), they will most likely take the most direct route to the next loop. This is the spot you need to trap. Find that route and place a trap in the middle of it. When you get there in chase, use ITH to get a hit. Remember that you don't have to lunge right away to ITH in a crossroad as your lunge may be cut off due to a bug (which has been confirmed as a feature, but I refuse to accept this and still call it a bug), take your time to lunge correctly. It's the teleport that is instant, not the hit.

Prediction and Application
Once you got the right mindset of setting-up traps instead of looking for survivors, you should do a lot better. Trapping mid-chase works, but wastes a lot of time. It is much stronger to prepare and then catch them off guard.
The Web - Introduction -
What is The Web?
The Web is all your traps combined. It consist of the loops you control, the crossroads you got trapped and the distance between every single trap. Yes, the distance between the traps is very important and we will cover that shortly.

As we already covered, you want to set-up traps instead of looking for survivors as they will set the traps off and this is when you will start to chase. You want your set-up to be a giant net where once people get caught inside, there is no escape. This is why you don't trap the whole map, you want to have complete control on about half of the map (depending on the size of the map, we will cover the maps below). As The Hag, you want to be able to punish every trap that gets triggered. A trap gets triggered while you are chasing someone? Teleport to them and get a hit. The person you were chasing will also trigger a trap if you placed your web perfectly, which means you are going to straight back at them anyway and get the down. This leads to...

Get hits, A LOT of hits
Everytime a trap is triggered, TELEPORT TO IT. This is very important and if your web is set perfectly, you will have no problem going back to the other person if they set off another trap. You want them to be injured so they have to heal and gain more time. Even if you downed someone, slug them and teleport away if a trap gets triggered. You want to punish that trigger and chances are you will get that second person very fast as well, creating a lot of map pressure.

This means that with every exit they have from the web being covered, you gain access to the absolute strongest map pressure in the game.

Where do I place my traps?
This is up to you. I shouldn't tell you where to place your traps. There is the commentary I do about the maps below which can help you get a general idea of how it is done, but you still should experience and try things. Use the spots that work for you. If for example you like placing a trap at the window of the shack like I do, it's cool. But if you think placing it in the middle is better, do just that. There is no objective best trapping spots in the game, there's good and there's bad spots. Every good spot has it's uses and that's all there is to it.

Do not learn where to trap, trap with your heart.
The Web - Hook Momentum -
The Hooks
You downed someone and no one else triggered a trap at this time. Take this opportunity to hook them nearby. Now, choose a hook that is deep inside your web if possible so you force others survivors to come inside. The more people in your web, the more map pressure and control on the game you have.

Once you got someone on the hook, place a trap in front of the hook (not too close as you want to force survivors to crouch from further). This isn't made as a camping tool, but more like as a way to slow the game down more and punish hook divers. You can then go a bit further and make sure every loop nearby is trapped. After this is done, the hook is going to be a death trap for anyone that comes in.

If you have Make Your Choice, someone WILL get hooked no matter what after your first hook. The momentum you gain from it is crazy strong as no matter who you will find when the unhook is achieved, you will get them fast and down them in one hit. Now, you do not HAVE to go back to the hook every time, especially if you already downed someone else, but it is adviced to do so if you are not doing anything more important.

Moving the web around
When you hook someone, your web will get bigger and add this extra layout of the map if the hook is a bit on the side of the web and not straight in the middle. This means your web will move place a bit. This is a great trick to get rid of all the loops on the map. The pallets you destroyed stay destroyed, which means if they somehow get out of the web in a chase, but go through that area, you will still get them as there are no pallets in the area.

If the spot had windows, you have to choose to either place a trap at the loop or on a crossroad that leads to it. Anything that can work for you to down them basically.
The Web - Disposition -
The importance of the disposition
Having a good disposition with your trap placement is very important and will separate a good Hag from a great Hag. You want your traps to not be too far away from each other nor do you want them too close from each other. Otherwise, these things will happen:

Traps too close: You will lose traps while being stuck in the swipe animation after hiting them, thus wasting them. Traps too close also means a small web, which hinders your map control tremendously.

Traps too far: You will waste time in chase as you will have to wait for the next trap trigger, this also means more chances of them finding a loop that hasn't been trapped yet. Like we covered before, you want to avoid having to trap mid-chase as much as possible as it wastes time. Also, your web will be way too big. This means you won't be able to punish all trap triggers at once, which wastes them and also makes you lose opportunities to punish and gain more momentum.

As you can see, traps being too far from each other is a much bigger issue than if they were too close. While still bad to trap too close, you can fix this issue with a certain perk if you want to keep trapping closeby.
That's right, Save The Best For Last will allow you to have a shorter swipe animation, giving you a bigger window to punish trap triggers. It's for that exact reason that this perk is one of the best on The Hag.

Distance between the traps
There is no exact number of meters the traps need to be away from each other and there is no distance that will also work 100% of the time and allow you to get both hits at once. However, if you want a general idea, keep reading as we are getting to the good stuff.

Most Hag players (once they go past trapping generators, a very bad habit) will trap looping spots. While a good idea, you shouldn't only trap those. A good way to keep track of it is by building your web, you want to have an alternationg between a trapped loop and a crossroad trap. For the loops, focus on the bigger ones, the unsafe pallets and be mindgamed, so there is no point in trapping those. For crossroads, you wanna trap the most common ones. Common paths taken by survivors work wonders to start chases, but they can also be used as a mid point between loops, which means you will prevent them from going to the next loop on the first place.

As an example of this kind of alternation, you want something like this:

X:Trapped Loop
O: Not trapped/unsafe Loop
- : Path
/ : Crossrad trapped

O - / - X - / - O
/ ---/-- O --/--- /
O - / - X - / - O

Assuming the paths are rather short in the middle, this could potentially be a decent web. The corner loops are not very important as the crossroads leading there are trapped and having your web taking over a corner isn't the best option, unless you are on a very big map. The middle loop isn't trapped, but it is not necessarly the middle of the map, beware, this may very well be slightly on a certain side and the X on the top may very well be a trapped building in the middle of the whole map.

Once you got someone and you want to hook them, an ideal spot would be near one of the "X" as these are the most heavily trapped parts of the web. Now, this web isn't perfect as it has some issues:

Negative points about this example of a web: This web has three traps that seem pretty close to each other on the top row and the bottom row. This may be seen as an issue as traps too close too each other tend to be wasted. Another problem is that only two loops seem to be trapped here. There is too much on a focus to crossroads. Now, this isn't a bad thing to trap a lot of crossroads and prevent them from going to the loops on the first place, but it becomes a problem when you start a chase using one of those traps. Going to a loop from there is much easier. Frankly, the closest loops are shut down, but if a chase starts in one of the crossroads on the far left/right of the middle row, the loops closeby are very much accessible and will probably be needed to be trapped mid-chase if you want to commit to that chase.
"And the worst thing happened"
Difficulties as The Hag
Of course, nothing is perfect and any Hag player can face some trouble. However, nothing is lost if one of those things happen as there's always something you can do. That's the beauty as The Hag, the majority of what happens in your game depends on your skill, unlike almost all of the other killers.

It's Coldwind Farm
Corn as Hag really does suck. You are short, it's pretty hard to see through and those maps are generally vast areas of nothingness but corn. Depending on the corn map you got, you can focus more on the main building and it's surroundings so you can avoid corn as much as possible. The main problem with corn is the fact that it's hard to determine good crossroads in it. Use the building as a crossroad. The only two exceptions are Fractured Cowshed and Rotten Fields. These two maps are the hardest maps in the game as The Hag. They are big, the main building is either in a corner or nonexistent and they have a lot of corn. What to do in those two maps? Try to focus on the shack and the jungle gyms. These spots can be easily covered in your web and if necessary, try to trap in the corn in a middle way between two generators. This should be an effective crossroad.

You found someone early
And when I mean early, I mean you have like two traps down only. If this happens, fake chasing them. Basically, let the survivor run from loop to loop and if you can make them drop pallets fast, do it. As you are "chasing" them, trap loops and crossroads taken on the way until you go too far away from the area you are setting the web. Not only did you set-up, but you also wasted this survivor's time. Leave them be once you are set-up and the next chase should be a cakewalk.

Traps are getting triggered while you are hooking someone
You lost traps. Now, if this happens, you already made a mistake as this means they were too easy to find. Now I'm not talking about one random trigger, but multiple ones in a row. This probably means you focused too much on trapping loops as those are obvious. You should have split it with the crossroads. Regardless, if this happens, you can move your web around the now hooked person so you can snowball from that. It'll be easier to defend, punish and slug people in that area.

A survivor has a flashlight
OK now this is annoying. They can try to destroy your traps with the flashlight. That said, you have to consider that this person isn't doing any objective and is wasting their flashlight battery. While this happens, make sure you got someone hooked and, like in the previous point, move your web around there. If you are getting your traps destroyed as you placed them, it's because they are following you and you can either go hit them so they have to heal or let them waste their time and find someone else to also pull away from objectives.
Hag Builds
I'll list down my personal Hag Builds. I have tested them all, they are all good. If you are too lazy or unsure about yourself to create your own build, just pick one of those.

Classic Lisa


Classic and predictable, this build works the best for any new player as The Hag as it's kinda like a jack of all trades. You have the slowdown from Hex:Ruin, the brutality from Make Your Choice and the amazing combo of Monitor & Abuse and A Nurse's Calling.

Russian Roulette Hag


A very strong build. Monitor & Abuse is one of the best perks on Hag and it works great with this build. Devour Hope and Ruin are great as they both offer a good amount of momentum and will save the other hex once during the game. The real heart of this build is Haunted Ground, a serious hinderance for the entire team once it is triggered.

Rancor


Rancor is the main focus of this build. It is used to gain information on the survivors so you can make the most optimal decision, kinda like Freddy would do. Using this information, it makes it easier to grind and maintain Save The Best For Last tokens. The other two perks are just good Hag perks in general. Make Your Choice is flat out amazing. Agitation is great to hook people faster, leaving your traps in a vulnerable state for a shorter time and gives you more time to punish the triggers.

Toxic Hag


This is very very mean. This build is extremely powerful, extremely toxic and is in my opinion one of the absolute most powerful killers in the entire game. A Hag with this build is extremely powerful and gets a lot of salt. Now that you have been warned, this build means buisiness. As you can see, this is a full "one-shot" build. Make Your Choice is a classic perk and you know by now how good it is. Devour Hope and Haunted Ground are a very powerful combo and if they somehow manage to still do the generators, you have NOED just in case. This is absolutely disgusting.

Slug Hag


If you want to use Third Seal, this is the best build I've found. Using this perk, you will gain a much more dangerous slug game, combined with Knock Out, you don't necessarly need all tokens to already start slugging effectively and it's also there in case they break the totem. As this is a slug build, I've also decided to put Deerstalker because it can be pretty useful. Finally, Make Your Choice is the best way to start a slugging streak as you instant-down the unhooker, then down the unhooked survivor fast and then you can use one of the two (or both) to slug.

Battle Hag


A very agressive build that uses both Sloppy Butcher and A Nurse's Calling to spread damage and punish heals. Enduring greatly rewards agressive plays and Save The Best For Last is a great perk that rewards damage spread as long as it's not on the obsession.

Gates Feast


Blood Warden is a very fun perk in my opinion, so I wanted to include it in a build. This is one of the best options I found. Monitor & Abuse and A Nurse's Calling pair very well together and Save The Best For Last makes it deadlier when you finally close the gates with Blood Warden. It's pretty effective, far from the best build, but if you want to do some Blood Warden plays, that's what I recommend.

Cluster of Hell


Focus down 3 or 4 generators close to each other and build a web there. Monitor & Abuse and A Nurse's Calling are a classic combo that do work well here, especially with the slow healing from Sloppy Butcher. The last perk is Agitation, it could have been Hangman's Trick as well, but Agitation is usually a bit better to get fast hooks and be able to react faster to everything going on.

No Escape From The Web


This is a build for smaller, yet deadlier webs. Depending on the map, you may place your web in a way to have crows inside of it or on the side and corners of the map to make use of Spies From The Shadows. Using this perk, there is absolutely nowhere to hide for any of the survivors anymore while they are inside your web. Monitor & Abuse helps ambushing said survivors once detected, Save The Best For Last makes your smaller web more effective and less of a handicap. Final slot goes to Agitation to allow you to choose the hook you want in your web, closer to crows preferably. You may swap Agitation or Monitor for Enduring or Sloppy Butcher if needed.
Hag Builds (2)
Corrupt Hag


When The Plague came out, one perk did stand out as a new potential weapon of destruction for The Hag: Corrupt Intervention is the perfect tool to set-up for free and being able to completely destroy survivors coming in your web thanks to agressive perks such as Save The Best For Last and Enduring. Agitation is to make sure you have even less counterplay and destroy everyone in your path.

True Terror


Just thinking about this build scares me. Corrupt Intervention does help with the set-up early-on, but then when you are set-up, you start completely destroying surivivors lives with your trump card: a detection perk truly terrifying on Hag: Infectious Fright, effectively revealing everyone in your terror radius when you down someone, which is increased by Monitor&Abuse. This combo is absolutely deadly and to think you will gain Save The Best For Last tokens to down people faster makes this only more terrifying.
Perk Talk
So you want more explainations? Here, I’ll make a quick description of my opinion on every perk on Hag. I’ll also give them a score from 0 (useless) to 10 (extremely powerful).

7/10
Very strong perk. It helps sneaking up on survivors that try to heal, which they should do as not healing vs Hag is pretty much a dead sentence. It’s not higher due to the fact you do not wander around that much and mostly teleport everywhere and you need Monitor & Abuse to use it effectively.

8/10
Having to transport survivors to hooks takes time and puts you in a vulnerable state as people can pop your traps without any punish. Agitation helps a lot against this and is a cruely underrated perk in that regard. I highly recommend it.

3/10
Very very niche. Too niche for me to recommend. It may have it’s mindgame uses and does save traps but you don’t really need it.

4/10
OK, it’s not horrible, but it really shouldn’t be used on Hag outside of BP farming. I do not recommend it’s use otherwise. The Hag can’t make use of that aura very effectively.

1/10
Uhhh no.


4/10
It’s like Barbecue, The Hag can’t make use of that perk effectively. It’s not good either.


5/10
This perk may save your game. It’s very situational but when it works, it’s very very good.


2/10
This perk is not useful at all. If you lose someone in chase and they pop no traps, you should’ve dropped the chase anyway. It’s not useless, just bad.

6/10
While I do understand it’s utility, I do not give it a higher scoring. Yes, cutting down animation times for The Hag is great, but pallet breaking shouldn’t happen too often. It’s usually better to just lay down a trap.

1/10
SpaceCoconut...no. Just no. It’s a placebo, it doesn’t impact your games at all. No. Terror radius is to small for it to have any effect.

6/10
Not bad, it does work well with The Hag as she’s a great slugger. I do not really need it personally, but if you like it, it’s decent.

4/10
Falling again in the « Good information that The Hag can’t use well » category, Discordance is kinda nice and might be a bit better on her than the rest but I still don’t recommend it.

-1/10
This perk HURTS you. No.


1/10
Damn, imagine being Dying Light. A perk that makes you lose if you try to make it have an impact on the game.

6/10
Enduring is good on everyone. The Hag is not an exception. It was better when it was reducing other stun times than stricly pallets, which made it a bit less viable. Not a bad idea tho.

2/10
This perk is bad. It only gets a 2 because it affects animations, otherwise it would be completely worthless.

8/10
Yes, this is a very good perk on The Hag. If survivors bring items you should definitely try it out if you have a slot to spare. Survivors will want their items back so make sure you trap the area to surprise them when they come back. Also helps destroying the battery of those pesky flashlights.

5/10
This perk is very underrated. While not the best tool, it can help you keep an important hook that is inside your web. It helps with 3 gen strats, it helps vs sabo (if you ever encounter those), it’s not great, but not bad either.

6/10
This perk can end games very fast. The problem is that it’s an hex. You’ll hear this a lot, by the way.


7/10
It’s definitely worth using. When it props, you turn into a teleporting Myers, it’s horrifying. It does require a bit of luck tho.

3/10
Too niche. Don’t run it over other hexes.


8/10
Very strong, strongest hex in fact. I don’t like this perk but I acknowledge it’s power. Don’t recommend using it when learning Hag, but it can be fun to run after getting a bad game.

6/10
Most overrated perk ever. It can be a good bait for Haunted Ground or traps however.


7/10
Very strong slug perk when it works. It could have been the strongest Hag perk if it wasn’t for the fact that it’s an hex.

4/10
The Hag can’t use that information well. It’s the same thing as Discordance really.


0/10
Lol.


2/10
Run Agitation.


3/10
Really...when do people use lockers vs Hag? Also...she can’t even use that information effectively.


9/10
Great perk! People can’t check where you came from as you mostly leave slugs by teleporting so they will have to search for the aura, which can lead them to triggering traps. Very powerful, I highly recommend it.

5/10
« BUT CROQUE IT’S OUTCLASSED BY FRANKLIN’S DEMISE!!!! » No it’s not. You can troll people that try to blind you, yes Franklin’s is better but it’s not outclassed completely, I just wouldn’t run it because it’s too situational. But the times I did run it, man was it funny to see survivors panicking because they can’t blind me.

3/10
This perk is a meme. Run it for giggles.


8/10
Great potential and The Hag is easily the strongest killer for it. That being said it’s not perfect. You may not always find the unhooker and it makes you a bit too predictable. Underestimating it’s power would lead to your downfall however. Especially if you think of replacing it with Coulrophobia...

10/10
It’s made for her. I don’t run it, but I’m weird. Run it, it fits every playstyle except mine. It’s amazing for obvious reasons.

0/10
Wtf are you doing?


4/10
Honestly, this perk is kinda bad on The Hag. She doesn’t hit generators often, she can’t use the information on failed skill checks that well...it’s not good.
Perk Talk 2
0/10
It’s Coulrophobia but even worse. No.


1/10
This perk is really bad on The Hag. You will lose stacks in two seconds and barely benefit from them.

5/10
This pisses me off as this is such a perk I’d like to run on The Hag if it wasn’t for the damn timer that makes it nearly unusable on The Hag. It's not as bad since they made the timer as long. It's usuable now, but it's still not the best. Make it token-based BHVR.

0/10
Scratch marks are not reliable. The Hag barely uses them anyway. Yeah no.


7/10
Great perk for information. Finally, The Hag can find people next to her and inside her web so she can down them quickly! It’s worth running.

3/10
This perk got BHVR’d. You probably won’t even get to access to it’s benefits. Too bad, it was decent before.

10/10
You cut the animation you are stuck in ALL THE TIME. Yeah, that’s defini a top tier perk on The Hag. You may lose stacks fast but you gain them extremely quickly too so don’t really worry about it and don’t hesitate hitting the obsession.

3/10
Run Monitor. Shadowborn is not worth it.


7/10
You can save quite some time by injure people over and over again. Also they will want to heal so use that to your advantage.

7/10
Not bad at all! You remember Rancor? Trade the fact it only props 5 times per game for making it map dependant. That’s basically what Spies is: a trade-off with Rancor.

3/10
The Hag can’t use that effectively, she’s 110. Also breaking pallets, you? Nani.


3/10
I liked it when it worked. It was my Rancor before they completed bugged the sound so much it’ll barely have an impact.

4/10
« Good information that The Hag can’t use effectively » you get it by now. Some people swear by it for the repair range and the sneak up with Monitor. I personally don’t think it’s worth it at all, the difference is very small.

3/10
Really too niche to have any important impact. If you get someone in the basement because of it, that’s cool but you’re not Leatherface.

2/10
Imagine thinking Thanatophobia has an impact.


0/10
No use on The Hag whatsoever.


0/10
WHY WOULD YOU RUN AN INSIDE TERROR RADIUS PERK ON THE HAG?!


2/10
This perk is laughable but it cuts down an animation so...yay?


5/10
OK I won’t say it’s horrible, but it definitely isn’t stellar on The Hag. You’re better off with Rancor or Spies.
Perk Talk (Plague and beyond)
These perks came after The Plague came out:

9/10
This perk allows you to set-up effectively in a part of the map where the gens aren’t blocked, forcing people to let you set-up or come inside your web. Both options benefit you heavily.

7/10
You remember Rancor and Spies? If you run Monitor, that’s a good one. When you down someone, if someone happens to be nearby in your web, you can go down them too. Pretty strong in some situations.

0/10
This perk is as useless as Tinkerer on The Hag


I'm All Ears
1/10
An incredibly useless perk on The Hag. The aura reading doesn't have any uses as you want the survivor to go to the next trap placed down in a chase, meaning that seeing them is pretty pointless. It got one point for the very situational detection that it might provide, but that's about it.

Thrilling Tremors
4/10
Falling in the same category of "good information perks that The Hag can't use well", this perk doesn't help a lot. You may know if survivors are working on a generator close to you, but really, that's very situational. Discordance would be better and even that perk is pretty bad on The Hag. Honestly, focus on your pressure as usual, ignore this perk.

Furtive Chase
0/10
If anyone can find an use for this perk, tell me. I honestly do not see the point and even if it would have any, Monitor & Abuse has a score of 10/10, so there is no way this perk will ever beat it.
Perk Charts
Here's every summed up. Anything C or below shouldn't be used on any serious build (except Barbecue, which is nice for points but is still a wasted slot).


Whose teachables should you get first
Add-ons
Let's look at every add-on category on The Hag:

Teleport Range
The best add-ons for The Hag. They allow her to teleport further than at base. Use them a lot, those allow you to have larger webs and cover a much bigger section of the map.


Base Range: 40m
Dead Fly Mud: 50m
Dragonfly Wings: 60m
Dried Cicada: 70m

Phantasm Duration Time
The second best category of add-ons for The Hag. They make the phantasm stay for longer which means more time to teleport to your traps which is good for mindgames and map control. Using one of those along with teleport range is the best add-on combo.

Base Duration Time: 5.5 seconds
Powdered Eggshell: 6.6 seconds
Half Eggshell: 7.7 seconds
Cracked Turtle Egg: 8.8 seconds

Trapping Speed
Used to be necessary, but since the buff for the setting time from 5 seconds down to 2 seconds, they barely have an effect and should only be used as filler.

Base Trapping Speed: 2 seconds
Rope Necklet: 1.75 seconds
Cypress Necklet: 1.6 seconds
Swamp Orchid Necklet: 1.55 seconds

Effective Trap Range
Very powerful, but you need to know what you're doing. They make it harder to get your ITH going, but the cam swing sky rockets, which can be used very effectively as a confusion tool. Use with caution.

Aura Reading
They are decent for tracking, but are mostly outclassed by other add-ons. Just like the necklaces, use them as filler.


Rusty Shackles
An interesting add-on. It works pretty well if you know what you're doing, but honestly, it's not really worth your time to learn how to play with a very rare add-on that doesn't really increase your effectiveness that much, especially compared to better add-ons.

Grandma's Heart
A decent add-on. Phantasm already have a terror radius at base and this increases it while removing yours while they are active. This is interesting as it can allow you to sneak up on a triggered trap, however it's a rather poor very rare add-on, especially due to how situational it is. Just teleport to your traps.

Disfigured Ear
This add-on is pretty annoying to play against and that's about it. It doesn't really help in any way and you probably won't notice any difference in your gameplay. Use it to troll someone in your lobby that you do not like. :p

Scarred Hand
The infamous bodyblocker add-on makes The Hag weaker in every way. As we already covered, you can already bodyblock with your traps if you know how, which makes this add-on completely worthless. All it does is remove your teleport. Avoid at all cost.

Mint Rag
Honestly, this add-on is badly designed. It carries bad Hags that run it with Make Your Choice (and shackles for...some reason...) and they think they're good. It's scummy, it makes your chase weaker (can't ITH as effectively) and really, you should avoid this at all cost too.

Waterlogged Shoe
The Hag's worst add-on. Basically, you can't teleport and move at 4.5 m/s. The hindered effect is near non-existent. It's probably just like The Clown's bottles, but it's way too klunky and you're too slow to abuse it in any way. There is literally no reason to run this add-on, it's terrible and makes you a lot weaker. Any add-on that removes The Hag's teleport ability should not exist, especially not as an ultra rare. Once again, avoid at all cost.
Evaluation - The Types of Traps (Basics) -
Time to test what you learned!

ITH, Cam swing and fear traps are the categories of types of traps, depending on the situation, you should use one of the traps from one of these categories to optimize your chase. All the types of traps can be found in the Hag Guide video below or in the Comprehensive Killer Guide. In the following situations, select the best trick to use.

1-You have a trap in front of the pallet you and the survivor are going to
a)Use ITH to teleport and hit or even bodyblock them
b)Use cam swing to confuse them
c)Use the trap as a mindgame

Answer:It's a)! The cam swing would be effective if the trap was placed on the side or a pathway close to the pallet. Here, it's right in front of it, making ITH the best option. Using a mindgame ain't a bad idea, but it works a lot better when the trap is on the other side from which you are coming from. Here, it's in the front, not behind the pallet.

2-You are going towards a rock. Behind the rock there is a pallet with a trap next to it. You have no vision of behind the rock with the survivor.
a)Teleport to the trap instantly and swing
b)Abuse the cam swing
c)Come from the side without the trap as a mindgame

Answer:It's c)! The best way to get the hit here is to come from the side without the trap for the survivor to slide back into your lovely arms. You have no vision of them, but that also means they don't have any vision of you either and the obvious would be to teleport, making them wanting to vault the pallet to avoid the phantasm. The cam swing is useless in this situation.

3-What category of type of trap should be used the most on Haddonfield?
a)ITH
b)Cam swing
c)Fear

Answer:It's a)! The bodyblock trap shines on this map due to narrow paths and stairs all over the place. The bodyblock trap is an ITH trap, making this category the most useful one. Cam swing and fear should be used in corners and at pallets respectively. They both can be used as well, but the player should focus on bodyblock the most here.

4-What category of type of trap should be used the most on Treatment Theatre?
a)ITH
b)Cam swing
c)Fear

Answer:It's b)! This map has a lot of walls, corners and dead ends to abuse the cam swing from. The player should trap any corner behind walls in hallways and abuse special corners such as the showers or the ones found in the room with the beds. They will screw survivors over, confuse them and make them panic.

5-You are about to use Bloodied Mud (increases effective trap trigger range), which category of trap is going to be stronger?
a)ITH
b)Cam swing
c)Fear

Answer:It's b)! By using this special add-on, you are making your cam swing exponentially stronger while weakning the ITH. It's a different playstyle, but having a huge trap AOE increases the cam swing a lot and can be deadly on some maps such as the Treatment Theatre or Asylum.
Evaluation - Perks -
Choosing the right perks for you is one thing, but knowing what to combine makes your build a lot stronger.

1-You have a bad habit of placing traps too close to each other, which perk can help you?
a)Monitor&Abuse


b)Save The Best For Last


c)Enduring


Answer:It's b)! By shortening the swipe animation cooldown, you allow yourself to have a bigger window to punish early trap triggers after a hit.

2-A friend of yours just started playing Hag, which perk should you recommend the most?
a)A top tier perk like Make Your Choice or Save The Best For Last
b)A "noob perk" like NOED
c)A perk that works well for you

Answer:It's c)! While knowning the meta on The Hag is fine and all, you should always share what you found to be the most effective. Chances are that you are using very well-rated perks for The Hag anyway, so there is no harm in recommending a perk such as Haunted Ground if it worked well in your experience even if Monitor&Abuse or Make Your Choice are rated higher.

3-Complete the following build with the best option available from the options below


a)A Nurse's Calling


b)Hex:Haunted Ground


c)Blood Warden


Answer:It's a)! While not bad choices, Haunted Ground and Blood Warden do not synergize with this build. You have two meta perks and sloppy butcher. The later synergizes very well with A Nurse's Calling as it opens a bigger window for the punish by slowing the healing down, making both perks more useful when they are together.

4-Which of these perks allows The Hag to start chasing directly inside the web without a trap trigger?
a)Bamboozle


b)Rancor


c)Whispers


Answer:It's b)! Bamboozle has nothing to do about this and Whispers, while has the possibility to give The Hag this, Rancor does it far better by pointing out exactly where the survivor is at the exact time the web is mostly done, which means you get the information when needed and can abuse it right away.

5-Which of these perks is NOT a good option to complete this build on The Hag?


a)Hex:Haunted Ground


b)Hex:Thrill of the Hunt


c)Hex:The Third Seal


Answer:It's b)! Haunted Ground is amazing with Ruin and The Third Seal can be used to slug people and gain more pressure. The Hag being good at slugging, this is still not too bad of an option. Thrill of the Hunt is not a good perk on The Hag. It forces you to run to protect your totems and you are not placing traps during this time. Funnily enough, The Hag is a terrible totem protector.
Evaluation - The Web -
The survivors thought they were safe. Alas, it was a Hag that knew what she was doing and made a web, a huge prison made of traps. Easy to enter, but so difficult to escape, much like a spider...

1-The Web is consisted of the traps you place down. Which things should be part of the web?
a)Loops, crossroads and hooks
b)Loops, hooks and generators
c)Loops, crossroads and generators

Answer:It's a)! Generators should never be part of the web. Do not trap generators, it's a waste of time, especially in early game.

2-Why is trapping only loops a bad idea?
a)It makes you predictable
b)It makes you waste time searching people
c)Both

Answer:It's c)! It makes both predictable and susceptible to flashlights, but also no crossroads traps makes it harder to start chases and thus finding survivors.

3-If you are running out of traps and are losing the shape of your web, what should you do?
a)Move the web to a hooked person by trapping the hook, the crossroads and the loops closeby
b)Recycle your traps by placing them down again at the spots they were
c)Place 10 traps around a hooked survivor and camp

Answer:It's a)! Hope you laughed at c). Recycling your traps is a fine idea for crossroads, but not for the loops. Once a pallet is gone, it's gone, go use that trap somewhere else. Moving the web around the map isn't a bad idea, it makes you unpredictable and punishes altruism.

4-At which distance should your traps be from each other?
a)It's not an actual number, but an alternation between crossroads and loops that is gained by experience
b)It's not an actual number, you need to place one trap and approximate a distance and use the remaining nine to trap around it like a circle using that distance
c)24m

Answer:It's a)! There is no exact distance and I recommend you alternate between loops and crossroads and change your distance based on your experience. It's all about how you feel the distance should be right so you get that second hit right when the swipe animation has ended.

5-What should be at the center of your web?
a)The center of the map
b)A crossroad that can serve as a loop such as a building
c)The shack

Answer:It's b)! Yes, sometimes it will be the shack or the center of the map, but in most cases, you want the center of your web to be a crossroad that is commonly used by survivors. It's even better if it can be served as a loop and is actually the main building as this is likely to be the most commonly used asset of the map during a chase.
Shoutouts
The Hag Guide right here is a great video for beginners and if you haven't checked it out yet, make sure you do as it will make understanding this guide a lot easier:


Keep in mind it has been made before the trapping speed buff, so the add-on section is outdated.

I might as well advertise my own Killer Guide. This is a huge guide about all the killers in the game, not just Hag and I highly recommend you check it out: https://steamproxy.net/sharedfiles/filedetails/?id=943828847
Conclusion
I hope you found this interesting. I'll make sure to answer as many comments as I can, feel free to ask me anything. :)
Updates
19th June 2019
With the release of Ghostface, I added his perks to the Perk Talk sections. I'll add pictures for them whenever they are available.

4th June 2019
  • Moved the "Perk Talk" sections towards the bottom.
  • Enduring change: 7 -> 6
  • Pop Goes The Weasel change: 4 -> 5
  • Added a Perk Chart and a Teachables Chart

9th May 2019
Added « Perk Talk » sections. They are currently at the bottom and will be placed correctly later.

24th March 2019
2.6.0 brought us The Plague and her new perks. Two of which are insane on Hag:
  • Infectious Fright and Corrupt Intervention both get the highest ranking for perks on The Hag.
  • spies got nerfed and dropped one tier.
  • Make Your Choice is not as effective as it used to be and dropped one tier.
  • Thanatophobia got nerfed and dropped one tier.
  • Revision dropped Bloodhound and Brutal strength one tier each.
  • Two new Hag Builds

23rd January 2019
2.5.0 is here and changed a few perks, here are the changes:
  • spies from the shadows is now "God Tier". The reasons of it being good are the same for Rancor, except on steroids. Using spies, you can detect people inside your web extremely easily. It may be a bit map dependant and have a counter in Calm spirit, but it truly is an incredible perk and is pretty much game changing for her. I had no other choices but to make it top tier.
  • surveillance is now "Outclassed". In a similar fashion to Overcharge, it's not a bad perk, just not really good on The Hag. You don't really kick gens often as Hag and generally have better things to do. Also, that slow speed ain't gonna help you go back to that gen fast. There's little to no reason to really use this perk on her when we have way better options such as Nurse's Calling, Rancor and now spies from the shadows to detect people in your area.
  • Iron Maiden is now a "Bad Perk". The detection lasts for an even shorter time, the timer makes it really hard to use, it's not really gonna do any good to you nor reveal anyone for that matter as who really uses locker vs Hag?
  • Whispers is now "Outclassed". It didn't change in the last update, it's mostly because there's now little to no reason to run Whispers now that spies from the shadows has been buffed.
I also added a new perk build using spies from the shadows.
Have a nice day!

2nd January 2019
Updated the Perk Tier List. Made it looked much better and it now has new pictures.

13th December 2018
Updated the Perk Tier List a little bit
I decided to finally place the 4 weird perks on Hag in tiers:
  • Bamboozle is Good
  • Coulrophobia is Outclassed
  • Hex:The Third seal is Outclassed
  • Rancor is Very Good
I don't have the pics yet, but I did place The Legion's perks:
  • Discordance is Anti-synergy
  • Mad Grit is Outclassed
  • Iron Maiden is WHY

19th November 2018
A small update on the Perk Tier List that shuffled a couple perks around.
A new build got added.

1st November 2018
Added a section for Hag Builds

29th October 2018
Posted this guide
49 Comments
Conartist 20 Nov, 2019 @ 1:42am 
Just started using hag after just wanting her perks. :steamhappy: Fell in love with the game play but I knew I was lacking in the fine details department. This guide is awesome in clearing up the more advanced tactics and common pitfalls a new-intermediary hag player would face. BIG thumbs up!
Croquedead  [author] 9 Jun, 2019 @ 5:58am 
It’s absolutely horrible
Croquedead  [author] 4 Jun, 2019 @ 5:40pm 
Hey guys! Just did a little update. The Ghostface perks update will come soon when I'm done analyzing them. I have already a little idea where to put them however (spoiler: they are not very good).
Normie 23 May, 2019 @ 12:57pm 
Croquedead Thanks for your pretty quick response. Now that I think about it every time I get a 4k with 4/3 gens left without ruin they might have only done 1, or 2 more and the SWF would have beat me with or without it. I might try D-hope and see how that goes, and hopefully Corrupt Intervention comes to the shrine soon. :)
Soren 23 May, 2019 @ 12:36pm 
What matters on Hag is not the early stall, but the snowball. Doesn't matter if you start your game with only 1 gen left if your web is perfect ^^
Croquedead  [author] 23 May, 2019 @ 2:38am 
I mean, there’s a reason I put it in the beginner build. It’s good to have when you first play because you get to face survivors that don’t necessarily know how to counter it and it gives you extra time to plan. Experienced Hag won’t need it.

The reason why I say it’s overrated is because it only works on bad survivors and you do not need perks vs those. Therefore, it’s pretty pointless.

Use it all you like, you’ll probably ditch it sooner or later.
Normie 23 May, 2019 @ 1:20am 
Great guide, I check it every update. But I just want to know...Why do so many killers say hex ruin is overrated? The amount of times I didn't bring it on hag and got rushed by a 3/4-man SWF group is insane. I feel like since killers can't see the difference Ruin makes first hand, they doubt it's power. But When I play survivor it is literally a pain in the @ss having all your time wasted. (Unless you're in that >15% who can hit great's consistently) I would much rather deal with Noed then ruin TBH. When there's no ruin I can pop 3 gens solo EZ PZ. Just my opinion though. Keep up the awesome guides! 👍
Croquedead  [author] 2 May, 2019 @ 8:43am 
Hag can’t use the aura from BBQ well at all. The BP sure is nice and definitely makes it so it’s OK to run, but I looked it purely as an aura reading tool. It’s pretty much the same as running WGLF as surv on her: a wasted slot.

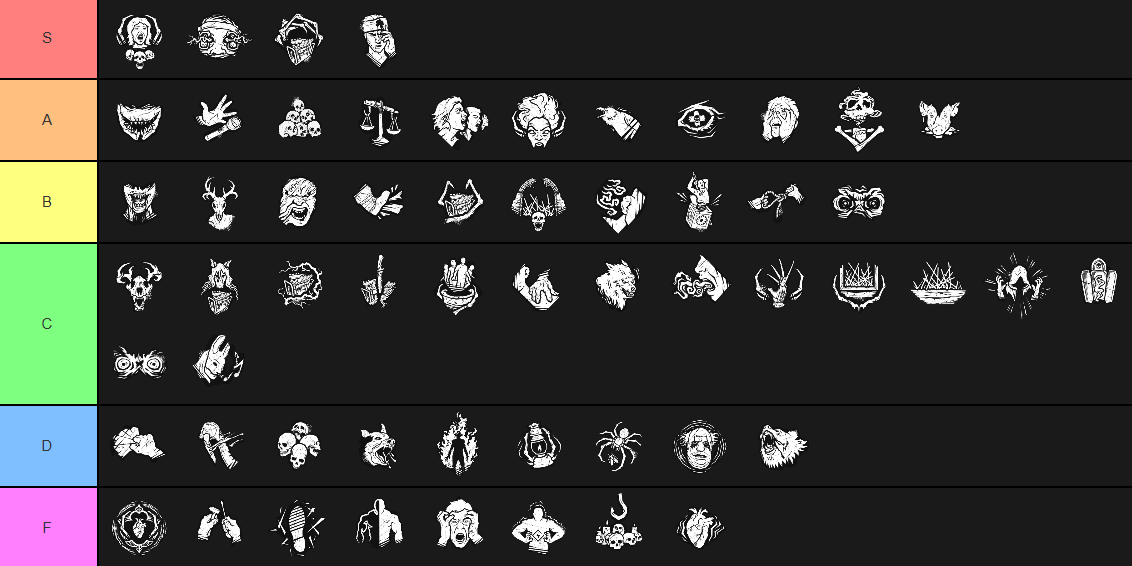
As for add-ons, Hag doesn’t need them at all. She’s perfectly fine without them and becomes kinda broken with Dried Cicada tbh
sea 20 Feb, 2019 @ 1:56pm 
Amazing guide, this has really helped! :)
᲼᲼ 19 Jan, 2019 @ 10:30am 
You have forgot to rate your builds, no?