Don't Starve

Don't Starve

524 ratings
Adventure Mode Guide
By Wantsomecookies
This is a guide for Adventure Mode, a 5 chapter long battle of intellect and fortitude against the game's villian Maxwell.
Information on specific adventure mode levels/chapters and starting adventure mode is contained within.
***Warning: It's much more fun to see these levels on your own, but if you're fed up/starved for info, come on in***
3
8
3
2
   
Award
Favorite
Favorited
Unfavorite
Overview of Adventure Mode
So, what makes Adventure Mode different from Sandbox Mode? Is there any reason to even do Adventure Mode? How much adventure is in Adventure Mode and should I bring bandaids in case I get boo boos? These are all valid questions.

First off, Adventure Mode takes place across 5 worlds. These are randomly generated (same as Sandbox worlds). However, in Adventure Mode, there are GOALS AND OBJECTIVES (oh my).

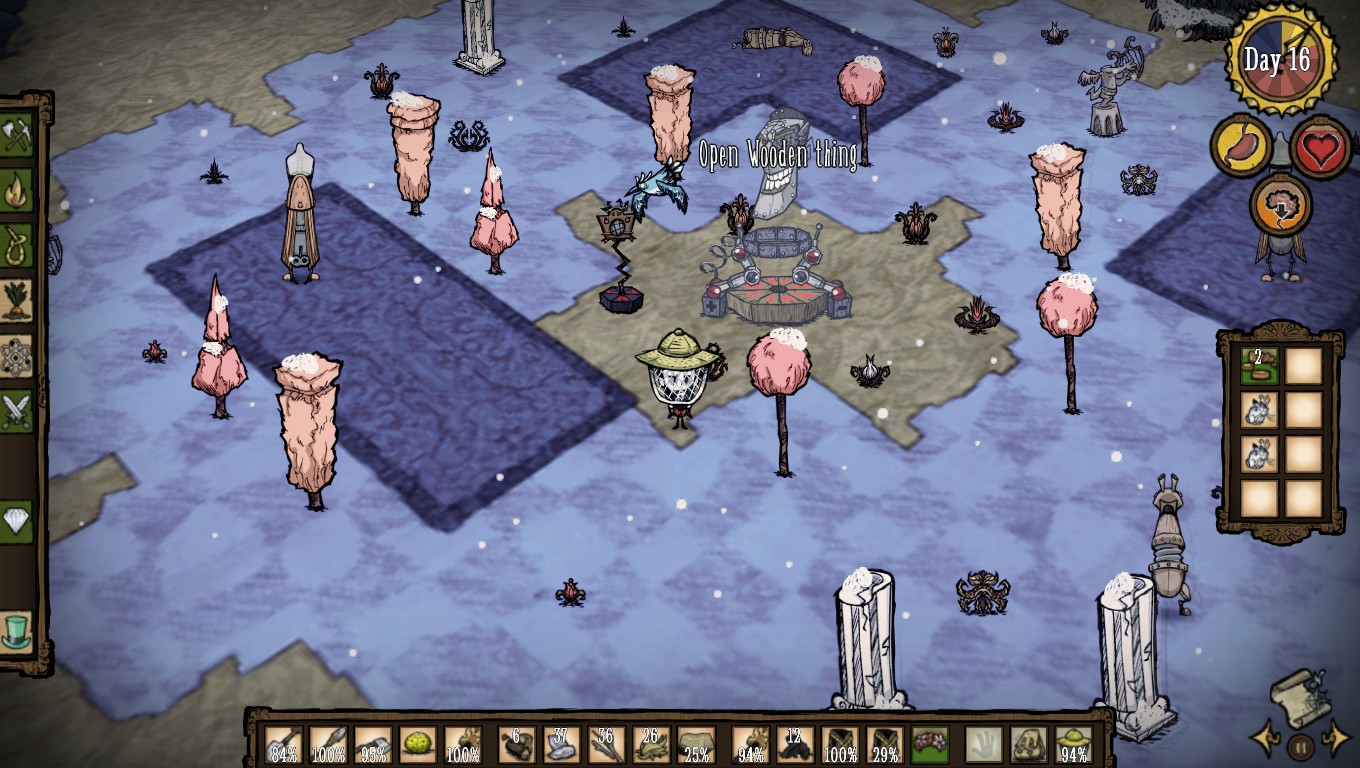
Actually, only one goal. Collect all of the pieces of the Wooden Thing, find the Wooden Thing structure base, put all the pieces on the structure, and move on to the next world bringing 4 items of your choosing from your inventory along with you, the rest being destroyed. Simple, right? A pic of the completed Wooden Thing is below.


You must be saying, "Easy peasy. No sweat. I've got this. You suck."

WRONG. You are so wrong about most of those things, I feel bad for you. No it's okay. Just...stop being so wrong, alright? Okay.

There are numerous obstacles that stand in your way of Wooden Thing assembly. The harsh elements, starvation, deadly monsters, traps, GUT WRENCHING HORROR and I don't know you might get frustrated and quit maybe. Perhaps.

You might be saying, "Wantsomecookies you devilishly handsome specimen, those things are all in Sandbox Mode. I know how to fight them off. Jeez, man." And you are right. BUT NOT REALLY, GOD. I TOLD YOU TO STOP BEING WRONG.

You see, these things have been placed with strategy by the insidious Don't Starve Gods. Meaning they are designed to QUICKLY overwhelm you and make you die in horrible ways. Here are some examples...

Hordes of Hound Mounds!


Pig Guardian Bridge!


Tentacle Maze!


Frequent frog Rain!


In all of these aforementioned cases, you are usually FORCED to go over such dangerous places. Throw in the need for food and potentially low amounts of key resources, and Adventure Mode is some bunch of stuff.

At this point, you may wonder..."Why? Why would I do this? WHY WANTSOMECOOKEIS, WHY?".

Well, Adventure Mode is there for those who have dominated Sandbox Mode. Lets say you have survived for 80+ days, killed the Deerclops multiple times, established scores of bases across the land and basically given the world you appeared in the finger. Adventure Mode is for you. This mode will challenge you much more than Sandbox ever could, by taking things you are familiar with and flipping them on their head.

Plus, there are rewards. One, a sense of amazing accomplishment (kind of like human spirit or friendship, it's intangible but still there). Two, Adventure Mode also functions as a sort of Story mode. So, you get to see the conclusion of the Don't Starve saga. Three, potentially two more characters you can play as that can't be unlocked anywhere but Adventure Mode.

Are you enticed by these rewards like a greedy pirate of the seas? Then read on, dear survivor. But know this...it shan't be easy.
So you just hit play and made a world...
...are you in Adventure Mode yet? NOPE.

Adventure Mode is accessed from within Sandbox Mode, which is the mode you will always be in when you start playing Don't Starve. In order to get into Adventure Mode, you must explore your Sandbox world until you find Maxwell's Door.


The above picture is Maxwell's Door. It's location will be random in your world. Make sure you explore every single nook and cranny of the map, it's only a tiny part of the world and the map icon is easy to miss. The below picture is what the map icon looks like, keep in mind this is fully zoomed in on the map, so it really is small (and often blurred by surrounding trees and such).


Alright, so you've found the door in your world, what now? Simply click on it, and this prompt will appear.


Now, read this carefully. It says that you will NOT lose anything if you die in Adventure Mode. At all. And if you do die in Adventure Mode, you will spawn back in your Sandbox Mode world at Maxwell's Door. You can then simply click on it again and try again, there are NO penalities whatsoever for dying in Adventure Mode. Also, your inventory will NOT be carried into Adventure Mode, so there is little use in bringing anything you don't outright need to the door.

So you are at the door, you get this prompt and you are feeling bad enough to save the president. Click on Yes to begin the journey to freedom!

Once you press yes, some demonic hands grab your character and pull him/her/it into the ground. The screen goes black, and you will see a chapter name appear on screen.
Now it's time to find the section for whichever chapter you have landed in. The chapters (and their worlds) are RANDOM. Meaning that you can start off in any of them.

Before you progress, consider looking at the next section "Things unique to Adventure Mode" for some examples of...things unique to Adventure Mode.

After that, find whatever the section for whatever chapter you've landed in and sit down. It's gonna be a rough ride.


Things unique to Adventure Mode
So, you want to know about the unique things Adventure Mode has to offer, hm? Well then, let's get you up to speed.

1. Obelisks!


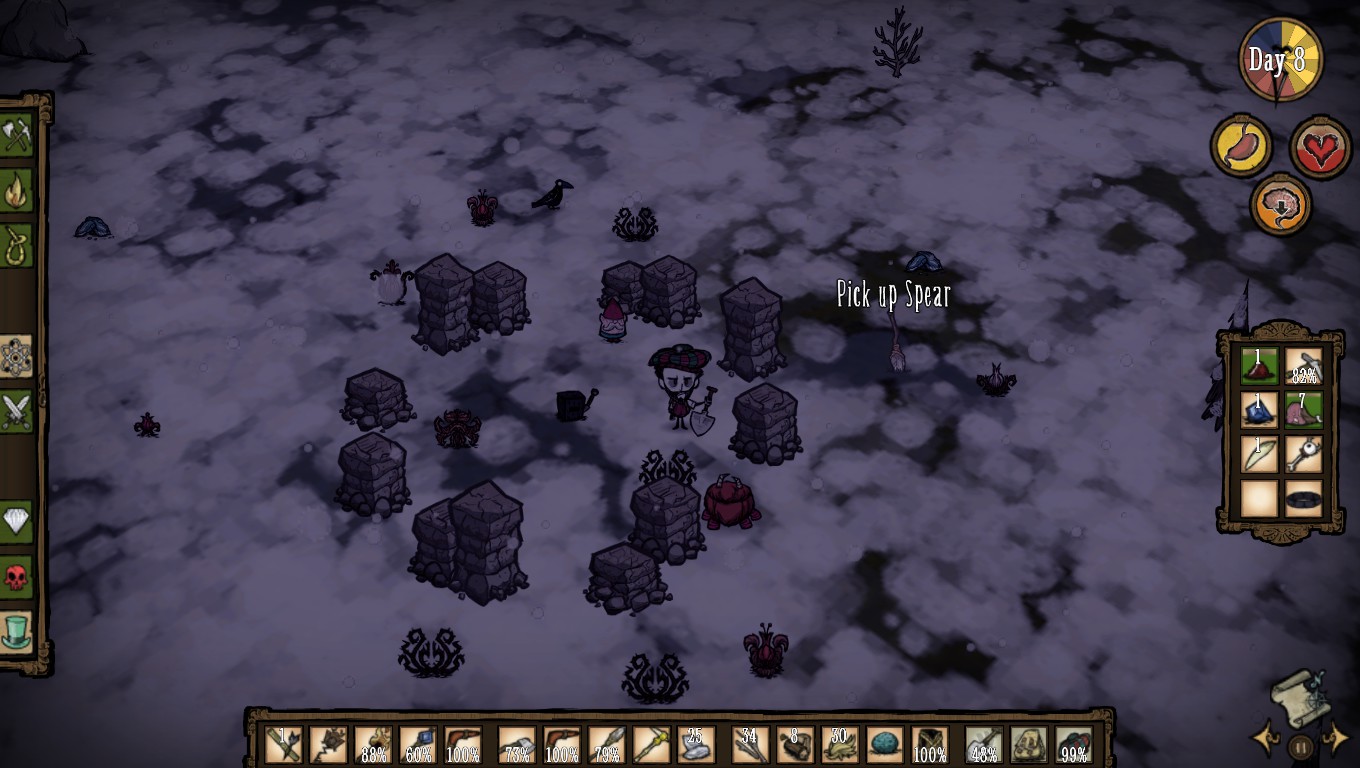
This is an obelisk wall. While in Sandbox these things are used to decorate the Pig King's...rotundness...in Adventure mode they offer a certain challenge. These walls will stay raised until your sanity is either below 30 or above 150. Some useful tips for lowering sanity include being around boss creatures (Deerclops/Spider Queen), eating monster meat/spoiled foods and just being alive during dusk/night segments of the day cycle. Also, MUSHROOMS. MUSHROOMS ARE AMAZING FOR MODIFYING SANITY. Heres a quick diagram for mushrooms and their effects.


Flowers are also a good way of raising/lowering sanity. Pick regular flowers to raise sanity, and pick evil flowers to lower sanity. Also, just standing around evil flowers will lower your sanity as well, this is especially effective when you are surrounded by many evil flowers.

2. Horrible Areas of Awfulness (AKA Mob set pieces)!

You know when you see 1 or 2 level 3 spider dens and you go, "No thanks" and run away like a cowardly man-child? Well, get ready for 8 level 3 spider dens all grouped together with Spider Queens! How about some Hound Dens full of houndish hounds? Or maybe swamp tentacle mazes? "But can't I just avoid them?". NOPE. Most of the time you will be required to run through these hellish places to get pieces of the Wooden Thing. Hooray!


3. Wooden Things!

Wait you say. I've seen these things in Sandbox worlds! YUP. They are there, so is the Wooden Thing. But in Sandbox worlds, they aren't that important. In Adventure Mode, they are the most important things. In all, there are four of these things. A crank thing, a potato thing, a box thing, and a ring thing. Pictures in the order I just said, GO!


You need to use all four on the Wooden Thing platform somewhere in your Adventure world.


Then you choose 4 items to bring over with you to the next level and teleport away. Do that 5 times, and you have beat Adventure Mode. But it's easier said then done...


4. Wes, The Lovable (why not) Mime

In your travels in Adventure Mode, you will most likely eventually come across this area.


Consider this an optional area to complete (not necessary to progress in Adventure Mode). However, if you are feeling adventurous, approach the area to see the lovable Wes.


Poor guy. Anyway, Wes is trapped. You can free him (and unlock him as a playable character) by destroying the Maxwell statues you saw on the way in to Wes' area with a pickaxe. BUT BE WARNED. Destroying one statue makes clockwork bishops and clockwork knights spawn around you. It's your job to take these guys out. Helpful tips? A log suit and a football helmet will ensure you say take around 20 damage from the whole thing. Also try luring bishops away and killing them while they are alone, being mobbed isn't fun. Simply destroy both statues and kill all of the enemies that spawn and Wes can be yours! BUT WAIT.


After you have destroyed both statues and all the enemies that spawned, approaching Wes makes even MORE enemies spawn. So, more fighting for you! Hooooooray. After killing all these guys, Wes falls over and is unlocked forever and ever. "Is Wes worth the hassle?" you say. NOPE. He sucks. He is designed to be Don't Starve's challenge mode, meaning he has less health, less hunger, less sanity and everything depletes faster. But he is so lovable. Well, maybe.

The King of Winter Chapter


So, you'll notice two things when you start this level. One, it's winter already (get used to it, that's this level's gimmick) and two, there are some trees on fire and a dead skeleton guy. Run over and pick up all the stuff around the dead guy, including the backpack. Inside the backpack will be a random schematic and some materials (usually specific to whatever the random recipe is) as well as some grass, logs and a heat stone. Next to the dead guy should be a schematic for rabbit earmuffs, some logs and an axe. Take it all and start looking for resources. You're goal in this is winter survival, grass and logs are essential as you will need fires constantly.


My suggestion? Pick a direction and run it to the ocean. Pick up everything you find along the way, get a full stack of 20 logs, 40 grass bits and 40 sticks. You are bound to find some food along the way as well, probably berries. Be on the lookout for rabbits as well, if you find a hole, make a trap and scoop them up by chasing them into it. Once you get two rabbits, make yourself some rabbit earmuffs (learned from using the earlier schematic you found).

So, you've hit the ocean. What now? PERIMETERS, GOGOGO. Run along the cliff, gathering more resources and mapping out your area. Don't be intimidated by running around during dusk, but once night comes set up a little fire. Cook up some food and try to keep your hunger at around 135+ so it doesn't become an issue.

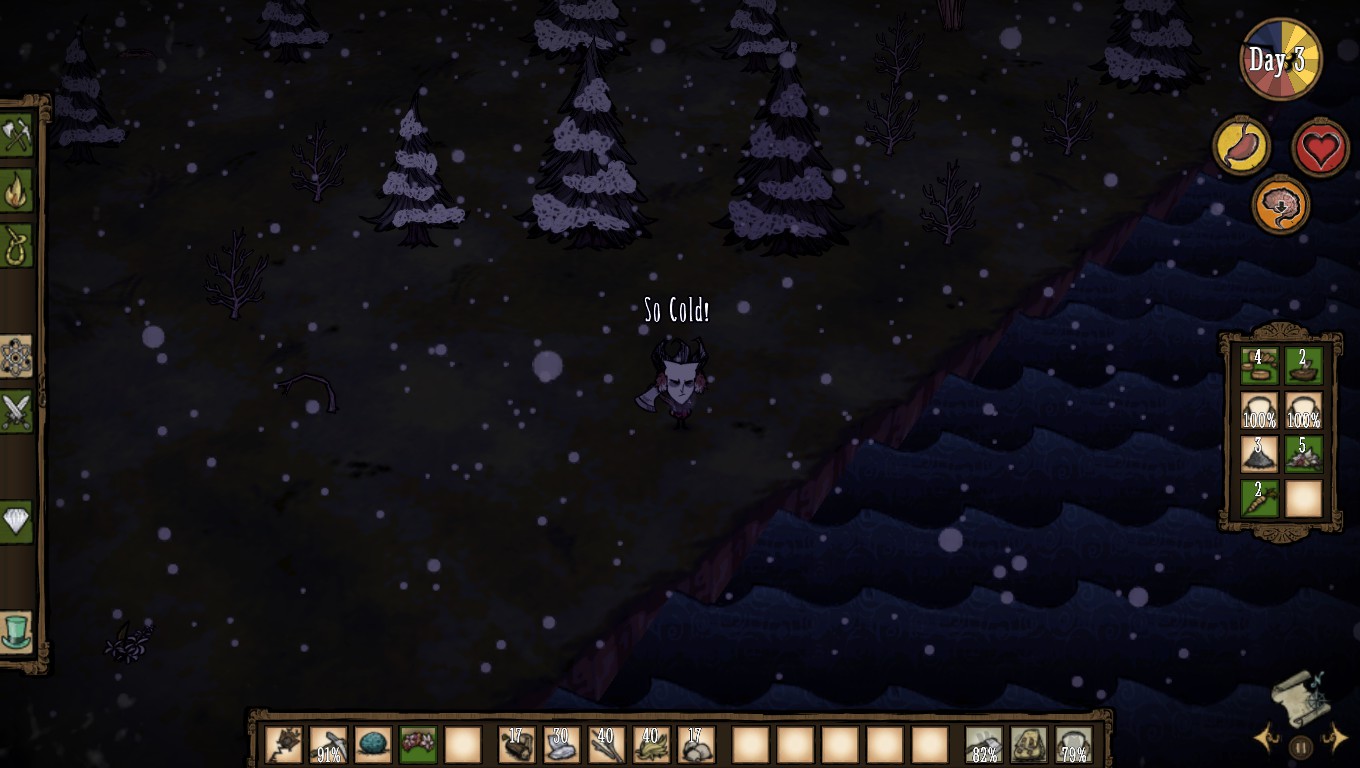
Also, ENTER WINTER SURVIVAL MODE. You need to know the cues for Wilson being too cold. When Wilson remarks "So cold!" that means you are starting to take damage. One step beyond that and you will most likely freeze to death. This means that you must keep your temperature up by standing near fires and absorbing heat with that nifty heatstone in your backpack. (FUN TIP: Heat stones don't work when kept in your backpack, put it in your main inventory!) You will be making around 2-3 fires a day cycle, so prepare accordingly.


So you have food, you've scouted some perimeters...what now? You're next step is to find some gold containing mineral rocks, because you are going to need to build a science machine to make nice things. Feel free to stray from the perimeters of the map, search all around. If you find them, make a pickaxe, get that gold, make a machine, and prototype a spear, a log suit, maybe a sleep roll if sanity is becoming an issue. There is the possibility that you will NOT find these on your island, and be forced to move on ill-equipped. If this is the case, pull out your divining rod and search your island. If you find a piece (or two, sometimes even three if you are lucky) great. If not, it's time to move on...past the obelisks of DOOM.

Remember when you scouted the perimeter? Maybe you found these things...


Pesty obelisks. To get past them you either need a high sanity (200, to be safe) or a low sanity (30 or below). Approach them with high sanity first, if they are still up, then time to become insane. Find some spider dens, eat some monster meat (or do other sanity draining things) and come back. Once you hit 30, the obelisks should go down. PRO TIP: Be absolutely ready to leave that island segment forever, leave nothing you might need behind. PRO PRO TIP: If you can find some green mushrooms, pick them and cook them for a fast sanity restoring food you can snack on when you are past the obelisks. Consider making a straw roll as well, and cross over at dusk so you can sleep and restore your sanity fast. Being insane in a new land is NOT fun.


From them on, it's the same game as before. Perimeter, gather resources and food, find all Wooden Things in area, get pask obelisks, repeat. Now, due to the nature of randomness, I can't guarantee that you will even find an obelisk gate. If you don't, be glad. If you find 200, then weep, for the Don't Starve Gods laugh at you.

Also, this is the perfect level to get yourself a fancy cane. You may have noticed an igloo house and two walruses with two ice hounds wandering around the map. These are the MacTusks, and they are kind of difficult but not very. You can take them with a log suit and a spear if you are good at kiting ice hounds. PRO TIP: Papa MacTusk fires blow darts at you while he chases you. Running in a diagonal pattern will help you dodge these darts. It takes around 5-6 spear hits to kill the Papa, and 3 to kill the Ice Hounds. Kill the Hounds first, then bum rush the big guy and spear him to death. Usually the little walrus will run back to the igloo house after everyone else is dead, either give chase or leave him.


The papa MacTusk will always drop meat and a blowdart, and he has a chance to drop his hat (better than rabbit earmuffs for temperature, plus restores sanity) and his fabulous walrus tusk. The tinier Mactusk only drops meat. If you happen to get a walrus tusk, get 2 gold and 4 sticks and craft a walking cane (alchemy engine needed). This little thing is well worth the hassle. It increases you're speed when equipped, and will never break. It doesn't do much damage, but it's great for spiders. The ability to outrun things is INCREDIBLY useful. Strongly consider making this an item you bring with you when you cross over to another level. It's that good. Plus it looks dapper indeed.


So that's all you need to know for this level. Simply keep exploring, keep an eye on your resources, collect all the Things and make your way to the Wooden Thing. It's tempting to rush ahead, but consider lingering in an area and draining it of all it's resources (food and such), as there are some islands that are resource deprived.


A Cold Reception Chapter


Ahhh, A Cold Reception. Difficult? Probably somewhere between King of Winter and Archipelago, with KoW being the harder one and Archipelago being the easier one. "So..." you say, "What's the gimmick in THIS level lovable author man?" Well, the weather is really bad. Like all the time. Expect it to rain around 1-3 times a day, and in some cases you'll get FROG RAIN. Frogs will rain down from the heavens. They aren't hostile unless you linger around them, but if you attack, prepare to be swarmed by horrible frog tongues.


The solution to frog rain? TRAPS. Make around 3 traps, and run around getting frogs to chase you. Set the trap down in front of you, run past it and get the frog to jump over it and voila. You have a trapped frog (didn't know it worked on animals besides rabbits? Traps also work on spiders! THE MORE YOU KNOW) and get to harvest it's delicious frog legs. See, you've just turned a bad thing (vicious frogs) into a good thing (frog legs for eating) with one piece of information. The power of knowledge. Maybe all those school teachers were right after all. Or maybe trigonometry is stupid and I've never had to use it in my life.

Also on top of rain, the season cycle is sped up a bit. Expect Winter to hit you around days 7-10, however it will also be over quicker. Keep the shortened days and long dusks in the back of your mind while you plot your advance through the world.

Other than these things, this level isn't too bad. Helpful tips include mapping perimeters (as always) and trying to avoid movement when frog rains occur. Not moving allows one area of the map to become heavily saturated with frogs, creating what I like to call a "frog event horizon gathering place". Then you don't have to worry about frogs all over the map, only in one area. And if you are ever low on food, you can just go to the FEHGP and scoop up them frogs. Awwww yeah.

Also, keep an eye on your sanity level. The constant rain will takes it's toll on your character's sanity, expect it to drain around 30-35 points a day and prepare accordingly. Maybe make a pretty garland to wear and show your mom.
Archipelago Chapter


Ah, Archipelago. In my opinion, one of the easier chapters to end up in. The gimmick to this level is that there are 6 islands (you start on one, there are 4 with Things on them, and then the last one has the Wooden Thing platform). The only way to get to these islands is through wormholes that are on each island. That might sound intimidating, but the hardest part about this map is navigating the swamp you will inevitably find and locating the wormholes. The island you spawn on has a plentiful amount of food and resources for you to use.

So, you just spawned in and Maxwell has taunted your puny mind. What now? EASY. Pick up that divining rod and put it away. Now what? PERIMETERS. Walk in a direction until you hit ocean, gathering resources as you go. Build axe, chop wood, get food. Run along the coast mapping the island out.

Since these worlds are random, it's hard for me to guess what world you have ended up with. But seemingly most times, the 1st land you spawn on has a little forest/plain area and then a huge swamp to navigate, dotted with merms and spiders and tentacles (oh my). After you have gathered enough resources, it's time to exploit these mobs. Find a tentacle close to a spider den, lure some spiders out, and run past the tentacle. It might take a little doing (try getting the spiders to attack you while they are standing in range of the tentacle) but eventually the spiders will swarm the tentacle.

Now you sit back like the awesome guy you are, awesome guy. Let these guys duke it out, and collect the silk/spider glands that drop. Even better, if the tentacle dies, you get a free tentacle spike weapon, which is quite delightful for bludgeoning things to death. Repeat this until you get enough glands/silks/spikes that you desire, and then get on finding a wormhole in the swamp. Once you have one, check the time (it's best to go through during the day, as it sucks being trapped in foreign territory at night) and jump on in.

The way these islands work is that there is usually one for each biome. Meaning there is a field island, a rock island, a swamp island, a forest island (may or may not contain buttloads of spiders) and a grass island (may or may not contain killer bee swarms). If you find the rock island early, you're in luck. Mine some gold, make a science machine, and gear up. If you don't find it early, just pull out your divining rod and get to finding the Thing or Platform on the island you've ended up on. It's best not to linger on these islands, as they are usually devoid of necessary resources (rock island doesn't have grass/trees, field island doesn't have trees or saplings, etc.).

Establish your base around where you first spawned and keep finding new wormholes, and jumping in. Remember, don't rush. If your health is below 50, consider finding some spider glands/making healing salves or poultices before going to a new island. All of these chapters reward those who prepare adequately, not those who rush in blind and hope for the best (foolish optimists, muahaha!).

Eventually, you will find all the Things and the Platform. Then it's time to build a fresh spear, get a new log suit, acquire some gold and get something else to put in the Wooden Thing and vamanos out of this easy chaper.


The Game is Afoot Chapter


Is it a foot? Or is it a hand? No, it's afoot. Not ahand. Buhdumtish ANYWAY

The Game is Afoot. Not the easiest nor the hardest level to manage. When you start out you'll notice its winter, but FEAR NOT. You will only have one day of winter and then summer will be upon you. So, for the first day just focus on the usual. Get the divining rod, maybe map out some perimeters, have a ball, see if I care (I care, I've always cared).

So, gimmick. What is this all about. WELL I'M GLAD YOU ASKED. The Game is Afoot will typically spawn you on a small patch of marsh, located in a much bigger grassland area. Simple easy childs play. HOWEVER, branching off of this central grassland area will be a bunch of bridges. And these bridges will be full of terrible things. LIST THEM? OKAY:

Pig blockade (pig guardians)

Spider blockade (Around 10-12 spider nests, most level 3, maybe some queens thrown in)

Obelisks (whoo)

Tentacle mazes (run fastly)

Tallbird maze (pecktastic)

Chess area (Full of horses/sometimes bishops)

Delighful. And you guessed it, in order to get to the Things, you must traverse these areas. Fun times for everyone. That being said, it's not that bad.

Pigs can be slipped by with a little tact (you can also set fire to their stupid wooden walls and watch them BURN), spiders can be either run past (risky) or trapped (6-7 traps should work well to thin out their numbers), Obelisks are blablabla (you should know how to deal with these), Tentacle mazes are not so bad (if you run through without pausing it is possible to only get hit 1-2 times) Tallbirds suck (sucky suck suck) and chess pieces are stoopid and can be outrun.

Even better, if you have managed to obtain a fancy cane from a previous level, use it FOREVER. Simply outrun every mob and watch them cry, ashamed of their speed. Silly mobs.

As long as you take it slow and steady you should be able to overcome this level with little difficulty. Just remember to keep calm, and don't just rush in to trouble areas. Preparation will ensure your survival.
Two Worlds Chapter


Your first remark upon entering this chapter will probably be "Holy crap, this is gonna be easy." For reference as to why you might think this, here's a picture of where you spawn at.


Notice the day cycle thing. That's a lot of daytime. The nights are so short here you can get through them using around 20-30 percent of a torch. Not too shabby. You even start with a little base too. And you thought Adventure Mode was supposed to be getting harder...but before you breath a sigh of relief, here I am to take the wind out of your sails (or breath I don't know).

This little island you find yourself on is resource rich. There's an abundant amount of trees, gold, food, everything you need. But there is a catch. Simply search your island until you find this little beauty.


"Le gasp!" you say. What does "sick" even mean? Well, it's a one way trip. As soon as you go through this wormhole, you won't be able to come back (unless you find a healthy wormhole, which is possible). You may be seeing what's going on already, but if not I'll paint the picture.

The gimmick to this level is you start in a resource rich island with all the trimmings, but there are NO wooden things found on this island. In order to find the wooden things, you have to take a one way trip to a different island. WHICH SUCKS. It's usually full of awful, in the form of swamps and hounds and maybe teeth traps. The day/night cycle even reverts back to normal. So the key to this level is preparation! Lot's of it. Like, maybe even too much.

A good idea? Maybe wait around and craft a meat effigy or two. Or three. Or seven. And put them on the starting island. This way if you lose, you don't lose EVERYTHING. Also, make your starting base full of log suits and football helmets and other nice things, so if you do die, you can just gather all your new stuff and gogogo.

All that being said, this level is NOT too bad. The Wooden Things are usually in close proximity to one another, and the "bad" island is not too big (usually). Also...

IMPORTANT. If you are playing this as chapter 4, strongly consider preparing for the next level (which is always the same chapter, Darkness). By prepare, I mean get a full stack of gold, as many fireflies as you can and bring along 20 jerky (or whatever you can scrounge together). Food is very scarce and perpetual night sucks without a huge amount of mining helmets. You have been WARNED.
Darkness Chapter


First off, Congratustamalations on getting this far! Its no small feat, pat yourself on the back. Maybe have a cookie or a snack. NOW BUCKLE UP CAUSE STUFFS GETTING REAL.

So, you first wake up to this.


He doesn't look pretty. Grab the backpack full of delightful stuff (usually grass+logs, fire staff, gunpowder and mining helmet +mining helmet schematic).

Anyway, what's this level's gimmick. "It has to be tough, this is the last chapter after all, right?" you say to yourself (stop talking to yourself). Well, when you start its nighttime. And that's it. Oh wait. Its always nighttime. Forever.

Yup, chapter 5 takes place in a world where it is always dark. Which means the grue (the thing that attacks you in the dark) is ever present, staring into your heart and waiting to strike at you from the darkness. You are likely to run into everything you've seen up to this point, including but not limited to:

Maxwell's Teeth Trap Field

Hound Mounds

A bunch of Spider Dens

Obelisk blocked bridges

Boulder blocked bridges

And many more. That stuff isn't very fair, is it? (That's the point)

But all is not lost. If you brought what has been recommended in other chapter guides (full stack of 20 gold, as many fireflies as you can get, jerky and fancy cane) you will have a much better chance at success.

If you didn't prepare, then it is still possible, just much harder. The level is fairly prevalent with fireflies however, and since it is always night you can always see them (and run into them to stall the grue if you have no light) and capture them. Gold may be hard to come by, but there should be SOME boulders/grave sites/spider areas with stray gold pieces. Remember, mining helmet. Mining helmet. Mining helmet.

A new thing also introduced into this chapter are Maxwell's Lights.


This delightful structures light up when you are near them. So, if you run out of mining helmet/torch and need to make a new one or if you just need a break, run up next to one of these and relax. Maybe take a nap, restore some sanity (which constantly depletes).

Some useful tips that will help you:

1. Mining helmets refund the straw hat you need to make them when they lose all their durability. So you don't need to worry about making a new straw hat everytime, just use the one you get back.

2. There are not a lot of food sources, so keep in mind that you may need to eat monster meats/mushrooms/other unpleasant stuff to live (or to lower/heighten sanity for obelisks).

3. You can use a torch to light something on fire (a tree, a sapling, whatever) for a momentary reprieve from the darkness. It's not long, but its long enough to craft a torch or mining helmet.

4. Don't be afraid to use anything you have been saving. This is the last chapter, after all.

5. Time is definitely a factor here, moreso than other levels for sure. If you encounter a large amount of hostile mobs or what have you, consider avoiding them (unless you need what they drop). Fancy cane definitely helps here as well.

Well, there you go. Keep an eye on your hunger, health and sanity and march ahead at a brisk pace. Expect a lot of bridges dividing up the islands and a lot of obstacles on those bridges.
If you beat this level, consider yourself amazing awesome forever guy, because you win.


Checkmate


And so, it is done. You've bested Adventure Mode, beat The Darkness, and conquered survival itself. So, where are you now?

You'll spawn next to a divining rod on a path covered in Maxwell Lights, pick up the rod and simply follow the Maxwell Lights to their end.


Eventually your camera will shift, and you will come face to face with Maxwell.


Keep talking to him if you want some (aka not much) clarification on what's been going on, but eventually you exhaust his words. That's when you'll notice the divining key lock (nightmare lock) next to Maxwell. Insert the divining rod into the nightmare lock to begin the end cutscene.


Poor Wilson/whatever character you played Adventure Mode with. But he/she/it shall live on. Maybe. Perhaps.

Anyway next you get a cryptic message from Klei studios!


Delightful. And upon clicking the "For Science" button, you will be whisked back to the Maxwell Door you used back in your Sandbox world all that time ago. Only, you'll notice you aren't your character anymore...you're Maxwell! Well, a little Maxwell. But, Maxwell all the same. You have now unlocked him as a character, and can choose him from character select.


Heres the end of the road. I hope this guide helped you stave off starvation, if only for a little while.
80 Comments
Lamb 1 Jul, 2023 @ 8:37am 
I just wanted to thank you for making this entertaining and incredibly helpful guide. I beat adventure mode for the first time today [night? it is 1 AM], and i know i would not have been able to do so without this guide [that is, without many hours of incredible pain]. Even with help, I ended up by dying over and over again in world one, got to world four, died, sulked because it was my own fault for trying to fight without armour, and then beat it!
I do find it funny in that i was severely over prepared for the last world, and managed to complete it before any hounds showed up, all thanks to your recommendation on what to bring to world 5. I'm a newish player, in that i'm playing blind [this guide excluded] and have only got to about day 60 for the first time last week. I haven't even touched the DLC's. I know this guide was made years ago, and i find it amazing how useful it still is 10 years later. Thank you :)
RetroStoatGaming 11 Jun, 2023 @ 5:01pm 
Homie this was made in 2013. A time when steam points didn't even exist.
Save_Israel420 27 Apr, 2023 @ 9:23pm 
you didn't even offer any solutions to this? okay this guide might be useful to SOMEBODY that doesn't even have the game itself. Literally anyone with atleast an hour on don't starve knows about maxwells door. i'm guessing you wrote this for steam points but alright.
Pooptastic ))<>(( 6 Sep, 2021 @ 9:50am 
Thanks for putting this together.
aureliusaugustine 26 Jan, 2021 @ 7:46am 
@Danodan What do you mean. Not mentioning RoG content does not make it outdated, it just makes it not an RoG guide.
Pureheart 1 Sep, 2020 @ 5:27pm 
I am quite new to ds but at about 16 hours I unlocked Wigfrid, decided to try her out and I came across Maxwell's door, I had never tried to enter or start adventure mode before this but.. I am now on the third world doing fine :) (so I am a noob doing fine in it :D)
Achilles 25 Dec, 2019 @ 12:18pm 
Honestly I just came here to read, man idk if u're still watching over this guide but ur wording made my day, I know I know its kinda forced and goofy but I found it really amuseing. Hope u had a great Xmas, and in fact everyone else here, ty for the guide buddy.
KelpTheGreat 24 Nov, 2019 @ 6:38pm 
"battle of intellect and fortitude against the game's villian Maxwell."
*villain
godamnsteemsux 3 Nov, 2019 @ 7:08am 
You DO lose something every time you fail at Adventure Mode: a little bit of time. The game doesn't pause during the hands-grabbing-you animation. I have died in survival mode because I died so many times in adventure mode.
Running out of grass is the deadliest killer, deadlier than Deerclops, killer bees, and tentacles combined.The best way to conserve grass is by being Willow so you don't need torches. And the lighter respawns anew if you don't bring it to the next chapter.
I find that it's better to bring a stack of silk to chapter 5 than a stack of fireflies, especially when you are Willow.
I also find that for the first few chapters, it's usually best to bring mainly basic resources like grass, sticks, raw carrots, and raw meat.
wasabi 15 Oct, 2019 @ 10:19pm 
Missing obvious crucial info in king of winter. Add the major tip for winter: if you're cold, burn a tree, don't make a fire.