Hunt: Showdown

Hunt: Showdown

673 ratings
A detailed Hunter's All-In-One Guide (UPDATE 1.7)
By »SoD« Thekillergreece
The purpose of this guide is to explain the damage system of the game as well as detailed information, including pros and cons for each weapon in-game as well as other equipment. This guide will be updated every time a new adjustment is made by the team to the weapons.

I made this "all-in-one" guide based on my experience in-game (Over 2000 hours). Most of the stuff should be taken as an estimate at best, some stuff is confirmed to be intended. It includes everything the game has.

NOTE: When a section has a "WIP" name, it means the info under that subject is not finalized and is not accurate yet.
WARNING: There are a huge amount of HIGH-QUALITY pictures in this guide. A fast internet connection is recommended. Some pictures may NOT load, this is a known issue among big guides. If this happens to you, simply refresh the page and they should appear.

(c)thekillergreece - If you would like to copy the information (besides Crytek's information such as Damage Charts) to your own guide or something, then let me know beforehand and make sure to put me in credits please, thanks!

Discord Channel: https://discord.gg/YugZDwc
Youtube Channel: https://www.youtube.com/c/Thekillergreece

CREDITS:
100% lucky shot - For proofreading the guide and fixing errors.
6
4
2
7
3
2
3
   
Award
Favorite
Favorited
Unfavorite
Introduction
The purpose of this guide is to provide information about each weapon that is currently in-game and will be updated according to any weapon that receives an adjustment (buff, nerf, etc) as well as information on the upcoming weapons should they ever be added to the game. Aside from that, all tools, consumables, traits, monsters, bosses, etc will be explained in detail as well. Hunters and Monsters/Bosses have some official lore texts if you are interested in reading.

Remember that some of the information is speculated at best, some of them are confirmed to be intended. For example, Crytek will not state how much damage a Grunt deals against Hunters which can lead to speculation.

All weapons are subject to be adjusted, nothing is permanent. In the case of a weapon receiving an adjustment to its stats (range, damage, rate of fire, etc), the information of the specific weapon will be updated as soon as possible. This same applies to the rest of the stuff (tools, consumables, monsters, etc). It will take some time for information to be updated after a new content update.

The pictures used in this guide are High Quality provided by the development team as a fan kit. However, most consumables, tools and some weapons have no pictures in PNG version therefore the quality may be low/slightly poor quality until the team provides HD PNG pictures.

Don't forget to rate and favorite this guide if you liked it ;). Maybe comment too if you notice something out of place or you have a question. If you would like to support my work, giving this guide rewards is more than enough!

Thank you for reading!
- Thekillergreece
The Damage System
The damage system in Hunt: Showdown is broken into five parts: Blunt, Rending, Piercing, Fire and Poison. Each of the damage types causes unique damage to the hunter.

Blunt - Rifle stocks, dusters and the sledgehammer bludgeon the target, causing internal trauma.

Rending - Weapons that can cause bleeding to the target. Saber, Machete, Knife, Concertina Bomb and Frag Bomb cause bleeding damage to hunters as it shreds through the flesh, forcing the hunters to retreat and stop the bleeding by any means.

Piercing - Weapons that can penetrate through hard surfaces such as metal, wooden (trees, fences, etc) and so on. Some weapons can only penetrate through wooden surfaces only (Winfield, Dolch) while others can penetrate even through metal surfaces (Nitro, Mosin). Knife, saber also fall under this category as they stab the targets, causing bleeding.

Fire - A weapon that sets the target on fire. Currently, there are no firearms that produce fire and/or set targets on fire but there are some consumables and tools that can do that. Lanterns are scattered around the map to set targets alight. This can cause hunters to lose their health bars permanently until they banish a boss or buy new health bars through the upgrade points menu.

As of Update 1.5, custom ammo has been implemented. Some of them can set targets on fire! Be careful.

Poison - A weapon that poisons a target. Currently, only Crossbow Poison Bomb has this ability but there is a consumable called Poison Bomb and Hive Bomb that can poison your target (Poison bomb is strong and instantly poisons a target while Hive Bomb will unleash toxic insects to attack nearby targets, potentially poisoning them).

As of Update 1.5, custom ammo has been implemented. Some of them can cause poison to Hunters.

All weapons have their own maximum damage and minimal damage. Range and the part of the body you hit play a huge role in this part.

Winfields for example, have 110 damage as maximum damage on the close range (up to 20m) and on the upper body. But if the Winfields shoots a hunter on their limbs, the damage is 75% of the total. The minimal damage could be 25 or even less if the target is far away and/or is being hit on limbs in that distance.

The damage drops off differently for each weapon in distance. Shotguns have huge damage drop off over distance while Mosin (Long ammo at least) has far less drop off over distance. This also plays a role in headshots. Winfields can headshot any target within 95m range but beyond that, they require two headshots or a headshot body shot combo.

There are five hitzones parts. These hitzones are legs, arms, lower torso, upper torso and head. Most weapons deal minimal damage to legs, arms and lower torso while dealing maximum damage on the upper torso and instant kill on the head.

The Weapon Damage Chart:
NOTE: This Damage Chart is updated as of APRIL 2020.
Standard Ammo types
All weapons use their own Standard Ammo types and each standard ammo type has its pros and cons as well as differences between the ammo types. Make sure that you have checked the Damage graphs for better understanding.

Compact Ammo - This box is coloured in red and only Caldwell pistols, Nagant pistols, Bornheim pistols, LeMat pistol and Winfield rifles use this ammo type. It is typically a powerful ammo type for targets in close range but is very weak for targets in longer distance. Hunters and some monsters require several shots before they are killed. Depending on the weapon, it typically deals 74-110 damage against the Hunters only in the short-range, upper body as it loses its damage in medium to long ranges.

Medium Ammo - This box is coloured in blue and only Springfield, Vetterli and Caldwell Pax pistols use this ammo type. It is considered to be a slightly more powerful ammo type than Compact Ammo as it deals slightly higher damage against the targets even across the ranges, particularly medium range as it loses its damage on the longer range. It is capable to kill stronger monsters in few shots. compared to Compact Ammo. Depending on the weapon, it typically deals 125 damage against the Hunters in short-range to medium-range, upper body.

Long Ammo - This box is coloured in yellow and only Martini, Sparks, Lebel, Mosins and Uppercut use this ammo type. It is considered to be the most powerful ammo type in the game besides the Special Ammo used by the Nitro. Depending on the weapon, it typically deals 136 damage at ranges up to 250m. Sparks deals 149 damage in close range. It is able to headshot Hunters at any distance.

Special Ammo - Special Ammo Cases provide ammo for Nitro Express Rifle, Dolch C96 and Crossbow variants. For Nitro, it is considered to be the most powerful ammo type in the game as it is capable to instantly kill Hunters in certain ranges and most Monsters which are explained in "Sniper" section guide. Bolts can be found from special ammo box as well. This ammo type is rarely found on the map and can not be found in standard ammo cases, unlike the other ammo types.

Shotgun Ammo - This box is coloured in green and only Shotguns use this ammo type. It can cause massive damage and cause bleeding to Hunters in close range only.

It is very important to remember the fact that each weapon has a different muzzle velocity / bullet speed. Martini, for example, uses Long Ammo but has 400m/s compared to Mosin that also uses Long Ammo but the muzzle velocity is 615m/s. The higher the speed, the faster the bullet will travel to meet its target.
Custom Ammo Types


All weapons, with the exception of Dolch C96, are capable to fire Custom Ammo with specific limits. Custom Ammo allows for a wide range of different playstyles a player can create. Each weapon will be able to fire specific custom ammo types and they all have their advantages and disadvantages.

Some custom ammo types are more expensive than others. If you load a weapon (before matchmaking) with a custom ammo type, the standard ammo types will be replaced and cannot be used for the remainder of the match. If you wish to load Standard Ammo, you can do so by unequipping the Custom Ammo in the loadout main menu - this will work only when you are not in a match.

Single-shot weapons (Romero, Sparks, Crossbow, etc) are able to have two Custom Ammo Types. Ammo Types can be switched by tapping "X" button by default.

All Custom Ammo Types costs.
All Custom Ammo Types have limited maximum ammo capacity.
All Custom Ammo Types can be unlocked in the Book of Weapons.
All Custom Ammo Types can be replenished through Special Ammo Cases (found in world, guaranteed spawn at supply points) and Ammo Boxes (can be purchased) only. Standard Ammo Cases cannot be used to replenish Custom Ammo. Count your shots!

Currently, there are 17 custom ammo types

Incediary


"This bullet contains a small phosphorous charge that ignites when fired and sets flammable targets alight. A visible tracer can give the shooter's position away."

Weapons that can use this ammo type - Winfield M1873C, Vetterli 71 Karabiner, Martini-Henry IC1, Winfield M1873, Sparks LRR, Lebel 1886, Berthier Mle 1892, Mosin-Nagant M1891, Caldwell Pax, Caldwell Conversion Uppercut, Bornheim No. 3, LeMat Mark II, Scottfield Model 3.

Pros
  • Can set most Monsters on fire in one shot.
  • Can set Hunters on fire in two shots, Medium Burning Intensity.
  • Can set barrels on fire, instantly exploding them in one shot.
  • Useful against Spider.
Cons
  • Decreased headshot range.
  • Useless against Butcher as it is immune to fire. As of result, you will deal very low damage against him.
  • Will not set Hunters on fire in one shot. Must be two shots. However, in one shot, a tiny amount of health points will be burnt as a "charcoal effect".
  • Tracer rounds. Your position will be given away when you shoot. Risky for night time or in dark areas.
  • Monsters will not stagger when shot at.
  • No penetration. However, it can still damage barrels.

Poison


"This bullet shatters on impact, releasing a toxic agent that is fatal in high doses. But the cost is reduced stopping power and penetration."

Weapons that can use this ammo type - Sparks LRR, Winfield M1876 Centennial, Nagant M1895, Nagant M1895 Officer, Hand Crossbow.

Pros
  • Hunters will suffer Medium Poison Intensity in one shot.
  • Useful mainly for PvE purposes.
  • Can kill most Monsters in 1-2 shots with the exception of Meathead. Water Devils can be killed in one shot as well.
  • Can kill all chickens in their cage in one shot.
  • Immolators will not set themselves on fire if shot at.
  • Very useful against Butcher and Assassin, dealing high damage even on frenzy mode.
Cons
  • Decreased damage.
  • Decreased headshot range.
  • No penetration. While it cannot damage yellow and red barrels, it can still damage green barrels.
  • Can be countered with Mithridatist trait.

High Velocity


"A hot-loaded bullet with a strong powder charge combined with a lighter projectile tip significantly boosts the muzzle velocity but increases recoil slightly. Great for ranged combat. When used on weapons with a silencer, the gunfire will be audible at slightly longer distances."

Weapons that can use this ammo type - Winfield M1873C, Winfield M1873, Vetterli 71 Karabiner, Nagant M1895, Nagant M1895 Officer, Bornheim No. 3.

Pros
  • Increases the muzzle velocity of a weapon by 200m/s.
  • Useful mainly for PvP purposes. Can help you compete against high-velocity weapons such as Mosin, Lebel, etc.
Cons
  • Slightly higher recoil.
  • Bigger muzzle flash when shooting.

Spitzer


"Spitzer rounds revolutionize rifle ballistics, improving both penetration and muzzle velocity but adding slightly stronger recoil. They are more stable in flight and can punch clean through multiple targets. However, they often cause less severe wounds."

Weapons that can use this ammo type - Lebel 1886, Berthier Mle 1892, Mosin-Nagant M1891.

Pros
  • Increases the muzzle velocity of a weapon by 205m/s.
  • Useful mainly for PvP purposes. Can help you hit targets in huge distance.
  • Increased penetration values, allowing you to penetrate through most surfaces. Can penetrate through Hunters and Monsters.
Cons
  • Very expensive.
  • Decreased damage.
  • Slightly higher recoil.
  • Bigger muzzle flash when shooting.

DumDum


"This modified bullet expands and shatters on impact, causing severe bleeding, but at the expense of penetration power and muzzle velocity. However, this additional stopping power has little effect on monsters and the infected, who often suffer from gruesome wounds already and are less concerned about blood loss."

Weapons that can use this ammo type - Springfield 1866, Nitro Express, Caldwell Pax, Caldwell Conversion Pistol.

Pros
  • Depending on range and weapon, it can induce Light to Heavy Bleeding Intensity in one shot. It's stackable.
  • Useful mainly for PvP purposes.
  • (Nitro) Can penetrate.
Cons
  • Decreased headshot range.
  • Decreased muzzle velocity.
  • No penetration except with Nitro.
  • (Nitro) Decreased damage.
  • (Nitro) Very expensive.
  • (Nitro) Cannot penetrate through Hunters and Monsters.
  • Useless for PvE as they aren't affected by the additional power since they are already dead.
  • Can be countered with Bloodless trait.

Full Metal Jacket (FMJ)


"A hardened casing increases this bullet's penetration power, though additional weight reduces muzzle speed."

Weapons that can use this ammo type - Vetterli 71 Karabiner, Martini-Henry IC1, Winfield M1876 Centennial, Sparks LRR, Caldwell Conversion Pistol, LeMat Mark II, Scottfield Model 3.

Pros
  • Increases penetration values.
Cons
  • Decreased headshot range.
  • Decreased muzzle velocity.
Custom Ammo Types (v2)
Explosive


"This bullet contains a small charge that bursts on impact, scattering shrapnel over an area. The larger the bullet size, the greater the area. It has reduced penetration, velocity, and damage, but a well-aimed shot can tear apart your enemies."

Weapons that can use this ammo type - Springfield 1866, Martini-Henry IC1, Nitro Express, Caldwell Conversion Uppercut.

Pros
  • High damage on Hunters and Monsters.
  • Can kill most Monsters in one shot. Able to kill Meatheads in 3 shots.
  • Can explode barrels in one shot.
  • Area-of-Effect splash explosive can injure and/or kill Hunters and Monsters.
  • Can kill crows and ducks in one shot.
  • (Springfield and Martini) High ammo capacity.
  • (Nitro) Very high damage. Can one-shot Hunters on upper torso for up to 70m of distance.
  • (Nitro) Can kill Meatheads in one shot. Area-of-Effect can also kill Meatheads in one shot.
  • (Nitro) Can kill bosses in two well-aimed shots.
Cons
  • Decreased damage.
  • Decreased muzzle velocity.
  • No penetration.
  • (Springfield and Martini) Low damage against bosses. Immolators can withstand 3 shots.
  • (Nitro) Very expensive.
  • (Nitro) Only 2/2 ammo capacity.
  • (Nitro) Will loot only one special bullet from special ammo cases and boxes.
  • (Uppercut) Only 6/3 ammo capacity.
  • Can be countered with Bulwark trait.

Flechette


"This shell contains a number of smaller dart-like projectiles which fan out in a tight spread. It will rarely pierce surfaces but can saturate an area and cause bleeding damage."

Weapons that can use this ammo type - Caldwell Rival 78, Specter 1882, Winfield 1887 Terminus.

Pros
  • Very tight spread.
  • Capable to headshot Hunters in close-range (9m for long/medium barrel, 8m for small barrel).
  • Depending on how many dart-like projectiles hit a Hunter, it can induce Light to Heavy Bleeding Intensity.
  • Significantly higher range.
  • Useful mainly for PvP purposes.
Cons
  • Decreased damage.
  • Useless against PvE.
  • No penetration.

Slug


"A single solid projectile that can be used in shotguns to provide an advantage in range and penetration over buckshot. Not effective at long distances."

Weapons that can use this ammo type - LeMat Mark II, Romero 77, Caldwell Rival 78, Specter 1882, Winfield 1887 Terminus, Crown & King Auto-5.

Pros
  • Increased range, capable for one-shot at increased distance.
  • Increased headshot range, capable of head-shot at increased distance.
  • Slightly increased penetration values.
Cons
  • Reduced accuracy from hip-fire.
  • Very expensive.

Dragonbreath


"This shell creates a several-meter-long jet of flame that ignites anything in its path. It has a reduced range over buckshot."

Weapons that can use this ammo type - LeMat Mark II, Romero 77, Winfield 1887 Terminus, Specter 1882.

Pros
  • Huge spread, capable to set numerous targets on fire.
  • Hunters will be set on fire in one shot, regardless of range. They may lose a significant amount of Health Points to fire.
  • Capable to kill Hunters in one shot at point-blank range.
  • Can kill crows in one shot.
Cons
  • Decreased damage.
  • Decreased range.
  • No penetration.

Penny Shot


"Coins replace shot pellets in this shell for a more powerful, if erratic, barrage. It will shred skin and flesh but cannot penetrate harder obstacles. Unreliable at a distance."

Weapons that can use this ammo type - Romero 77, Caldwell Rival 78, Specter 1882, Winfield 1887 Terminus, Crown & King Auto-5.

Pros
  • High damage in close-range. Can one-shot Hunters and kill Monsters quickly.
  • High ammo capacity.
Cons
  • Decreased range.
  • Huge damage drop-off across distance.
  • No penetration.

Starshell


"A shell that launches a flare that descends slowly, illuminating the area. It ignites everything it touches."

Weapons that can use this ammo type - LeMat Mark II, Romero 77.

Pros
  • Shoots a flare, illuminating the area.
  • Can instantly explode barrels.
  • Potentially blinding for Hunters staring at flares.
  • Useful mainly for PvE purposes as they can kill most Monsters in one shot.
Cons
  • Unreliable for PvP combat.
  • Loud.

Explosive Bolt


"A highly volatile and explosive bolt."

Weapons that can use this ammo type - Crossbow.

Pros
  • Very high damage on Hunters and Monsters.
  • Area-of-Effect explosive splash.
  • Shares a lot similarities with Explosive rounds.
Cons
  • Low ammo capacity, 1/4.
  • No penetration.
  • Can be countered with Bulwark trait.

Shotbolt


"Modified, multi-purpose bolts tipped with shotgun shells that detonates on impact."

Weapons that can use this ammo type - Crossbow.

Pros
  • Very high damage on Hunters and Monsters.
  • Very small Area-of-Effect buckshot splash, potentially damaging nearby targets.
  • Capable to one-shot Hunters on the upper torso, regardless of range.
  • Capable to kill most Monsters in one shot, regardless of range.
Cons
  • Low ammo capacity, 1/5.
  • No penetration.

Poison Bolt


"This compact bolt releases a highly toxic agent upon impact. In high doses, it can cause death in seconds."

Weapons that can use this ammo type - Hand Crossbow.

Pros
  • Shares similarities with Poison rounds.
  • Spawns a toxic poison cloud on impact, lasting 90 seconds in the air. Can deal 5 damage per second.
  • Capable to kill Meatheads in three bolts.
  • Most Monsters who walk through poison clouds can be killed instantly.
Cons
  • Hives are immune to poison and cannot be killed.
  • No penetration.
  • Can be countered with Mithridatist trait.

Chaos Bolt


"A compact bolt that emulates the sound of a gunfight just like a Chaos Bomb, but with a shorter effect."

Weapons that can use this ammo type - Hand Crossbow.

Pros
  • Very cheap.
  • Bolts can stick on Monsters.
  • Shares similarities with Chaos bomb.
Cons
  • Unreliable for PvP combat.
  • Effect lasts only 10 seconds.
  • Very low ammo capacity, 1/4.

Choke Bolt


"A Choke Bomb in the form of a compact crossbow bolt. It has a shorter lifespan and a smaller range. Can be used offensively or defensively."

Weapons that can use this ammo type - Hand Crossbow.

Pros
  • Detonates on impact. It also detonates in water.
  • Can be used for a precise aim on teammates' bodies or anything else.
  • Shares similarities with Choke bomb.
Cons
  • Useless against most Monsters.
  • Effect lasts only 90 seconds.
  • The choke cloud is smaller than the bomb.
  • Very low ammo capacity, 1/3.
Rifles
Overview
Rifles are the most common weapons a Hunter will use in a match because of their capability for long-ranged combat, good accuracy/sway and ammo capacity to some extent. Rifles are recommended weapons for ranged combat however close range combat may spell death due to their generally slow rate of fire.

Winfields, Springfields, Vetterlis, Martinis, Lebels and Mosins all are Large weapons. There are several Rifle variants that are shortened and hold the Medium Weapon Slot.

IMPORTANT TO NOTE: Custom Ammo is NOT taken into consideration in these weapon sections. Only standard ammo types are taken into consideration. If you wish to read further information about the Custom Ammo types, scroll above. :)

Winfield M1873C

The Winfield is the primary rifle that is available at first ranks and uses Compact Ammo. It packs some firepower in close range, the rate of fire is high therefore a Hunter will be able to score a lot hits in close range and the ammo capacity can make sure that the Hunter will not run out of ammo quickly. However, the weapon is very weak from medium to long-range (Above 20m) and loses its dominance in the field at that point, leaving the users at mercy to Vetterli users or to Mosin users particularly. The muzzle velocity is fairly slow. Winfield is one of the very few weapons that have several variants to accommodate the player's playstyle as there are 11 variants of it.

Unlocked at - Rank 1 (1873C) Rank 20 (1873)
Damage - 110
Muzzle Velocity - 400m/s (non-Silencer) 250m/s (Silencer)

Pros
  • The sway is low, allowing for well-placed shots on any target.
  • High rate of fire, making it a dangerous weapon for close-range fights for experienced users.
  • High damage for close range, upper torso.
  • Ammo capacity is rather high.
  • Taking ammo from supply caches yields a huge amount of compact ammo.
  • The Talon version can kill monsters mostly in one hit, 3 hits for armored. Can instantly kill Hunters in one heavy attack.
  • The Swift version can reload up to 7 bullets quickly with a speed reloader rather than injecting bullets one by one. An empty Winfield can be reloaded 14 bullets in one go and two more manually loaded one by one.
  • The Silencer version allows the user to kill any target quietly. Very useful for killing boss quietly.
  • The Marksman version allows the user for well-placed shots on any target in the distance as it is equipped with a long-range scope.
  • The Aperture version is equipped with a peephole scope, similarly to Nitro.
  • The smaller version of variants use Medium Weapon Slots and allows different playstyles.
  • All variants can be used with levering.
Cons
  • Low damage in distance, particularly from 20m or so, especially to limb shots.
  • Inefficient weapon for long-range combat due to slow muzzle velocity.
  • The Silencer version has a high damage drop-off across distances.
  • The Contraband Marksman version has cracked lens.
  • The Aperture version has a very small peephole, potentially making it very difficult to hit targets and anything outside of the zoom is blurred. However, you can tap "X" button to remove the peephole.
  • All variants except the original C and its successors can be expensive.
  • All variants cannot penetrate through wooden objects to Hunters who keep their distance from them. They cannot penetrate metal at all.
  • All smaller variants have higher sway and recoil.

Springfield 1866

Springfield 1866 is the second rifle that is available at first ranks, it uses Medium Ammo and can act as the replacement for the Winfields due to their higher damage in short to medium range (Which Winfield can only cause maximum damage on the close range only) as it can typically kill a hunter in two shots, most of the time. However, only one bullet can be loaded into the chamber which can put users at risk. There are 5 variants of Springfield 1866.

Unlocked at - Rank 1
Damage - 132
Muzzle Velocity - 440m/s

Pros
  • Cheap variants.
  • Uses medium ammo.
  • Very minimal recoil and sway.
  • Quick reload time.
  • Higher muzzle velocity than the Winfield.
  • The Compact version is a medium-slot weapon.
  • The Striker version comes with a knife attached, allowing for better melee combat.
  • The Marksman version comes with a medium-range scope attached.
  • The Deadeye version is cheap and comes with a short-range scope attached.
  • The smaller versions use Medium slot.
Cons
  • Only one bullet can be loaded into the chamber.
  • Large hammer which can obstruct the view.
  • The Compact version has increased sway and recoil.
  • The Striker version has no blunt attack mode, posing a risk to Immolators.
  • The Deadeye version has increased sway and recoil which can make scoping increasingly challenging.
  • The smaller versions got higher sway and recoil.
Rifles (v2)
Vetterli 71 Karabiner

Vetterli 71 Karabiner is the third rifle that is available in early ranks, it uses Medium Ammo and can act as the replacement of Springfield 1866 due to their higher ammo capacity in the chamber. However, because of its slow reload time, slow rate of fire and increased sway, users can be put at risk if they don't know how to control a Vetterli 71 Karabiner. Vetterli has 5 variants to accommodate the player's playstyle.

Unlocked at - Rank 6
Damage - 130
Muzzle Velocity - 410m/s

Pros
  • Uses medium ammo which has high damage for close and medium-range, upper torso and limb shots (albeit slightly less damage).
  • Increased range for maximum damage on hunters. It typically can win a fight versus a Winfield in ranged combat.
  • The Bayonet version allows for better melee combat.
  • The Deadeye and Marksman version allows for sniping playstyle.
  • Powerful weapon to tear off Armored's armor plates, effectively slowing them down when they are being shot.
Cons
  • Slightly increased recoil than the Winfield.
  • Slightly slower velocity than the Springfield 1866.
  • Slightly lower damage than the Springfield 1866.
  • Base variant is slightly more expensive than the Winfield base variant.
  • Lower rate of fire.
  • Slow reload time, putting users at disadvantage during close-range combat.
  • You get only 3 medium bullets from the supply caches.
  • The Contraband Deadeye version has some cracked lens.

Martini-Henry IC1

Martini-Henry IC1 is the fourth rifle that is available at early ranks, it uses Long Ammo and can act as the replacement of Vetterlis and/or Springfields due to their higher damage and quick reload time. However, only one bullet can be loaded into the chamber which can put users at risk. There are four variants of Martini-Henry IC1.

Unlocked at - Rank 16
Damage - 143
Muzzle Velocity - 400m/s

Pros
  • Uses long ammo.
  • Very minimal recoil and sway.
  • Quick reload time.
  • Significantly higher damage than the previous rifles in early ranks.
  • The Deadeye version comes with a short-range scope attached.
  • The Riposte version comes with a mini-saber attached which can inflict devastating melee damage.
  • The Riposte version comes with two melee attacks: Light and Heavy.
  • The Riposte version can one-heavy-hit Hunters to their body.
Cons
  • Only one bullet can be loaded into the chamber.
  • Very slow velocity overall, same as Winfield.
  • The Deadeye version can be rendered useless for long-range combat due to its slow velocity.
  • The Riposte version cannot perform blunt-attack on enemies.
Rifles (v3) (WIP)
Lebel 1886

Lebel 1886 is the fifth rifle that is available in middle ranks and it uses Long Ammo. Lebel 1886 is one step away from the Mosin Nagant which is an almost flawless weapon. Mosins are more expensive and unlocked at later ranks though. Lebel variants deal higher damage than Vetterli at most ranges, have low sway, low recoil and are unlocked at mid-ranks, giving the users some advantage against Vetterli users. However, the advantages come at cost such as slower/clunky reload time and cocking speed, high price and it inflicts slightly less damage from the Mosin. Lebel 1886 has 4 variants to accommodate your playstyle.

Unlocked at - Rank 52
Damage - 132
Muzzle Velocity - 630m/s

Pros
  • High damage at most ranges as it uses Long Ammo.
  • Low sway.
  • Has the highest muzzle velocity out of all guns.
  • Very low recoil. Lowest of any rifle.
  • 10 bullets loaded in rifle. Nine in the tubular magazine with one additional round in the chamber.
  • The Talon version allows the users to deal with devastating melee attacks.
  • The Marksman version allows the users to snipe targets in distance.
Cons
  • Clunky and slow reload time.
  • Slow rate of fire due to the cocking speed.
  • Only 5 bullets in reserves, requiring the users to bring Uppercut with them as it will upgrade their reserves from 5 to 14.
  • Cannot be loaded with stripper clips, users have to reload the rifle with bullets one by one.
  • Unspent rounds will be ejected from the rifle(s) and lost should the user try to reload unless if they got the Bulletgrubber trait.
  • The Contraband Marksman version has some cracked lens.

Winfield M1876 Centennial

Winfield M1876 Centennial is the "upgraded" version of the standard Winfields that use compact ammo. Unlike the standard rifles, this Centennial version uses Medium Ammo and comes with a higher muzzle velocity, allowing for long-range combat as well as dealing higher damage overall. However, it comes with cons such as a slower rate of fire, reload speed and recoil. If used right, it can be a dangerous weapon to deal with especially with its levering capability. There are two variants of Centennial.

Unlocked at - Rank 58
Damage - 123
Muzzle Velocity - 600m/s

Pros
  • High damage at most ranges as it uses Medium Ammo.
  • Low sway.
  • High muzzle velocity for a Winfield rifle.
  • 10 bullets loaded in rifle, 8 in backup if not paired with a sidearm that uses Medium Ammo.
  • Can be used with Levering Trait.
Cons
  • Slow reload time in comparison to standard Winfields.
  • Slow rate of fire in comparison to standard Winfields.
  • Slightly high recoil.
  • Cannot be loaded with speed loader mechanism as shown in Winfield 1873 Swift.
  • Very high recoil when levering. In addition, the rate of fire while levering is slightly slower than the standard Winfields.

Berthier Mle 1892 (WIP)

Berthier Mle 1892 is the sixth rifle that is available at mid-late ranks. It is considered to be the alternative rifle to Lebel 1886. It uses long ammo and comes with an average high damage, reload speed and high muzzle velocity. However, it comes at a cost of very low ammo in magazines and that losing unspent ammo can be very easy.

Unlocked at - Rank 62
Damage - 130
Muzzle Velocity - 590m/s

Pros
  • High damage at most ranges as it uses long ammo.
  • Fast (full) reload time.
  • High velocity, almost close to Mosin Nagant.
Cons
  • Only 3 bullets in magazine.
  • Unless you have the bulletgrubber trait, you will lose every unspent round in the magazine if you reload.
  • Partial reload time is slightly slower than full reload time.
  • Expensive. No reason not to use superior Lebel 1886 over this.

    Mosin Nagant M1891

    Mosin Nagant M1891 is the seventh rifle that is available at later ranks and it uses Long Ammo. Mosin variants typically can be the worst nightmare for any long-range combat as they can snipe off a hunter in long range without losing significant damage as the damage drops in very long range. It deals high damage in most ranges, quick reload time when empty, very low sway comparable to Winfield and the recoil is manageable. However, they come at a cost such as limited ammo capacity, slow rate of fire and the price tag. Finally, it is one of the few rifles that bring 7 different variants to accommodate a player's playstyle.

    Mosins were infamous to one-shot hunters pre-content patch 1 (Scoped weapons update).

    Unlocked at - Rank 72
    Damage - 136
    Muzzle Velocity - 610m/s

    Pros
    • High damage for any range. Loses damage only in long-range or beyond that. It can typically kill any hunter in two shots at most ranges, most of the time. Potentially dangerous weapon for close to medium range combat.
    • Has the ability to one-shot kill hunters who have 135 health points or less than that at most ranges, making it a potentially dangerous weapon to fight against.
    • Can be loaded with stripper clips which loads the rifle quicker. The chamber must have one bullet or empty though.
    • Very low sway, similarly to the Winfield.
    • Quick reload time, especially if the Mosin is empty as it is then loaded with a stripper clip.
    • Winfield and Vetterli users are at a huge disadvantage if Mosin user is shooting from long distance.
    • The Bayonet version allows for better melee combat.
    • The Obrez version is a cheaper version.
    • The Obrez Mace version allows users to inflict higher melee damage against A.I and players.
    • The Obrez Drum version has 15 bullets in a drum magazine.
    • The Sniper version is excellent for long-range combat.
    • The Automatic version is excellent for any short-range combat, able to destroy a team rather quickly.
    • The Automatic version may incite fear and cause players to leave.
    • The Automatic version can be a very dangerous weapon if you are experienced with it.
    • All variants are able to headshot hunters up to 250m of range.
    • All variants have average prices.
    Cons
    • Unspent rounds will be ejected from the rifle(s) and lost should the user try to reload unless if they got the Bulletgrubber trait.
    • Ammo capacity is very low (10 on backup), forcing users to bring Uppercut, an expensive long ammo revolver, to increase the capacity from 10 to 19.
    • Refills only 1 to 3 ammo from ammo caches.
    • The Obrez version has slightly higher sway than Vetterli in comparison and has more damage drop-off starting from medium to long-range.
    • Similarly, the Obrez Drum version has no ammo in backup (15/0) unless paired with uppercut.
    • The Sniper version is not worth without the appropriate traits as it's not a good idea to use the Sniper version without them. Inexperienced users are also put at big disadvantage.
    • The Sniper version can not be reloaded with a stripper clip when empty thus increasing the reloading times and putting the user at disadvantage.
    • The Contraband Sniper version has cracked lens.
    • The Automatic version has a long reload time and a very high recoil and is very expensive for what it offers. It is not recommended for inexperienced users.
    • The Automatic version has a higher sway, similarly to Obrez version.
    • The Automatic version has no bullets on backup unless paired with Uppercut.
    • The Automatic version is locked behind a huge exp grind lock (16.000 exp in total to unlock).
Snipers
Overview
Snipers are the weapons with the sole purpose, as self-explanatory, to snipe off hunters in distance but this is done typically by weapons that deal high damage at huge ranges with low sway. Sniper weapons do not necessarily mean they have a scope attached to them. They are also capable to headshot hunters in any range with the exception of silenced versions.

Currently, there are 2 sniper versions. They all are large weapons.

Sparks LRR

Sparks LRR used to be infamous to be able to one-shot hunters pre-content patch 1 (Scoped weapons update). But now, while it no longer one-shots hunters most of the time, it still deals very high damage in close range but reasonable high damage to medium to long-range as well, coupled with low sway at low price. However, all these come with the costs of ammo capacity and one bullet chamber. Sparks have 3 variants to accommodate the player's playstyle.

Unlocked at - Rank 26
Damage - 149
Muzzle Velocity - 533m/s (Sparks) 300m/s (Silencer)

Pros
  • Very high damage for close range less than 20m as it can deal 149 damage, typically killing any Hunter that has 149 health points or less.
  • It is able to headshot all hunters within 250m of range.
  • Relatively cheap weapon for what it offers.
  • Very low sway.
  • Recoil seems about right.
  • The Silencer version deals 149 damage as well but only for close-range, upper body.
  • The Sniper version has a long-range scope attached, making it effective for long-range combat and is cheap.
Cons
  • Only one bullet in the chamber, potentially making it a useless weapon for close-range combat.
  • Very slow reload time.
  • The Sniper version has cracked lens which will need some time to get used to it.
  • The Silencer version deals significantly less damage in distance.
  • The Silencer version has low muzzle velocity.

Nitro Express Rifle

Nitro Express Rifle is the second sniper weapon. It is considered as an "Elephant gun" by the development team which in turn it means that it is capable to one-shot kill hunters within 50m, upper body along with slightly low sway and average reload time at a cheap price. All these come with negatives which are the scarcity of the ammo, the huge recoil and the two-round chamber weapon. It also comes with a peephole scope which is considered as the lowest quality of scope.

Unlocked at - Rank 88
Damage - 364
Muzzle Velocity - 550m/s

Pros
  • Capable to one-shot hunters within 40m of distance or less on the torso.
  • High damage.
  • Low sway.
  • Can kill most Monsters in one shot. Meatheads sometimes require 2 shots to be killed.
  • Can kill bosses, especially Spider, rather quickly. It can kill Spider usually in 2-3 shots.
  • Can penetrate through anything.
Cons
  • Only two bullets in the chamber.
  • Uses special ammo which is rarely found around the map and cannot be looted from Hunters.
  • Cannot take ammo from standard ammo cases, only special ammo cases and/or ammo boxes.
  • The recoil is huge but can be manageable.
  • While aiming in the peephole, anything outside of it is blurred.
  • Expensive.
Shotguns
Overview
Shotguns are commonly the secondary weapon a Hunter may have one on disposal due to their capability to cause high damage to enemy hunters in close ranges, usually killing them in one or few shots. While they are powerful weapons for any close-range fights, they have sharp damage drop-off in range.

All Romeros and Rivals are large weapons with the exception of the handcannon / specter compact shotguns which are medium weapons. Specter, Terminus and Crown & King Auto-5 are large weapons.

All damages are speculated because shotguns are really complicated weapons. Other times a shotgun can one-shot kill a healthy hunter, other times it won't.

Romero 77

Romero 77, a long barrel shotgun that can one-shot hunters in close range if aimed correctly and right onto a Hunter at the cost of a single bullet in the chamber. This weapon is available for new players. It comes with two variants one of them being a handcannon, a sawn-off shotgun.

Unlocked at - Rank 1
Damage - 200 (Long-barrel) 140 (Handcannon)

Pros
  • Chance for one-shot kill close range.
  • The long barrel version has less spread which can make it easy to apply enough damage on a single target.
  • The long barrel versions have the longest effective range out of all shotguns (15m).
  • The long barrel Talon version can act as a replacement for the knife as a tool.
  • The handcannon hatchet version deals more damage than a knife and can act as a replacement to it.
  • All variants are very cheap and noob-friendly.
Cons
  • Only one shell in chamber.
  • You need luck to use handcannon on players due to the spread and potentially low damage at some range.
  • The Handcannon variant has higher recoil.

Caldwell Rival 78

Caldwell Rival 78 acts as the successors of the Romero 77 versions and variants. They come with an increased chance of one-shot kill as well as increased damage with two shells in the chamber. Their spread is slightly higher, making it easy to kill a Hunter in two shells. All these come at the cost of slightly increased price, accuracy and reload time. There are only two versions of Caldwell, long barrel and short barrel (handcannon) to accommodate the player's playstyle.

Unlocked at - Rank 10
Damage - 175 (Long-barrel) 85 (Handcannon)

Pros
  • Two shells in the chamber which is a good upgrade from Romeros 77.
Cons
  • Longer reload time due to two shells being reloaded.
  • Slightly expensive since the only noticeable upgrade is the ammo capacity in the chamber.
  • Lower effective range than the Romero long barrel versions.
  • Lower damage per shell.
  • The Handcannon variant has higher recoil.

Specter 1882

Specter 1882 is the first shotgun that works as pump-action and can deal much higher damage, potentially killing hunters in one or two shots close range as well as more ammo capacity in the chamber which can make it a potentially dangerous shotgun in close range. However, this comes at the cost of a poor rate of fire due to slow pump-action and slower reload time. It comes with 3 variants to accommodate the player's playstyle.

Unlocked at - Rank 36
Damage - 185 (Long-barrel) 85 (Compact) 175 (Bayonet)

Pros
  • Sometimes, it is capable to one-shot kill Hunters in 12m of distance or less.
  • High Damage.
  • Higher ammo capacity in the chamber.
  • The Bayonet variant can replace the Saber as a melee.
  • Very good against Butcher as it inflicts high damage.
  • Relatively cheap for what it offers.
Cons
  • Unspent shotgun shell will be wasted away should the user decide to reload the shotgun while already having a shell in the chamber unless the user got Bulletgrubber trait.
  • Very poor rate of fire due to slow pump action.
  • Slow reload time.
  • The Bayonet variant has a higher spread.
  • The Compact variant has a higher recoil.
Shotguns (v2)
Winfield 1887 Terminus


Winfield 1887 Terminus is the first lever-action shotgun and can deal a devastating attack in close-ranged fights thanks to its lever-action capability which increases its rate of fire (especially with levering) and it has the highest ammo capacity in the weapon, the highest of any Shotgun in-game. However, the reload time is slow and its spread is high and those must be taken into consideration. The weapon comes with a smaller version variant.

Unlocked at - Rank 64
Damage - 185

Pros
  • Good damage for close ranged fights.
  • 7 bullets in the weapon, the highest of any shotgun out there.
  • Rate of fire is average. It can be increased significantly with levering, dealing devastating attacks to Hunters in close range.
  • All variants can be used with levering.
Cons
  • Expensive.
  • High spread.
  • High recoil.
  • Slow reload time which may put the user at disadvantage and at risk.
  • Unspent shotgun shell will be wasted away should the user decide to reload the shotgun while already having a shell in the chamber unless the user got Bulletgrubber trait.

Crown & King Auto-5

Crown & King Auto-5 is the first shotgun that works as semi-automatic and can deal a devastating attack coupled with a high rate of fire on enemy teams in a matter of seconds. All this comes at the cost of poor reload time and seemingly poor damage over range.

Unlocked at - Rank 82
Damage - 185

Pros
  • Good damage for very close range (About 12m or less).
  • Rate of fire is higher than any other shotguns, able to empty a full magazine on one or two hunters, effectively killing them in some range.
  • Doesn't require Bulletgrubber trait as it will not eject any magazine while initiating a reload process.
Cons
  • Expensive.
  • Slow reload time which may put the user at disadvantage and at risk.
  • High recoil.
  • Low maximum ammo count.
Pistols
Overview
Pistols are one of the most common sidearms a Hunter will use usually because of their cheap prices as well as being generally good backup sidearm when the primary weapon runs out of ammo or is not reliable for some reason (ex. Primary is Shotgun and I need med-long range weapon so I use my sidearm).

Hunters who don't have the Quartermaster trait and have a large weapon on disposal are highly encouraged to select a pistol or melee weapon as a sidearm as they are small weapons with the exception of the precisions. While pistols can be used for any range, they are strongly recommended for close and medium range only as the damage drop off starts from the medium range and it substantially increases damage drop off at long range, rendering it useless most of the time unless if the hunter tries to score a headshot.

Hunters who have Quartermaster can equip a large weapon and a medium weapon that can consist of a precision version (ex. Nagant, Dolch). Nagant M1895 Officer Carbine is the only pistol that is classified as a Large weapon.

Nagant M1895

Nagant M1895 is fairly similar to Caldwell Conversion Pistols when it comes to damage, recoil and rate of fire. However, Nagant M1895 Officer has a much higher rate of fire at the cost of accuracy as it is a double-action pistol. They come with 7 variants to accommodate a player's playstyle.

Unlocked at - Rank 1 (Pistol) Rank 12 (Officer)
Damage - 91 (Pistol) 104 (Carbine)
Muzzle Velocity - 330m/s (Nagant) 250m/s (Silencer)

Pros
  • The fanning is slightly faster than the Caldwell pistols, allowing a slightly increased rate of fire.
  • It's cheap.
  • The Nagant M1895 Officer has a higher rate of fire as it is a double-action pistol.
  • The Nagant M1895 Officer Brawler variant has a duster attached, replacing the duster as a tool, capable to handle a mob.
  • The Precision variant comes with a stock that decreases the sway and recoil significantly, allowing for well placed shots at a distance
  • The Silencer variant is better when it comes to killing targets quietly without alerting nearby hunters.
  • The Deadeye variant is equipped with short range scope and stock, allowing users to snipe off targets at distance with minimal sway. It seems to have a minimally cracked lens.
  • The Carbine variant has lower recoil and sway.
  • The Carbine variant makes it easier to score headshots.
  • The Carbine variant can replace the cheap variant of Winfield.
  • All Nagant variants are relatively cheap and noob-friendly weapons.
Cons
  • Slightly increased damage drop off over ranges.
  • Long reload time as the bullets are ejected and injected one by one.
  • The Silencer variant has very little damage, making it a virtually useless weapon to kill any hunter unless one manages to land a shot on the head. However, the weapon can be viable if the hunter has a fanning trait or dual wielded, giving him a chance to win a close-range fight.
  • The Officer variant has poor accuracy if the user rapidly fires with it.
  • The Officer variant cannot be fanned.
  • The Carbine variant only has 7 bullets in the cylinder.

Scottfield Model 3 Revolver

Scottfield Model 3 Revolver is a break-action revolver that allows for a quick ejection of spent rounds, unlike other revolvers. It uses medium ammo and behaves similarly to Caldwell Pax in terms of damage and rate of fire. Though, it can unload spent rounds rather quickly as mentioned above.

Unlocked at - Rank 1
Damage - 107
Muzzle Velocity - 280m/s

Pros
  • Uses medium ammo.
  • Fairly cheap.
Cons
  • Slightly slow rate of fire.
  • The sway can be a problem if you are trying to target targets above 20m.
  • While the unloading speed is fast, the loading speed is extremely slow.

Caldwell Conversion Pistol

Caldwell Conversion Pistol is one of the most standard and common weapons a typical Hunter will bring in a match. It uses compact ammo and behaves similarly to Winfield except the damage drops rather quickly above 20m or so with the rate of fire and reload time being very slow. This pistol has four variants to accommodate the player's playstyle.

Unlocked at - Rank 22 (Conversion) Rank 18 (Pax)
Damage - 104 (Conversion) 110 (Pax) 130 (Uppercut)
Muzzle Velocity - 300m/s (Conversion) 330m/s (Pax) 410m/s (Uppercut)

Pros
  • Uses compact ammo like the Winfield.
  • Potentially dangerous pistol for close range but loses its effectiveness significantly at medium range for numerous reasons.
  • The recoil is mostly manageable.
  • Very cheap and is a noob-friendly weapon.
  • The Caldwell Pax uses medium ammo and is a great upgrade from the base variant.
  • The Caldwell Pax is very cheap and has similar recoil to the base variant.
  • The Pax Claw variant is equipped with a knife, increasing melee damage attacks.
  • The Chain variant has huge ammo capacity in the magazine.
  • The Chain variant can be a devastating weapon close range if the hunter has fanning trait as the rate of fire will be increased almost similar to an Avtomat.
  • The Uppercut variant uses long ammo and is a big upgrade from the base variant.
  • The Uppercut variant has similar stats of a Mosin, able to kill a hunter in two shots close range (about 20m).
  • The Uppercut variant can behave like a mini-avtomat in close range if used correctly. Requires fanning trait.
Cons
  • The sway can be a problem if you are trying to target targets above 20m.
  • Long reload time as the bullets are ejected and injected one by one.
  • The rate of fire is slow.
  • The Chain variant, if used for fanning, has very poor accuracy even when crouched and will run out of ammo.
  • The Chain variant has the longest reload time if emptied.
  • The Pax Claw variant is slightly expensive.
  • The Uppercut variant has slightly higher recoil than the base variant.
  • The Uppercut variant is expensive.
  • The Uppercut variant has a long reload time.
Pistols (v2)
Bornheim No.3

Bornheim No.3 is the first (second released) semi-automatic pistol in the game. Unlike the Dolch, it uses Compact ammo. It comes with good damage on close range, a higher rate of fire, average reload time and good recoil. All of this comes with the cost of moderately low damage on longer ranges and limited ammo capacity. There are three versions of Bornheim No.3.

Unlocked at - Rank 30
Damage - 74 (Non-Match) 80 (Match)
Muzzle Velocity - 400m/s

Pros
  • High rate of fire.
  • Low sway.
  • Low recoil.
  • It is fed with an ammo clip which speeds up the reload time when the weapon is empty.
  • Fairly cheap.
  • The base and Match versions can be loaded with magazines.
  • The Extended version has 8 bullets with one more to load in the clip.
  • The Match version has a stock, allowing for better accuracy and recoil control.
Cons
  • Slow muzzle velocity.
  • Deals less damage than the Nagant.
  • Limited ammo capacity. Only 5 + 1 bullets in the clip.
  • Uses Compact ammo which severely limits its effectiveness in longer ranges.
  • Unless the hunter has the Bulletgrubber trait, an unspent bullet will be ejected when initiating the reload process.
  • The Extended version has no clip. Load bullet one by one.

LeMat Mark II

LeMat Mark II is a pistol that uses Compact Ammo. Unlike any other pistols, this is the first pistol that has an alternative fire mode which allows the weapon to switch to a second barrel that holds a single shotgun shell. While the Compact Ammo barrel will inflict low damage as normal, the second barrel that uses Shotgun Shell can deal devastating damage to hostile Hunters. All this comes at a cost of long reload time either of the barrel, slow fanning speed and inefficient second barrel capabilities at longer ranges.

Unlocked at - Rank 46
Damage - 75
Muzzle Velocity - 300m/s

Pros
  • High damage when using second barrel (Shotgun).
  • Relatively low sway.
  • Low recoil.
  • Can be useful not only in ranged fights but also close-ranged fights thanks to its Shotgun barrel.
  • A lot of bullets (9) in the cylinder along with a shell.
  • Good amount of reserves.
Cons
  • Low damage when using primary barrel (Compact).
  • Slow reload time.
  • Slow fanning speed.
  • Only 3 Shotgun Shells in reserves.
  • Shotgun barrel is efficient only in 3m of distance or less.
  • Shotgun barrel has a high spread, requiring the user to aim precisely and be close to the target.

Dolch 96

Dolch 96 is the second (first released) semi-automatic pistol in the game. Unlike Bornheim No.3, it uses Special ammo. It deals massive damage at close range, a high rate of fire and average reload time. All of this comes with the cost of the price, ammo capacity and recoil. Dolch 96 comes in two variants to accommodate the player's playstyle.

Unlocked at - Rank 68
Damage - 96
Muzzle Velocity - 440m/s

Pros
  • High damage.
  • High rate of fire.
  • Relatively low sway allowing well-placed shots.
  • The reload time is average and it can be sped up when the Dolch 96 is empty (or has only one bullet in the chamber) as it is then loaded with a stripper clip.
  • The ammo capacity is the highest with 10 bullets.
  • The Precision variant decreases the sway significantly, making it a useful weapon for ranged combat.
  • Uses Special ammo which increases its effectiveness in close to medium ranges.
Cons
  • Very expensive.
  • Extremely long (partial) reload time.
  • Reserve ammo is limited as it uses Special Ammo.
  • Unless the Hunter has the Bulletgrubber trait, an unspent bullet will be ejected when initiating the reload process.
  • While the recoil is manageable, it kicks quite a lot with rapid firing.
  • The damage drop off is noticeable at the medium range, at least above 20m.
Crossbows
Overview
Crossbows are mechanized weapons. They are the quietest weapons that can be used in disposal, similar to silencers. They are capable to kill targets within close range, usually, 40m more or less, able to one-shot hunters in that range and kill the bosses quietly.

The crossbow is a large weapon while the hand crossbow version is a small weapon.

Crossbow

Crossbow is the first large mechanized weapon that can potentially kill targets in one bolt in close range, usually 20m or less. In case it fails to kill a target in one bolt, the bleeding can potentially finish them off afterward. However, while it is a quiet weapon, it has a slow reload time and the rate of fire is very low unless paired with the Bolt Thrower trait which makes the reloading quick. It comes in a large and small version.

Unlocked at - Rank 4
Damage - 195 (Hand Crossbow) 260 (Crossbow)

Pros
  • Potentially very high damage.
  • Capable to one bolt shot hunters (upper body) in short-range starting from 20m and less than that.
  • The recoil is little to non-existent.
  • The sway is low, sharing similar sway of Winfield and Mosin.
  • The normal bolts can be picked up.
  • The base variant can kill Grunts in close range.
  • The Hand variant can potentially one bolt shot hunters (upper body) in 10m or so.
  • All variants cause bleeding.
Cons
  • Only the Hand Crossbow is unlocked initially. It requires grinding to unlock the large Crossbow.
  • Very slow reload time.
  • Very slow rate of fire.
  • The base variant cannot kill Armoreds or Meatheads in one or even two shots.
  • Bolts can be stolen by enemy hunters who are equipped with crossbows.
  • Bolts have drop-off over distance, making it very difficult to hit targets in distance.
  • Requires a lot of patience and precise shots, especially in stressful situations.
Hunting Bows (WIP)

Overview
Hunting Bows are similar to Crossbows; silent and deadly. They are capable to kill Hunters in one shot if aimed right on their chest or head, regardless of the range.

The Hunting Bow is a medium weapon.

Hunting Bow


WIP
Melee
Overview
Melee weapons are weapons that a typical Hunter has at their disposal. It ranges from a knife to Bomb Lance. Depending on the melee type, they can cause blunt or piercing and rending damage against the Hunters.

There are two types of melee weapons. One that can be bought directly from the store and the other melee weapons spawn as world items, in other words, they can not be bought directly from the store and are found throughout the map. Melee weapons bought from the store cannot be dropped or thrown against the targets while the melee weapons as world items can be dropped and thrown against the targets which require the Tomahawk trait.

Combat Axe

The Combat Axe behaves similarly to the Wood Axe except it can be bought directly from the store at a cheap price but can not be thrown against the targets. It is capable of causing high damage as well as bleeding. However, it takes slightly more time to charge for an attack.

Unlocked at - Rank 1
Damage - 165 (Light Attack) 330 (Heavy Attack)
Cost - 5$

Pros
  • Able to kill a Hunter in one light charge.
  • It can cause bleeding.
  • Very stamina friendly, it is able to launch 4 full charges before exhausting the stamina entirely.
  • Can typically kill Armoreds in only two full charges.
Cons
  • Very slow, potentially putting the users at huge risk while preparing to attack a Hunter.
  • Incapable to cause massive damage against the bosses.
  • Cannot be thrown against the targets.

Machete

The machete replaces the knife as a tool due to increased damage as it can kill weak monsters in only one light charge, able to kill an Armored in 3 full charges. It can also deal massive damage to Hunters, usually killing them instantly. It is classified as a small weapon.

Unlocked at - Rank 24
Damage - 90 (Light Attack) 135 (Heavy Attack)
Cost - 60$

Pros
  • High damage, it can kill Grunts in one light charge and 3 full charges on Armoreds.
  • It is capable of instantly killing hunters in one full charge on the head.
  • Cheap and noob-friendly melee weapon.
  • Can kill Butcher rather quickly. Requires extreme caution and may require a stamina shot to avoid losing stamina.
Cons
  • Poor range when it comes to Hellhounds.
  • It needs a small weapon slot, forcing the hunters to have only one ranged weapon.

Cavalry Saber

The Cavalry Saber is able to hit targets at a slightly longer range than the knife and the machete. It is capable of instantly killing targets most of the time if it hits the upper body and can cause bleeding in case the target does not die from the first charge. It is classified as a small weapon.

Unlocked at - Rank 62
Damage - 82 (Light Attack) 168 (Heavy Attack)
Cost - 60$

Pros
  • Exceptionally high damage for its use against Hunters, able to kill hunters in one stab, most of the time.
  • Cheap.
  • Can kill targets at a slightly further distance, useful to kill Hellhounds before they attack you.
Cons
  • It needs a small weapon slot, forcing the hunters to have only one ranged weapon.

Bomb Lance

The Bomb Lance is superior from all melees in-game when it comes to damage and its range as it is able to hit targets at a much longer range than the Cavalry Saber combined. It can be treated as an anti-boss and anti-meathead weapon as it deals devastating damage to them. Hunters light-hit by the melee can be killed in one go as well. It is classified as a Large weapon.

Unlocked at - Rank 78
Damage - 150 (Bomb) 180 (Light Attack) 360 (Heavy Attack)
Cost - 199$

Pros
  • Depending on the monster, it can kill them in one light/heavy attack.
  • Can kill Meatheads in one shot to their body.
  • Can kill Hunters in one full charge or in one shot on their body (unless they got the Bulwark trait)
  • Can deal devastating damage to the bosses.
  • The harpoon can stick on a non-metal surface.
  • The harpoons can be replenished from special ammo boxes.
  • The harpoons can stick Assassins but only when it does its first scream or before its attacks.
  • Longer melee range than the Saber Cavalry.
Cons
  • It uses a large-slot weapon, limiting users from equipping other large-slot firearms.
  • The harpoon will take 2-3 seconds before they detonate.
  • Immolators will still ignite on fire if hit by a Bomb Lance.
  • Only 6 ammo in capacity, same as Nitro.
  • Long reload time, about 4 seconds.
Tools
Overview
Tools are one of the most important items for a Hunter to have at their disposal. They often can improve the chances during a fight or even in certain playstyles such as going quietly, stealthily, etc. All tools are permanent and won't be lost even after their usage as they will still remain in inventory after the match ends. Tools can also be resupplied in a match.

Tools usually help the Hunter accomplish certain tasks quickly such as using the knife to kill targets in quick succession so that they can progress on without Grunts harassing them on the way. Flare Gun as a tool can be used to kill stronger monsters without wasting stamina by using knives on them, etc.

Knife

The knife is one of the few very common melee weapons a Hunter will have at disposal. They are extremely useful when it comes to taking down monsters in one or few hits, depending on the monster. They can also be used for any other stuff. However, it's not recommended to be used against enemy hunters.

Unlocked at - Rank 1
Damage - 52 (Light Attack) 105 (Heavy Attack)

Pros
  • Can kill Grunts in one full charge as well as Armoreds in 3 full charges.
  • Relatively stamina-friendly. Can do 4 full charges on maximum stamina before running out.
  • Causes bleeding against any Hunter if a light attack is used.
  • Cheap and noob-friendly melee weapon.
Cons
  • Relatively poor damage against enemy Hunters unless aimed at the head.
  • Very short range, it can be difficult to attack enemy Hunters or even Hellhounds before receiving damage.
  • Useless against Immolators as they will ignite on fire.
  • Cannot kill most stronger Monsters in 1-2 full charges.

Dusters

Dusters is a melee weapon that is considered to be a more light weapon as it requires less stamina to charge and attack the opponents. It is extremely useful for a mob of Grunts however the damage is kind of lacking. It is considered to be a tool.

Unlocked at - Rank 20
Damage - 31 (Light Attack) 72 (Heavy Attack)

Pros
  • Stamina friendly as you can punch several times with it before running out of stamina.
  • Can instantly kill Grunts with a single full charge on their heads, similarly to Knife.
  • Useful against Immolators.
  • Cheap and noob-friendly.
Cons
  • Damage is pretty minimal.

Spyglass

Spyglass is a tool where it allows you to spot targets in further distance or allows you to see clearly if there is anything happening in distance.

Unlocked at - Rank 24

Pros
  • Allows you to see stuff clear in distance.
  • Cheap and noob-friendly tool.
Cons
  • It cannot attack.

Heavy Knife

The Heavy Knife is the second variant of the Knife family. It deals much higher damage than the regular Knife at slightly increased cost and the time required to build a heavy attack.

Damage - 72 (Light Attack) 120 (Heavy Attack)

Pros
  • Deals much higher damage, able to kill monsters in fewer hits.
  • Causes bleeding against any Hunter if a light attack is used.
Cons
  • Very stamina consuming, especially for Heavy attacks.

Throwing Knives

Throwing knives are a tool that can potentially replace the knife as a tool as they have similar roles between the two. However, throwing knives are recommended to kill monsters in a distance where it would be risky to be done with a knife. This requires patience and precise throwing shots as a Hunter can miss quite a lot on their targets.

Damage - 130 (Throw) 22 (Light Attack) 52 (Heavy Attack)

Pros
  • Can throw knives at monsters, killing them quietly in distance.
  • Can instantly kill Hunters in close range, upper body and only if they got 125 Health Points or less.
  • Can cause bleeding.
  • Can be picked up from where their knife was landed at, indefinitely.
  • Works best with a knife. Knife for close-range targets, throwing knives for slightly longer-range targets.
  • They can be resupplied from item boxes and/or looting Hunters.
  • Cheap and noob-friendly tool.
Cons
  • Requires a lot of training when it comes to precision shooting as missing shots is very common and can lead to your downfall if you were trying to kill a Hunter with them.
  • Cannot throw in larger distances as the knife will drop over distance.

Electric Lamp

The electric lamp is useful for the Hunter to explore dark areas, especially at night time of day where everything is dark and difficult to see. It can also be useful against Hunters during combat as it will produce powerful light, enough to visually cover your whole body in the nighttime of day or in very dark areas. However, the lamp produces a powerful light that can be seen in distance by nearby hunters and experienced Hunters may still be able to kill lamp users effortlessly.

Unlocked at - Rank 1

Pros
  • Produces powerful light that can illuminate dark areas, allowing easy exploration in those areas.
  • It can make Hunters difficult to take down electric lamp users at night time of day, especially in close quarters combat as they tend to visually block the whole body.
  • Can be turned on and off at any time.
  • Very cheap and noob-friendly tool.
Cons
  • Because it produces a powerful light, you can be a very easy target by enemy hunters. You may even be prioritized to be killed because the lamp makes you an easy target to shoot on.
  • The dark sight can easily replace the lamp as it can still help you explore dark areas with the dark sight.
  • The lamp will not work efficiently in GOLD and FOG time of days unless in very dark areas. It's useless in MIDDAY time of day regardless if you are in very dark areas or not.
Tools (v2)
First Aid Kit

The First Aid Kit is one of the most common tools that a Hunter will have at their disposal in a match. It can heal yourself and your teammate. It has three healing charges, allowing yourself or your teammate to be healed up to 3 times. After 3 charges, the first aid kit is no longer usable and is lost permanently.

Unlocked at - Rank 1
Cost - 30$

Pros
  • It has three charges, allowing yourself or your teammate to be healed up to 3 times. (Note, if you healed yourself twice and your teammate once, it will not be usable after that as 3 charges were used)
  • Cheap and can be "upgraded" if you got the Doctor Trait and the Physician Trait where they give you 100 Health Points to heal as well as decrease the healing time from 5 seconds to 3.
  • Can halt and stop bleeding.
Cons
  • It takes a long time to bandage yourself or your teammate, similarly to the Vitalities unless you got Physician trait where it reduces the time required to bandage.
  • It heals only 50 Health Points regardless of the bar's size unless you got Doctor trait which will then heal 100 Health Points.

Fusees

Fusees or more commonly, flares are a tool where it can produce big light, illuminating the surroundings for a long time, very useful at night. It can potentially block visual contact between the hunters. A Hunter will have three fuses in disposal should they have a pack of fusees.

Unlocked at - Rank 1
Cost - 10$

Pros
  • Illuminates the surroundings with a big light.
  • Can block visual contact between the hunters versus enemy hunters, especially at night.
  • Can be thrown onto Monsters which will set them on fire and kill them almost instantly. Does not apply to Meatheads and/or Hellhounds. Useless against Butcher and Immolator.
  • Can be thrown into the standing lamps of animal cages, killing the animals instantly.
  • Very cheap.
  • They last a long time, typically five minutes.
  • Can instantly explode barrels if thrown at.
Cons
  • Virtually useless in day and fog time of days unless if used in dark areas.

Flare Pistol

The Flare Pistol or commonly abbreviated as Flare Gun is a tool with the sole purpose to set targets on fire as well as illuminate a large light in an area at night time of day, potentially blocking visual contact of enemy hunters or expose their positions.

Unlocked at - Requires unlock of Fusees
Cost - 36$

Pros
  • Can set targets on fire, instantly killing most monsters (excluding Meatheads) and cause Hunters to lose their health bars permanently unless if they manage to put out the fire in time.
  • Can illuminate a large light in dark areas.
  • Useful to flush out campers, exposing their locations as well as blocking visual contact of them in the night time of day or in dark areas.
  • Cheap and noob-friendly tool.
Cons
  • Monsters on fire can still attack you for a while.
  • Cannot kill Meatheads at all. Requires a lot of flare shells.
  • Only three maximum flare shells in the disposal.
  • The burning flare won't last long.

Choke Bomb

Choke Bomb is a tool item with the sole purpose to put out a fire such as downed Hunter on fire, Butcher's fire, Immolator, environment fire and so on. It can also remove poison clouds. Upon detonation, it will explode into a smoke cloud of which puts off any active fire/poison as well as force Hunters in the cloud to violently cough. It can also prevent new fires from being lit. Hunters in the smoke cloud will have decreased recoil stability due to cough. The cloud will remain in the air for 120 seconds. Even if Hunters flee from the cloud, they will still cough for several seconds.

Unlocked at - Rank 11
Cost - 25$

Pros
  • Cheap.
  • Anti-fire/poison item.
  • Can instantly kill Immolators.
  • Detonates a cloud which may help for safe-revive but still risky.
Cons
  • The smoke is not thick enough.

Knuckle Knife

Knuckle Knife is coming from the Knife and Dusters family. It can be treated as a combined weapon, knife and dusters. If a light attack is used, it can be treated as dusters which are useful against Immolators. The Heavy Attack can be treated similarly to the normal knife's light attack.

Unlocked at - Requires unlock of Dusters.
Damage - 58 (Light Attack) 92 (Heavy Attack)
Cost - 15$

Pros
  • Stamina friendly.
  • Can instantly kill Grunts with a single full charge on their heads, similarly to Knife.
  • Can be used against Immolators if Light Attack is used as it's blunt damage.
  • Noob-friendly tool.
Cons
  • Inferior to the normal knife.

Decoys

Decoys are a useful tool to distract enemies and force them to enter investigation mode, moving to a location you want them to. They can also be used to fool enemy hunters of a location that they think you are coming from where you are not. Finally, it can be useful to cause false alarms by triggering Monster's aggro. It also comes with a variant that produces much better and effective results to distract enemy hunters and the A.I.

Unlocked at - Rank 32

Pros
  • Can distract Monsters as well as aggro them.
  • Can trick Hunters.
  • Can be used to target burning lanterns on animal's cages to kill animals quietly.
  • The Blankfire variant produces a gunshot which can effectively fool an enemy Hunter.
  • The Blankfire variant can explode barrels when thrown at.
  • The Decoy Fuses can fool Hunters into thinking you are throwing an explosive item.
  • All variants are very cheap and can be toyed around.
  • All variants can be resupplied with the Decoy Supply trait at ammo caches.
Cons
  • It cannot be used to cause significant damage to monsters or especially Hunters.
  • Decoys cannot kill horses.
  • The Blankfire variant has only 6 decoys.

Variants
  • Decoys (6$) - Base decoys variant. Maximum capacity: 16 decoys. Unlocked at rank 32.
  • Blankfire Decoys (45$) - Base decoys variant that produces a gunshot sound on impact. Maximum capacity: 6 decoys.
  • Decoy Fuses (60$) - Decoy fuses that can be lit and tossed. Maximum capacity: 3 decoy fuses.
Tools (v3)
Alert Trip Mine


The Alert Trip Mine is a trap tool with the purpose to behave not only as an audio trap but also to signal nearby Hunters that something passed through an Alert Trip Mine, very useful for the owners who placed the trap in the first place but hostile Hunters will also be alerted over the trap.

Unlocked at - Requires unlock of Decoys
Cost - 60$

Pros
  • Very loud, can be heard in some distance.
  • Will send a red flare on the sky if there is nothing blocking it.
  • Can be treated as an audio trap, similarly to Bear Traps.
  • Can be placed in any area.
  • There are 4 Alert Trip Mines in disposal, in one tool slot.
  • Can instantly explode barrels (except poison ones) if placed near them.
  • Can be disarmed.
Cons
  • Monsters can unintentionally trigger the trap.
  • Nearby Hostile Hunters can spot the red flare.
  • The red flare doesn't last too long and is not clearly visible at any time of days other than Night.
  • Can be disarmed by Hostile Hunters.
  • If disarmed, it becomes a world item, usable by anyone and cannot be stored back.

Concertina Trip Mine


Concertina Trip Mine is a trap tool with the purpose to explode barbed wires in a small radius around the victim who or which triggered the trap. It behaves similarly to Alert Trip Mine.

Unlocked at - Rank 40
Damage - Similarly to regular Concertina Bomb.
Cost - 90$

Pros
  • Inflicts 49 damage on initial explosion.
  • It can be placed anywhere.
  • Very useful if placed near doors or in very tight corridors, especially if triggered.
  • Can effectively prevent rushers as it slows them down significantly and damages them.
  • The trap is slightly audible when triggered.
  • There are 2 Concertina Trip Mines in disposal, in one tool slot.
Cons
  • Monsters can unintentionally trigger the trap.
  • Since the Concertina Trip Mine is small, it cannot block a whole gate.
  • Can be disarmed.
  • If disarmed, it becomes a world item, usable by anyone and cannot be stored back.

Poison Trip Mine

Poison Trip Mine is a trap tool with the purpose to explode a poison bomb in a small radius around the victim who triggered the trap. It behaves similarly to Concertina Trip Mine. It comes in a pack of two.

Unlocked at - Requires unlock of Hive Bomb
Damage - 13
Cost - 60$

Pros
  • Inflicts 13 damage on the initial explosion. The damage persists per second, killing a Hunter if not moved within seconds.
  • It can be placed anywhere.
  • Very useful if placed near doors or in very tight corridors, especially if triggered.
  • Can effectively prevent rushers as it slows them down significantly and damages them.
  • The trap is slightly audible when triggered.
Cons
  • Monsters can unintentionally trigger the trap.
  • Can be disarmed.
  • If disarmed, it becomes a world item, usable by anyone and cannot be stored back.

Quad Derringer

Quad Derringer is a small tool that can be used to kill targets in quick succession and in very close range.

Unlocked at - Rank 66
Damage - 50
Cost - 30$

Pros
  • It deals average damage, able to kill most Grunts and Hives in quick succession and in one shot to the head, close range (about 10m or less).
  • It can kill a Hunter if they are injured enough or off-guard.
  • It's a tool and does not require a weapon slot.
Cons
  • It is virtually useless against stronger monsters such as Armored or Meathead.
  • Slightly higher recoil if rapid firing.
  • May lead to downfall if you fail to kill a Hunter with the Quad Derringer.
  • Reloading can eject all unspent rounds, losing them permanently even if you have the Bulletgrubber trait.
Consumables
Overview
Consumables are the items that have various roles and purposes to ensure the Hunter has the necessary items at disposal to help them survive in matches. This is ranging from vitality shots that heal an injured Hunter to various explosives and/or toxic items with the sole purpose to harm and kill other Hunters or even monsters and bosses.

Consumables are one of the most common items to see in a match and there is no match without them in anyone's disposals. Without one consumable, particularly vitality, in any Hunter's disposal, it can spell them their death. It is possible for Hunters to obtain cheap consumables and others to get expensive, it largely depends on every player's playstyle.

Vitality Shots

Vitality Shots are the healing items that help Hunters to survive in matches especially during or even after an armed conflict with other Hunters or after a bloody fight with rampaging monsters and/or bosses. A Hunter can heal themselves in either 75 health points or full health, depending on the vitality shot. However, while a Hunter is initiating a healing process, they are vulnerable to any form of attacks for 3 full seconds. This process can be interrupted prematurely on Hunter's wish but will not give them any health points if doing so.

Pros
  • The Weak variant can heal up to 75 Health Points.
  • The Weak variant is very cheap.
  • The Strong variant can heal up to full health.
  • Both variants can stop active bleeding.
Cons
  • It takes 3 full seconds to be injected.
  • The Strong variant is expensive.

Variants
  • Weak Vitality Shot - Base vitality variant that comes with a bronze color. Can heal up to 75 Health Points. Unlocked at rank 1.
  • Strong Vitality Shot - Base vitality variant that comes with a silver color. Can heal to full health.

Fire Bomb


Fire Bomb is a consumable item where a Hunter lights on a bottle full of fuel liquid and throws them to targets, setting them on fire. This is particularly useful when it comes to killing most Monsters quietly as well as setting Hunter's body on fire. It uses a similar role to the Lantern. It comes with 3 variants to accommodate the player's playstyle.

Pros
  • Shares similar purpose and role from the Lantern.
  • Very cheap and noob-friendly item.
  • The Hellfire Bomb variant creates a larger fire and smoke radius.
  • The Liquid Fire Bomb can set targets in water on fire with the exception of downed Hunters.
  • All burning durations, except Hellfire Bomb, will last 2 minutes.
Cons
  • Can not kill Meatheads in one go. Butcher and Immolator are immune to fire damage.
  • Similar cons of the Lantern.
  • The Hellfire Bomb variant lasts only 10 seconds.

Variants
  • Fire Bomb - Base Fire bomb variant. Unlocked at rank 3.
  • Liquid Fire Bomb - Base Fire bomb variant. Can set targets in water on fire.
  • Hellfire Bomb - Base Fire bomb variant. Creates a larger fire and smoke radius, lasting 10 seconds.

Dynamite

Dynamite are the explosive items that a Hunter can have at their disposal as they can potentially kill a large number of monsters, bosses, or even Hunter(s) during combat. They can also be used to produce a big cloud of smoke allowing safe reviving of downed Hunters or even reposition without being spotted. Depending on the Dynamite type, the bigger the dynamite is, the bigger radius and damage it causes. It comes with 4 variants to accommodate the player's playstyle.

Damage - Dynamite can instantly kill any Hunter in range. The bigger the dynamite, the bigger radius and the bigger the damage rate. It can also kill most Monsters in one dynamite but bosses require a Big Dynamite Bundle to be killed in one go. All Dynamite timers are 4 seconds.

Pros
  • Very dangerous consumables as they can change the shape of a combat moment.
  • It is capable to instantly kill Hunters in radius as well as most Monsters.
  • The Dynamite Stick is very cheap.
  • The Big Dynamite Bundle is able to kill the Butcher, Spider and Assassin in one go. Must be thrown right on them.
  • The Waxed Dynamite Stick can produce big smoke upon detonation on the land.
  • The Waxed Dynamite Stick can explode in water.
  • All variants can cause doors to be forced opened as well as tear down gates or even doors.
  • All variants produce a big cloud of smoke, allowing for safe reviving or safe repositioning.
  • All variants have fair prices for what they offer.
  • All variants can be cooked in.
Cons
  • Dynamite items can be dodged rather easily.
  • Dynamite items can be shot down as they are being thrown, potentially killing you in the process if a Hunter shoots your dynamite.
  • You need to aim precisely to throw dynamite, exposing yourself to enemy fire.
  • The Big Dynamite Bundle has a very short throw range.
  • All variants with the exception of Waxed Dynamite Stick do not explode in the water.

Variants
  • Dynamite Stick - Base Dynamite variant that comes with one stick. It explodes in a small radius, with high damage. Unlocked at rank 8.
  • Waxed Dynamite Stick - Base Dynamite variant that comes with one stick filled in modified powder fuse. It can explode in the water.
  • Dynamite Bundle - Base Dynamite variant that comes with three attached sticks. It explodes in a slightly bigger radius, with high damage.
  • Big Dynamite Bundle - Base Dynamite variant that comes with seven attached sticks. It explodes in a bigger radius, highest damage.
Consumables (v2)
Stamina Shot

The Stamina Shot is a consumable item that gives a Hunter a temporary boost that makes them tireless to running and swings from their melee weapons. This item is particularly useful to those who want to evade pursuing Hunters in quick or even those who want to go rampage spree and kill Hunters or even Bosses with a Machete or even a Cavalry Saber.

Pros
  • It lifts the stamina limits, giving the ability to run endlessly and swing melee weapons without stamina cost.
  • It can potentially make a Hunter dangerous when it comes to melee combat as they will not lose stamina by swinging their melee weapons constantly.
  • The Stamina Shot lasts ten minutes.
Cons
  • Does not affect jumping-stamina.
  • It takes 3 full seconds to be injected.

Variants
  • Weak Stamina Shot - Base stamina shot, effects last five minutes.
  • Stamina Shot - Base stamina shot, effects last ten minutes.

Regeneration Shot


The Regeneration Shot is a consumable item that gives a Hunter a regeneration rate over time. The regeneration starts to kick in once a Hunter receives damage and it will stop until the Hunter is full on health and/or the duration is expired.

Pros
  • Regenerates health over time, helpful during active combat.
Cons
  • The regeneration rate will be halted if the Hunter is poisoned.
  • It takes 5 full seconds to be injected.

Variants
  • Weak Regeneration Shot - Base regeneration shot, effects last five minutes.
  • Regeneratio Shot - Base regeneration shot, effects last ten minutes.

Flash Bomb

Flash Bomb is a tool where it can be thrown at Hunters and potentially stun them temporarily. Stunned Hunters will not be able to see for four seconds or less, depending on how close was the Flash Bomb thrown to them and if they were staring at it or turned their backs from it.

Unlocked at - Rank 1

Pros
  • Stuns enemy Hunters for 5 seconds in 8m of distance provided they were facing the impact.
  • Can be useful when storming into a compound/hut where enemy hunters are in.
  • Can be useful to temporarily blind enemies during active armed conflict or force them to abandon their rushing plan.
  • There is no timer, they flash and stun enemy hunters instantly the moment it is thrown in.
  • Cheap.
Cons
  • Cannot stun monsters.
  • Can stun you and your partner.

Frag Bomb

Frag Bomb is an explosive item that shares similar to the Dynamite but at a slightly lower damage, radius. However, it explodes sharpels which means it will cause bleeding to nearby Hunters caught in the blast.

Damage - It can kill Hunters in one go if they are very close to a frag bomb. It can also cause bleeding to Hunters caught in the blast. It is able to kill most weak Monsters in one go. The timer is 4 seconds.

Pros
  • Can kill Hunters in one go if very close.
  • Hunters caught in blast can get bleeding.
  • Can be cooked in.
Cons
  • Expensive.
  • Produces too little cloud of smoke, rendering safe reviving difficult.
  • Cannot force doors open.

Concertina Bomb

Concertina Bomb is a consumable item that explodes barbed wires around the area, effectively blocking it with barbed wires, killing most weak Monsters in one go and seriously injuring the Hunters. Hunters can still move through the barbed wires but will receive significant damage and bleeding.

Damage - It is speculated to cause 50 damage to Hunters caught in barbed wire blast. It will also cause bleeding the moment a Hunter touches a barbed wire as they try to pass through it. It can cause significant damage to bosses, particularly Butcher.

Pros
  • Can effectively block areas that you don't want Hunters or even Monsters to pass through.
  • Hunters trying to pass through a concertina bomb will be slowed down and get inflicted bleeding.
  • Causes damage every time a Hunter moves while in the concertina bomb zone.
  • Can be thrown on bosses, causing significant damage, especially the Butcher.
  • Can be thrown on Hunter's body if there is no lantern/fire bomb to set it on fire. This will force the enemy hunter to try to destroy the concertina by any means, giving away their position.
  • Cheap.
Cons
  • Bosses cannot die by the concertina in one go.
  • Butcher will be able to run through concertinas, unlike Hunters.
  • It can be destroyed by explosives or melee weapons. Either way, it is time-consuming and resource-demanding.

Antidote Shot

The Antidote Shot is a consumable item that cures the poison of the Hunter. Hunters injecting themselves with the Antidote Shot will be immune from Poisons for the remainder of the match as well as decreased damage from toxic insects by Hives, spider pounce and Poison Hand Crossbow.

Pros
  • Gives poison immunity to Hunters from toxic clouds, poison bombs, etc, for one (60 mins) hour.
  • Slightly reduces the damage taken from hives and toxic insects from Hive Bomb.
Cons
  • Like the Stamina Shot, it takes 4 full seconds to be injected.
  • Spider will still inflict full damage when pounced.

Variants
  • Weak Antidote Shot - Base antidote variant that comes with a silver color. Can cure players from poison attacks for 10 minutes. Unlocked at Rank 1.
  • Antidote Shot - Base antidote variant that comes with a gold color. Can cure players from poison attacks for 30 minutes.

Poison Bomb

Poison Bomb is a toxic consumable item with the purpose to harm Hunters as well as poison them, distorting their view.

Damage - Behaves similarly to poison clouds caused by the Spider. Causes damage at faster rate.
Unlocked at - Rank 11

Pros
  • Can poison damage to Hunters in range. The poison will distort them.
  • Average damage as Hunters will lose health over time faster should they be in the range for a long time.
  • Detonates on impact.
  • Can kill Assassin rather quickly.
  • The Poison cloud will stay in the air for five minutes.
Cons
  • Spider is immune from the Poison, rendering it useless.
  • Hunters can dodge the cloud rather quickly.
  • Hunters who took Antidote Shot will be immune from the Poison Bomb.

Ammo Box

Ammo Box is an ammunition consumable item with the purpose to supply Hunters with ammo when an ammo case from supply points and/or anywhere is not available to be looted.

Unlocked at - Rank 80

Pros
  • Can be placed anywhere.
  • Can be used at any time.
  • Can be used by partner(s). It behaves like a mini-ammo case.
  • Can restock special ammo.
Cons
  • Expensive.
  • The placement can take some time which may leave you vulnerable.
  • Can be used by Hostile Hunters.
Consumables (v3)
Sticky Bomb

Sticky Bomb is an explosive consumable item with the similar purpose of the dynamite but with the ability to be stick to most surfaces with the exception of metal and concrete. It can also stick on a Hunter as well either for a kamikaze attack or to kill the enemy Hunter by sticking the bomb on them. However, this comes with a long fuse timer which is 8 seconds.

Damage - Can instantly kill Hunters caught in range. Potentially causes high damage to nearby Hunters.

Pros
  • Capable to kill a Hunter in one go if stuck on a Hunter.
  • Capable to kill Bosses in 2-3 bombs.
  • High damage for nearby hunters.
  • Can stick on most surfaces.
  • Can cause bleeding.
  • Deals reasonable damage against bosses.
  • Cheap.
Cons
  • The fuse timer is very long but can be cooked.
  • It can not stick to metal and concrete surfaces.
  • Hunters can take off the sticky bombs from them when they bleed.

Hive Bomb


Hive Bomb is another toxic consumable item with a similar purpose to Poison Bomb. However, it does not produce a toxic cloud but it frees a swarm of toxic insects from the jar of glass and will attack nearby Hunters temporarily, reducing their health and poisoning them as well.

Damage - Behaves similarly to Hives monster. The toxic insects will keep attacking for a small period of time unless the Hunter manages to evade the toxic insects in time.

Pros
  • Attacks nearby Hunters, causing damage and poisons them.
  • Can be used to block a pathway temporarily.
Cons
  • Expensive.
  • Toxic insects will not attack Monsters.
  • Toxic insects can be killed from two heavy blunt attacks.
  • Hunters who took Antidote Shot will receive reduced damage from the toxic insects and will not be poisoned.

Chaos Bomb

Chaos Bomb is a consumable item with the sole purpose to attract the attention of enemy Hunters and Monsters. It produces multiple gunshots, effectively creating a pseudo-fight between two teams which can fool most Hunters if used correctly. It also aggravates Monsters in a big range, effectively attracting their attention to a location that can swarm your enemy Hunters. The sound effects last approximately 30 seconds. However, like the Sticky Bomb, it comes with a long fuse timer which is 8 seconds.

Pros
  • Cheap.
  • Can attract monsters in a big range.
  • Can be used to attract and fool Hunters if used correctly.
Cons
  • Long fuse timer so plan accordingly when to use it.
World Items
Overview
World Items are the items where they can't be bought directly from the store and are located only on the map, hence their name. World Items can be anything from melee weapons to tools or consumables such as Wood Axe or Lantern. They can be found randomly on the map.

Some world items can be traps as well such as the Bear Trap. Currently, there is only one trap spawned as a world item. The sole purpose of traps is to harm or potentially kill Hunters or even Monsters, as well as act as an audio trap, potentially exposing Hunters' locations who step on them.

Wood Axe

The Wood Axe behaves similarly to Combat Axe except it spawns randomly as a world item throughout the map. It is capable to kill Grunts in one full charge and Armoreds in three full charges. However, like the Combat Axe, it takes longer to recharge a full charge.

Damage - Capable to one-hit kill hunters in full charge, otherwise the bleeding can finish them off. It can kill Armored in one (1) full charge.

Pros
  • Able to kill a Hunter in one full charge.
  • It can cause bleeding.
  • Can typically kill Armoreds in one full charge.
  • It's a world item, therefore it is located randomly.
  • Can be thrown against the targets.
Cons
  • Very slow, potentially putting the users at huge risk while preparing to attack a Hunter.
  • Consumes a lot of stamina.

Sledgehammer

The Sledgehammer is a powerful melee weapon and shares similar characteristics to other melee weapons. It can deal massive damage, able to kill Armoreds in two full charges. However, it can deplete stamina if two full charges are used with a Sledgehammer and it is as slow as the axes to be recharged for an attack.

Damage - Capable to one-hit kill hunters in full charge. It can kill Armored in 2 full charges.

Pros
  • Able to kill a Hunter in one full charge.
  • Can typically kill Armoreds in only two full charges.
  • It's a world item, therefore it is located randomly.
  • Can be thrown against the targets.
Cons
  • Very slow to recharge an attack.
  • It does not cause bleeding as it is a blunt weapon.
  • Very stamina demanding. Stamina will be depleted if two full charges are used.

Bear Trap

Bear Trap is a trap that is used to injure a Hunter stepping on one or generally act as an audio trap as they loudly snap whether a Hunter has stepped on it or disabled by someone. They can also cripple and potentially kill Monsters stepping on one. They are never found activated so if one is activated then a Hunter has activated one. They can be set and disabled quietly with the Poacher trait.

Damage - It deals 41 damage on any Hunter stepping one and applies for a bleeding status, automatically. It instantly kills Grunts stepping on one and can cripple Armoreds.

Pros
  • Average damage, can be potentially dangerous for Hunters with low Health Points.
  • It can cause bleeding to Hunters, forcing them to bandage themselves after stepping on one.
  • They can be found in small boxes where lanterns would usually be located.
  • It can kill any Grunt stepping on one and cripple Armoreds.
  • It produces a loud snap whoever steps on one or disables it, exposing you or your enemies' location.
  • They can be placed anywhere even in water.
  • It's a bit difficult to spot them in dark areas or tricky spots.
  • Can be used on Hunter's body to instantly down them after being revived by their partners.
Cons
  • Offers virtually little protection as Hunters can still rush in and potentially kill you in the process, ignoring the bear trap and the bleeding it causes them.
  • Bear traps set on by you, can backfire your plans if you step on them while trying to ambush.
  • Can not kill Armoreds in two bear traps. Hellhounds often avoid them and Hives are tricky enough to lure them in.
  • Can not be used to kill bosses as they require several bear traps to be killed. Spider is seemingly mostly impervious from bear trap damage.

Lantern


Lantern is a burning lamp that can be used to set targets on fire or kill animals in cages, effectively killing the audio traps as the animals whine in pain, bark, etc. There are two types of Lantern, one that is stationary and can not be picked up other than light on or off and the other one that can be picked up from anywhere, more commonly from boxes which can be thrown to any target or anywhere to set something on fire. They are very useful to burn Hunters, monsters, bosses and kill animals.

Damage - There is no real damage as it only reduces the health bars of Hunters, losing them permanently if one is lost to fire. Grunts, Armoreds, and Hives die almost instantly but Hellhounds are tricky to be killed by a Lantern and Meatheads require several lanterns to die. Butcher is impervious from fire and Spider is weak to it.

Pros
  • Very commonly found as a world item.
  • Can set targets on fire.
  • Can kill most monsters and animals.
  • Can be used to set pathways on fire, blocking Hunters from escaping or entering.
  • Can be used to burn Hunter's body.
  • Can be used on Spider as it is very weak to it.
Cons
  • Dangerous world item to carry in the night time of day as it produces huge light, potentially attracting nearby Hunters. You will be an easy target if holding a Lantern.
  • Can not kill Meatheads easily and Butcher cannot be harmed by it.
  • Hellhounds seem to be resilient from fire.

Pitchfork


The Pitchfork is a world item melee weapon that can instantly kill Hunters in one heavy attack on their body.

Damage - Capable to one-hit kill hunters in full charge. It can be treated similarly to Cavalry Saber.

Pros
  • Able to kill a Hunter in one Heavy Attack charge.
  • It's a world item, therefore it is located randomly.
  • Can be thrown against the targets.
Cons
  • Very slow, potentially putting the users at huge risk while preparing to attack a Hunter.
  • Consumes a lot of stamina.
  • The Light Attack is weak.

Shovel


The Shovel is a world item melee weapon that can deal blunt damage.

Damage - Capable to one-hit kill hunters in full charge if aimed at the head.

Pros
  • Able to kill a Hunter in one Heavy Attack charge on the head.
  • It's a world item, therefore it is located randomly.
  • Can be thrown against the targets.
  • Its Light Attack can kill Grunts in one go.
Cons
  • Very slow, potentially putting the users at huge risk while preparing to attack a Hunter.
  • Consumes a lot of stamina.
Traits
Overview
Traits are the perks of the game. It can boost the Hunter in certain parts such as Movement, Aggressiveness, etc.

Some of the traits rely on movement, some on reloading parts, some on effects part, etc. A Hunter can have up to 15 traits at the same time. In order to buy a trait, you need to have the appropriate number of upgrade points which can be gained through gaining exp in matches.

Upgrade points are abbreviated as "UP".

Adrenaline

Adrenaline trait enables Hunters to instantly regain stamina when their health is low, about 25 Health Points or less. This can be useful when you desperately want to kill a Hostile Hunter who is close to killing you or even Monsters with a melee weapon. It can also be useful in evading the pursuing Hunters.

Unlocked at - Rank 1
Cost - 1 UP

Conduit

Conduit trait heals the Hunter up to 50 health points and receives stamina boost the moment they take a clue, rift and bounty. However, this will not recover permanently lost health bars. It will instantly refill melee and sprint stamina.

Unlocked at - Rank 1
Cost - 4 UP

Greyhound

Greyhound trait allows the Hunter to sprint for a longer distance before tiring. This allows the Hunter to evade pursuing Hunters and/or Monsters for a longer time before tiring. If this trait is paired with the Determination trait, it can be powerful when it comes to movement.

Unlocked at - Rank 1
Cost - 4 UP

Packmule

Packmule trait allows you to receive additional tools or consumables when looting from dead Hunters and/or item boxes provided you have a free slot.

Unlocked at - Rank 1
Cost - 3 UP

Magpie


Magpie trait allows the Hunters to receive either Antidote shot, Stamina shot or Regeneration Shot for a brief time after picking up a bounty token.

Unlocked at - Rank 1
Cost - 1 UP

Horneskin

Hornskin trait reduces the damage taken by blunt weapons by 25%. Fists are also considered a blunt weapon. This is particularly a useful trait to be used against Monsters mostly as they all are armed with blunt weapons.

Unlocked at - Rank 1
Cost - 3 UP

Salveskin

Salveskin trait helps the Hunter heal their health bars damaged by fire to their full amount quickly than normal. Without the trait, it takes very long for a health bar damaged by fire to recover to full health. This trait will not recover lost health bars from fire or when downed.
In addition, it will also slow the burning speed by 25%, even when downed.

Unlocked at - Rank 1
Cost - 5 UP

Bloodless

Bloodless trait will cause the bleeding NOT to escalate from light bleeding to medium or intense. This is particularly useful if you are constantly harassed by Grunts armed with cleavers, Hellhounds, frag bombs and so on.

Unlocked at - Rank 1
Cost - 4 UP

Determination

Determination trait helps the Hunter start their stamina recovery soon. This is very helpful at most times, especially when you are trying to reach to area faster or trying to evade pursuing Hunters and Monsters. Should the Hunter tire after running, they can walk for 2-3 seconds before their stamina begins to recover compared to 5 seconds without the Determination trait.

Unlocked at - Rank 5
Cost - 3 UP

Iron Repeater

Iron Repeater trait allows you to remain in zoom after shooting a lever-action weapon such as the Winfield.

Unlocked at - Rank 7
Cost - 2 UP

Resilience

Resilience trait allows the Hunter to have 100 health points the moment they get revived. Typically, without this trait, all Hunters get revived with about 15 health points in their health bar.

Unlocked at - Rank 9
Cost - 2 UP

Bolt Thrower

Bolt Thrower trait reduces the reload time of a Crossbow variant. This reduces from 6 full seconds reload time to 3.2 full seconds reload time, a big difference between the two times.

Unlocked at - Rank 13
Cost - 3 UP

Levering


Faster rate-of-fire from the hip when using lever-action weapons, very useful for close-range combat. However, spamming can increase recoil and loss track of your target.

Unlocked at - Rank 14
Cost - 3 UP

Mithridatist

Mithridatist trait significantly reduces the poison duration.

Unlocked at - Rank 15
Cost - 3 UP

Fanning

Fanning trait increases significantly the rate of fire when using single-action pistols (Caldwell and Nagant). This can render all pistols behave as mini-avtomat and can be potentially dangerous weapons for very close range at the cost of accuracy and the chance to run out of ammo before you can hit the target at all. Caldwell Uppercut can be potentially dangerous to be used as fanning due to their damage. The Fanning will not work when the Hunter is aiming at iron sights or the scoped pistols.

Unlocked at - Rank 17
Cost - 7 UP

Ghoul

Ghoul trait heals the Hunter 5 Hitpoints after killing a Grunt at close range (25m).

Unlocked at - Rank 19
Cost - 7 UP
Traits (v2)
Gator Legs

Gator Legs trait allows the Hunter to walk and sprint through deep waters faster and with less stamina consumption. You will also make less noise by crouch-walking in water.

Unlocked at - Rank 21
Cost 2 UP

Deadeye Scopesmith

Deadeye Scopesmith trait allows the Hunter to remain in scope view after firing a shot while using any weapon that uses the Deadeye scope (ie. Vetterli Deadeye, Nagant Deadeye). Without the trait, the Hunter will not remain in scope view after firing a shot, potentially interrupting the focus on a target as it zooms in and out constantly.

Unlocked at - Rank 23
Cost - 1 UP

Silent Killer

Silent Killer allows the Hunters to silently kill Monsters. However, they must be unaware / unalerted for this to work. Silently killing as in, the collapse / stab sounds will be less audible.

Unlocked at - Rank 25
Cost - 5 UP

Lightfoot

Lightfoot trait reduces the movement sound when jumping, vaulting and climbing ladders. Useful for stealth Hunters or those who tend to flank hostile Hunters.

Unlocked at - Rank 27
Cost - 5 UP

Serpent


Serpent trait allows players to obtain clues, rifts, abandoned bounties and interact with banished targets from a distance of 25m. The interaction takes 10 seconds in dark sight.

Unlocked at - Rank 28
Cost - 4 UP

Physician

Physician trait reduces the time required to bandage your health bars by using the First Aid Kit from 5 full seconds to 3 full seconds. This is a very helpful trait that allows you to heal your Hunter quickly especially since the Vitality Shots take 5 full seconds to be injected in. This trait can be powerful if paired with the Doctor trait.

Unlocked at - Rank 29
Cost - 5 UP

Steady Aim

Steady Aim trait gradually reduces the sway when looking through the scope of a rifle and aperture scope of Winfield. The effect will be removed once the Hunter stops looking through the scope of a rifle. Without this trait, the sway will not be decreased when looking through the scope of a rifle.

Unlocked at - Rank 31
Cost - 3 UP

Steady Hand

Steady Hand trait gradually reduces the sway when looking through the scope of a pistol as well as a Spy Glass. The effect will be removed once the Hunter stops looking through the scope of a pistol or Springfield Compact Deadeye. This is helpful when trying to score hits or a well-placed shot. Without this trait, the sway will not be decreased when looking through the scope of a pistol and/or Springfield Compact Deadeye.

Unlocked at - Rank 33
Cost - 2 UP

Marksman Scopesmith

Marksman Scopesmith trait allows the Hunter to remain in scope view after firing a shot while using a marksman weapon (ie. Winfield).

Unlocked at - Rank 35
Cost - 2 UP

Vigor


Vigor trait gives Hunters the ability to regenerate their health and stamina much faster when in dark sight.

Unlocked at - Rank 38
Cost - 4 UP

Whispersmith


Allows Hunters to quietly switch equipment in their inventory.

Unlocked at - Rank 38
Cost - 2 UP

Frontiersman

Frontiersman trait increases the recharge slot of your tool by one. For example, the Concertina Trip Mines can be used three times instead of twice.

Unlocked at - Rank 39
Cost - 8 UP
Traits (v3)
Beastface

Beastface trait reduces the reaction range of all animals (horses, crows, dogs and chickens in their cages), allowing the Hunter to sneakily past the animals without alerting them which can expose their location to enemy Hunters or even Monsters. Without this trait, the reaction range is generally big, requiring extreme caution when it comes to moving past the animals. This trait does not affect the Hellhounds as they are not exactly... animals.

Unlocked at - Rank 41
Cost - 3 UP

Decoy Supply

Decoy Supply trait allows the Hunter to resupply any form of Decoys from ammo caches. This can be particularly useful for Hunters who rely on decoys to distract enemy Hunters or Monsters.

Unlocked at - Rank 43
Cost - 1 UP

Ambidextrous


Ambidextrous trait allows for quicker reloading of matched pairs, and custom clip reloads for semi-auto pistol sets.

Unlocked at - Rank 44
Cost - 3 UP

Tomahawk

Tomahawk trait allows the Hunter to grab any world item melee weapon and throw them to any target, causing significant damage. However, the melee weapons drop rather quickly over distance, potentially rendering the trait useless. It's useful for close range.

Unlocked at - Rank 45
Cost - 1 UP

Iron Sharpshooter

Iron Sharpshooter trait allows the Hunter to remain in iron sights after firing a shot when using bolt-action rifles.

Unlocked at - Rank 47
Cost - 3 UP

Blade Seer

Blade Seer trait highlights bolts, arrows and throwing knives within 25m, allowing you to easily find and pick them up. Without this trait, they will not be highlighted.

Unlocked at - Rank 49
Cost - 2 UP

Quartermaster

Quartermaster trait allows the Hunter to equip a large and a medium weapon. Without this trait, you can only have one large and one small weapon at the same time or two medium weapons.

Unlocked at - Rank 51
Cost - 6 UP

Pitcher

Pitcher trait allows the Hunter to throw all throwable items in a longer range than normally regardless of the item. This can be particularly useful for Hunters who often if not always throw explosives or other items at large distances against the enemy Hunters.

Unlocked at - Rank 55
Cost - 6 UP

Bulletgrubber

Bulletgrubber trait allows the Hunter to catch unspent rounds ejected from Mosin variants, Specter 1882 variants, Winfield 1887 Terminus, Dolch 96 variants, Bornheim and Lebel 1886. This is particularly useful if your Hunter has one or two of the three weapons in disposal as they all eject an unspent round when a reloading process is being initiated.

Unlocked at - Rank 57
Cost - 6 UP

Poacher

Poacher trait allows you to place and disarm traps quietly. Useful for stealthy Hunters.

Unlocked at - Rank 57
Cost - 1 UP
Traits (v4)
Dauntless

Dauntless trait gives the ability to defuse live explosives instantly. This can be done by simply pushing the "F" button on a live explosive.

Unlocked at - Rank 61
Cost - 1 UP

Kiteskin

Kiteskin trait reduces the damage by half when falling off tall buildings or anywhere else. However, falling huge buildings, especially towers, will still instantly kill the Hunter. Without the trait equipped, the Hunter will receive full damage from falling.

Unlocked at - Rank 63
Cost - 1 UP

Iron Devastator

Iron Devastator trait allows the Hunter to remain in the iron sights of the Specter 1882 after firing a shot.

Unlocked at - Rank 65
Cost - 4 UP

Necromancer


Necromancer trait allows Hunters to use Dark Sight to revive a downed partner from a distance (25m), though at the cost of a small amount of health. The revival takes 10 seconds. It will NOT put out the fire though.

Unlocked at - Rank 69
Cost - 4 UP

Vulture

Vulture trait allows the Hunter to always loot dead Hunters even if they got looted by other Hunters.

Unlocked at - Rank 71
Cost - 3 UP

Doctor

Doctor trait allows the Hunter to heal up to 100 Health Points instead of 50. This can be particularly useful if paired with Physician trait and can act as a replacement over Vitality Shots as they take 5 full seconds to heal. Without the Doctor trait, a first aid kit will only heal 50 Health Points at the time.

Unlocked at - Rank 73
Cost - 8 UP

Sniper Scopesmith

Sniper Scopesmith trait allows the Hunter to remain in scope view when using Sniper variants (ie. Sparks, Mosin) after firing a shot.

Unlocked at - Rank 77
Cost - 3 UP
Traits (v5)
Poison Sense


Poison Sense allows Hunters to see nearby (50m) poisoned Hunters in dark sight. They can be seen through walls as well.

Unlocked at - Rank 84
Cost - 1 UP

Vigilant

Vigilant trait gives the ability to see traps in Dark Sight within 25 meters through the walls. Useful for Hunters who need to rush a trapped lair.

Unlocked at - Rank 87
Cost - 2 UP

Bulwark

Bulwark trait reduces the damage taken from explosives by 25%, including Bomb Lance Harpoons, potentially saving you from one-shots.

Unlocked at - Rank 89
Cost - 2 UP
Hunters
Overview
Hunters are the people who inherited or underwent a ritual in order to obtain the Dark Sight. Proved seasoned hunters (Tier III) seem to display symptoms of deterioration as a result of dark sight usage, visible traits are burns, lesions and discoloration of the skin. A common claim among Hunters is that they are destined to hell. Seasoned Female Hunters are often covered in war paintings or wear hoodies.
Unlike the regular folk, Hunter's blood is vastly different, dumped as ritual blood. Contact with their blood through saliva would yield dark results. For more information, read the Monsters sections.

All Hunters are members of various organizations with American Hunters Association (AHA) being the notable ones.

START OF LORE
Since the 1600s, Hunters have been sent into areas to hunt down bounties in the form of giant monsters. They operate under a very loosely structured organization called the AHA (American Hunters Association) which calls on Hunters in times of crisis. The AHA does not have any guidelines or much structure and just serves to give rewards for successfully handing in bounties. Other than that, they do not have much power over what the Hunters do. This led many Hunters to form pairs and go after the bounties together. There are multiple factions / organizations of Hunters that are loyal to different leaders such as the Bone Doctor and his voudou influence, or the Reverend and his Christian influence. As it stands now though, the AHA is in shambles.

The Twins, Jos and Fin McGowan assassinated the Director of the AHA, Dr. John Huff Jones and this led to a power vacuum within the organization. It ended up fragmenting into different groups, such as the Bone Doctor’s voudou organization, Isaac Powell and his doomsday cult Night of the Hunter, and Reverend Ishim Gird and his Biblical group.

Initially, women were allowed to undergo a ritual process and become Female Hunters but this practice was later banned because of an incident. More specifically, a Female Hunter, Hannah, had a romantic relationship with a Male Hunter, Jonathan. They became an extremely powerful Hunter couple and went on Hunt several times.

At some point, they mated which resulted in the pregnancy of Hannah. However, since they both underwent a ritual before becoming a Hunter where they got the ritual blood, the pregnancy yielded dark results: The mother was given great power by the baby, being able to kill swarms of enemies and becoming almost berserk at times.

However, as she came closer to birthing, she started to become crazy, yet the AHA at that time was unsure of what would happen to the baby since the baby feeds off of the ritual blood of its mother. When it was born, it becomes extremely powerful and corrupted, seeking to kill anything around it. The baby proceeded to eat Hannah as she stood there, laughing, and grew to be the size of a six or seven-year-old. It had no head and instead, leeches writhed all around it. It killed 12 Hunters before it was destroyed. This incident resulted in the organization banning Females from undergoing rituals.

Soon after, they developed a serum that made it impossible for women to be pregnant ever again. As of result, the ban was lifted and allowed the women to undergo the ritual process and eventually become Female Hunters and still be involved in relationships but with no future, as they were unable to make children.
END OF LORE

The exact reasonings for the hunt is unknown but it is implied through the lore texts that they are seeking the True Deck (Because it seems to tell their future) and the Salvation (Because they are destined to hell).

It seems that each tier has a meaning and reputation which follows:
Tier I - Initiates (Fresh Hunters who just got their Dark Sight)
Tier II - Proven (Hunters who have been on hunts and know what it is)
Tier III - Veteran / Seasoned (Hunters who have seen it all, killed it all and lost it all)

They are player-controlled and are the main threats to encounter in-game. A Hunter can play whatever they want in a match and what they will decide to do is up to them thus making every Hunter unpredictable to encounter. Some may open fire immediately upon sight, some may retreat and avoid any form of confrontations and some may even ask for a truce, team up and cooperate with each other. It is implied through the lore text that they are not required to kill each other.

Hunters can be equipped with any available weapons, tools and consumables available at their disposal to use in a match. They will gain money from taking clues, finding the boss lair, killing the boss and extracting with the token dropped by the boss after banishment. They may also loot money from dead hunters.

All Hunters have 150 Health Points. Hunters killed will be lost permanently with no chance to bring them back. Downed Hunters can be revived by their partners otherwise they are killed permanently if they have no partner or their partner got killed as well. Hunters who lose all their health bars permanently from fire or from getting downed can not be revived again. Hunters who have lost bars permanently can recover them back when banishing a boss or when buying Health Bars with Upgrade Points through Hunter's menu on the main menu. A small bar costs 1 UP while a big bar costs 2 UP.

Hunter's tier also matters mainly from their outfits. Tier Is mostly have light outfits which can make them spotted rather easily, especially in the nighttime of day while Tier IIIs mostly have dark outfits which can make them very hard to be spotted, especially in the nighttime of day. However, the higher the tier is, the higher is the cost to recruit. There are no differences between a Male and Female Hunter other than their clothing.

Killing a Hunter yields a good amount of XP, depending on their ELO rank versus your ELO rank. Their bodies can be looted for ammo, tool, consumables or even some money. Looted money needs to be extracted as it will be lost on death. A Hunter can be looted only twice. Burnt Hunters cannot be looted at all.
Monsters
Overview
Monsters are the secondary threat of the game and are found throughout the map, providing a challenge to Hunters who are trying to reach their objective without attracting unnecessary attention to other Hunters and/or those who are trying to explore areas of the map safely without being harassed by them or them causing too much noise by screeching, screaming, etc.

START OF LORE
The Sculptor started to create new monsters that are known as the Hive, Armored, Hellhounds, Immolator, and Meathead. The Grunts on the other hand are dead bodies that have come to life through the powers of the rift. It is believed there is some dark liquid that is alive in each of them, and that is the source of their zombification. All the “special creatures” - creatures with attributes - started from one template person and are replicated time and time again which is why they all look the same. Each Monster comes from one source and that the Sculptor played a hand in creating them.

This is when the American Hunters Association (AHA) steps in and calls on Hunters to start closing rifts and killing the bosses. The AHA, among other worldwide organizations, exists to silently defend people from these events spiraling out of control and entering the public eye.
There is no known motive of the Sculptor yet.
END OF LORE

Infected people were transformed into different types of monsters which are stated as: Grunt, Armored, Hive and Immolator. In some exceptional cases, an unnamed resident was transformed into Spider, one transformed into Butcher, one to Assassin and one (unnamed Soldier) to Scrapbeak.
In special cases, certain Monsters were created, accidentally, from Hunter's blood such as the Meathead, Hellhound and the Water Devil.

Grunt
Grunts, commonly called zombies, are the weakest and the most common monster to encounter throughout the map, particularly in dense forests. They are often found eating the remains of a horse, hibernating, or patrolling around most areas of the map.

START OF LORE
Father Nico captured a Grunt and performed a thorough investigation into it with the help of Dr. Reinhard Winkler. Winkler performed an autopsy on it and revealed that the heart was not normal. It became more spherical in form and instead of pumping blood, it was pumping a dark, sticky fluid. The dark fluid has a tiny larvae in it that serve to drive the creature. This was believed to be the source of zombification.

It seemed as though the Grunts still had a consciousness deep inside, and fought the progressive illness that took over the bodies, even if they stopped having mental control over their motor reflexes. Black’s notes believe them to be a “vessel” for whatever the Plague has created.
END OF LORE

Their movement is rather sluggish when moving while minding their own business but will walk normally when they are alerted to Hunter's presence or even noises at which point they will investigate, looking around while searching the source of the noise. Grunts will break into a sprint and scream or screech when they spot a Hunter and attack with their fists or their crude weapons. Grunts can jog in water without a speed penalty.

Grunts are mostly unarmed but one can be armed with torches or cleavers. Grunts with torches will set Hunters on fire and deal some 15 damage. Grunts with cleavers seem to deal about 20 damage and can cause (Light) bleeding intensity to Hunters, making them potentially dangerous to deal with but are weak regardless. Unarmed Grunts deal about 15 damage per hit.

All Grunts are blind to a great degree therefore they will not be able to spot a Hunter across the distance unless they are very close in about 10m or less. Hunters that are crouched can not be seen unless they are close to them in about 5m or less.

However, they will be alerted should someone or something cause noises such as dogs barking, chickens rattling, horses whining in pain, Hunters running or even walking near them, explosions, gunshots, etc. At this point, they will go into "investigation mode" at which point they will walk slowly to the source of the noise, effectively distracting them from their original spot. Their range to spot Hunters is also slightly increased. If the noise persists such as repeated gunshots, more than two explosions, more than two crows triggered, Hunters running near them, etc, they will jog after the source of noise and may extend the duration of their investigation mode.

Hunters caught during the investigation mode will immediately be attacked even though they didn't cause the noise. Grunts alerted of Hunter's presence or even attacking one will also alert nearby Monsters into investigation mode as well.

The only danger Grunts can be is the fact that they are everywhere and can make it difficult for Hunters who want to explore areas without causing noises as Grunts in attack mode screech and scream which can be heard across some distance. They can also be a big threat should a Hunter engage in an armed conflict with another Hunter in a barn full of Grunts as this increases the possibility of them being swarmed by a mob of Grunts which can result in them killed by either the Grunts or by the Hunter.

Grunts are dealt with very easily. They can be killed by a full charge from a Knife or any form of weapons can kill them with the exception of Dusters. Compact ammo may require two shots to their body.

Grunts will constantly scream at Hunters if they are in unreachable spots, potentially attracting nearby Monsters and hostile Hunters.

Once a Grunt kills a Hunter, they will return back to wherever they were before.
Doctor Grunts can be found randomly across the maps, they will cause (Medium) poison intensity and 15 damage per hit. Killing them will drop a medkit on the ground. They will be unusable if they are damaged by explosives or fire.
Miner Grunts are only found in some areas in DeSalle exclusively. They got helmets with lamps attached. Killing them to the head will explode the lamp into the fire, causing light burning intensity or into a pool of oil if it was disabled (through a choke bomb, etc).
Monsters (v2)
Armored
Armoreds, commonly called armors or armours, are one of the two toughest monster types that are encountered throughout the map, particularly near compounds, choke points (tight areas) or even inside some of the huts.

START OF LORE
They are built more of a shock trooper and their armor is made of a material like a hornet’s nest. The origin is unknown but some sources indicate petrification. In one instance, there is a fluid that is discovered by Charles and Frank Boyds that can turn people into stone. However, after some time a papery wasp nest-like growths begin growing on the corpses. So it is unclear if the fluid is from the Sculptor, or some other source, and whether that is the cause.
END OF LORE

They are found patrolling around the map at some premises of an area and are never found eating the remains of a horse like the Grunts. They can be recognized by their loud footsteps as well as by some noise that they cause themselves. When killed by weapons or melee, their corpse will cause a loud thud should they fall on the ground due to their armor.

While they are moving slowly while patrolling, they do walk a bit quicker when alerted to Hunter's presence or to a noise which puts them in investigation mode. Should it spot a Hunter, it will break into a sprint and attack them with their right hand as their left hand seems to be fused to their back. Their attacks cause significantly higher damage than a typical Grunt as they deal about 40 damage per hit.

They can be a threat if a Hunter during an armed conflict against other Hunters is being targetted by an Armored. Armoreds will often manage to catch up with Hunters but they move much slower than the Grunts during the investigation mode.

They withstand more punishment than the Grunts. They require 3 full swings from a knife to be killed. They may survive from some explosives but that will leave them very weak and easy to be killed. Their legs can be shot or knifed to slow them down significantly. Concertina Armoreds will require 4 full swings from a knife and will always cause bleeding status if you are too close to them, attacking them too close or get attacked by them.

If a Hunter is on unreachable spots, Armored(s) will constantly scream at them just like the Grunts. However, if a Hunter barricaded themselves in a building, Armored(s) will break down any door and wooden gates and step in. They will ignore metal doors though. They can also break down barricaded doors, unlike the Immolators.

Once an Armored kills a Hunter, they may return back to patrol.

Hive
Hives, commonly called witches or bee women, are the monsters who unleash a swarm full of toxic insects against Hunters, potentially causing damage and poisoning them in the process. Such behavior is played similarly with Hive Bomb. They are encountered throughout the map, particularly in open areas or near compounds.

START OF LORE
Ada Ruth Shell was one of seven kids that all lived together with their mother in a small house. Ada was 13 years old when she witnessed her mother become the monster known as the Hive. Ada said that bugs started swarming into the house and flying into her mother. Soon after, she heard the sound of cracking as her mother’s body split in half at the rib cage and a wasp nest protrudes out. Two of the mother’s kids, Viola and Lily, drew the hive out of the house and sacrificed themselves to save the other kids.

Ada lost her arm as she killed her mother, however, the Sculptor was cloning the hive so Ada was constantly trying to give her mother the rest she deserved. Ada was admitted into an AHA hospital and was found to be pregnant even though she was a virgin. When they pulled the “baby” out, Ada realized it was a dead larvae that had taken root in her and was probably the source of her mother becoming the Hive.
END OF LORE

Hives are the only monsters that are unable to attack Hunters with hands compared to Armoreds and especially Grunts. However, they are capable to unleash a large swarm of toxic insects which are sent after Hunters who were first spotted by the Hive. Hunters can easily outrun the Hives as well as the toxic insects, this way they will not be damaged and poisoned by the Hive. However, it does take some time for the toxic insects to give up chasing, approximately 20-30m away from the Hive.

While patrolling, they move very slowly and their movement is rather sluggish, indicating poor motion control especially with the upper torso hanging on their left. However, when alerted to a noise or Hunter's presence, they will jog after the source of noise or last Hunter's presence. In case of unreachable spots, they will stand still as a large swarm of insects flies around them, temporarily.

During the aggressive mode, Hives will typically scream in pain while unleashing a large swarm of toxic insects and send them after the Hunters. At the same time, they will also jog after them.

Hives can be killed rather easily. They mostly require two shots to their body before they get killed. One-shot to the head will kill them instantly while fire can kill them almost instantly. However, alerted hives may be difficult to be killed because of the large swarm covering the majority of the body and the head, making it difficult for headshots.

Hives may be a true threat during an armed conflict against other Hunters as Hives can launch their swarms in distance, potentially poisoning and distorting Hunters during combat. They can quickly kill weak Hunters.

Like other monsters, Hives will return back to their business after some time.
Monsters (v3)
Meathead
Meatheads, commonly called big guys, are one of the toughest monsters encountered throughout the map behind the Armored. Although they are not common monsters to be encountered, they are sometimes found near compounds or more often near the clues, acting as clue defenders.

START OF LORE
The Meathead’s originally was the baby of Hunters, Hannah and Jonathan Kinney before it became the abomination we see now. Because the baby feeds off of the ritual blood of its mother, when born, it becomes extremely powerful and corrupted, seeking to kill anything around it.

Over time they became an extremely powerful Hunter couple, and once Hannah became pregnant she became even stronger. However, she started to become crazy as well, as she came closer to birthing. When born, the baby proceeded to eat Hannah as she stood there, laughing, and grew to be the size of a six or seven-year-old. It had no head and instead, leeches writhed all around it. The baby killed 12 Hunters before it was eliminated.
END OF LORE

Meatheads are lacking their head and their left arm, relying on their right hand to attack Hunters. They are deaf and blind, therefore they are harmless most of the time. They rely on leeches, acting as sensors, which live inside the body and are released from the body to patrol around the Meathead. Sensors can travel in somewhat long distance from the Meathead and may also follow the Hunter if they are close to them.

If a Hunter fails to avoid the sensors, the sensor will screech which in the process alerts and aggravates the Meathead into fury at which point it will break into a sprint to the location the sensor is screeching. Approaching a Meathead is not an option as well as the sensors reside in it which means it can also sense nearby (About 5m) Hunters and attack them. Crouch walking near a Meathead makes no difference.

While harmless, they can be dangerous for any unaware Hunters as they deal about 60 damage while attacks from sensors are poisonous, dealing (High) Poison Intensity and some damage. Meatheads are also dangerous for poisoned Hunters as they can sense them within 15m of distance. That way, Meatheads can pursue Hunters for longer distances before retreating.

They can not enter investigation mode as they are unable to hear or see. They are unable to locate the source of gunshots against them without the sensors spotting them first.

Dealing with Meatheads is not easy but not difficult either. For rifles, particularly Winfields, they need several shots to be put down. Shotguns can kill it in about 4 shots while Nitro can kill them in 1 or 2 shots. Setting a Meathead on fire will not kill it in one go but can slow it down, allowing Hunters to take the clue safely as the Meathead tries to put down the fire, in vain. Once a Meathead is killed, all its sensors will curl up and seemingly die.

Once a Meathead kills a Hunter, it will calm down and return back to patrol.

Hellhound
Hellhounds, commonly called dogs or hounds, are the only monsters that take the form of an animal. They come in solo, duo or in packs with one of them being the leader.

START OF LORE
A Hunter's dog whose name was Bunny nibbled the ear of her owner. As of result, she accidentally got infected from her owner's blood which slowly made her vicious and aggressive dog. At some point, Bunny attacked a farmer's dog which prompted the farmer to shoot her dead. It was unknown if that was a typical rabid disease or something darker.
END OF LORE

Unlike most monsters, Hellhounds have increased visual and audio awareness, able to spot Hunters in some distance and able to react to gunshots or explosions taking place in the distance. This can make them the true nuisance if there are two packs close to each other as they can catch up with the Hunters very fast.

They are mostly found patrolling on roads or near some clues. Their patrol route is usually short, effectively blocking an area's entrance or exit point. They are usually in packs of 2 to 5 members, one of them being the leader of the pack. However, leaders and members don't bear many differences other than that the members will always follow behind the leader. A pack may have a Hellhound wearing an Anti-Headshot mask, rendering them immune from headshots by weapons that use compact ammo and melee weapons.

Hellhounds have no investigation mode but will temporarily snarl towards the source of noise or last Hunter's presence before returning back to their usual business. Should one spot a Hunter, the whole pack will go aggressive and bark before launching into an attack towards the Hunter. Their barks can attract nearby Monsters in a great distance and Hunters as well. They will go sideways while running towards the Hunter, this way they can effectively dodge most weapons until they are close. This tactic can make them potentially dangerous to deal with. If a member of the pack is killed silently, the whole pack may still go aggressive and attack the Hunter.

Should a Hellhound be very close to a Hunter, it will charge, causing about 20 damage and incite (light) bleeding intensity, which can make those monsters very dangerous to encounter and to deal with, especially if the Hunter is weak. It is recommended for Hunters to avoid packs whenever is possible, especially if there is a second pack in the distance as they can react to gunshots in a long distance. The Hellhounds will often avoid melee attacks therefore shooting them will be required to kill them - effectively attracting nearby Monsters or Hunters.

Hellhounds will usually guard Hunter's body they recently killed otherwise they will return back to their business.
Monsters (v4)
Water Devil
Water Devils, commonly called devils, are monsters that are only found in the waters of the Louisiana Swamps. The Monster themselves are the mutated bloodworms. They are mostly docile in the waters but will attack aggressively Hunters who step in the water, deep or not.

START OF LORE
A pair of Hunters, Beefrat and Harpo, were starving as they had no money for food as they spent them on women and drinks. They resorted to eating rotten meat infested with bloodworms to try to stay alive. The problem was the Hunter's blood, aka ritual blood, which messes with the organic structure of animals, the bloodworms started mutating and growing inside them.

Two other Hunters, Jonas and Gator, were following them when Beefrat and Harpo dropped to the shore clutching their stomachs, thinking they were going to die from food poisoning. Jonas shot Beefrat and killed him. Gator pursued Harpo who tried to find a shelter in the water. In meantime, Jonas cut Beefrat open, revealing that the worms had been mutated and consumed much of the intestines. Gator was about to shoot at Harpo but the latter suddenly started vomiting bloodworms. The worms ate through his eyes, his stomach, and fell out of every orifice of his body. The worms that infested Beefrat and Harpo crawled towards the water and became known as the first Water Devils. They then proceeded to eradicate the gator population that lived in the area and claim the water as their own.
END OF LORE

Water Devils are the only Monsters that are unable to attack Hunters who are on the land even if they are right next to them and they are the only monsters that do not patrol in the waters at all as they are always stationary. However, if a Hunter steps in the water near a Water Devil, they will be aggressive and leave their spots to swim after Hunters in quick speed to catch them up. Their attacks deal about 10-20 damage being the first attack and 5 more damage per second as well as (high) bleeding intensity - this way it makes them potentially very dangerous monsters to deal in the waters or try to escape from, especially if the land is in big distance from the Hunter. Fog and Nighttime of day also add another danger factor regarding the Water Devils.

While idle, a Hunter can hear gurgle noises if a Water Devil is nearby. Their spot can be noticeable by noticing water occasionally submerging and emerging. A water area may sometimes have up to 4 Water Devils at the same time. If a Water Devil is aggravated by throwing a decoy near it or stepping in the water near a Water Devil, they will scream and swim after the Hunter and/or the source of the "noise" caused by the Decoys. If they are chasing after a Hunter, nearby Water Devils will submerge until the initial Water Devil loses aggro of the Hunter they were after. Water Devils can be aggravated in big distances unlike most Monsters, it is estimated that they can be triggered up to 20m of distance from the Hunter in the water.

Water Devils also have an Investigation mode. This can be noticed by throwing a Decoy near them and/or causing enough noises on the land near a Water Devil which upsets them into swimming around for a while, causing splashing noises. Nevertheless, they will eventually calm down and return to their spots.

During the aggressive mode, it is very hard to outrun an aggravated Water Devil as they move twice as fast as Hellhounds and their splashes are very loud - potentially attracting nearby Monsters and Hunters. Despite their dangerous nature, they can be killed quickly with Shotguns or even semi-automatic to full-automatic weapons as they are effective against them. They seem to be as strong as Armoreds. It has been noticed that Compact Ammo is very weak against the Water Devils, requiring several shots to put them down. A Waxed Dynamite Stick can instantly kill them if thrown on them.

If a Hunter is on the land after a pursuit, the Water Devil will still splash in the water for some time before calming down and returning back to their spot. Ducks seem to aggravate Water Devils from a further distance than Decoys.

Water Devils can kill Grunts instantly if they (Water Devils) swim past them (Grunts) to catch up with the Hunters they are chasing after. They will also unintentionally harm Armoreds as well.

Water Devils will return back to their spot after killing a Hunter.
Monsters (v5)
Immolator
Immolators are monsters who have some form of fire lighting inside their bodies. This form of fire ignites the whole body of the monster in specific cases which can make the monster dangerous for the Hunters to deal with. They are commonly encountered around large open compounds but they can be found in small compounds as well. They tend to be alone, paired with few monsters in distance and/or in rare cases, paired with another Immolator.

START OF LORE
A gang liked to prey on religious preachers and beat them up. A kid confessed this incident to Father Vincent Clemens. The Preacher began reciting what the kid believed to be scripture, and suddenly Jeremy exploded into a huge ball of fire. The kid was unsure of what happened to Jeremy however a few days later, the corpses of the men who beat him up were found but barely recognizable.
END OF LORE

Interestingly enough, Immolators are in fact Grunts who have mutated in a different way making them very dangerous and handled very differently to other monsters. Initially dormant, it will create havoc when a Hunter approaches too close especially if it got fired upon and/or stabbed with melee weapons as those cases will cause the monster to ignite itself on fire, dealing some damage in its surroundings as well as leaving some fire trails behind it. Decoys, Throwing knives and Quad will also force it to ignite itself on fire making it nearly impossible to kill Immolators stealthily or killing it quietly without getting damaged by the monster. The only way to kill an Immolator without causing it to ignite itself on fire is by using blunt weapons/melees, choke bombs/bolts and poison rounds/bolts. Immolators are immune to fire attacks but choke bombs can put out their fire. Killing it with blunt weapons is a quieter method than shooting at it.

They behave exactly the same as Grunts in terms of patrolling and investigating. However, unlike most other monsters, they have an increased aggro range especially when they are alerted as they can spot Hunters in longer distances and run after them. Unless fired upon, stabbed, etc, they will not ignite themselves and will behave similarly to Grunts but they move extremely fast even when investigating a source of noise and are much stronger than the Grunts. They will always catch up with Hunters in a matter of seconds regardless of the distance.

When it ignites itself, it will kill nearby monsters as it will set them on fire as well. If a Hunter cannot be reached, they will still run around causing havoc to its surroundings before collapsing dead if they were on fire for 30 seconds. Unlike other Monsters, they will never calm down after getting triggered. They will never stop investigating even after locating the source of the noise. Their patrol patterns are random.

Unlike most other monsters, they will open doors they saw hunters entering a house by knocking them a few times. They will also open them if they see a Hunter inside a building. They are unable to open sliding gates and will only knock them for a while before leaving. They will not open barricaded doors or metal doors. Armoreds on the other hand can break down doors, barricaded doors and sliding gates.

Immolators inflict 10 damage per second on Hunters three times before cooling off for 2 seconds of which it will then resume attacking again, they can be potentially dangerous for Hunters on low health and/or on low stamina.

Immolators can also attack the bosses but Butcher is immune to fire and will not be affected by it and the Spider is extremely tricky for the monster to attack at it as it is rarely on the ground, either way, the Immolator is short-lived if it was set on fire so moments like that will be difficult and rare. Immolators will have their fire put out if they enter deep waters.
Bosses
Overview
Bosses are the main objectives of every Hunt. Bosses were the victims who turned into demonic entities by the Sculptors, into something more unique, big and stronger than the regular Monsters. They are the monsters who Hunters are tasked to eliminate, banish them to hell and take the bounty dropped after the banish which is required to be extracted at any Extraction Point. What they get in exchange for the bounty is currently unknown.

Bosses are always found inside their lairs around the map. The location of a lair is randomized every match and they have unique exterior modifications. For example, if the lair is active, it will have Spider webs around the exterior of the lair area (and inside of it) for the Spider and blood scattered outside the lair for the Butcher. The lair will have several shadows, bugs and insects if an Assassin resides in it. If Scrapbeak resides in it, the lair will be surrounded with feathers and skulls. Furthermore, its entrances will have a swarm of crows.

All bosses have a frenzy mode if they suffer enough damage in a short time. During the frenzy mode, they will suffer less damage.

Currently, there are only four bosses. All banishment takes about 3 minutes and 30 seconds.

Spider
Spider is the boss where victims got fused with spider parts, eventually transforming into the form of a Spider. This grotesque monster can pounce on Hunters, poisoning them in the process and causing damage. It can also spit toxic poison which will remain in the air for a while, similar to Poison Bomb. The Spider is fully immune from poison attacks (Poison Bomb, Poison Hand Crossbow).

START OF LORE
The Spider is an amalgamation of corpses that form the body of a spider. The face that is seen protruding from the mouth is that of a little girl that John Victor buried in a mass grave with the others from Dr. Reed’s party. John believed that Dr. Reed had something to do with the development of the Spider. However, the Spider has the Sculptor’s influence because this is something more evil and primal than Reed could make on his own.

The Spider is the first case of cloning that the Hunters noticed. Because even though Hunters kept killing it, it kept coming back to life. Harold Black wrote a few core rules the Spider follows. The first being that there can never be more than one because it keeps re-forming. The other thing is that a dock, central to the dead zone, is the source of the Spider. Harold Black compiled an extensive journal on the Spider and confirmed that it was Dr. Reed’s party that had been stitched together to make the monster.

The purpose of the Spider is unclear, but it is believed that it serves to eliminate bad or feral versions of creations that the Sculptor made.
END OF LORE

Initially, the Spider will be idle in a spot until a Hunter approaches its lair and/or causes noises, enough to aggravate the Spider. When that happens, it will not calm down until any team within the area keeps a long distance from the lair.

During the combat mode, it will move around the lair at a quick speed, making it very difficult to shoot at it or even throw lanterns at it. Sometimes, it will stop in a spot for a bit, giving the Hunters a good opportunity to shoot at it or throw lanterns at it. Over time, it will try to pounce on a Hunter, causing about 60 damage and light poisoning them in the process. Hunters can avoid the pounces mostly by running around the lair or one can shoot at it right before it tries to pounce.

In Frenzy mode, it will constantly attack a Hunter. They will attempt to attack a team three times before calming down. Alternatively, they will calm themselves down in 30 seconds without attacking a team provided they are avoiding the Spider by leaving the lair or running around inside. Frenzy attacks will deal 25 damage with light poisoning.

The Spider is weak when it comes to fire. It will lose health rather quickly if set on fire. Some weapons can do a good job, particularly Winfield and Uppercut. The Nitro however can kill it in 2-3 shots, finishing it quickly. A Big Dynamite Bundle can kill it in one go if thrown right on it.

When the Spider has about 25% health or less, it will begin bleeding, making it easier to track it or spot it in darkness as the blood drips on the ground.

When the Spider has lost all its health, it will scream in pain and move around the lair temporarily before succumbing to its wounds.

Butcher
Butcher is the boss where a person transformed into a monster that grown twice in size, losing their head and their left arm, similarly to Meathead but much stronger than them. A pig head has been placed on top of the butcher but it's only a cosmetic skull. It is capable to lighten its blade on fire, throwing flames to its target, setting them on fire.

START OF LORE
A Meathead became the monster we now know as the Butcher. The corpse of the Meathead was found by a taxidermist who went by the name of Ariel D'aunoy. D’aunoy took up residence in the abandoned Slaughterhouse when the citizens of New Orleans grew unsettled by his practice of preserving people’s pets. Here he came across the body of a Meathead and began trying to preserve it to sell as the morbid curiosity it was.

When he grew unsettled by how it looked he gave it the head of a pig, and an apron to hide the cut he made when he was taking all the internal organs out. The spikes on the Butcher are from D’aunoy’s attempts to keep the Meathead’s skin on a mud and clay mold that was used to keep the body together. D’aunoy was found dead later but could only be recognized by his glass eye.
END OF LORE

Initially, the Butcher will slowly patrol around its lair. However, it can be aggravated instantly the moment a team is approaching its lair or causes enough noises.

Once aggravated, it will launch into fury and jog aimlessly around the lair until the team keeps a long distance from the lair of which the Butcher will calm down eventually.

During the combat mode, it behaves almost similarly to the Meathead except that most of his attacks not only deal about 60 damage but also set Hunters on fire which is very dangerous if there are explosive barrels in the lair and its surroundings. The Butcher can throw fireballs onto Hunters which will enlighten them on fire.

In Frenzy mode, it will roar and run after the Hunters, constantly swinging its blade which can make it potentially very dangerous and deadly for Hunters on low health. Butcher in Frenzy mode will move much faster, dealing 45 damage with heavy fire on Hunters. It will eventually calm down after 30 seconds, regardless it attacks a team or not.

The Butcher can be killed rather quickly and at ease, especially by Winfields, fanning pistols, Dolch, Shotguns, Avtomats and the Nitro which can kill it in 2 or 3 shots. The Butcher is immune from fire damage but can be damaged rather quickly by Concertina Bombs and Poison Bombs. A Big Dynamite Bundle can kill it in one go if thrown right on it.

When the Butcher has about 25% health or less, it will start to lose all cosmetics items it got on it such as the pig skull and the wooden cross.

When the Butcher has lost all the health, it will get into its knees and will attempt to deliver a final blow to nearby Hunters which can cause about 40 damage before collapsing to the ground, dead.
Bosses (v2)
Assassin
Assassin is the boss that takes a form of a humanoid creature consisted of bugs and rags, capable to move around the lair quickly and deal devastating damage against Hunters in few seconds. Its attacks will cause bleeding status on Hunter and it can climb onto walls or shadows to make it difficult to see it until it is right behind you. The boss has two forms; the Assassin form and the Bug form.

START OF LORE
Formerly the human Vincent Corsica, how he became the Assassin is unclear. The arrival of the Assassin marked a turning point in the Louisiana Case. Before its arrival, the entity's major aspects were the formidable combatants such as the Butcher and the Spider, though designed for other purposes. The humanoid Assassin seemed especially sculpted to shock humans, and destroy them.

Harold Black crossed paths with the Assassin multiple times and was the source of who Vincent was before. He grew close to Vincent over several years, and only later realized that he was the Assassin while hunting him. However, Harold noticed several signs that pointed to Victor having powers even while he lived in the city. There was a suspicion that Vincent was involved in the murder of David Hennessy and other local political figures.
END OF LORE

Initially, the Assassin will be dormant in its lair until a team approaches its lair of which it will move around in a bug form. Only when the team enters its lair the Assassin will begin attacking them, switching forms constantly to avoid getting shot and so on. It will also occasionally laugh as it attacks a team.

During the combat mode, it will attack the closest Hunter of which it will sting them with its stingers, dealing 60 damage as well as applying bleeding status to a Hunter. Its stingers can also be thrown by the Assassin in some distance which deals around 35 damage and causing bleeding status as well, potentially making the boss very dangerous to deal with. Unlike other bosses, there is no cooldown mode between its attacks. Running around the lair to avoid its stingers will not always work.

The Assassin will always enter its bug form when it needs to move around the lair, climb walls, after attacking, etc. In this case, shooting at its bug form will be increasingly difficult unless a Hunter has a Shotgun at disposal. Only when the Assassin wants to attack will it form into Assassin-form otherwise it will remain in bug form until it has its opportunity to attack. In normal form, they can be treated just like other bosses, shooting at their center mass.

In some cases, the Assassin may duplicate itself into three decoys which are fake but can attack Hunters regardless. This can create confusion for Hunters. Shooting decoys will not damage the boss at all. The decoys will fill bugs onto a Hunter of which will only disorient them temporarily. When that happens, the screen may move. This can be prevented by shooting the decoy before it touches the Hunter.

In Frenzy mode, the Assassin will constantly duplicate several decoys and will receive reduced damage. It will eventually calm down after several seconds and/or after spawning several decoys.

The Assassin's main weakness is Poison. Shooting at it with a poison crossbow and/or throwing a poison bomb on it will inflict increased damage.

When the Assassin has lost all the health, its stomach will burst a large amount of blood before it collapses onto its knees, dead.

Scrapbeak

Scrapbeak is a humanoid monster that resembles an oversized crow, armed with various melee weapons, that can "shoot" concertina wires to Hunters when the situation requires it during combat. The monster will gradually lose its fur and feathers, dropping several loot items provided they don't get ruined from fire or explosives.

START OF LORE
A former veteran soldier from 1863 war that took place at Fort turned into a savage monster. Its origin is disputed; Others believe that this beaked beast has been created by Hunters themselves, performing rituals meant to grant them power instead of more Sculptor's corruption.

The truth is far more macabre just like many other evil things. It started with the appearance of the birds, followed by small models and statues and, finally, the form of a monster.
END OF LORE

Much like the other bosses, Scrapbeak will be dormant until a Hunter approaches its lair. The entrances will always have crows positioned on top of it or near them. When a team approaches or enters the lair, Scrapbeak will chase and attack them.

Scrapbeak will be armed with various (world) melee weapons ranging from axe (will also deal bleeding damage), hammer, shovel and pitchfork, dealing 40 damage per hit. While this makes it a less deadly boss than the other bosses, it can be dangerous for low-health Hunters.

When Scrapbeak resides in a lair, all supplies (ammo cases, medkits, bear traps, lanterns and many more world items) within the compound will not appear. Instead, they have been hoarded by Scrapbeak. Care is to be taken, supplying yourself before entering the lair is recommended.

In Frenzy mode, Scrapbeak will receive reduced damage and launch concertina wire attacks towards to Hunters as well as spawn more of them on its spot, entrapping Hunters in the lair which makes it difficult for them to leave without suffering bleeding injuries. It will also rapidly swing sideways with its melee weapon.
Attacking it with firearms may cause it to drop concertina wires.
Furthermore, it will also drop several world items loot (ammo cases, medkits, etc).
However, if Scrapbeak is set on fire and/or explosive items are thrown at him, the loot it will drop will be destroyed, rendering them unusable. Refrain from using Bomb Lance harpoons, explosive rounds, explosive items, fire items, etc if you desperately need the dropped supplies.
It may sometimes drop trait charms.

It will calm down after several seconds. The more frenzy modes it enters, the increased movement speed the boss will have. It may sometimes scream, causing an ear-ringing effect to all players in proximity.

The boss has a backpack where all loot is hoarded as mentioned above. During the frenzy mode, loot will be dropped off the backpack, gradually decreasing the size of a backpack.
Hitting the backpack will deal decreased damage. Piercing weapons (bayonet, etc) are exempted from this rule.

Scrapbeak will toss its concertina wire to you if you are in an unreachable spot. It may sometimes toss concertina wires at entrances and exits.

Anything is effective against Scrapbeak, including firearms. Poison can deal significant damage. The front torso, especially the head is the weakest hitpoint.

As Scrapbeak gradually loses health, it will lose feathers, exposing its naked body.

When Scrapbeak has lost all its health, it will get on its knees and collapse, succumbing to its wounds.
Animals
Overview
Animals consist of horses, chickens, dogs, etc that were once owned by the residents of the Louisiana Swamps and, like the residents, enjoyed a normal life and helped the farmers in their agriculture work indicated the number of farms, cornfields and so on. This soon changed when the demon infestation broke in as most animals fell victim to Monsters as most of them, particularly horses, got killed and eaten by the ravaging Monsters, most notably the Grunts. Few of them are still alive with dogs and chickens in their cages, starving and the horses whining in pain. Occasionally, a herd of crows rests in some land of the Lousiana swamps and ducks in the waters.

There is no lore text regarding the animals therefore nothing is verified. Animals will never react to Monsters' presence but react only to Hunters' presence for reasons unknown. It is believed that the animals are infected and hallucinating in some way as it is possible that they do not see the Monsters but only see the Hunters.

Crows
Crows are the first animals that are aerial therefore they will flee away from any danger such as a Hunter is too close to them or even loud noises occur near them (gunshots, explosions, decoys, etc). They are mostly found in scripted posts.

Crows will occasionally squawk quietly when a Hunter is passing through within some range but they will squawk loudly as they flee away from the Hunter - potentially attracting nearby Monsters and Hunters.

Sometimes, the crows may return back to the spot they fled from. This usually happens only when a Hunter hasn't visited back the same area they were in.

Crows cannot be killed by any form of weapons but they can be killed only if a fire item is thrown right on them. Explosive items can kill them if exploded on time. Explosive ammo can also kill them. Spots, where crows got killed, will not spawn crows for the remainder of the match.

Chickens
Chickens are one of the two animals that reside in cages only. Chicken Cages are uncommonly found around the map. They are mostly in scripted locations.

Initially, they will be stationary and won't make any noise but if a Hunter is within some range, they may freeze and stare at the Hunter, sometimes causing very low-sound noise. However, if a Hunter is in very close distance of the Chicken Cage, the Chickens will loudly squawk and run around the cage in panic - potentially attracting nearby Monsters and Hunters.

The Chickens will take some time to calm down if not killed.

If the Chickens are in a cage, the cage is marked as "active" and will have a red color. Active cages will always have a hanging burning lamp that can be shot down, killing the Chickens immediately. Alternatively, a lantern, choke bomb, or firebomb can be thrown in the cage, killing them instantly.

Chickens not in the cage are marked "inactive" and will have gray color instead. However, they may still spawn in inactive cages so care is to be taken. Inactive cages will not have a hanging burning lamp.

It is possible to enter the cages in some ways but the Chickens will not attack the Hunter at all but merely panic like usual.

Dogs
Dogs are the second type of animals that reside in cages only. Dog Cages are commonly found around the map and are mostly in scripted locations.

Initially, they will be seen resting in their cage, completely silent. Though, if a Hunter is nearby, they will stand up and may bark quietly. However, if a Hunter is very close to a Dog Cage, the dogs will bark maniacally and aggressively, running around the cage - potentially attracting nearby Monsters and Hunters.

Like the Chickens, it will take some time for the Dogs to calm down.

Similar to Chicken Cages, they can be killed easily by shooting the hanging burning lamp. And, like the Chicken Cages, it is possible to enter the Dog Cages as well. However, unlike the Chicken Cages, the dogs can attack you the moment you step inside the dog cage, instantly causing you bleeding and 3 damage per 2 seconds.

Ducks
Ducks are the second animals that are aerial behind the Crows therefore they will flee away from any danger such as a Hunter is too close to them or even loud noises occur near them (gunshots, explosions, decoys, etc), they behave in a fairly similar manner to Crows.

Unlike the Crows, Ducks are found only in waters, occasionally swimming around their spot and/or flapping their wings which is a typical behavior while they are idle. However, their presence is uncommon as they aren't always found in the waters.

They will flee from their spot should they sense a nearby danger. They will quack loudly (which is quieter than the Crows' squawk) as they flee. They may return back to the spot they were in.

They can be killed by any Fire item by throwing right onto their head(s).

Horse
Horses are one of the most common animals that a Hunter will encounter throughout the map in a match. All of them are stationary and laying flat, wounded from their injuries possibly caused by the Monsters. Most of them have scripted spots to spawn in.

Most of the time they seem to be sleeping on the ground and slightly twitch their bodies from time to time. A horse will raise their head slightly should a Hunter be present within some range from it. However, if a Hunter is close enough, the horse will panic and whine in pain as they try to stand up in vein due to their injuries. Their whining is loud and can be heard - attracting nearby Monsters and potentially, the Hunters.

The horse will keep whining in pain as long as a Hunter is within its range otherwise it will take some time to calm down as it lays flat again. Injured horses may kick you, dealing some damage if you stand behind them for too long.

Horses are also used as an extraction for Hunters to get out. Horses will freak out if two teams are close to each other at the extraction point otherwise they will be calm if there is only one team extracting.

Horses can be killed with any weapon. Depending on the weapon and the body part, they may need 2-3 bullets to die. Extraction Horses are immune to damage.
Maps
Overview
Currently, the game contains two playable maps. The Stillwater Bayou and the Lawson Delta. Both maps are different when it comes to using weaponry since Lawson Delta is way more open-ended than the Stillwater Bayou therefore using Shotguns is not recommended.

Stillwater Bayou - The first map to release, it is mixed with land and a large stretch of water. All weaponry can be used with no issues.

Lawson Delta - Released on 15th November 2018, it is mixed with a larger land and a smaller stretch of water. Rifles are a must to be used. Shotguns are possible to be used but very risky.
- Stillwater Bayou

The Stillwater Bayou is the first map that was released in the game since its pre-alpha period. It underwent several mapping changes during its pre-alpha status till now. It is the most balanced map in this game where any weaponry can be used during on a Hunt. Many compound underwent several name-changes during the development until the Early Access launch.

It consists 16 compounds with some of them being large therefore the players will have to move around longer to find the clues and/or reposition during gunfights. With no further ado, their names are:

Alain & Son's Fish - Formerly as MacDonald's Fishfarm or Bertel & Son's Crawfish Factory, it's a compound where it is surrounded in water, several trees and small huts. It is located top left corner of the map and it was used to farm the fish as indicated by its old name. It has about 4 Hunter spawn points and only one clue to be taken. Only one lair building can be located here.

Reynard Mill & Lumber - Formerly as Willis Sawnmill or Albercht Mill & Lumber, it's a compound where it is located east of the Alain & Son's Fish. The compound was used to saw the trees before they were presumably abandoned when the Outbreak broke out. It has about 2-3 close Hunter spawn points and only one clue to be taken. Two lair buildings can be located here with the east of the compound always being the Spider lair and the west of the compound being the Butcher lair. Assassin lair is located on either side.

Darrow Livestock - Formerly as Hopkins Pig Farm, it's a compound where it is located between the Reynard and Alice Farm. The compound was used to farm the pigs, as indicated by its old name. Only one clue can be located and only one lair building can be located in this compound. The Butcher will always spawn in the basement of the building and the Spider and Assassin in the base area of the building.

Alice Farm - Formerly as Bankside Farm, it's a compound where it is located right next to the Darrow Livestock but between Port Reeker and the Lockbay Docks. The compound was used to plant seeds in the farm as indicated by the farm fields. Only one clue can be located. However, like the Reynard Compound, two lairs can be located. The Spider lair is located west of the compound and the Butcher lair east of the compound. Assassin lair is located on either side.

Port Reeker - Formerly as Plague Village, it's a compound where it is located west of the Scupper Lake and was used for industrial works as indicated by the nature of the buildings in this compound. It is currently unknown how the compound would originally look like since the old name does not fit the current compound's look. It has about 2 Hunter spawn points and two clues to be taken accordingly. Unlike most compounds, three boss lairs can be located. They are located west, south and east of the compound. The south and east lairs are commonly used by the bosses while the west lair is seemingly rarely used by the bosses.

Scupper Lake - Formerly as Farwater Cabins or Cameron Lake, it's a compound where it is located top right corner of the map and it consists a few huts partially underwater. It has about two Hunter spawn points and only one clue to be taken. It has only one boss lair used by all bosses.

The Chapel of Madonna Noire - Formerly as Rotten Chapel or The Chapel of St. Sebastian, it's a compound where it is located south of the Scupper Lake and north of the Stillwater Bend. The compound consists solely of a partially collapsed church and several tombstones, some of them leading inside the basement of the church. It has two Hunter spawn points and only one clue to be taken. It has only one boss lair used by all bosses.

Stillwater Bend - Formerly as Stillwater, it's a compound where it is located south of the Chapel of Madonna Noire. It's a compound which it is filled of a few houses and small huts. Apparently it was used for residential where residents could live in as well as farm in nearby large fields. Hellhounds and hives make a dense presence in the fields so care is to be taken. It has about two Hunter spawn points and only one clue to be taken. It has only one boss lair and is located underground, used by all bosses.

Lockbay Docks - Formerly as Rotten Boathouse, it's a compound where it is located south of the Alice Farm and the Darrow Livestock. It is mostly surrounded by waters connecting to the Healing Waters Church. It has only one clue to be taken and the central large building is the boss lair used by all bosses. The Spider and Assassin can be challenging to be dealt with.

Blanchett Graves - Formerly as Family Graves, it's a compound where it is located south of the Alain & Son Fish. There are about three Hunter spawn points and two clues to be taken accordingly. Like the Port Reeker, it has three boss lairs. One located in the Circle which is located just north of the Church where it is surrounded by tombstones, one underground of the Church and one inside the big Church room. The Circle lair is owned by all bosses, the big Church room owned by the Butcher and the Assassin and the underground owned by the Spider and the Assassin. However, the Spider makes the most common appearance underground of the Church and is very easily dealt with due to its cramped interior.

Pitching Crematorium - Formerly as Red Crypt, it's a compound which is located just east of the Cyprus Huts and west of the Healing Waters Church. It is surrounded by a high density of trees. It has only one clue to be taken and the lair is located underground of the Crematorium. The lair is owned by all bosses.

Healing Waters Church - Formerly as White Chapel, it's a compound where the first largest church in this map is located at. It is located east of Crematorium and west of Stillwater/Catfish Grove. It has two clues to be taken accordingly and two boss lairs. They are in the Church and underground of the church. All of them are owned by all bosses.

Cyprus Huts - Formerly as Gator Huts or Falgout Huts, it's a compound where it is located just bottom left corner of the map and is surrounded by a large stretch of war and trees. There is only one Hunter spawn point and only one clue to be taken. The lair is inside the big building and is owned by all bosses.

Davant Ranch - Formerly as Everett or Ortiz Ranch, it's a compound where it is located between the Cyprus Huts and the Slaughterhouse. The compound may be felt one of the few largest compounds located in this map. There are three Hunter spawn points and only one clue to be taken. It has two lairs, one located west of the compound and the other one east of the compound. The Spider resides in the west lair and the Butcher in the east lair. The Assassin resides in either lair.

The Slaughterhouse - Formerly as Jackson Farm or Jacks Brothers Slaughterhouse, it's a compound where it is located between the Davant and the Catfish Groves. It was used to slaughter the pigs prior the Outbreak. There's only one Hunter spawn point. It has only one clue to be taken and one lair located in the large building owned by all bosses.

Catfish Grove - Formerly as Bayou Huts or La Fourch Grove, it's a compound where it is located bottom right corner of the map and is surrounded by a large stretch of water and some huts. It has two Hunter spawn points and only one clue to be taken. The lair is located in the big building and is owned by all bosses.
- Lawson Delta

The Lawson Delta was the second map released during the Early Access period in November 2018. It shares a lot of differences from the Stillwater Bayou such as the map has much larger compounds, more land and less stretch of water and is more open-ended, favoring Rifles and more particularly, Scoped Weapons. Using shotguns on this map is still possible but very risky since most fights take place in open areas.

The map consists of 16 compounds.

Godard Docks - A compound surrounded by stray waters and fishes. There's only one boss lair where all bosses reside and only one clue to take.

Blanc Brinery - Train's last stop is located in this compound. It's located next to Godard Docks. Only one clue can be found and one boss lair is resided by all bosses.

Lawson Station - One of the few largest compounds on the map, consisting of trains, wagons, etc. Two clues can be found and two boss lairs exist here. Both are resided by all bosses.

Golden Acres - Surrounded by fields and trees, there's only one boss lair which all bosses reside and one clue to take.

Salter's Pork - Surrounded by some fields and trees, only one clue can be found and one boss lair which all bosses reside.

Arden Parish - Surrounded by several cabins, it has a church. It was once a small town that was abandoned during outbreak infestation. Only one clue can be found and one boss lair which all bosses reside in.

Windy Run - Only one clue can be found and one boss lair.

Hemlock and Hide - One boss lair, one clue.

Nicholls Prison - Abandoned prison. This is the only compound where you will encounter Prisoner Grunts and Guard Grunts. Two clues can be found and two boss lairs. Both reside by all bosses.

C&A Lumber - One clue, one boss lair.

Bradley & Craven Brickworks - One clue, one boss lair.

Wolfshead Arsenal - Formerly Liberty Arsenal, it was used by military for its arsenal which is now abandoned. One clue and one boss lair.

Fort Carmick - Abandoned fort that is in despair after a war. Two clues and two boss lairs.

Iron Works - One clue, one boss lair.

Sweetbell Flour - One clue, one boss lair.

Maw Battery - One clue, one boss lair.
- DeSalle
The DeSalle was the third map released in July 2021. Unlike the previous two maps, it has a lot less water, more ground and verticality as well as an increased number of residential and industrial areas, providing a lot more Western feel and look.
Modes
Overview
Currently, the game has two modes which are nicknamed Bounty Hunt and Quick Play. Both modes share several differences, having a different set of game rules which can give some uniqueness between the two and so on. More modes are planned and/or potentially coming in the future.

Bounty Hunt - A mode where a player can join as solo or in duos and must find the boss and extract with the bounty token dropped by the boss. As of Update 1.0, the trios opt-in system was implemented.

Solo - Released in August 2018. Initially, It was released as an Event before it became a permanent Mode. Solo Mode was exactly the same as the Bounty Hunt Mode but players could spawn solo only, with their desired loadout and the contracts were always one-boss which had only one token of bounty. This mode was replaced by Quick Play Mode due to various gameplay issues.

Quick Play - Released in December 2018, it is a mode where a player has to close four rifts and deplete the Wellspring in order to win the match. It replaced the Solo Mode.

Trials - Released in June 2020, it is a mode where a player has to complete a number of challenges in a short timeframe. The rewards are mainly cosmetics but can give you weapons, tools, etc for free.
- Bounty Hunt

The Bounty Hunt, commonly called Classic Mode or duos teams, is a mode where a player can either play solo, in a team of two or three with a random partner(s) or with a friend(s). Initially, in the early development stages, this mode had no official name.

The main objective of this mode is to find the boss, kill it, banish it and extract with the bounty token dropped by the boss after banishing it to the Hell.

Up to 12 players can be found in this mode either in solos, duos, trios or mixed of the three. Attempting to form in-game alliances with other Hunters is possible so is sharing the bounties between them. A Hunter can carry only one token bounty from one boss. In other words, they can carry one token from each boss but they can't carry two tokens from the same boss.

Your hunter's partner is outlined in blue color with a white arrow pointing at them if they are off-screen from you. This blue outline is not seen if your teammate is in huge distance from you. If your teammate is downed, you can revive them for five (5) seconds which leaves you vulnerable to attacks. If your teammate dies in the match where reviving is not possible, you can still continue playing in the match but you will be alone for the remainder of the match until you extract. Spectating your teammate after getting downed/killed is possible or vice versa. Finally, players can extract at any time they want in the match even if they are not carrying a bounty.

The player has to hire a Hunter first before clicking the Bounty Hunt Mode otherwise the game will instruct them to recruit a Hunter first before clicking the mode. The player will then be given a few contract options before entering a matchmaking stage.

Each compound will always have at least one clue which must be taken by the player. Taking a clue will gray out certain compounds of the map closer to the lair's location. The more clues are taken, the more compounds are grayed out on the map, growing closer to the lair's location. Players will have to take only three clues in order to automatically find the location of the boss lair. However, they can find the boss lair instantly after taking a clue located near the lair or by entering a lair building where a boss is currently residing in the match the player is in.

A clue will normally have a white patch. If the clue is taken before you, it will have a deep hole. Taking a clue lasts a few seconds which leaves you vulnerable to attacks and some clues are guarded by monsters.

There are about three to four supply points (wagon, boat and/or railroad car) scattered around the map and they can be located on the map. They will always have three ammo cases, one special / custom ammo case, three medkits and one item box, enough to supply two teams ammo, health and a random offensive consumable item if the item box is looted. However, they are sometimes guarded by monsters and/or crows which will fly away, attracting nearby hunters and monsters.

Banishing a boss takes about three minutes and thirty seconds, enough time for the defenders to barricade the lair and/or prepare for incoming hunters who will attempt to overwhelm the defenders and take the bounty for themselves. Hunters who take the bounty are claimed as "Bounty carrier" or "Bounty holder" and will have a boost that highlights all Hunters within 150m of the distance between the carrier and the rival Hunter in orange color. The boost timer is only 5 seconds and will be depleted if it reaches 0 of which the carrier will no longer see highlighted Hunters through the Dark Sight. The timer is reset if someone else picks up the bounty. You can replenish one second of boost duration (5 secs max) by collecting clues and looting dead hunters. Bounty Holders can also revive red-skulled hunters.

The further the Hunters are, the smaller the orange color is, making it difficult to see them and/or judge their exact position. Hunters can locate carriers by entering the Dark Sight and/or checking the map. They will be able to see lighting sparks in the Dark Sight and/or on the map.

If all the bounty has been extracted from the match, any Hunter that is still alive on the map will be given five minutes to go to an extraction point to extract otherwise they will be killed if the timer expires.

Hunters who extracted with the bounty will receive several rewards such as experience and money.

As of 1.0 Update, an opt-in option to play in a team of trios was implemented. They can still fight against trios, duos and solos. Players who play in trios often call it squads mode.

Lorewise, after isolating the Outbreak incident to avoid public and authorities attention, the American Hunters Association sent Hunters to locate the boss lair and extract with the bounty token dropped by the boss for unknown purposes. It is implied that they are seeking the True Desk and the Salvation.
- Quick Play

The Quick Play, commonly called Battle Royale Mode or Solo Mode, is a mode where a player will spawn as solo and fight against 11 more solo players. Unlike the Bounty Hunt mode, this mode is available only during day times such as foggy, neutral and noon.

The main objective of this mode is to close four rifts and deplete the Wellspring.

Up to 12 players can be found in this mode, all of them being solos. Attempting to form in-game alliances is still possible but not recommended as only one survivor can win the match.

In order to play the Quick Play mode, the player has to choose three classes:
Medium Range - The Hunter will spawn with a low-grade pistol or hand crossbow.
Short Range - The Hunter will spawn with a low-grade shotgun such as Romero Handcannon or Rival Handcannon.
Melee - The Hunter will spawn with either Machete, Cavalry Saber or Combat Axe.

Alternatively, they can choose a "Random" class which the game will automatically assign them either of the 3 classes as stated above. Players will always spawn with a first aid kit at their disposal.

Players can choose what outfits their Hunters should spawn with. They can choose only one of the five outfits available and the list will change after a Quick Play match whether the player wins the match or not. If the player does not choose an outfit, the game will choose a random outfit for them.

Once the players are ready to play the mode, they can simply click the Quick Play Mode and wait for the game to find them a match. Players can not choose their spawn points to spawn.

Since players spawn with weak weaponry, they can find better weaponry and gear found around the map, on top of blue unique boxes. A large box represents a weapon/melee and a small box represents a consumable or a tool.

Certain weaponry is rarely found on the map. Their rate is speculated at best and are not confirmed nor are truthful:
Common: Winfield, Nagant, Vetterli, Rival, Martini, Springfield
Uncommon: Obrez, Specter, Dolch, Carbine, Lebel
Rare: Crown and King, Avtomat, Nitro, Precision Dolch

Powerful weapons are usually found at supply points over random locations on the map.

Unlike in Bounty Hunt mode, supply stations are not located on the map therefore players have to locate them themselves without any help. Once a player finds a supply station, the station will be marked on their map for later use.

Players have to close four rifts located around the map. Rifts have the exact behavior as the clues except their appearance is different. Their position is the same as the clues. Once taken, some parts of the map will be grayed out as normal. The map will gradually be grayed the more rifts are closed by a player. Closing a rift grants one random trait to the Hunter and awards them 50$, similarly to clues.

Once a player manages to close four rifts before anyone else, they will obtain the Wellspring which they must deplete in order to win the match. Wellspring carriers will be seen in Darksight AND on the map in lighting sparks AND in orange color like the Boost. Unlike the Bounty Hunt mode, the orange color is not precise at all therefore the carrier's location should be estimated at the best.

On the other side, Wellspring carriers must survive by depleting it and avoid getting killed by other Hunters. They cannot see them through Darksight however, putting them at a great disadvantage.

If a Hunter manages to kill the Wellspring carrier, they become the next Wellspring carrier and must survive by depleting it and avoiding other Hunters.

The Hunter wins only if:
1. All Hunters have been killed and they are the sole survivor (must have the Wellspring at disposal).
2. Depleted the Wellspring.

Any Hunter who failed to obtain the Wellspring and deplete it themselves but was not killed will be consumed into flames and be killed, marking a Game Over for them.

Players who won the match will keep the Hunter they played and won with. They can be used for the Bounty Hunt mode. Players who lost the match will get nothing but some experience points and money taken from closing rifts if they did.

Lorewise, Hunters who have been killed while on their Bounty Hunt are given a last chance to reclaim their soul back. Hunters who get killed while trying to close rifts will lose their souls for good. Hunters who fail to deplete the Wellspring for themselves will have their souls engulfed in flames, killing them permanently.

Hunters who win the game will reclaim their souls back, allowing them to return back on Bounty Hunt if they wish to. Wellspring is believed to give them the power to get their soul back.
80 Comments
RedPanzer 26 Nov, 2022 @ 3:13pm 
And with the Ronin hunter now, despite the weird time and place bring to this game a plus that counts to me, has a oriental char before Ubitoft despite being asked to them since ac3, haha.
Purromi 5 Dec, 2021 @ 3:29am 
Can you please add section with "wall penetration" and entire analyze of this aspect of the game? which bullets, ammo can penetrate what in the game? with details. Please.. it's only one mechanic a lot of people is confused about.
»SoD« Thekillergreece  [author] 15 May, 2021 @ 7:55am 
I'm not sure about melee but I will update the fletchette thingy, I totally forgot about it. :D
@snake @buhoc
snake"WU"frØst1 15 May, 2021 @ 7:18am 
Yup.. and they are improving mellee of Talon variants and Machete i guess? For more consistent hits.
Buhoc 15 May, 2021 @ 5:46am 
Hello. There are some inconsistances with the flechette regarding headshot capabilities. It was updated according to 1.5.2 but the "cons" says its not capable to headshot. Just a heads up. Cheers for this guide! Very well done and thorough.
snake"WU"frØst1 4 Apr, 2021 @ 11:50am 
about same as Machete. That is what i would say for Romero Talon.
Pimpin Pippin 4 Apr, 2021 @ 11:28am 
Thanks for replying.
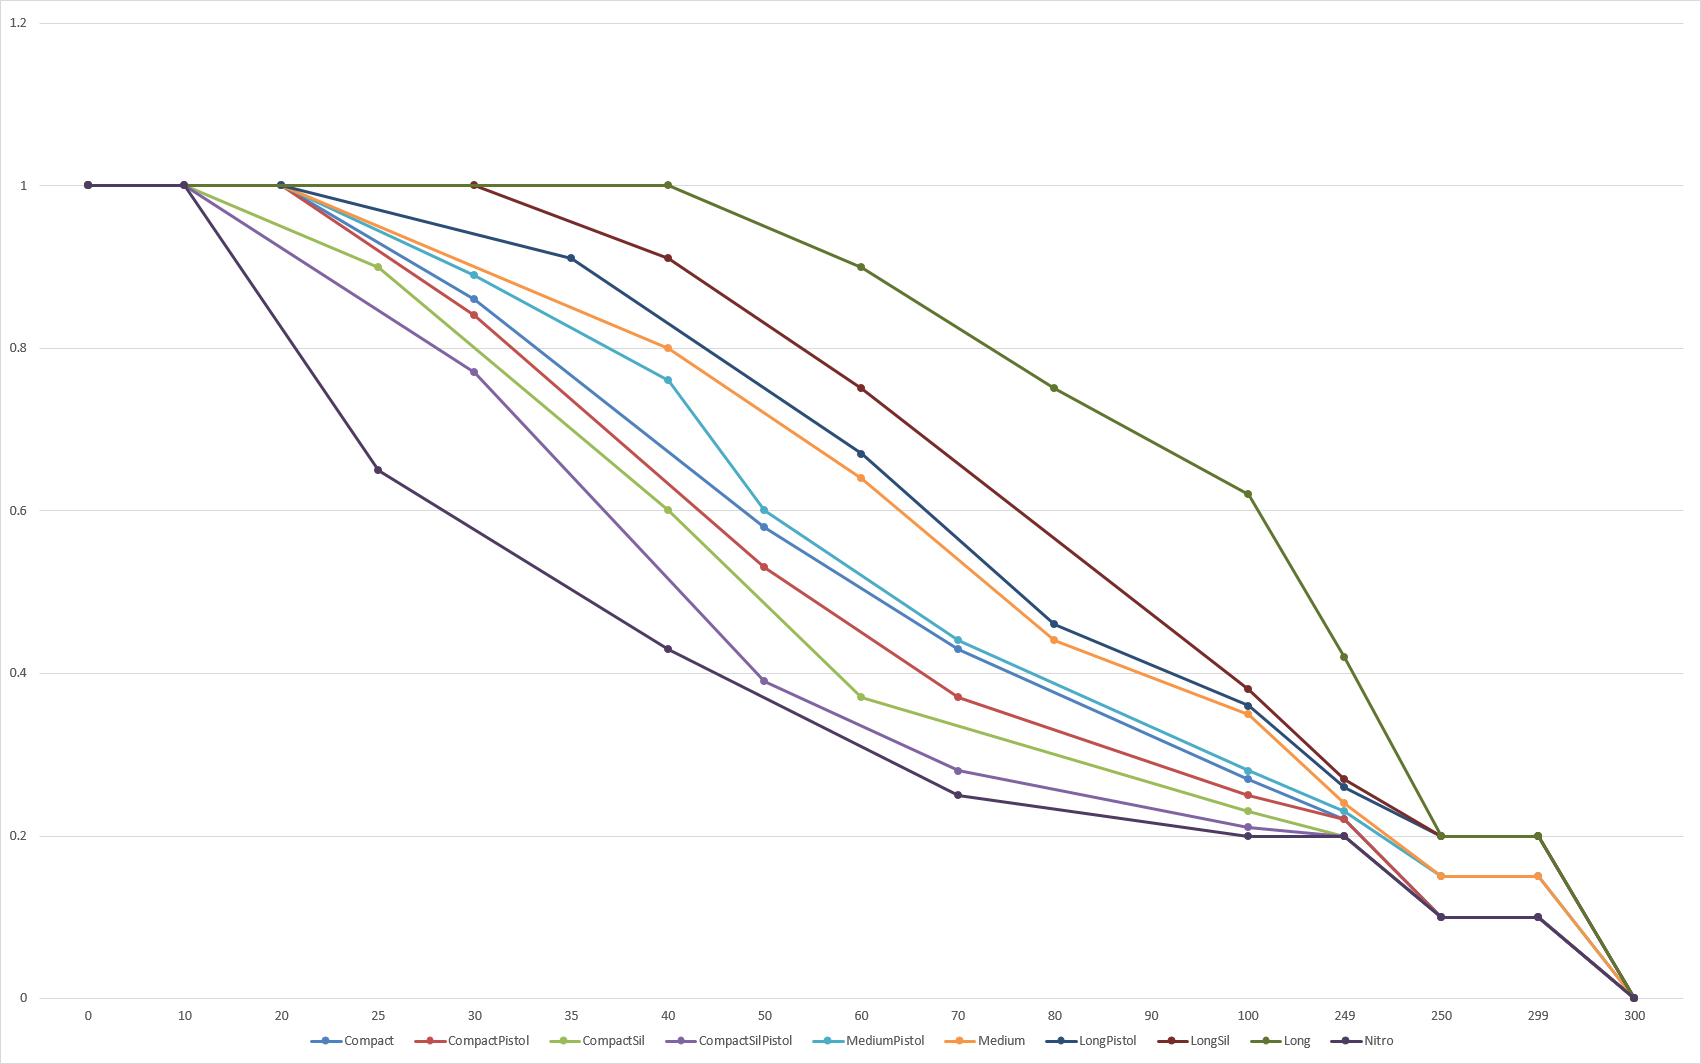
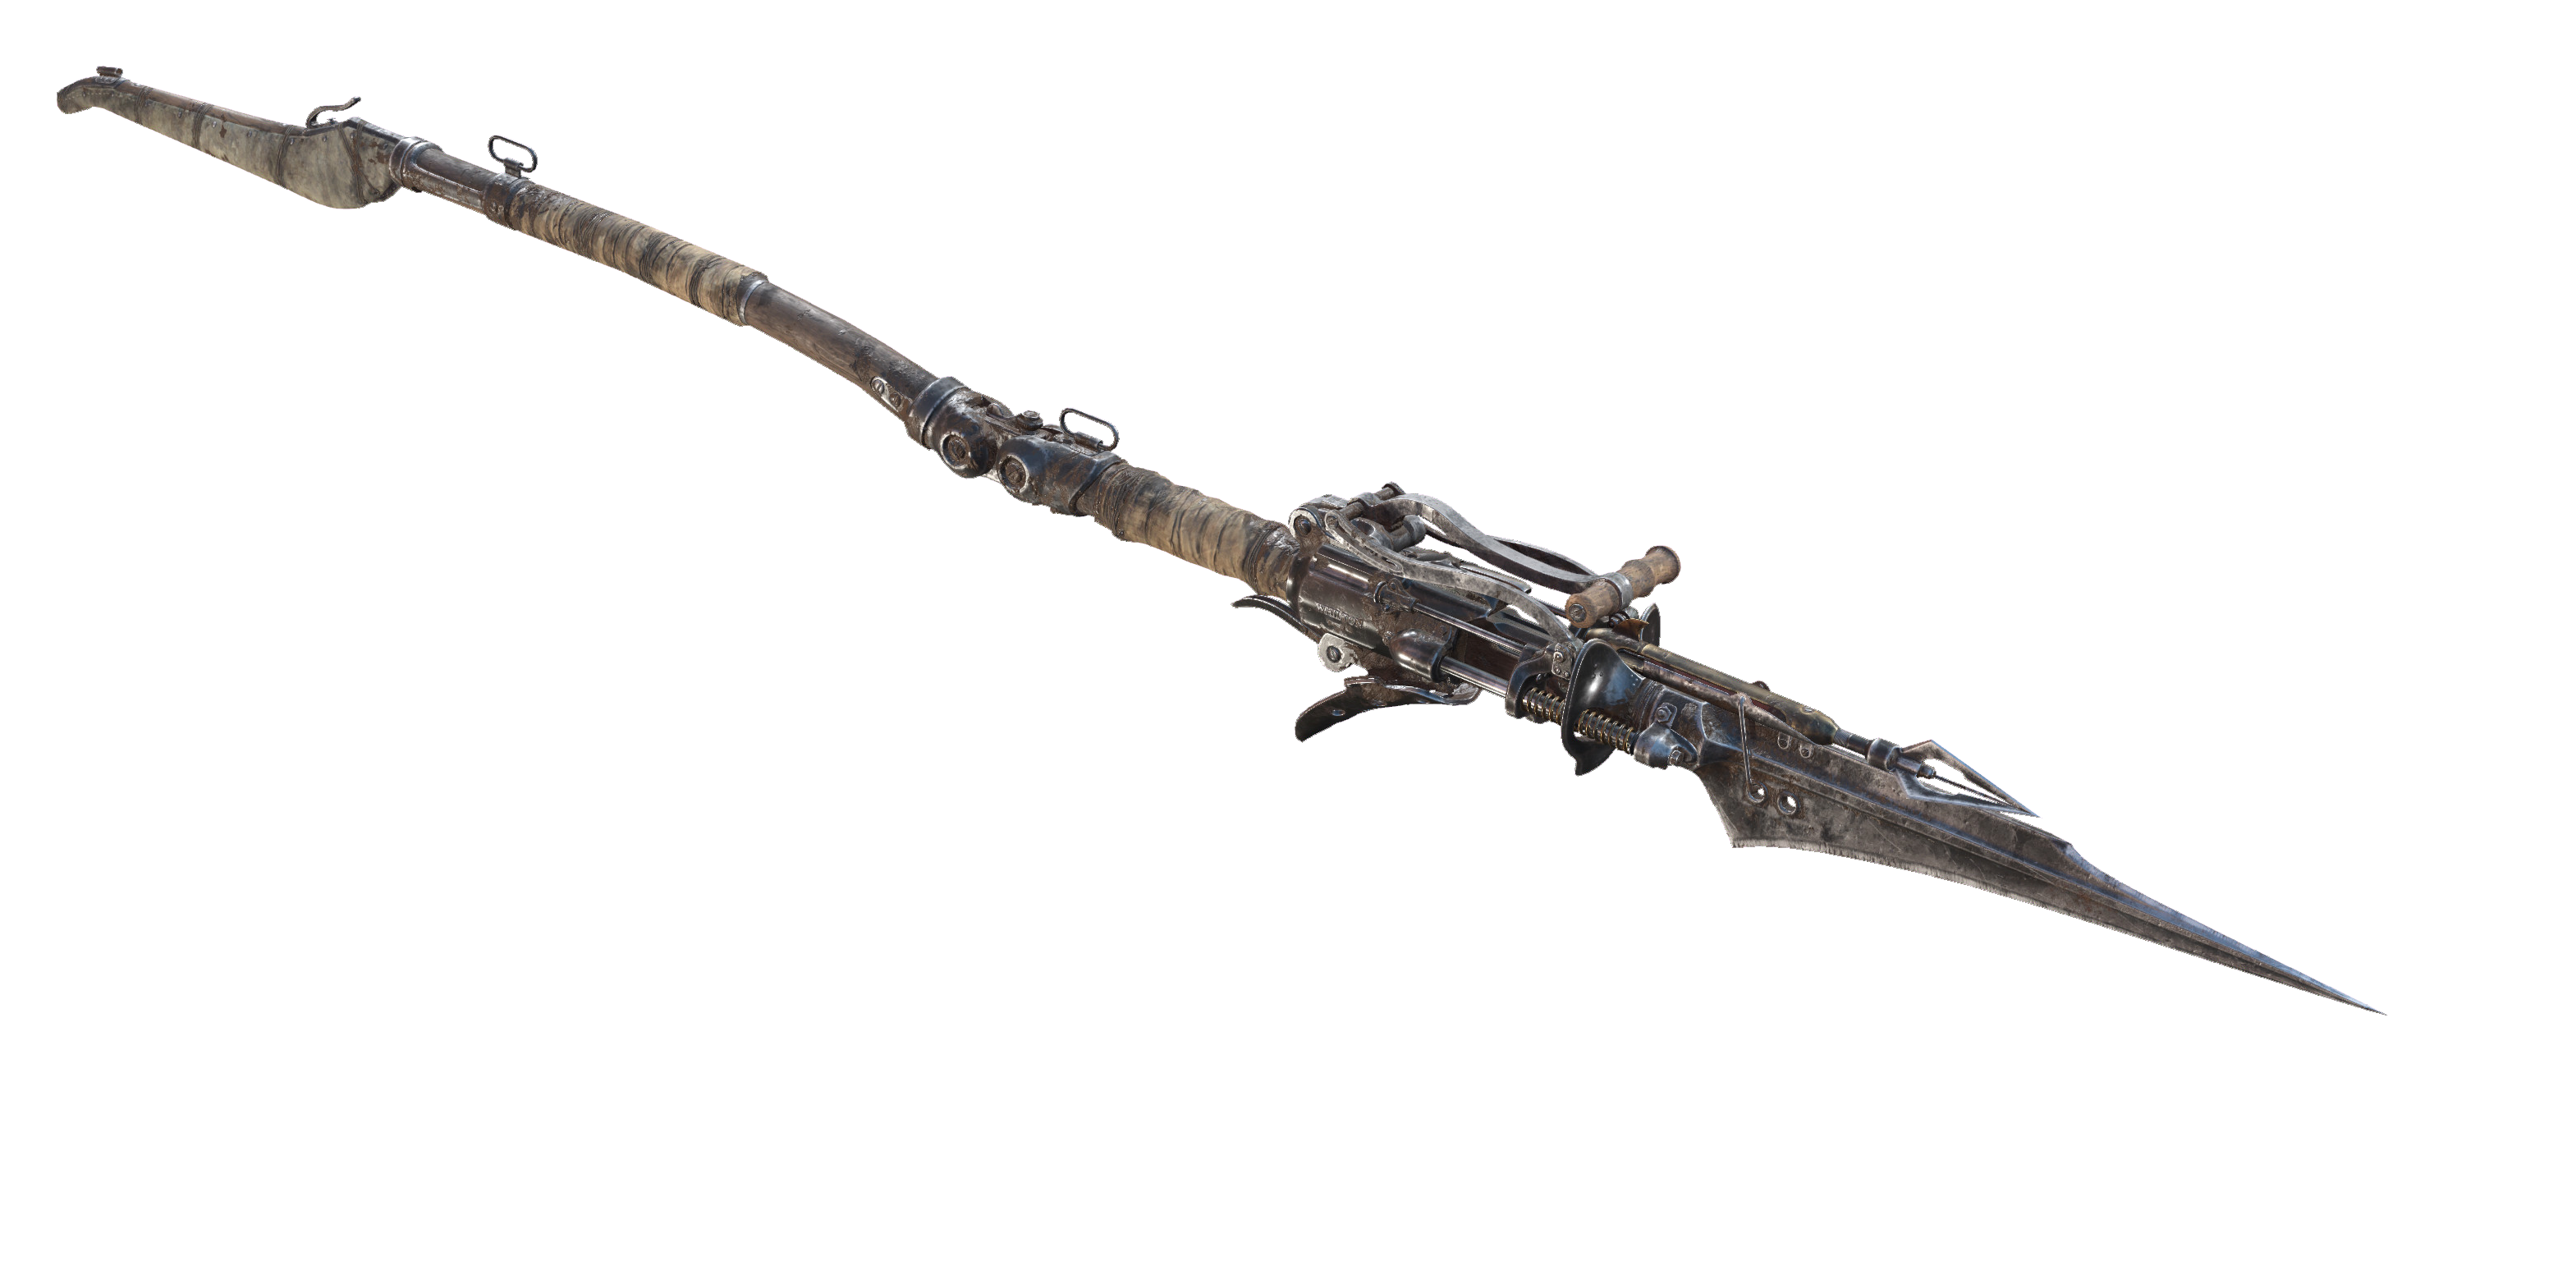
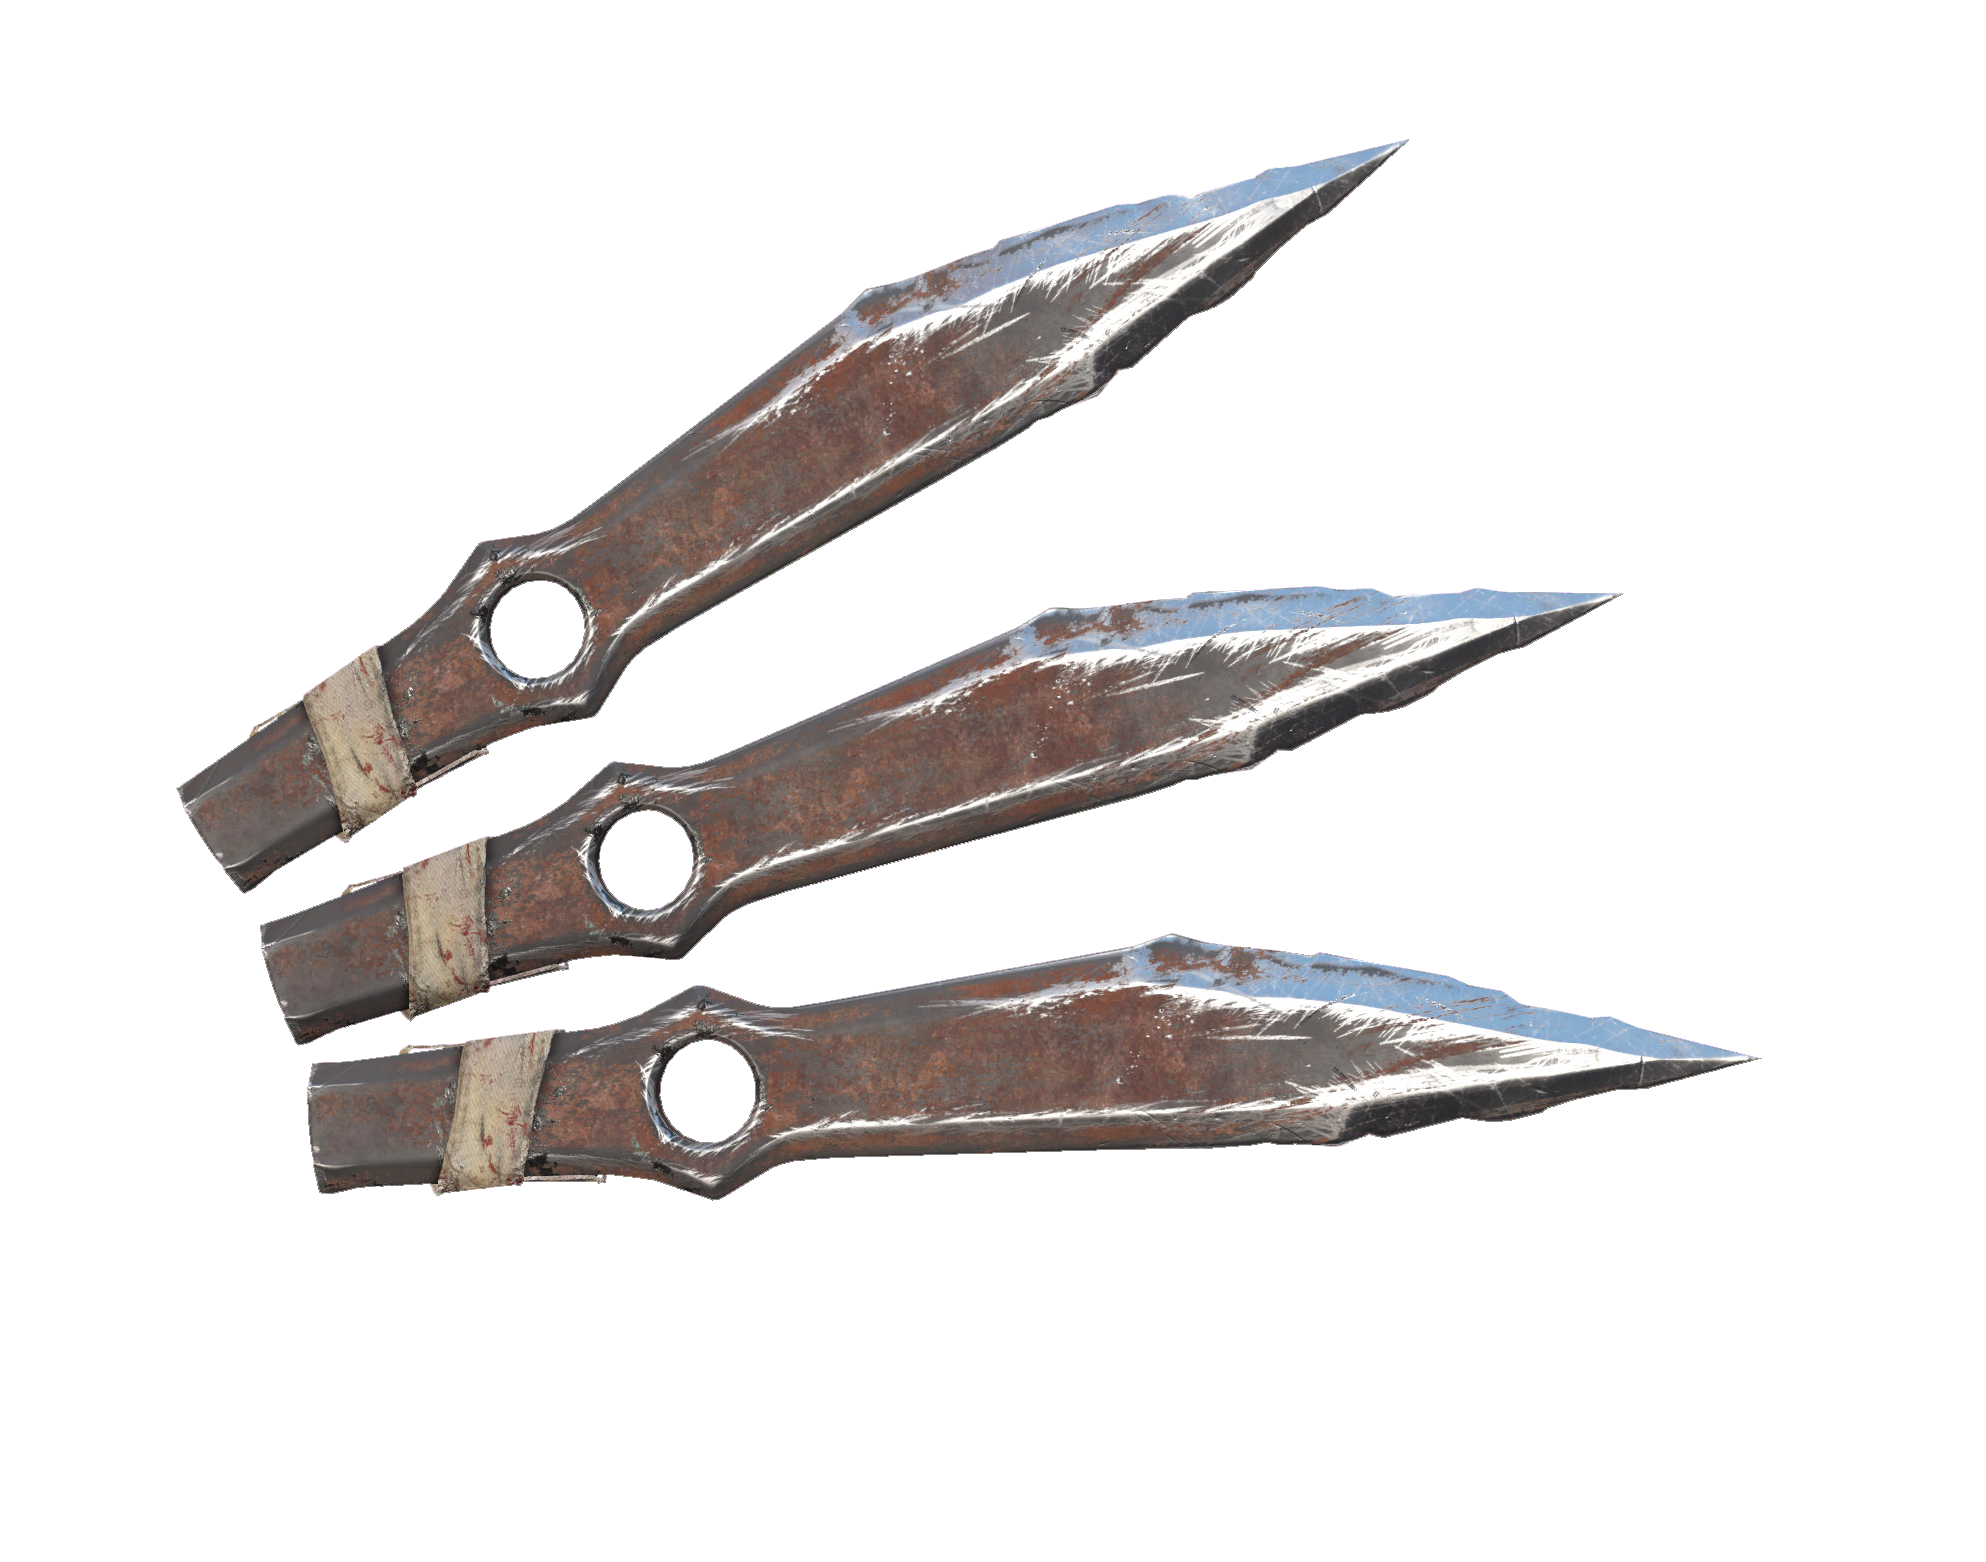
Could you please add exactly what is the melee range/reach of melee weapons?
Aside from lance and sabre being "longer" there is no clear info in the game what are the exact melee ranges.
snake"WU"frØst1 4 Apr, 2021 @ 1:23am 
Mr Pimpin.. At point blank you want your spread to be BIG. I mean really big, increasing the chance to hit a person.
Pimpin Pippin 4 Apr, 2021 @ 12:10am 
I saw a youtube video showing that Talon/Hatchet shotguns have a much worse spread than the regular versions of those shotguns.
Seems extremely important info that is not mentioned in game at all...
Pimpin Pippin 3 Apr, 2021 @ 11:45pm 
thanks for the amazing guide!