Railway Empire

Railway Empire

339 ratings
Basic Game Mechanics and Undocumented Features
By chaney
There is a lot going on in Railway Empire, but many features and game elements are not obvious to a new player.

This guide is an attempt to lay out the basics of game mechanics as they are in the game.
3
21
2
2
5
3
2
   
Award
Favorite
Favorited
Unfavorite
Introduction
TLDR; The game needs a good manual explaining how to do things and how things work. I apologize that this guide may not be the easiest to use, but it does contain a lot of information and I have tried to keep it very accurate.


THE LONG VERSION;

The aim of this guide is to make players aware of the basic play mechanisms of the game as it is. Wading through all the threads to discover these tools can take a lot of time, so an attempt is made to compile them here. Please feel free to supply corrections and additions, and I will try to maintain a useful and accurate document. It is expected to be current as of June 20, 2019.

It is recommended that the player read through available in-game and on-line documentation, but there are many features not covered there that will enhance your game enjoyment. You can discover a lot on your own by playing. Start a game with no intention of "winning" or really even playing it as you normally would. Take your time exploring the interface and learn how to get around and what is there.

This guide is not intended to provide play tips or advanced techniques, although a bit of that does find its way in.

It is not intended to be a discussion of what the game "should" be or how it should be changed. Suggestions and complaints for changes to the game are directed to the forums - find an existing thread or start your own.

Most importantly, thanks to those who have helped uncover and explain the things described here!
The AI Competitors and Rail Network/Track Usage
The player can choose to have AI Competitors in the game, but not other human players. The Campaign and set Scenarios have fixed numbers of Competitors, but the Free mode lets the player pick for themselves, including no Competitors.

When starting a game, the player chooses the Track usage mode: "Realistic", "Normal" (used to be called "Easy"), or "Normal (AI)".

In Realistic mode, only one Train will be on a Section of Track at a time. (Track is divided into sections by Signals - more on that later.) The player and AI must use Realistic track rules.

In Normal mode, trains can pass through each other without incident, and many can occupy the same track at the same time. This simplified Track network may use single Tracks without the need for passing sidings or double/one-way track, and many trains will run "on top of" each other and through each other. When loading/unloading at a Station, the trains may stack on top of each other, but only as many Trains may load/unload at a time as there are Platforms at the Station.

In Normal (AI) mode, the Player must use Realistic Track rules, but the AI may use Normal Track rules. The AI will pay more for the track it builds to compensate for the differences. Also, "under certain circumstances, it may become easier to create track for them." It is unclear exactly what that means, but it seems this option is available to fit different players' preferences in terms of aesthetics, challenge, and in taking over AI track if the player fully buys out the AI company.

Other game play rules and restrictions are the same for the Player and AI companies, except as follows. Setting the AI difficulty will change the rate at which their Companies execute their plans. The AI can make plans ("think") and build ("click around the UI") much faster than a human, so this throttle is intended to create more human-like behavior. Setting the AI Level to "Normal" starts their Companies with less money. Setting it to "Hard" starts their Companies with the same initial cash as the player's Company, and reduces their building costs. Setting it to "Very Hard" starts them with more cash and further reduces their building costs.


THE REST OF THIS SECTION APPLIES ONLY TO PREVIOUS VERSIONS OF THE GAME. AS OF THE JULY 2018 UPDATE (1.4) THE ABOVE APPLIES. THIS SECTION IS RETAINED INTACT ONLY FOR THOSE USING AN OLDER VERSION OF THE GAME AND FOR THE HISTORICALLY CURIOUS; OTHERS SHOULD SKIP IT.

TLDR; this section is to inform newcomers about the topic - there have been many, many threads created that mostly rehash the same material.

As this topic has been the source of many discussions, let's start with it. Remember, the guide discusses game mechanics as they are, and debate over the merits is for another part of the internet, please!

The player can choose to have AI Competitors in the game, but not other human players. The Campaign and set Scenarios have fixed numbers of Competitors, but the Free mode lets the player pick for themselves, including no Competitors.

The player also chooses their own Track usage mode: Realistic or Easy. The AI will always use Easy, even if the player doesn't. In Realistic, only one Train will be on a Section of Track at a time. (Track is divided into sections by Signals - more on that later.) In Easy mode, Trains can pass through each other without incident, and many can occupy the same track at the same time. The result is that the AI will build single Track in general, and run many trains "on top of" each other. When loading/unloading at a Station, the trains may stack on top of each other, but only as many Trains may load/unload at a time as there are Platforms at the Station.

If the Player chooses Easy mode, the same building and operational rules apply to them as to the AI. If the Player chooses Realistic mode, the AI will still use Easy, but will pay a premium for Track costs to try and compensate.

The developers are currently working on an option to have the AI use Realistic mode when the player does, but the result of that work is yet to be known.

This topic has been a huge source of discussion, so I will include some opinions from those discussions here, contrary to the general guide form.

Many players have been able to enjoy the game as it is. The AI is not generally regarded as terribly difficult to beat, although of course new players will struggle.

Some players are bothered by the visual difference in play mechanics when the Player uses Realistic and the AI is using Easy.

Some have also had very negative reactions to the AI using Easy mode when the Player uses Realistic. As mentioned, the developers are working on this. If you wish to discuss this, please join one of the existing threads on the topic or wait to see how things work out.

There have been a small number of claims that the AI does something other than what is described, but I have seen no evidence posted. Details are difficult to interpret as the game operation is a bit opaque when it comes to Competitors.
Buildings
Going through the Campaign 1 Scenario you will learn the basics: build Stations in Cities and near Rural sources of goods.

Some fine points to consider:

Larger Stations have more Platforms, so more Trains can be loaded/unloaded at a time. This will be important as a City grows, but you can start small and upgrade the Station. Just click on the Station to select it. The icon in the upper right showing a house with an up arrow is the way to upgrade it. It will open a confirmation dialog.

For Rural Stations, the larger a Station is, the further it can be from the goods source. While a small Station is cheapest, and even has the lowest cost per Platform, sometimes a large Station that can serve multiple suppliers makes sense by simplifying tracks or allowing multiple goods to be picked up in a single stop.

Larger Stations also load faster. A Large Train Station Platform can fully load an 8 car Freight train in about 12.6 sec, or 3 days in-game time. The "medium" Train Station takes 1.2X longer, and the Small Station takes 1.4X longer. Consider larger Stations for faster operation, but keep in mind that a low level supplier (i.e. Level 1 Farm) will generate goods slowly, so that may be the rate limiting factor. You can buy the farms, mines, etc. by clicking on them on the map, then clicking on the $ button near the top right of the screen. You can also upgrade them up to Level 5, which increases production rates. Click on the house with an up arrow and agree to pay the cost to upgrade them. You can even downgrade them (to reduce supply if you need to limit it) but it costs money, so that will be rarely used.

You can also add a Maintenance shed to any of your Stations. Select the Station and then click the icon with the house and a wrench to add one. Your trains will occasionally linger at a Station for maintenance if they have the shed. This costs precious Platform time, but unmaintained trains will sometimes break down showing poor condition as the cause.

There are also Stations with Signaling Control. Those stations come with a fully connected switch network for their connections, and an automatic controller to guide incoming trains to unused Platforms. This was made in response to player request from people frustrated with trains waiting for each other while there were open Platforms at the Station. (More on this later.) These Stations with their attached switch networks are much longer than conventional Stations. As a result, you can NOT directly upgrade from one type to the other. To change types, you may need to delete some track and the Station, and build the replacements.

When you delete a Station, the game will keep track of it's "name" for a while and when you replace it, any trains with it on their route will recognize the replacement.

While Signaling Control at a Station makes it easier to hook things up and keep trains from waiting while there are unused Platforms, there are some drawbacks. They cost more. They are also less efficient than a well-managed conventional Station. The reason is that trains wait outside the long switch network until they get their turn to enter, so the swap time from one train at a Platform to the next train at the same Platform is high compared with a conventional Station with a nice tight in-out double track connection to a Platform. The choice is up to the player's preference.

Each city can have TWO Stations, each of any size. There is no City "ownership" so the Player and the AI can each have one Station in the same city, or either may have up to two. Note that two small Stations provide two net Platforms at a lower cost than a single medium Station, but will load slower.

There is also the Maintenance Station. It is a giant Station with built-in Maintenance shed, Supply Towers (See below,) and Signaling Control on both ends. It is expensive and very large. Trains that pass through it will automatically stop if and only if they need supplies or maintenance. It is tempting to put them in long stretches of track to automatically keep the trains serviced, but be careful! If you use double track (two one-way tracks) and connect to both track with this building, you will get a lot of undesired jamming. The trains seem to want to insist on using Platform 1 preferentially, even if their route brings them in on the direct line to Platform 4, and their outgoing route is also closest to Platform 4. As a result, trains keep dodging across each others' paths, leading to lots of delay. If you connect this building to only ONE of your double tracks, you don't get jamming but do get service that does not delay trains behind the one being serviced!

Another building is the Supply Tower. They are placed on tracks to supply trains with water, lubricant, and sand (for traction.) If you select a train, then click the Manage Train button, you get a screen showing the train picture at the center top. To the right are three gages showing the three supply levels on the train. When one is running low (always water!?!) the train stops at a Supply Tower to stock up. If supplies run out, the train will slow down. Testing thus far suggests that the slow down is fairly minor - imagine a steam train running without water! To use these towers, put one on each train route. Longer routes (over half a map long) may require two towers along the route. If you build more than one parallel track, the Supply Tower will automatically resize to cover all the parallel tracks at its location.

Note that you can usually Right Click anywhere on the screen to close an open menu like the building menus. This saves the time to mouse over to the "X" to close the box.
Laying Track
Play the first two Campaign Scenarios to get the basics.

The tool is generally easy to use, but can be overly picky. Sometimes you may need to destroy a section of track and try again. To reduce the money lost, use the Bulldozer tool carefully. You can SHIFT Leftclick to set a marker on existing track. The marker will divide the track when using the Bulldozer tool to click and destroy track, so you can trash a small section rather than a long section. The tool highlights the section that will be deleted.

Track has a cost per mile to build. The basic cost in my testing has been in the $550-$575/mile range. If the track is not on level or gently sloped ground, it may need Earthworks (berms or embankments built up, or trenches/cuts dug,) Bridges, or Tunnels. Earthworks are relatively low cost and can be used to smooth out track and avoid steep (high grade %) sections. Some times, Bridges and Tunnels are unavoidable. They are quite expensive so be careful!

When placing control points building track, you can use the mouse wheel to adjust height at the current point. By default, height is local land height, but you can force it up or down. You can also hover over an existing control point and adjust the height. (One thread shows an autohotkey hack if you don't have a mouse wheel.)

If you build near existing track, you can build parallel track. It looks nice, and you often want double track to run trains both ways efficiently. When placing a control point near existing track, you may see an icon of two pieces of track and the green under construction track segment will snap to the existing track. This indicates formal parallel track construction. Apart from looking nice, parallel track MAY save you money. You still pay for the track, but the added construction costs of Bridges and Tunnels are reduced (by 87.5% in my tests.) You can build as many parallel Tracks as you like, but only two on each Bridge or Tunnel
Setting up a Route
Campaign 1 shows how to set up a simple route.

Some undocumented features are worth knowing.

If you set up a route just by selecting Stations, the game automatically selects the shortest route to the next Station, and picks the nearest Platform at that Station. This has the tendency to result in lots of trains stacked up waiting for the same Platform, while other accessible Platforms sit unused. This takes many players off guard. You need to manually select different Platforms to help distribute the load. While this may surprise or even upset some players, it is the intended behavior of the game. The alternative is to use a Station with Signalling Control (see above) that will guide trains to open Platforms.

When you add a Station to a route, if you SHIFT while clicking on the white circle it will open the dialog box to manage that Station stop for this train. You can then click on a Platform in the dialog box to set it as the target, and also manage what to load and how much to load at that Station if you like.

You can also set Waypoints to direct a train to use a particular section of track. Just click on the piece of track you want it to use, making sure to put it in the right order among the Station stops you plan. You can use this, for example, to use a particular bypass or siding rather than automatically following the shortest route (which the game chooses by default.) This can be valuable to keep trains off of precious Platforms that are used for loading/unloading, and reduce crowding on heavily used section of track, or to route fast Express trains along dedicated sections of track while slower trains use a separate track.

When setting a Waypoint, make sure you pick the exact track section you want to use. If clicking on a double track, don't get the wrong one or your train will take a crazy path!

As of the July 2018 update (1.4) *for the purposes of finding the shortest path only* the automatic pathfinding method will calculate a penalty to paths passing through a Station Platform without it being a scheduled stop. This means that if you build a bypass track past a City, the pathfinder will use the bypass instead of routing through the Platform, so you won't need to specify a Waypoint or ensure bypass track is shorter than Station track to improve efficiency. The method seems to add approximately 17 miles of "penalty" to paths being evaluated that pass through a Station to achieve this. Again, this penalty is only in figuring out which is the shortest path, it does NOTHING to the trains moving along the selected path, it only influences which path is chosen.

Warning: for Goals that require delivery of passengers non-stop from one City to another, use of a Waypoint (or any scheduled stop at any Station) will disqualify that load of passengers. (Unscheduled stops due to breakdown, stopping for supplies, or blocked track are ok.) This has reportedly been fixed in the current release. These non-stop passenger tasks require there be no scheduled stop from origin to destination. Stops due to breakdown, traffic, weather, taking on suppies, and maintenance at a Maintenance Station do not disqualify the passengers.
Train Management
Click on an individual train to select it for management.

Click on a section of track and a list of all trains using that section will appear on the left of the screen. Clicking on a train in that list selects that train.

As new models of engine become available, or trains get worn out and slow down, you may want to upgrade your trains.

From the Engine Shed (4th icon at the top left) you can scan through the various engine models available. At the top right of that screen you can buy a new engine with the $ button, or upgrade a bunch at once with the =$= button. With the latter, you can either upgrade *all* your engines to a different model, filter by Age, Suitability (Freight, Express, Mixed - determined by the model,) or by Route properties (Cities only, with a Rural business stop, carrying Freight only, carrying Passengers and Mail) to upgrade all engines in that class. You are refunded the remaining value of the old engine.

You can also select an existing single train and click on the Manage Train button (train with a pencil) to open a detailed individual manager. At the top right is a $ button to "Buy locomotive." This new engine will replace the old one, again refunding remaining engine value.

Sometimes you want to manage a train's route. Select a train and click on the little map button above the train information to make changes to the route. Each stop has a box on the left of the screen. You can rearrange the order of the route by moving those boxes up and down by clicking the arrows that appear on the middle of the boxes. You can also hover over one and click on the pad of paper icon to open the manager for that stop. You can click on individual types of good to cycle through preferred (green) banned (red) and normal (no added icon) pickup of that good at this stop. You can set min and max carloads to be picked up (total.)

While in route management, the right hand box can set the train route to be Automatic, Passengers and Mail Only, Freight Only, or Manual. Automatic is generally pretty good, but experiment! Restricted modes will pick up only those goods. Manual allows the player to set EXACTLY what to pick up and drop off at a Station. Click around, you'll get the hang of it, of see the Case Study: Manual Route below.

Trains will ONLY pick up goods that are in demand at one of their other Stations, and only as many goods as that/those stations have room for. If a train isn't loading the goods you have specified or want it to, this is probably the reason. Cities have limited space for each type of good, and if another train is already on the way, the goods it carries count to that limit.
Passengers
Trains can carry Express goods, including Passengers and Mail between Cities on dedicated Passenger and Mail cars.

The main screen for each City (click on a City to open it) shows some information on Passengers and Mail for the City. Click on the right panel and it will open the screen for the City's Express demands. This will be a table of rows for the other Cities and corresponding demand for transportation to those other Cities. The numbers represent *individual* Passengers or packages per week wanting to go to other destinations.

Mail cars can carry up to 40 packages.
Passenger cars have capacity that changes depending on the era of the car: (thanks to gardlt for the information)
Era :-: Passengers per car
1830 : 25
1850 : 35
1870 : 40
1890 : 45
1910 : 50

Passengers don't follow the same rules as ordinary goods (i.e. delivery from producer to consumer.) Passengers will seek efficient paths to their intended final destination City. They are willing to take your train part of the way and use horse carts or walk on foot the rest of the way, and will make transfers at Cities taking multiple trains along their chosen path.

If the path your train takes is more than twice the direct distance, they won't take it. They also won't wait at a Station more than 14 days to get on a train, but once they are on your train will tolerate indefinite waiting while others load.

Passengers pay more for faster trips and comfortable trains. Preferences can be found for each engine type that improve trip ratings, and of course short travel times come with extra satisfaction.

If the train can gain formal "Express" status (lightning bolt icon in the train list) they pay a premium, too. Developers have said Passengers and Mail pay a 10% premium to travel by Express. There is some confusion as to the formal requirements to qualify for Express status (not to be confused with the setting to carry only Express goods that the player can set) but it appears to require that a particular engine make a quick round-trip time for the route. There are suggestions that the engine *must* be the fastest available, but that does not seem to be true. To make quick times, use fast engines, add speed increasing personnel, and limit the train to few cars. A train with 8 cars and no personnel can become an Express, but it seems easier with the adjustments. It has been suggested that straight and level track help, which would indicate that the quick time isn't just measured against previous trips, but there is a fixed standard that must be met. Further details are unclear to me, but the time requirement seems to depend on distance between the Cities (of course) and what trains speed is available to any company in the game, so if you get behind in train model you might not be able to get the status. The status progress can be monitored on the train management screen at the little yellow dial to the left of the train picture. It will build up with successful trips, and if it gets into the gold zone at the top, you get Express Status. This typically takes at least two trips, but I have seen Express Status granted in single very long trips.

The engine with the fastest top speed rating (usually an express model) won't necessarily be the quickest for the trip. If there is steep track and you pull a heavier load, tractive power may be more important than top rated speed. Look through your engine options. The load you pull matters too, so consider that. Here are some weights thanks to user Thineboot:

Freight cars have a mass 10.
Mail cars and the four Railcars have a mass of 2.
Passenger cars have mass that changes depending on the era of the car:
Era :-: Mass per Passenger car
1830 : 1
1850 : 1.5
1870 : 2
1890 : 2.5
1910 : 3
Warehouses
For a Warehouse to function, you must click on it and specify what it will hold (up to 6 different types of goods.) You also specify the maximum amount of each good - typically clicking on the button at the bottom to set the limit to 99.

You can't stock goods in a Warehouse that are not in demand (yet) anywhere on the map.

Generally when you transport Freight, you get paid when you drop it off at a City. This means you don't get paid bringing, say, Grain from a Farm to a Warehouse, but you do when it later goes to a City.

Use of Warehouses is a style preference - you can play without them. Some players like the look of them, others find them an unnecessary expense/complication. With high throughput, they can help "balance" demands in a City by providing what the City needs from the Warehouse. This is a little clunky. On Automatic, loads will be selected to saturate capacity on one good at a time, leaving other goods unfulfilled ... which is not optimal for City growth. Multiple trains making the deliveries and set to prioritize different goods can work well, but isn't really much easier than direct delivery from sources.

A Warehouse has value for high demand goods that come from far away. Because trains will only load enough carloads of a particular good to fill their target City to its capacity (and other trains already on the way with the same type of goods count toward meeting that capacity,) a distant source may see full capacity already "on the way" and not load more. Once the goods are delivered they immediately start being consumed. For distant sources, it is possible the goods will be consumed before the next train can resupply, so the City will run short of the good because the trip takes a long time. The Warehouse can serve as an accumulator of the good nearer the City so that a continuous supply can be maintained.

Warehouses can serve Cities and rural industries directly. This makes them a great alternative to delivering everything to precious City Station Platforms. When you place a Warehouse, bars indicating locations in range for service appear. When you specify goods to be taken at the Warehouse, any goods PRODUCED at connected locations and in excess stock there are available to be picked up by trains at the Warehouse. (Note that such goods are not counted as "in" the Warehouse, but are at their source.) Furthermore, any goods delivered to the Warehouse by train are available to a connected City. Note that you can not automatically "pull goods" through a Warehouse without using a train, so you can't deliver goods between a nearby source and a City without a train!
Company Stock
If playing against AI competitors, you can buy stock in their Company, and they can buy stock in your Company. Companies may not buy their own stock "defensively" as in other games.

Shares in general do not pay dividends.

Buy shares in the competition by clicking on the 4th icon on the top left (Company) and going to the 3rd screen of that section. Click the two arrows on the competitor company box then with the slider select how much to buy and confirm.

As you buy shares in another company, the marginal cost per share goes up reflecting some supply and demand effects. Thineboot indicates a cost of 150% of company value if you buy all at once, and a test just now yields a 160% cost, so the premium is significant.

If you want to shortcut the buyout, you can hit the Merge button (linked squares.) This will buy out the remaining shares, but at a 10% premium on top of the effect above, so don't do that unless you don't care about money any more and time is important.

If you choose to buy up all of another Company, you have the option to Merge them into your Company, or let them keep operating, giving you their profits. If you Merge, you have options to either sell off (demolish) their infrastructure (trains, tracks, and buildings) or take over it.

Keep in mind that they may have "Normal" (single/Easy) track, so if you are playing Normal (AI) rules, there will be some track building to be done to make workable lines. In any case, they have station lead-in that is impossible for the player to build, and is also terrible because it bottlenecks to a single track. This must be a method to make the AI work with Realistic track. I recommend destroying all the junk parts of the track and building something better ... I use Manual Pause so there is no real down side while Trainiacs would lose a lot of time doing this.

Their employees will become available to you. If you want office employees, assign them soon or they time out. Train employees stay where they are assigned, but you should look for personality conflicts and resolve them, as well as Conductors on Freight trans and other silly assignments. You gain their Technologies to use for yourself as well when you Merge.
Signals
There are other guides on the topic, so this will be brief. For some reason this has been a difficult topic for many, but the signal behavior is simple and effective if you understand it.

TIP #1 If you are used to signals in another game, FORGET WHAT YOU THINK SIGNALS DO IN ***THIS*** GAME! Don't try to make your expectations match the game, instead learn how the game does work.

Signals divide track into blocks. In Realistic mode, only ONE train may use a block of track at a time, the first train to claim a particular block goes first while the others wait for it to exit the block.

The signals may require some practice and experiment to use effectively. Please play with them while not trying to win a scenario!!!

There are two types of signal: Stop and Directional. Stop signals are represented during construction by a yellow cone, Directional by a yellow cone with a red disc (the "no" symbol.)

Signals will cause trains traveling in the direction of the cone to stop if the block ahead is not clear. Stop signals will have no effect on trains going the other way, but Directional signals will completely prevent trains from going in the other direction. Use them to make an efficient two-track setup.

With tool tips on, directions are at the bottom of the screen.

You can place individual signals, or many at a time. Hitting CTRL will place signals along an entire section of track with one click. They will be spaced roughly a full train length apart.

Click to place Stop signals, SHIFT-Click for Directional. The mouse wheel will change the planned signal direction while building, and clicking on an existing signal will change its direction.
Hotkeys
There are some fixed hotkeys in the game.

WASD or Arrow Keys move the map around QE to rotate the view, or rotate virtual building in build mode CTRL in build mode slows rotation RF to zoom in or out SpaceBar toggles Pause in some states ESC open Game Options Menu Tab/Shift-Tab: Map/train dialog: toggle trains City dialog: toggle towns with a Station Dialog: toggle tabs Numpad +/- game speed H Center starting City If in Track or Station Construction with contour lines option "on" toggle contour lines. Delete open Bulldozer Mode (manual indicates Backspace, too, but it doesn't work for me.) Enter: Dialogs: confirms Set up route: save and exit route Trackbuilding: pay and build Backspace Delete selected train/planned track/route changes/cancel dialog X toggles Signal Mode in some states V Ride along T Track Construction B Building Construction L Train List K Town List G Flow of Goods M Toggle Minimap off/on N Orient view North up P Skip the current musical tune F1 Tips and Tricks F2 Tasks F3 Company F4 Research F5 Engine Shed F6 Personell F8 Quicksave F12 takes a screen shot C Center camera on selected train

AutoHotkey is easy to use to add/customize hotkeys. I have a sample script in the thread "DIY hotkeys" at http://steamproxy.net/app/503940/discussions/0/2860219962089755265/
City Growth
Towns will grow when their demands are met, defined as the town having more than 60% of their total demanded goods (in carloads) in stock. Click on a City and a page for the City will open. On the left panel the percent fulfillment appears. If it is more than 60%, the City Population will grow. Too low and the City will actually shrink!

Click on that left panel and another page opens showing the details of the City's demands on the right side. There are rows for each type of good, the "in demand" goods are highlighted. Others will be added to demand as the City grows. The columns are for Supply of the good in the City, weekly consumption in the City, production capacity of the City, Global production capacity, and Global demand, all quantities in carloads.

You need to have Supply > 0 for over 60% of CONSUMER goods, weighted by their consumption rates.* Early consumer goods include Grain, Corn, Wood, Meat, and Beer. Note that while Grain is used to make Beer, it is also a consumer good, while the Cattle used to make Meat are NOT a consumer good directly so they won't count toward fulfillment of demand.

The game initially starts with a small extra deficit so you may supply 3 of the 5 goods and only get 59% fulfillment. The "percent fulfillment" is basically a 30 day moving average where weighting is exponential in time so that "today" counts a lot toward the average, while 29 days ago barely counts. (The time constant of 7 days fits data well. This is equivalent to the moving average being calculated as approximately 90% of yesterdays running fulfillment and 10% of today's fulfillment.)

Horse wagons may fulfill the demands from nearby sources (the game does short-range transportation automatically and invisibly) but the player will eventually need to use trains to keep up with the growing rates of consumption.

*Having higher demand goods in stock counts more toward fulfillment of demand than low demand goods. For a made up example, if demands for Grain, Corn, and Wood are each 10 carloads/week, and demand for Meat and Beer are each 5 carloads/week, then the total demand is 40 carloads/week. If you have Grain, Corn, and Wood all in supply but no Meat or Beer, fulfillment is 75% (10+10+10/40). If you have Grain, Meat, and Beer but no Corn or Wood, fulfillment is only 50% (10+5+5/40). This means early goods, which have higher demand, are more important to keep in supply for high fulfillment, although it may be easier in some cases to keep the later, lower demand goods in supply.
Case Study: Manual Route
Here is a step by step example of how to set up a Route with Manual control of what gets loaded and unloaded at each Station.

I've started a game using the "America" (USA) map from 1910-1930; the starting City is Atalanta.
Stations are built in Atlanta, Charlotte, and a (medium size) Rural Station at "Moore Farm" that can access the Vegetables and Grain grown nearby. A simple single track connects the Stations for this example with one train moving Freight from the Farm to the Cities.

A Simple Track Connecting the Stations

I used the space bar to pause, because I like a casual pace. Clicking on the "New Train" button (engine icon in the bar at the top right) opens a dialog allowing the player to buy an engine for the line by clicking on the "Add locomotive" button.

This opens the locomotive purchasing screen.

Scrolling down to find Old Maude at the bottom of the list, click on the "$" to buy one. Old Maude has a lot of Tractive Power (lightning bolt = 206%) good for pulling heavy freight cars. While her speed isn't top notch, the cost is low compared with the other options.

Above the Add locomotive button is the button to "Set up rail line."

In this mode, click on the green discs that appear hovering over Moore Farm, Charlotte, and then Atlanta. A yellow arrow band will appear on the screen showing the route in order.

The Map Now Shows the Stops in Order

The box on the right has the control to set the train goods type. It defaults to "Automatic," but clicking the arrow buttons left or right scrolls through "Passengers & Mail only" (Express), "Freight only," and "Manual." For this example, set it to Manual.


While the route manager is active, you see the list of stops at the upper left of the screen. Hover over the pencil and paper icon for the Farm and click to open the Station manager for this train.

Since this train has Manual management for its cargo, you will see two rows representing the cars. The top row represents the (up to) 8 cars state as the train arrives at this Station, the bottom row represents the cars as the train leaves the Station.

We have Vegetables and Grain available at this Station. Since the Cities are too small to demand Vegetables (!) don't load any. If you try, the train will sit there for ever not loading them because trains will never load goods that are not currently in demand somewhere later on their route. Both of the Cities, however, want Grain, so let's load up with that.

Click on the Grain icon in the Offered goods section and the available cars will indicate that they will carry Grain, one car per click. Clicking on the cars will instead toggle that good "off" and show the car as empty.
Note that for this first Station being managed on the Route, the good will appear in both the top and bottom rows, indicating a problem (with !) because the grain can't be unloaded here. This will be resolved automatically as we finish the manual specification.

Oops! There isn't demand for Vegetables on this route, the train will wait for ever not loading.

Ah, a full load of grain for the hungry Cities.

In the same manager, at the lower right is a control to set the minimum number of cars to use. It is often (not always) a good practice to set that to 8 (full train) in Automatic mode so that trains don't leave below capacity. In Manual, I recommend leaving it at 0, because if you don't specify enough loads to reach the minimum, the train will wait forever to reach the minimum, which it can't because the specified load is too small.

Now move on to the Charlotte Station management (pencil and paper icon for that Station.)
Click on four cars with Grain. Now the bottom row shows four empty cars for the train leaving the Station, and the top row shows the corresponding cars unloading here with a blue down arrow.

Let's empty half the grain at this Station

Then go on to manage Atlanta's delivery.

Here only two cars will be emptied at Atlanta. We should probably go ahead and empty the rest, too.

Now checking back at the farm, the loads make sense. The train arrives empty and leaves full.

The cycle complete at the Farm

With these controls, you have control over what is loaded and unloaded at each stop of a route.

Is this a good route? For this particular situation, we can do better with a single train.

Consider that for this route run twice, the train will deliver 8 grain to each City. In the process, it will run the full distance from the Farm to Atlanta 4 times, and make 6 stop/start cycles.

Suppose instead the route ran Farm to Charlotte to Farm to Atlanta, carrying a full 8 cars each trip out of the Farm. The total distance traveled is now the distance from the Farm to Atlanta 2 times, and the distance from the Farm to Charlotte 2 times --- substantially shorter. It will also only make 4 stop/start cycles. Each stop takes time, as does the travel distance, so this route may be repeated in a shorter time while still delivering 8 carloads to each City in a cycle.

There can be timing issue as demand rises or with differing amounts of demand, but in general, the approach gains in more efficient delivery of the goods for a higher profit.
Scaling
There are a lot of questions about how big, how long, time, speed, etc. in the game. Some players are bothered by unrealistic or strange looking features and numerical values.

For a game like this, it is necessary to use MULTIPLE SCALES at the same time. This means that not everything can be "proper." The reasons are a mix of the look of things, practical play times, narrative intent, game balance, playability, etc.

The most obvious scale is time. For a pure simulation, you want game time and player wall-clock time to be the same 1:1. For most other types of game, you really want the time in game to run much faster, as in this game. Suppose one second of real time represents a day in-game. That's a scaling of 86,400:1. The scale will depend on how long the narrative/story time should take in-game, and how long in real time the game should take to play.

An example of mixed scales is the train/map scale. Suppose you build your on-map destinations "realistic" distances from each other. If you want a "large" map with something like a dozen cities and an interesting economy, you might end up with destinations something like hundreds of miles apart.

If you have two stations 200 miles apart, and trains at the same scale that are say 200 feet long, then the train will be 1/5280 as long as the stations are apart. Suppose you zoom to show 400 miles of map across your 17" monitor. The train is now about 0.0016" long. (A typical LCD monitor has about 100 pixels/inch, so the train is about 1/6 of a pixel.) You need to zoom in to a view of under 10 miles full screen for the train to be as big as a grain of sand. Most players would not find that to be an appealing visual experience, but would prefer something that looked more like a model train set. A reasonable design decision is to make the trains larger than map scale so they look nice and are visible to the player when looking at a decent section of map. Suppose you make the train that is realistically 400' long now something like 10 miles long on the map scale to get the desired look; it has been scaled up 132:1 compared with the map.

So now you have these beautiful giant trains moving around 132X larger than the landscape. You don't want the landscape to be ugly or look crazy at any zoom level, so you have to fudge it to make it look real when zoomed at train scale and still represent the desired topography at map scale.

If you make the train look like it is moving at the right speed to the player, you'll want it to move some number of car-lengths per wall clock second. Let's take our 10 mile long on the map train that "in reality" might be 400' long. A real steam train like that running along may take something like 14 seconds to pass. That would look nice, but now our in-game clock tells us that two WEEKS have passed ... but the train has only moved 400' at train scale or 140 miles at map scale ... neither of which are a realistic fit for two weeks running a train! We have run up against the problem of mixed scales making it impossible for everything to fit together at the same time and have "the math" work out.

For a game to be a good experience to play, the developer must compromise these scaling details, unless they are building a pure simulation where time and length scales are 1:1 across the board.

We want a pretty game that is balanced for challenge and real time, so we have to accept some of these compromises. Since we have a small number of trains taking a long time to do a single trip, you can think of each train as representing many trains operating at more realistic sizes and speeds. This ultimately has the effect of crowding the representative track, so that what might realistically be easily managed with little track, a few sidings, and small stations may require a lot more to be built in the game.
Location of Game Saves, Setting, and Progress
The game settings and progress are saved in a file by default saved somewhere similar to:

C:\Program Files (x86)\Steam\userdata\(myusernumber)\503940\remote\settings\settings.dat

The first part through Steam is wherever you have Steam set up.
(myusernumber) will be a set of numerals representing your Steam number.
503940 is the Steam number for Railway Empire.

Saved games are similarly located at:

C:\Program Files (x86)\Steam\userdata\(myusernumber)\503940\remote\savegames\save###.trn

where ### represents some numeral(s).

Autosaves are in the same location and named saveautosp#.trn

where # is 0, 1, or 2.

The above seems to hold for local saves. If you use cloud saves, you may need to try

C:\Users\[UserName]\Documents\My Games\Railway Empire\savegames
91 Comments
chaney  [author] 19 Jan @ 11:40pm 
You are very welcome, I'm happy it is still useful!
Scrof 19 Jan @ 8:27pm 
Thank you, this is a very useful guide.
chaney  [author] 10 Sep, 2023 @ 1:40am 
Thanks for the report! Was the Warehouse the same size (number of Platforms/Tracks) as the Station? I only tested as reported, Stations loading Freight. I never looked at differences between Stations and same sized Warehouses, or proximity but those could result in some differences! I can't run the game on my current computer, but if you test please report the results - it's nice to know such details for the compulsive player :)
Kadjai 9 Sep, 2023 @ 10:12pm 
Hi, thanks for the guide...I was looking for train unload speeds, I ended up testing and found unloading to a warehouse is at a faster speed than to a city station (3.9 secs vs 5.8s), and did not matter proximity to the city like a city station does. I was looking for info on how sensitive the location of the industry affected the train unloading speed. TY
chaney  [author] 31 May, 2022 @ 1:38am 
You are very welcome, and I share the thanks with all the others from the forum who have rooted out how things work!
UglyBird 30 May, 2022 @ 11:47pm 
Great job @chaney. one of the best guide I have come across for a long time, THANKS!
chaney  [author] 11 May, 2022 @ 2:05am 
See the Passengers section, paragraph 2 for what I *think* you are talking about.
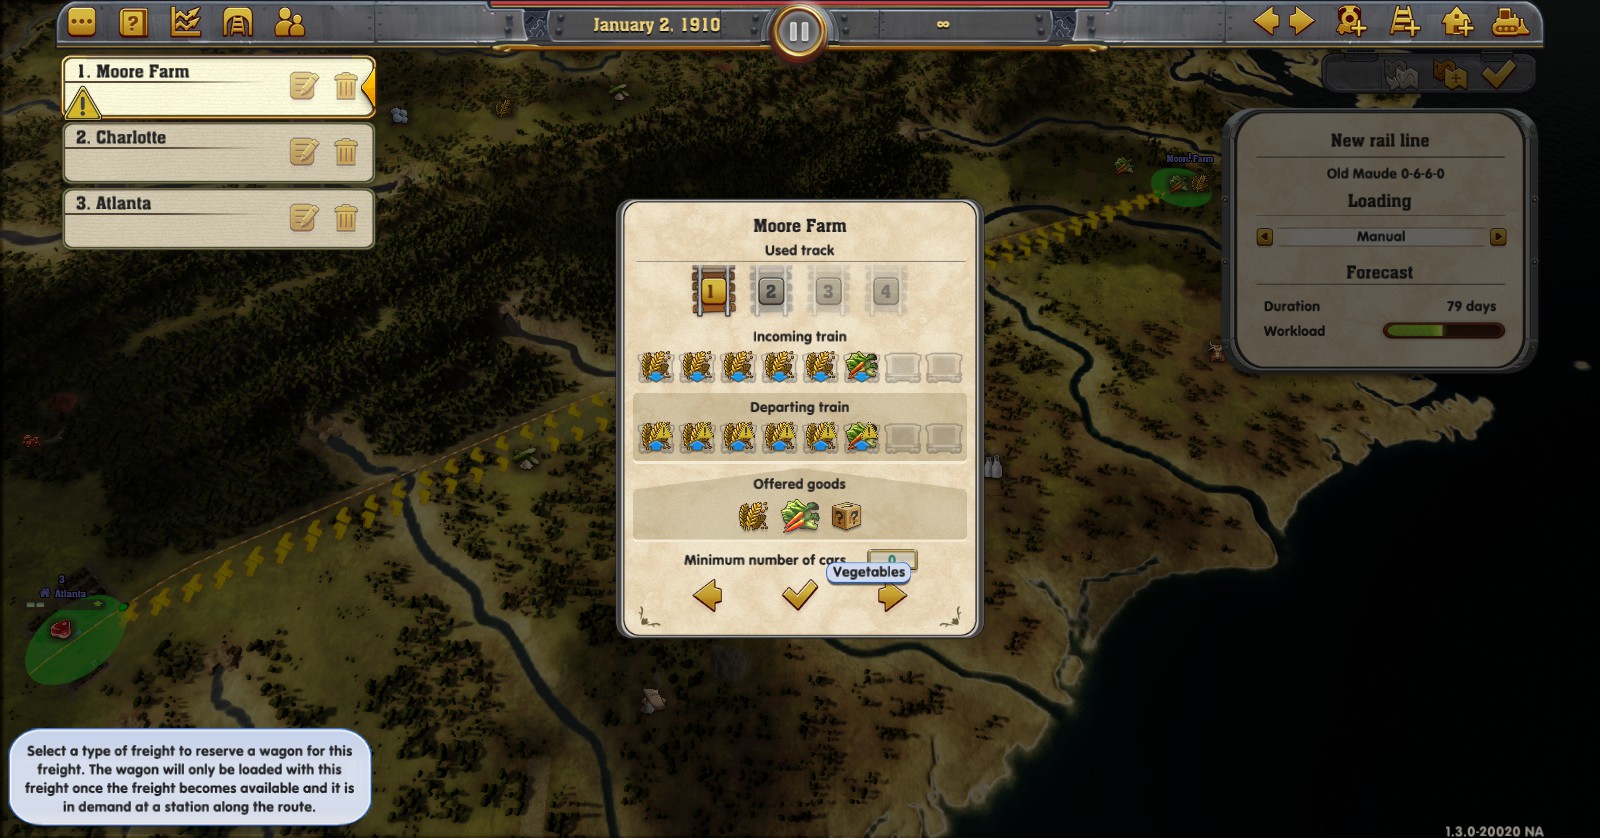
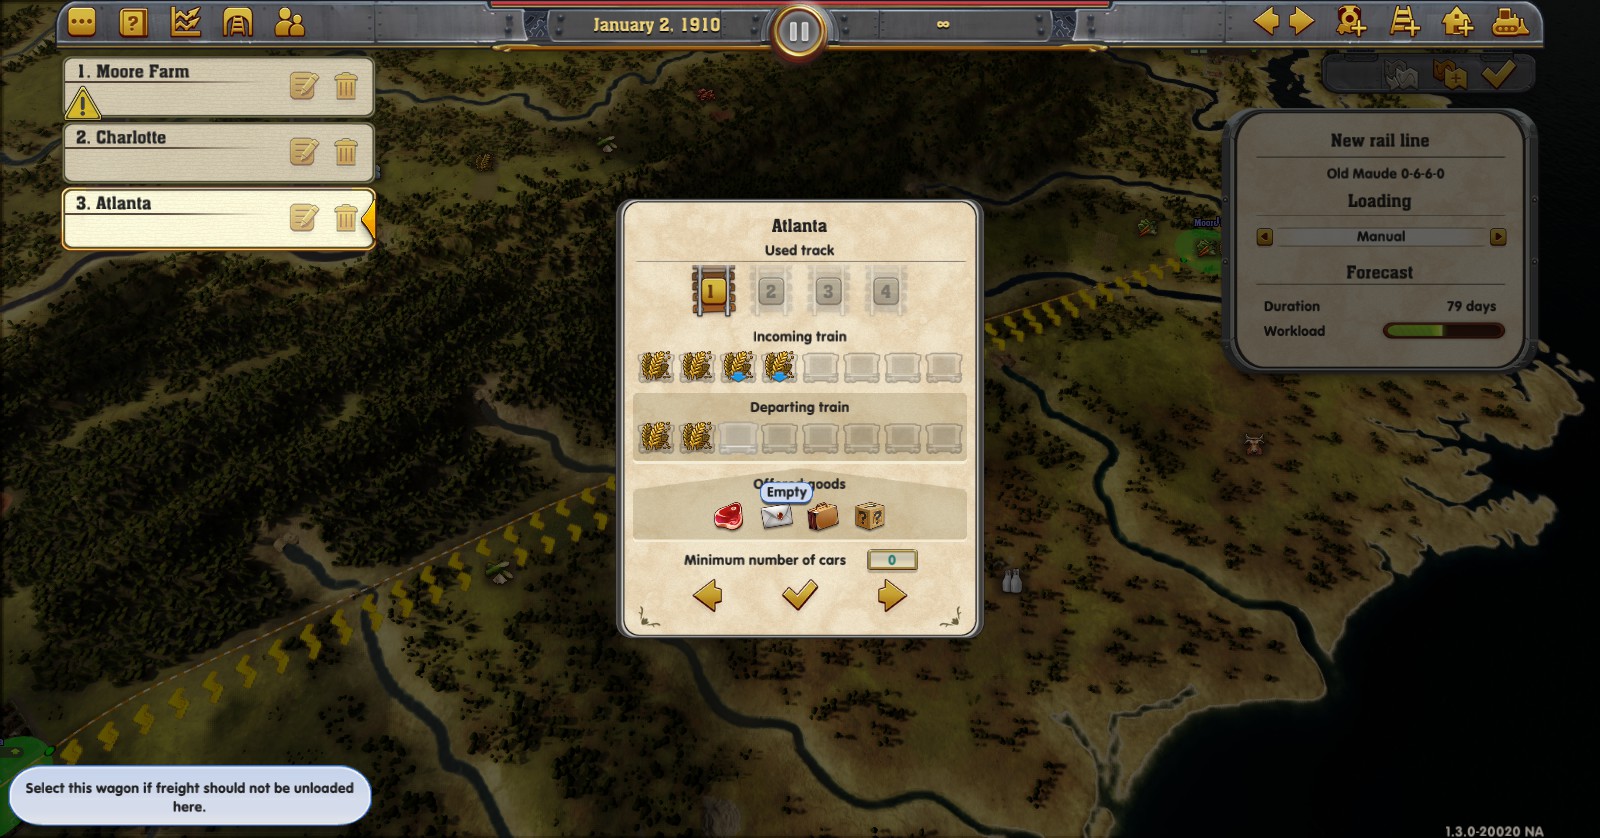
The numbers are the demand generated per week. Percentage is (IIRC) the portion that you are serving with your trains.
Master of Tides 10 May, 2022 @ 7:37pm 
When managing a city, there is an interface about the passengers and mails to different cities. I don't understand what the numbers and percentages mean, could you tell me? Thank you.
chaney  [author] 24 Mar, 2022 @ 4:45pm 
Never had that trouble. Maybe the train has been set to Freight only? Are you getting NO Express delivery, or is it just diminished? If diminished, you may just be fully serving available demand already, but if you get none, check the train for priorities/prohibitions to see if that explains it.
Boompaw 24 Mar, 2022 @ 10:59am 
Running along pretty good, but all of a sudden I can’t get passengers or mail from Chicago to Indianapolis.
Everything else works great with all the other cities, tried a different route from Indianapolis to Chicago and it works, But that route really screws me up somethings not right. Checked everything I know of… has anyone ever had this problem.