Team Fortress 2

Team Fortress 2

281 평점
How To Make Animated Sprays Using VTFEdit
GreenSwede 님이 작성
This guide will show you how to make animated sprays using VTFEdit, GIMP and Photoshop. Different compression formats and resolutions will be compared to show you how many frames in total you can use before reaching the 512 KB file size limit.
13
   
어워드
즐겨찾기
즐겨찾기됨
즐겨찾기 해제
Prerequisites
This guide will be going through the following tools on how to make an animated spray:
  • VTFEdit[www.tophattwaffle.com](v1.3.3 used for this guide) Used to import the separate images and export all of them into one single animated VTF file.

  • GIMP[www.gimp.org] (v2.8.22 used for this guide, however other/newer versions also work fine)
    Used to import already separate images or animated GIFs and turn them into layers, resize/crop each layer to a valid resolution and then finally export all layers as separate images.
    You will need this plugin to export all of your layers as separate images:
    https://khalim19.github.io/gimp-plugin-export-layers/


  • Photoshop (CS6 used for this guide, however other/newer versions also work fine)
    Does the same things as GIMP except it also allows you to directly import MP4 videos and export them as separate images. I would personally recommend using Photoshop if you got access to it due to its features.
    Optional script you can use to export layers to files faster than the built-in script provided by Adobe: Export Layers to Files Fast[github.com]

To follow along the guide you will at least need:
  • An animated GIF
  • Already separate images
  • An MP4 video (Photoshop walkthrough only)
Keep in mind that external tools can be used to turn videos into separate images if you happen to only be able use GIMP and need a workaround. Google is your friend.[www.raymond.cc]
Compression Formats And Resolutions
Important thing to note when it comes to making sprays is that they cannot exceed 512 KB in file size. If a spray does not stay under that limit then it cannot unfortunately be used as a spray. This is a limit for sprays in all Source games made by Valve.

In order to ensure that the spray does not exceed the 512 KB limit it is important to know how many frames you can afford to use depending on the chosen image format (compression) and resolution.

The DXT formats (DXT1 and DXT5) are compressed formats. This means that they will be the best options to use if you want to have the most amount of frames or the biggest resolution. The downside is that the colour depth is slightly decreased, but the compression does a good job hiding it for the most part. The limited colour depth is more noticeable on certain colours.

The BGR888, BGRA8888 and BGR565 formats are uncompressed formats, giving you the best looking spray quality. However, using these formats will increase your spray file size by a lot so it is not suitable for sprays with many frames or with big texture resolutions.

BGR565 is similar to BGR888 except it has a limited colour depth. It serves a great purpose for sprays and can help keep the file size lower without causing compression artifacts to the colours. Consider using it for pixel-art sprays when you need the extra frames, like this guide's avatar.

Compression Comparison Tables
Here are some tables I have made which will go through the five common image compression formats. They show just how many frames you can afford to use depending on the used resolution and compression. "(Alpha)" means that they have transparency support for transparent images. You should not use alpha supported image formats if your spray does not need it, as it only increases the file size with no visual improvement.

Please be aware that the following specifications does not include mipmaps! It is not advised to use mipmaps because that is going to cause your spray to increase in file size even more than necessary.

DXT1
Resolution
Frames
File Size
64x64
255
510 KB
128x128
63
504 KB
256x256
15
480 KB
512x512
3
384 KB

DXT5 (Alpha)
Resolution
Frames
File Size
64x64
127
508 KB
128x128
31
496 KB
256x256
7
448 KB
512x512
1
256 KB

BGR888
Resolution
Frames
File Size
64x64
42
504 KB
128x128
10
480 KB
256x256
2
384 KB
512x512
0
768 KB

BGRA8888 (Alpha)
Resolution
Frames
File Size
64x64
31
496 KB
128x128
7
448 KB
256x256
1
256 KB
512x512
0
1024 KB

BGR565
Resolution
Frames
File Size
64x64
63
504 KB
128x128
15
480 KB
256x256
3
384 KB
512x512
0
512 KB
How To Use GIMP

First time using GIMP? You may want to click on "Windows" and make sure "Single-Windowed Mode" is selected before continuing with the guide.

Importing a GIF
  1. Open up GIMP and click on File > Open. Browse to your GIF and Open it.


Importing separate images
  1. Open up GIMP and click on File > Open as Layers...

  2. Browse to the images you want to add, select all of the image files, then click on Open


Unoptimizing GIF layers
  1. The layers are the frames used in the GIF and will show up in the Layers tab to the right. "Background" is the first frame.

    Some GIFs may be "optimized" causing each layer to be rendered on top of each other every frame, this is a technique done to reduce the file size of animated GIFs. This is a bad thing and will cause the layers to look like the image below:


    Unoptimize the layers by going to Filters > Animation > Unoptimize.


    After unoptimizing the layers it should no longer have any weird optimization issues, like the image below:


Scaling (resizing) the images
  1. Scale the images by going to Image > Scale Image.

    Make sure the image size is a power of 2 (64x64, 128x128, 256x256, 512x512).

  2. To scale the images so it has the same width and height proportions, click the chain icon so it is broken like the image below:


  3. You can change the interpolation to suit your needs. Cubic and Linear can look better than one another depending on the image that you had to scale down.

    Sinc (Lanczos3) is best used for pixel art featuring pixels and aliased edges, like the spray used in the guide avatar. If you use it, divide/multiply the source material's size by 2/3/4 etc so all pixels stay the same size. Count the pixel size so you do not accidentally mess up and make the pixel-size inconsistent/distorted.

Cropping the images
  1. Cropping images can be useful in many scenarios to prevent images from becoming stretched/squished if the proportions are uneven. If you want to crop the images without scaling it up/down, use the Crop Tool (shortcut: Shift+C).


  2. Click the dropdown list to change from Aspect Ratio to Width, Height and Size. The fixed size can be adjusted. Holding Shift while dragging the cursor using the Crop Tool will also force it to be a fixed size.

Exporting the layers
  1. Now you are ready to export the layers as separate images. Make sure you got the "export layers" plugin downloaded and installed which is mentioned in the prerequisites section.

    Go to File > Export Layers... and select the destination where you wish to export the layers, then click on Export Layers.

  2. Another window will pop up. Leaving the window with these settings like the image below should be fine:


  3. Click on Export and you are done. Now every layer has been exported as a PNG file in the chosen resolution. Simple! Please move on to the VTFEdit step.
How To Use Photoshop


Importing a GIF
  1. Open up Photoshop and click on File > Open. Browse to your GIF and Open it.


Importing separate images
  1. Open up Photoshop and click on File > Scripts > Load Files into Stack...

  2. Browse to the images you want to add, select all of the image files, then click on OK. After clicking OK, click on OK again to start loading the images into separate layers.


Importing an MP4 video
  1. Open up Photoshop and click on File > Import > Video Frames to Layers...
    Browse to your video and Open it.

  2. Now that the video is open, it is advised to mark "Selected Range Only" and only select a minor part of the video due to all the frames. However that is up to you, you can always delete/skip frames afterwards.


  3. Once you feel satisfied, click on OK.


Scaling (resizing) the images
  1. Scale the images by going to Image > Image Size...

    Make sure the image size is a power of 2 (64x64, 128x128, 256x256, 512x512).

  2. To scale the images so it has the same width and height proportions, click on Constrain Proportions so it is unchecked like the image below:


  3. You can change the resampling used when resizing your images to suit your needs.


    Bilinear is what I personally use the most when it comes to resizing images. There are times when I may want to use the other resampling options however, as it depends on the images used. For a good summary of what they all mean, look at the parentheses.

    Nearest Neighbor is best used for pixel art featuring pixels and aliased edges, like the spray used in the guide avatar. If you use it, divide/multiply the source material's size by 2/3/4 etc so all pixels stay the same size. Count the pixel size so you do not accidentally mess up and make the pixel-size inconsistent/distorted.

Cropping the images
  1. Cropping images can be useful in many scenarios to prevent images from becoming stretched/squished if the proportions are uneven. If you want to crop the images without scaling it up/down, use the Crop Tool (shortcut: C).


  2. Click the dropdown list to change between different fixed sizes. Unconstrained allows you to drag the crop tool freely with any proportions you want, while 1 x 1 (Square) restricts it to a square. Hold shift to make it fixed.


Exporting the layers
  1. Now you are ready to export the layers as separate images.

    Before you do that though, you may have to reverse the layers so they will be exported in the correct order. Images are sorted based on their names in VTFEdit once you're adding them, so if the numeric order is incorrect it will play in reverse.

    To reverse all layers, select all layers by going to Select > All Layers and then go to Layer > Arrange > Reverse.

    Go to File > Scripts > Export Layers to Files... and browse to the destination where you wish to export the layers. Give them a file name prefix and select PNG-24 as the file type. The following options like the image below should be fine:


    Transparency should only be used if your image contains any transparency (alpha channel).


  2. Click on Run and you are done. Now every layer will be exported as a PNG file in the chosen resolution. Good stuff!
How To Use VTFEdit
Now that you are done with either the GIMP walkthrough or the Photoshop walkthrough, it is time to guide you through VTFEdit. We will be going through the entire process in one go.

  1. Open up VTFEdit and click on File > Import

  2. Browse to the destination where all the separate images were exported and select as many as you want (and can afford).

  3. Once the images have been selected, click on Open.

  4. Now you will be greeted by the VTF Options window. In here you can select which normal/alpha format you wish to use, and what type of texture type it is. Since we're making animated sprays, click on the dropdown list and select Animated Texture.


  5. The other checkboxes should stay unchecked, just as the image above shows you. They serve no functional purpose for this guide. Click on OK once you are done selecting the format. Do not forget to check the "Compression Comparison Tables" section at the near beginning of this guide for more info on which compression is appropriate to choose.

  6. If you have followed all the instructions correctly so far you should be able to see your spray in the preview window in VTFEdit right in front of you.


    The Image tab allows you to click on Play to see the animation in motion, although it will play a lot faster than in-game. In-game sprays are unfortunately restricted to a framerate of 5 frames per second. You can also go through every frame in the Frame list manually.

    The Info tab shows you the file size of your spray, how many frames it has and what image format it uses.

    To the left in the Image tab there is a Flags section with different checkboxes. Each flag gives the spray a different property where most of them change the way the spray looks. A couple of flags that you may want to be aware of for your sprays are:

    No Mipmap (we skipped including mipmaps so this can be enabled)
    No Level of Detail (spray quality is not affected by players' texture quality setting)
    Clamp S (often used for sprays that are transparent, clamps S coordinates)
    Clamp T (often used for sprays that are transparent, clamps T coordinates)
    Point Sample ("pixel art" texture filtering, works great for sprites and pixelated art)

  7. Once you're happy with the image format used, the amount of frames, the resolution, and of course the file size, it is time to save it as a VTF file!

    Click on File > Save As... and give the spray a name and save it wherever you want.
How To Import The Spray
Now that you have the VTF texture file, it is time to import it to TF2. If you already know how to import sprays to TF2 manually then you can ignore this section of the guide.

Importing is done very easily. The game requires a VMT file for the spray, which is necessary to have in order for the game to find your texture. The easiest option for most people to generate it is to:

    1. Open up TF2 and head down to Options > Multiplayer
    2. Click on "Import Spray"
    3. Navigate to the VTF file and import it

After that is done, the spray should now be in the list of selectable sprays.

You can also use VTFEdit to generate the VMT file manually by opening the VTF file and clicking on Tools > Create VMT File. Just be to sure to open the VTF after placing it in your game folder first (typically tf/materials/vgui/logos) or the path it generates in the VMT file will be incorrect. The VMT file can be edited in VTFEdit or by using a text editor if necessary.
You Did It! 🎈
Congratulations, you should now have a fully functional animated spray! You deserve a pat on your back!

Examples of animated sprays I have made:


Curious how this spray was made?
128x128, BGRA8888, 3 frames. File size: 192 KB
Flags: Point Sample, Clamp S, Clamp T, No Mipmap, No Level of Detail


Curious how this spray was made?
128x128, BGR565, 15 frames. File size: 480 KB
Flags: Point Sample, Clamp S, Clamp T, No Mipmap, No Level of Detail
In-game it looks like this: https://i.imgur.com/a8CXUGG.gif
As shown, the Point Sample flag works great with pixel art. It does not turn blurry no matter how far or close you approach the spray.


If anything in the guide is confusing for you, let me know in the comments. I will try to update the guide every now and then if I find things that are inaccurate or not explained well.


Feel free to check out my other guide down below which shows you how to make HD 1024x1020 resolution sprays!
http://steamproxy.net/sharedfiles/filedetails/?id=1282767477
댓글 139
jerry 2024년 1월 20일 오후 9시 28분 
Thank you this was extremely helpful. was wondering why my 18 frame vtf was exporting as 578kb with no way to compress it more!
GreenSwede  [작성자] 2023년 8월 26일 오전 6시 06분 
It's possible that the gif by default wasn't optimized so you accidentally optimized it.
Ineffable 2023년 8월 25일 오후 4시 56분 
I was able to fix it - un-optimising the images I wanted to turn into a GIF caused the shadowing effect.

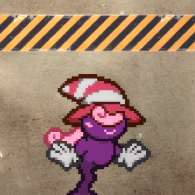
It wasn't along the borders - it was, for some inexplicable reason, every frame show the previous frames. The shadow would 'disappear' when the animation went back to frame 0.

Not doing the 'Unoptimise' step solved the issue.
GreenSwede  [작성자] 2023년 8월 25일 오후 3시 40분 
If you get black pixels along the edges it's probably because the matte color is set to black. It will automatically blend the color of semi-transparent pixels to black by default, or it will blend to whatever color is chosen in the export settings.

Photoshop has an option to disable matte blending entirely, and I'm quite confident GIMP has that option also. Another workaround is to ensure that no pixels are semi-transparent. The pixels have to be 100% opaque. If you apply the transparency by yourself, make sure anti-aliasing is turned off.
Ineffable 2023년 8월 22일 오후 2시 40분 
How are you removing the 'shadow' in a GIF? Your guide doesn't cover this at all and using Layer exports has the shadow appear for each frame.

I have a transparent background GIF and you can see the motion of all layers, so this is an issue for me but I've seen you've been able to remove that issue with the Paper Mario character spray.
Dubion 2023년 8월 22일 오후 12시 21분 
thanks
GreenSwede  [작성자] 2023년 8월 22일 오전 11시 16분 
yes
Dubion 2023년 8월 22일 오전 11시 12분 
is the file "vtfedit133.exe" safe to open?
GreenSwede  [작성자] 2023년 8월 18일 오전 1시 41분 
David 2023년 8월 18일 오전 12시 04분 
i aint doing allat shit for a rat to dance