War Thunder
102 оценки
The Complete Guide to Tank Assault Arcade
От SuperC
This guide will teach you how to win (or at least not fail so badly) in the PvE Co-op Tank Assault Arcade mode. It is an adaptation of my guide on the War Thunder Forums[forum.warthunder.com].
   
Награда
Добавяне към любими
В любими
Премахване от любими
Introduction
Tank Assault was introduced in Patch 1.67 as a PvE Co-op alternative to PvP battles for War Thunder Ground Forces in late 2017. As a primarily PvP-focused game, this mode has not exactly received the most polish or attention (and that is really saying something, considering how polished the rest of War Thunder is).

Having said that, I do find this mode enjoyable to play. One should think of it as an MMO raid of sorts: if you and everyone else on the team doesn't understand what's going on and aren't using the right stuff, it can seem extremely difficult. Once you get together with a few players and you understand how this mode works and use the right tactics and equipment (vehicles/ammo choices), it becomes quite easy, and even farmable:


In this guide, I will teach you how to minimize your chances of getting killed by the T-1000 cyborgs commanding the AI tanks and, more importantly, how to win.
Lesson 1: The Basics
Tank Assault pits a team of 10 human (questionable in some cases) players against 11 waves of AI-controlled tanks as they struggle to defend an arbitrary square in the middle of nowhere from these hordes.


Your objective as a team is to prevent the AI tanks from entering the blue square marked on the minimap. If an AI tank enters the square, they will start to capture the base, the square will start flashing red, and the blue bar on top representing your tickets will start to shrink. You will lose the game when all the tickets run out. Successfully completing a wave will refund you a small amount of the tickets back. The red bar represents how many waves are left. You can also check the white star icon surrounded by a red square on the bottom left of your screen to see exactly how many waves are left.

What this means is that you MUST KILL ANY TANKS THAT ENTER THE SQUARE AS SOON AS POSSIBLE! The more tanks that enter the square, the faster the tickets will run out!

In each wave, three groups of AI tanks will spawn and approach the base from three random directions. Each wave will also spawn one or more ground attack aircraft (depending on the BR bracket; more on that later) that will attack the players with bombs, rockets, or cannon, depending on the plane type.

Winning Tank Assault gives you about 25,000 SL and 5,000 RP (with premium account) for the 2.7–3.7 bracket (which is, in my opinion, the easiest one to win), varying a little depending on your number of kills and your score/place on the team. This reward scales with the BR bracket, going up to about 8,000 RP and 50,000 SL for 6.7+ if you win. The first match of the day will also give you a 300% SL or RP booster if you win. The booster will be significantly worse if you lose.

The actual combat mechanics in Tank Assault Arcade are more or less identical to PvP Arcade Battles, with some important exceptions:

1) Unlimited Respawns

Players may respawn as many time as they like in any vehicle of their choosing. There is a spawn cost associated with each vehicle, approximately 40% of the vehicle's Arcade Battles repair cost in Silver Lions; however, unless you are using a very expensive vehicle like the Rank VI self-propelled anti-aircraft guns and/or are getting killed a lot, you will usually more than make back that cost if you win.

2) Ammunition

Ammunition is resupplied for free after every Assault battle, so you can spam that 1,000+ SL HEAT-FS as much as you want without bankrupting yourself. You may also refill ammunition in the white circle inside the base but (a) it takes far too long and is a complete waste of time that you could better spend killing bots, and (b) the circle is usually placed in an exposed location, so you will probably get killed anyway. It is much better to just abandon the tank and respawn.

3) Bomb Fuses

Unlike in PvP, bombs from both player and AI-controlled aircraft will explode immediately on impact. Player bombs can also damage or destroy teammates near the target, so be careful of where you drop them!

Lesson 2: The Enemy


In each wave, three (3) groups of AI tanks will randomly spawn at predetermined spawn locations on the map. These groups will then make a beeline towards the square that you must defend, following a preset route and stopping at its edge. This means that it is quite possible to setup ambushes and flanking routes beforehand to destroy them relatively quickly. Of course, you only have five (5) seconds between waves to prepare, and the spawns are unknown until the wave actually starts, so you will have to act quickly!


The AI tanks may, of course, use their turrets and shoot at players while moving towards the square. Being AI, and due to the way accuracy and aiming mechanics work in War Thunder, they are far, far more accurate than any human player could ever hope to be in this game while firing on the move without a stabiliser. The AI will generally prioritise the closest threat to them, but you should absolutely not be surprised at getting killed by the AI moving at full speed from 1 km or more. That is not to say that the AI is always 100% accurate, and they will often miss shots at point-blank range, but you should not tempt fate by sitting exposed in front of them unless you don't mind respawning.


The AI does not intentionally target weakspots, but will sometimes get lucky and hit them at longer ranges. It will also not deliberately angle its armour towards players, so flanking is definitely a very viable option to deal with the AIs in heavy tanks.


The AI tanks repair their crews and modules very quickly (about as fast as a player in Arcade with fully maximised Field Repairs and Agility skills + Ace), but either cannot or do not use the Fire Extinguisher. This means that setting an AI tank on fire is an efficient way to kill them, unless they are in the square and need to be destroyed immediately. You should generally leave AI tanks on fire alone and concentrate on higher priority targets unless they are in the square. Killing crew members also takes them significantly longer to replace than repairing a module.


The AI appears to use the stock shells on the tanks it drives; use that knowledge to your advantage if you know the tank's capabilities. It will also sometimes use the tank's AA machine guns to target player aircraft, but not ground vehicles.

All AI vehicles are fully upgraded, including with add-on armour if available for that vehicle.
Lesson 3: The Maps
There are currently five maps in Assault Mode: Mozdok, Ardennes, Kursk, Sinai, and Japan, where you will fight the Germans, Americans, Soviets, British, and Japanese, respectively (France does not have its own map yet). Here I will attempt to give you a summary of where the AI spawns and how it moves, as well as some places to go.

You can, of course, just camp in the base if you want, but you will only have yourself to blame when (not if) you get sniped by the AI. I also don't recommend staying there unless your tank has a very good gun.

Ardennes


Ardennes has a lot of options and cover, and is arguably one of the easiest maps.

  • Locations 1, 2, and 5 provide excellent cover, and can effectively shut down the North to AI waves with a competent player in a decent tank there, especially with the excellent side shots it allows. They will effectively make the AI spawning at E, F, or G a non-issue. 2 will also give you shots on Wave A when it reaches the base, if the tanks are tall enough.
  • Location 3 can counter A, B, and C spawns. The house will cover you from enemy fire in the lower BRs, but it is no longer viable at 6.7+ because the AI will drive by both sides of the house due to the sheer number of tanks per wave.
  • Location 4 counters A and B when they enter the base.
  • Location 6 is for countering B and C with houses for cover, although you risk getting shot in the back if the AI spawns at D.
  • Locations 7 and 8 are for base campers if you don't feel like flanking or are too slow, and will cover the North, West, and South.

Screenshots of my preferred spots.[imgur.com]

Kursk


Kursk is unique in that the AI only comes in a 180° arc, instead of from all directions. There is very little cover outside of the base, so most of the locations are just particularly good base camping locations.

  • Location 1 lets you go hull down and will counter A, B, and C.
  • Location 5 is mostly there if you want to flank the F wave.

The other locations are mostly just common defensive locations. Don't be afraid to charge out at the AI once they approach the base if you cannot penetrate them frontally.

Screenshots of my preferred spots.[imgur.com]

Mozdok


Mozdok has a lot of good locations, but you can and should move about depending on where the waves spawn, as there is a lot of cover.

  • Location 1 can single-handedly shut down the North, countering A, B, and G.
  • Location 2 is the most versatile location. It will counter C and D, and allows you to shoot at Waves A, B, and G when they enter the square.
  • Locations 3, 4, and 5 are situational depending on where the AI spawns. They are very exposed in some directions and should only be used as needed. 5 in particular is useful for countering D, E, and F.
  • Location 6 is for countering E and F if you can't get a shot from the North and need to move quickly.
  • Location 7 is for getting better shots on A and/or G, but can be shot by AI spawning at B or C if you are not careful.

Screenshots of my preferred spots.[imgur.com]

Sinai


Sinai is easily the hardest map in Assault Mode. Pick whether you want to go North or South and hope that the people can take care of the other side. Flex if you have to. My preferred locations are 5, 6, and 7, since they can cover the most possible waves. You will want to spawn as soon as possible at the start of the match because you barely have enough time to get to those places in the 30 s before the first wave, and if you are caught in the open you will most likely be sniped by the bots.

If you prefer to play safer (like me), go to my other preferred place, 1. The only problem with that spot is that the rocks in the base can block your shots, and it can only take 2 or 3 people max.

2, 3, and 4 are very situational spots, and I don't recommend camping the whole game at those places as you can get killed very easily if the waves spawn at the wrong places.

Recently, the map has been changed to provide more rocks as cover in the base, so it is more viable to camp there. However, it is still possible to get caught in a crossfire depending on the spawns. The passage at 1 has also been closed off, so you cannot peek at the North-East-spawning bots from there any more.

Screenshots of my preferred spots.[imgur.com]

Japan


Combat ranges in Japan tend to be on the longer end of the spectrum. This map is nowhere near as bad as Sinai, and the Japanese tanks are generally not very well armoured.

The western waves (A) are quite easy to deal with, by having people at 1, 2, and 3. 2 and 3 can also effectively shut down the north-eastern waves (B).

The south-eastern wave (C) cannot be adequately dealt with from any of those locations, although 3 can engage some of the tanks depending on how tall your tank and the enemy tanks are. 4 is the best place to deal with them.

The eastern flank is a lot more open, so there is no real location that can adequately handle all the waves on that side at once while being relatively safe.

Screenshots of my preferred spots.[imgur.com]


Lesson 4: Battle Ratings
Assault is divided into several Battle Rating (BR) brackets depending on the highest BR of the vehicles in your line-up:

  • 1.0–2.3
  • 2.7–3.7
  • 4.0–5.0
  • 5.3–6.3
  • 6.7–7.7
  • 8.0+

The AI tanks are NOT restricted by this, and some waves may contain vehicles with BRs higher than what the players can bring.

Ideally, if you intend to win this mode, you should bring a vehicle with a good to decent rate-of-fire, and a high one-shot one-kill capability. Armour is helpful, but do not rely too much on it. Speed is also helpful for flexing, especially on Ardennes, but slow tanks can still perform decently well. High penetration is optional; you only need enough to get through flanks.

These are the vehicles you will encounter in the BR brackets. The asterisk (*) indicates a "heavy" tank which will spawn in the most difficult waves, i.e., every three (3) waves and the final wave. This means when the counter is at 9, 6, 3, and 1.

One ground attack/bomber aircraft will spawn per wave, except for at BR 6.7+, where two or three aircraft will spawn per wave instead.

1) 1.0–2.3

Mozdok

PzKpfw III Ausf. E
PzKpfw III Ausf. F
PzKpfw III Ausf. J1*
PzKpfw IV Ausf. E

Ju 87 G-1

Kursk

T-70
BT-7
T-28
T-28E*

Il-2 (1942)

Ardennes

M22 Locust
75 mm HMC M8
M3 Lee
Valentine XI*

A-20G

Sinai

A13 Mk II
Crusader Mk II
Crusader Mk III
Valentine Mk II*

Beaufort Mk VIII

Japan

Chi-Ha Kai
Ho-I
Ro-Go*
Chi-He

Ki-45 tei


1) 2.7–3.7

Mozdok

PzKpfw III Ausf. J1
PzKpfw III Ausf. L
PzKpfw III Ausf. M
KpfPz Churchill (e)*

Bf 109 F-2

Kursk

T-28E
T-34 (1941)
T-34 (1942)
KV-1 (L-11)*

Il-2M (1943)

Ardennes

M24 Chaffee
M3 Lee
M4 Medium Tank
Ram II (M4A5)*

P-38G-1

Sinai

Cromwell Mk V
Cromwell Mk I
Sherman Mk II
Churchill Mk III*

Hudson Mk V

Japan

M24 Chaffee (JGSDF)
Chi-He
Chi-Nu II*
Chi-Nu

D4Y2 Suisei


3) 4.0–5.0

Mozdok

PzKpfw IV Ausf. F2
PzKpfw IV Ausf. G
PzKpfw IV Ausf. H
PzKpfw VI Ausf. H1 Tiger*

Fw 190 F-8

Kursk

T-34 (1942)
T-34E STZ
KV-1S
KV-85*

Il-10

Ardennes

M18 Hellcat
M4A2
M4A1(76)
M6A1*

P-47D

Sinai

Sherman VC Firefly
Sherman II
Churchill Mk III
Churchill Mk VII*

Firebrand TF Mk I

Japan

Chi-To
Chi-Ri
Heavy Tank No. 6*
M4A3 (76) W HVSS (JGSDF)

J2M3 Raiden


4) 5.3–6.3

Mozdok

PzKpfw IV Ausf. H
PzKpfw VI Ausf. H1 Tiger
PzKpfw V Panther Ausf. D
PzKpfw VI Ausf. B Tiger II (P)*

Fw 190 F-8

Kursk

T-34E STZ
KV-85
IS-1
IS-2 1944*

Su-6 AM-42

Ardennes

M41A1 Walker Bulldog
M4A3(76)W HVSS
M26 Pershing
T26E1-1 Super Pershing*

AD-2 Skyraider

Sinai

Comet
Centurion Mk I
Black Prince*
Centurion Mk 3

Sea Fury

Japan

M41 Walker Bulldog (JGSDF)
ST-A1
Heavy Tank No. 6*
ST-A2

Kikka


5) 6.7–7.7

I do not recommend playing this bracket unless you are in a squad and/or know what you are doing, if you want to win consistently.

Also important: TWO (2) AI aircraft will spawn per wave.

Mozdok

PzKpfw Panther II
PzKpfw VI Ausf. B Tiger II (P)
PzKpfw VI Ausf. B Tiger II (H)
PzKpfw VI Ausf. B Tiger II (105)*

Fw 190 F-8

Kursk

T-44
T-44-100
IS-2 1944
IS-3*

Su-6 M-71

Ardennes

T92
M46
M47 Patton
T32*

F-86F-25

Sinai

Centurion Mk 3
Caernarvon
Chieftain Mk 3*
Conqueror Mk 2

Attacker FB Mk. 1

Japan

M41 (JGSDF)
Type 61
Type 74*
STB-1

F-86F-30 (JASDF)


6) 8.0 and above

IMPORTANT: THREE (3) aircraft will spawn per wave. SPAA highly recommended. "Heavy" tanks also spawn more often.

Mozdok

Leopard 1
KPz 70*
Leopard 1A1A1

MiG-15bis (DDR)

Kursk

T-54 (1951)
T-64A*
T-10M

MiG-17

Ardennes

T95E1
MBT-70*
M60A1 RISE (Passive)

F-84B-26

Sinai

Chieftain Mk. 5
Chieftain Mk. 10*
Conqueror Mk. 2

Attacker FB Mk. 1

Japan

Identical to BR 6.7–7.7.


Lesson 5: What NOT To Do
These are miscellaneous things that you should avoid doing to prevent yourself from being a nuisance or a hindrance to the team.

1) Smoke Grenades & Smoke Shells

DO NOT shoot smoke shells at or use smoke grenades around bots inside the square. It prevents other people from killing them and can also cause people with not-so-good systems (like me) to lag. If you have to use the smoke grenade to cover yourself, try to back out of other people's lines of fire first. If you can't, just don't use the grenades. You have unlimited respawns!

2) Fighters and Attackers

Just because that button with the plane on it lights up doesn't mean that you have to use it right away! AI aircraft are generally not as dangerous as the AI tanks, but if you don't have an SPAA on your team and the aircraft are starting to become a nuisance, DO NOT spawn in a fighter during a "heavy" wave (marked with a * in the previous section). You are just wasting the team's time, especially for someone else who may have the points to spawn in a heavy bomber. Wait for an easier wave.

Attack aircraft are also generally less useful than heavy bombers (rockets and guns are much harder to kill tanks with than bombs). It is better to save the points instead.
Appendix 1: Vehicles I Have Used (1.0–2.3)
The following is a list of vehicles that I have used so far in Tank Assault, with varying degrees of success.


PzKpfw IV Ausf. C/E/F1 (1.3/2.0/2.3)
Hands down the best tank to use in the bracket. Good gun depression, fantastic gun with lethal APHE and 80/100-mm-penetration HEAT along with a fast rate-of-fire, decently mobile. Armour is not very good, but smart use of terrain will easily compensate for it.

T-28 (2.3)
Second only to the PzKpfw IV, the T-28 is faster and has a large crew, making it less likely to get one-shot by AI tanks. It also has an absolutely lethal 76 mm with APHE or shrapnel rounds if the target is vulnerable to it. However, it lacks gun depression and is pretty hard to hide behind cover due to its size.

StuG III Ausf. A (2.3)
For all intents and purposes a turretless Panzer IV. Lower profile allows it to hide better, but gun depression is worse and the limited traverse can be bothersome. It is a bit faster than the Panzer IVs.

Type 1 Chi-He (2.3)
Chi-Ha Kai with thicker armour. Can take a few hits, and has an excellent gun, but its mobility is only okay.

Type 3 Ho-Ni I (2.0)
Excellent gun on a bleh platform. Once it sets up, it will mow down bots like grass, but is itself very vulnerable. Good gun depression for peeking over hills.

Type 2 Ho-I (2.0)
The Ho-I has decent armour, a good APHE round with low penetration, and a high penetration HEAT round with reduced lethality. You will have to make the choice between high penetration or high lethality.

75 mm HMC M8 (2.0)
Similar to the StuG III Ausf. A, but lacks APHE. Has a (very slow) turret and is quite fast, but the poor ballistics make it an awful sniper. Best used as a flanker.

Type 97 Chi-Ha Kai (2.0)
Fantastic gun with lethal APHE and excellent gun depression, but the tank itself is fragile and the turret traverse speed is very bad. Mobility is okay. The Chi-He has 50 mm of frontal armour, so is reasonably durable for this BR.

Type 4 Ho-Ro (1.7)
The HE shell will obliterate anything that it hits, and it can arc its shells over terrain. It is very fragile and has very restricted gun traverse angles, however.

BT-5/7 (1.3/1.7)
The BTs are fast with very good guns using APHE. However, they are very fragile. The BT-5 in particular has good gun depression, and has no spawn cost since it is a reserve.

PzKpfw III Ausf. B/E/F (Reserve/2.0/2.3)
The Panzer IIIs are decent vehicles in this mode, but are handicapped by the abysmal manual turret. The 5 cm KwK 38 on the Ausf. F is particularly good.

PzKpfw 35(t)/38(t) Ausf. A/F (Reserve/1.3/2.0)
Good alternatives to the Panzer III. The Panzer 38(t) Ausf. F has relatively heavy frontal armour as well.

PzKpfw II Ausf. C/F (1.0)
Fast and hilarious to run circles around the AI, with significant firepower using PzGr 40 ammunition.

75 mm GMC M3 (2.0)
Fantastic mobility with a powerful punch, crippled by its fragility, slow gun traverse, and the absurdly bad reload speed. Can reverse at 20 km/h for peeking at bots.

Panzerjaeger I (1.7)
Decent, with a pretty good gun. Not much special about it.

72-K GAZ MM/Flakpanzer I/Gepard/Type 94/Ta-Se (2.3/1.3/2.0/1.3/1.7)
Excellent SP AA vehicles with enough penetration to destroy AI tanks. The German ones get access to ridiculous APCR rounds.

Crusader Mk II (2.0)
The Crusader II has decent armour (for its speed) and good gun depression. Unfortunately, solid shot is a big handicap, especially with the lightweight 2-pdr, but it is still quite workable in this bracket.

A13/A13 Mk II (Reserve/1.3)
These perform similarly to the Crusader II, but are a bit more fragile and less mobile.

M3/M3A1 Stuart (1.3)
Very fast and decently armoured, but the solid shot 37 mm AP has disappointing lethality.

SOMUA S 35 (2.0)
The armour is quite good when angled, but it is rather slow and only has solid shot AP ammunition. Good on Kursk.

M2 Medium (1.3)
Slower M3 Stuart with a worse gun, but still acceptable.

Type 95 Ha-Go (Reserve)
Low penetration hurts it quite a bit, but if it penetrates it will do a lot of damage. Decently fast for flanking, with good gun depression. Best used on Kursk.

Ke-Ni/Ka-Mi (1.3)
The mobility of these light tanks is disappointing, and their penetration is on the low side. They are further crippled by poor turret traverse speeds, although this is less of a factor in PvE than in PvP.

Renault ZT 3 (1.0)
This is the fastest French tank until the postwar era. It can flank and the gun has okay-ish penetration, but the damage is underwhelming due to the small calibre of the gun. Also has very poor gun traverse arcs.

AMC 34 (Reserve)
Okay mobility, gun penetration is rather low but when it penetrates it will deal a lot of damage since it uses APHE. The turret has decent armour, but the hull is weak.

H 39/R 39 (1.3)
Their relatively thick armour is good on Kursk, but the guns are rather weak, and they are too slow to be viable for flanking on Ardennes or Sinai, especially against the Valentines.

T17E2/M13 MGMC/M16 MGMC (1.7/1.3/2.3)
A decent AA vehicles, but lack the penetration to harm most of the AI waves except at very close ranges.

DShK GAZ AA (1.0)
Can harm some vehicles, but the gun can only fire over the front or sides of the vehicle, as the gunner is blocked from shooting to the rear by the ammo boxes; a serious disadvantage for any AA vehicle.

4M GAZ AA (1.0)
If you want to shoot down planes and only planes. It's more viable here than in PvP at least. May have some difficulty shooting down Il-2s on Kursk.

FCM 36/H 35/Type 89 I-Go Ko/Type 97 Chi-Ha (1.0/Reserve/Reserve/1.3)
Don't even think about it.


Appendix 2: Vehicles I Have Used (2.7–3.7)
PzKpfw IV Ausf. F2 (3.7)
The God of this mode, with easily the best gun available on a very acceptable platform combined with good gun depression. It can obliterate AI heavy tanks at long range with its high penetration, very lethal PzGr 39 APHE.

T-34 1941/1942 (3.7)
The T-34s do not have as much penetration as the Panzer IV Ausf. F2, but compensate for this with better mobility and sloped armour. The F-34 has enough penetration to pierce heavy tank flanks at medium ranges, and the BR-350B APHE round is without par in lethality.

3-inch GMC M10 (3.7)
A highly lethal tank destroyer with a (very slow) turret. Has access to APHE and a .50 cal machine gun to shoot at planes, decent mobility, and sloped armour that can ricochet shells from time to time. The French version is identical and performs just as excellently.

29-K (3.7)
One of the best guns available with a wide traverse arc. The platform itself is completely unarmoured, making it very vulnerable to planes, but ironically very durable against AI tanks thanks to a large crew.

StuG III Ausf. F (3.7)
This tank is to the Panzer IV Ausf. F2 what the StuG III Ausf. A is to the Panzer IV Ausf. F1. Overall, not bad at all, but inferior to the Panzer IV.

Marder III/III Ausf. H (2.7/3.0)
Packing some of the most powerful guns in this range, but extremely fragile. Watch out for planes too.

M4A1 Medium Tank/Sherman II (3.3/3.7)
Excels at hull-down, where it is fairly well-protected. It is very vulnerable if caught in the open, and pivots badly. It has a good M61 APHE round and a .50 cal for shooting down the AI attack aircraft. The Sherman II is the only British tank with APHE; it is identical to the American M4A1 except for access to a (useless) APCR round. The French version is identical to the American M4A1.

Archer (3.3)
Despite using solid shot, the Archer's 17-pdr is the single most powerful gun available in this bracket in terms of penetration. It can easily snipe the heaviest AI tanks with impunity, though its unusual layout may not be to everyone's tastes.

StuH 42 Ausf. G (3.7)
Fairly well-armoured on the front, the howitzer has a great APHE round which will one-shot most tanks with a flank shot. HEAT is available for higher penetration, but the APHE is more lethal.

KV-1 L-11 (3.7)
A good meatshield, although the L-11 gun is terrible and will struggle against AI heavy tanks. If it penetrates, it will do a lot of damage, however. Particularly recommended for Kursk, as very few of the waves can harm it if angled properly.

SdKfz 234/2 (2.7)
Glass cannon version of the PzKpfw III Ausf. J1, arguably better. Fast reverse speed is a nice asset.

PzKpfw III Ausf. J1 (3.3)
Acceptable firepower with the 5 cm L/60, good mobility. Awful turret traverse, though. Thin armour, vulnerable to most AI guns.

SU-76M (2.7)
Good mobility with the gun of the T-34 1942, but fragile and has poor gun depression. Works best as an ambush vehicle.

Cromwell Mk I (3.3)
Fast, nimble, with good gun depression and good penetration, but handicapped by solid shot and abysmal reverse speed. It is still quite effective despite this, however.

Crusader Mk III (2.7)
Decently fast, with high penetration on the 6-pdr. It lacks gun depression, uses solid shot, and is rather fragile, however.

Cromwell Mk V (3.0)
Worse gun than the Mk I and slower to boot, but still very decent.

3-inch Churchill Gun Carrier (3.0)
Formidable armour on the front and sides, with an acceptable gun. Gun depression is good, though the gun is mounted low in the tank. It is slow, but can neutral steer for fast turning. Handicapped by narrow gun traverse arc and solid shot, but is a good meatshield, especially on Kursk.

Valentine Mk IX/XI (3.3/3.0)
Decently armoured, particularly when angled, though is vulnerable to getting one-shotted due to its small size. Guns are decent, though handicapped by solid shot. Excellent gun depression and slow speed make it a more defensive tank.

PzKpfw III Ausf. J (2.7)
The short 5 cm gun will struggle against heavy tanks, and needs APCR to go through a KV-1, but not too bad otherwise. Mobility helps for flanking, and you will need it.

M3 Lee (2.7)
The 75 mm gun will struggle against KV-1s, but is otherwise quite capable of destroying AI tanks with flank shots. The 37 mm has enough penetration to damage the KV-1 at close ranges, but fires solid shot with minimal fragmentation.

SU-122 (3.3)
Restricted to only using HEAT, which has iffy lethality. Slow reload and poor gun depression and ballistics mean it is best used in close-range ambushes.

SAu 40/Valentine Mk I/Matilda Mk II (2.7/2.7/3.0)
Just no.
Appendix 3: Vehicles I Have Used (4.0–5.0)
8,8 cm FlaK 37 Sfl. (4.3)
A very lethal SPAA gun that will have no problems destroying any of the AI tanks from the front except for the Churchill Mk VII. It is slow, and its layout is rather awkward, however.

Sherman Firefly (4.7)
Despite using solid shot, the Firefly's 17-pdr gun is very lethal in its tier, and it is capable of frontally penetrating anything it will encounter. It has poor gun depression and is not terribly fast, especially on bad terrain like the sand in Sinai, but will perform very well in a good sniping location. The recent buff to solid shot has only made it better than ever.

StuG III Ausf. G (4.3)
Take the 3.7 StuG III Ausf. F, slap on 30 mm of extra armour and a slightly better gun, and you have the Ausf. G. The armour is nothing to write home about in this bracket, although it can bounce when angled. The gun is still competitive here, but is not powerful enough for Churchill VIIs on Sinai.

KV-1 ZiS-5 (4.3)
Somewhat slow, but relatively heavily armoured, and the gun is lethal if it penetrates. The penetration itself is lacking against the vehicles it will face here, so it works best in locations where it can shoot into AI flanks.

ZSU-37 (4.7)
Once you get the APCR belt, it is quite capable of dealing with enemy tanks at close ranges. It performs decently in the AA role, and the platform is better than the ZiS-43.

T-34-57 (4.0)
Sufficient penetration to deal with most tanks while having a good rate-of-fire. It is rather fragile in this bracket, and the lethality of the APHE is less than desirable.

Churchill Mk III (4.0)
Very slow, especially bad on Sinai. Quite durable when angled (albeit with significant weakspots in the armour), and has very good penetration and decent lethality, despite using solid shot.

ZiS-43 (4.0)
Nice SP AA gun with decent armour penetration and high probability of killing AI planes if it hits. The AP round is solid shot with no filler, so lethality is less than desired. It also does not have enough penetration to deal with Tigers and KVs.
Appendix 4: Vehicles I Have Used (5.3–6.3)
T-44 (6.3)
One of the best tanks to bring in this bracket. Powerful 85 mm gun, superb mobility, and decent armour for a well-balanced vehicle capable of handling anything.

T-34-85E (5.7)
An absolute monster in a good flanking position. High rate-of-fire and murderous BR-365K APHE allows it to single-handedly obliterate entire groups of AI tanks if it catches them in the flanks. It is rather fragile, though.

PzKpfw VI Tiger Ausf. H1 (5.7)
An excellent choice, the Tiger has a very lethal and fast-firing gun, with enough penetration to deal with all but the most heavily armoured vehicles. With proper angling, it is also quite resilient to fire.

Cruiser Tank Challenger (5.7)
With the solid shot buff, the Challenger is quite a good vehicle in this mode thanks to its blistering rate-of-fire (~5 s), high mobility, and one of the best guns of its calibre range. With APDS it can cut through the heaviest armour it might encounter, although the APCBC has better post-penetration effects and fragmentation. I only really recommend using APDS on Sinai due to the Black Princes. The only real downsides are that abysmal Cromwell chassis reverse speed and relatively low ammunition capacity.

T-44-122 (6.3)
Great mobility with a gun that will almost certainly one-shot anything it hits. It is hampered by the awful reload speed, so you will have to pick your targets carefully.
Appendix 5: Vehicles I Have Used (6.7–7.7)
ZSU-57-2 (7.7)
This is easily the best vehicle to use if you need to kill a whole group of enemy tanks quickly, and it is one of my favourite vehicles to use in this mode. It is also acceptable at shooting down planes, although the low rate-of-fire hurts. Unlike the ZSU-23-4, it has a pretty reasonable spawn cost, which is a good thing because it only has 15 mm max of armour, so you can expect to die a few times.

T-54 obr. 1947 g. (7.3)
A better T-44-100 in every way except for slightly worse mobility. Has just enough gun depression to work on most spots.

T-44-100 (7.0)
Not as fragile as the T-34-100, with a faster rate-of-fire. This is a decent vehicle for this bracket, although the 100 mm gun's reload speed is relatively slow compared to alternatives. It will usually kill whatever it penetrates, however. It lacks gun depression and will struggle on hilly terrain.

T-34-100 (6.7)
Fast with a powerful gun, excels at flanking. Very vulnerable without cover and lacks gun depression for hull down positions; best in Ardennes where there are a lot of buildings to cover it. Rate-of-fire is also somewhat on the low side.

IS-6 (7.0)
Exceptionally tough armour, but the AI will occasionally hit the turret ring weakspot. The gun is lethal, but lacking in penetration and reloads relatively slowly. It is mobile enough to be a flanker, but can tank hits if needed. Also has an AA machine gun to retaliate against AI planes.
Appendix 6: Vehicles I Have Used (8.0+)
T-64A (9.0)
One of the best vehicles in the game period, and among the top contenders for Assault mode. Blessed with a 7.1 s reload thanks to the autoloader while at the same time having an amazingly effective APFSDS round, the T-64A also has very good protection from frontal attacks, as well as high mobility. The only drawbacks are a relatively high spawn cost, low ammunition capacity, and poor reverse speed.
15 коментара
SuperC  [автор] 12 май 2023 в 23:43 
You cannot use your own aircraft in this mode (other than helicopters)
Narrative7918165 11 апр. 2023 в 5:45 
Do you know if we can use our own aircraft please? I found nothing. I have a bomber and fighter but none of them can be used (equal BR or little less than my tank). Thank you for this guide.
Blamite Delight 26 апр. 2021 в 19:54 
this guide needs to be updated, GAYJIN decided to "patch" sinai so that most of the camp spots you listed are blocked off by rocks.
cobra_four_zero 3 март 2021 в 11:30 
Wheres the 15cm sig?
viewqa 29 ян. 2020 в 8:38 
RUS: Выберите что то одно из этого списка и напишите в моём профиле, отвечу тем же!
ENG:Choose the one that's on the list and write in my profile, I will answer the same!
+rep good player
+rep nice player
+rep Amazing Tactics 👌
+rep Epic Clutch ✌
+rep Clutchmeister 👍
+rep Killing Machine *_*
+rep 1Tap Only 👊
+rep Insane Skills 👌
+rep One shot, one kill. No luck, just skill ✔
+rep Top Player 🔝
+rep Thx for carry 👍
+rep Epic Comeback 👍
+rep Good Teammate 🎮
+rep Friendly Person 💜
+rep clutch 👊
+rep ONE TAP MACHINE
+rep AWP GOD
soulja boy 11 авг. 2019 в 16:53 
g
magvera bushmaster 7 септ. 2018 в 5:19 
mod is better than arcade but reward is shit
РенданиГрејпфрут 21 февр. 2018 в 10:47 
Did something changed with this mode?
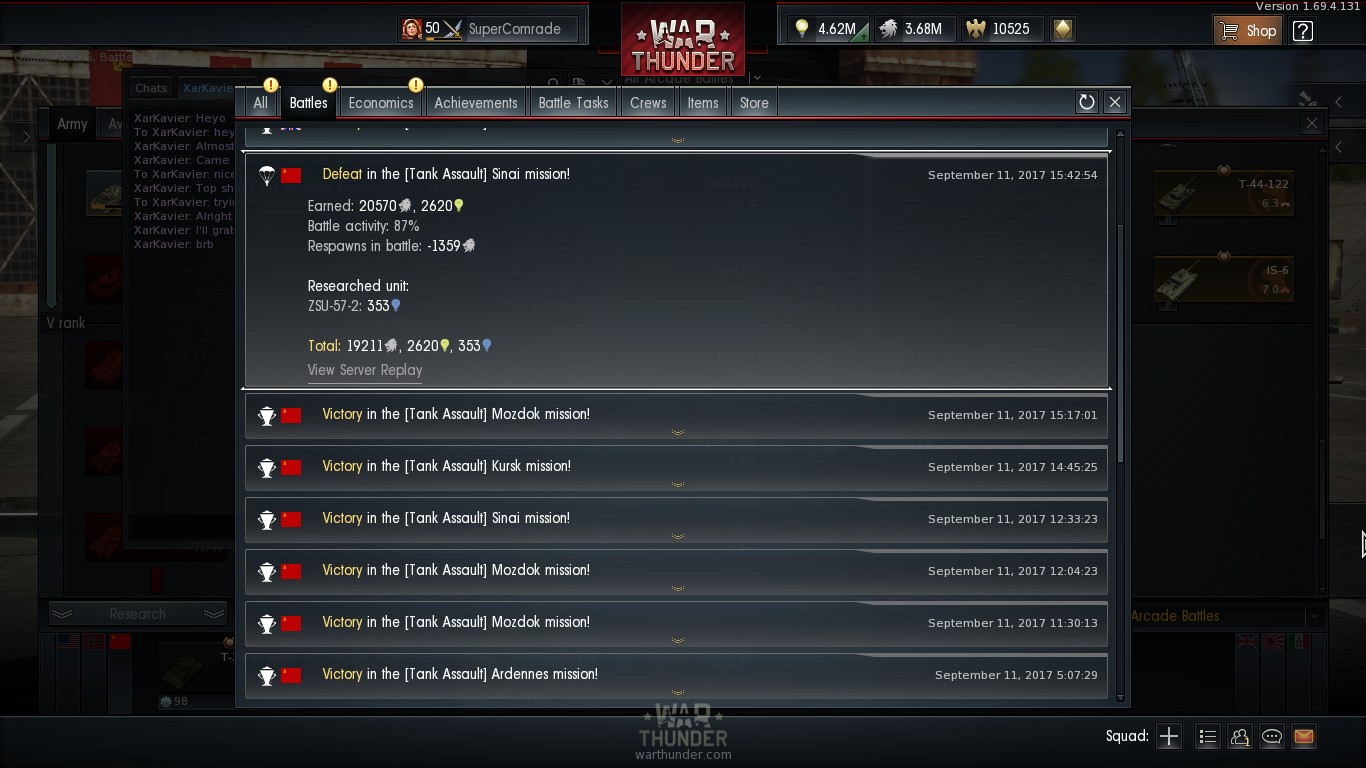
played the lowest bracket,got a lot of kills and managed to get to the wave before the final one. And got only 600rp.Wtf gaijin?
pequod 18 февр. 2018 в 0:46 
I want to play this game mode.. nobody ever plays it
SuperC  [автор] 12 февр. 2018 в 5:38 
Just going to add that this is probably the most painfree way to spade a stock vehicle if you know what you're doing, especially if you can get a good squad going. Your loss if you don't want to play it.