Team Fortress 2

Team Fortress 2

101 ratings
Vaccinator: Basic Usage
By Lord Kelvin
UPDATED FOR GUN METTLE AND TOUGH BREAK!

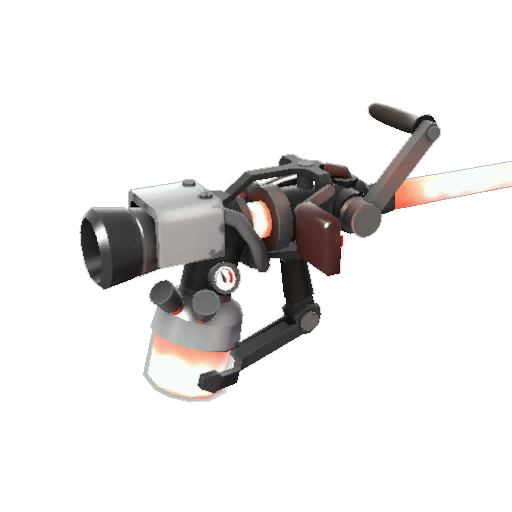
The newest addition to the Medic's arsenal, the Vaccinator is easily the most complicated Medi Gun available to date. Here's the basic low-down on how it works.
   
Award
Favorite
Favorited
Unfavorite
Introduction
Introduced to the game in the Mecha Update, the Vaccinator is easily the most complicated weapon yet to grace the game, requiring the addition of the Special Attack key in order to work (which was later combined with the Reload key in the October 29, 2013 Patch[wiki.teamfortress.com]). In fact, it is also the most-changed among all of the Medic's Medi Guns, having seen complete rebalances in the Gun Mettle Update as well as the Tough Break Update. Because it is so complicated to use, new players flail about in an attempt to understand how it works, causing many to label it as a useless tool. This guide aims to correct any misconceptions about the weapon, and hopefully show you how it works.


Last updated: 3 January, 2016
Basic Information
Before we go in, here's a basic overview of the Vaccinator's attributes. You can read up on this on the Official Wiki, but for convenience I've written it here as well. Besides, as a Wiki staff member I oversaw the writing of the Wiki article anyways, so it won't be much different, just that the language used here will be less formal.

When healing a teammate, both you and your patient gain 10% resistance against the selected damage type. This damage type can be changed using the Change Resistance key. You have three damage types available that you can resist: Bullet (which also includes arrows), Explosives, and Fire. A shield icon above both you and your patient indicates what damage you are currently resisting, which can be seen by teammates and enemies. You will be able to see the damage type next to your ÜberCharge meter, and a shield will appear next to your health bar as well. Your teammate will also see the resistance type next to their health.

For any damage that your patient takes and resists (that is, any damage that matches the type that you have selected to resist), you'll receive a small bit of ÜberCharge, increasing the rate at which you build charge.

As a drawback, the Vaccinator's healing rate drops by two-thirds when a teammate is being overhealed. This means that once a teammate hits full health, you'll only be healing them at a rate of 8 HP per second (maximum of 24 if they haven't taken any damage for a few seconds).

While your patient is below full health, the Vaccinator is capable of building its ÜberCharge meter 67% faster than the default Medi Gun, at a rate of 4.2% per second. However, the second your patient hits full health, your charge rate drops to 2.8% per second, and will further halve to 1.4% per second once your patient reaches 150% health.

The Vaccinator's ÜberCharge meter is divided into four bars (more on this below). When you deploy an ÜberCharge, one of those bars will be instantly consumed, and you and your patient will both be granted a shield that resists 75% of the damage type that was selected upon popping Über; this shield lasts for 2.5 seconds. This shield is effectively a placed buff, and you can switch targets or switch resistances without having any negative effect on that shield (although be warned, switching away from the Vaccinator will remove any active shields from the Medic). What's more, you can use another bar of Über to put another shield on the same patient, and give them resistance to two damage types.

When healing a patient, you cannot resist crits even if you select the proper damage type. However, once an Über shield is placed, it will completely protect the Medic and patient from crits of that damage type; the base damage of any damage instance of the correct type will be reduced by 75%, and the extra critical damage is negated completely. So if a crit rocket is headed your way and you have an explosive shield up, 75% of the 90 base damage is resisted (resulting in 22 damage taken) and the entirety of the remaining 180 damage is ignored.
Control Re-Binding
When first introduced, Valve made possibly the very worst decision in implementing this weapon by setting the Special Attack key to the Middle Mouse Button. Because the mouse wheel also defaults to switching weapons, this caused players to accidentally scroll away from the Vaccinator as they attempted to switch resistances, and screw themselves and their teammates over in the heat of battle.

This was changed in the Scream Fortress 2013 patch, and the Special Attack key now has no use. Instead, hitting your Reload key while the Vaccinator is the active weapon will change your resistance type. However, this brought its own host of problems, chief among them being that taking your pointer off of the D key to switch resistances is extremely dangerous. Doing so means that you temporarily lose the ability to strafe to the right, which can mean death under the right circumstances.

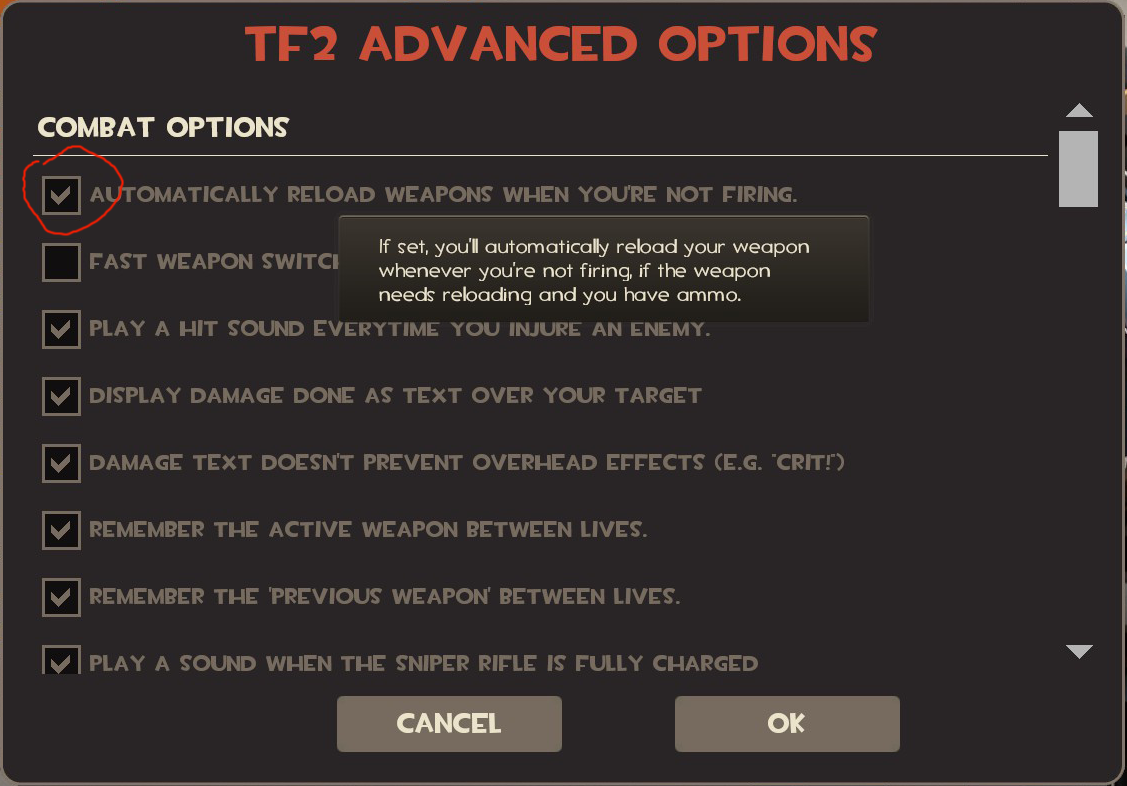
So, then, what to do? The best solution to this is to simply re-bind your Reload key to a place where you feel comfortable using it to change resistances. Thanks to changes made to the default settings, implemented in the Gun Mettle Update, automatic reloading is now turned on by default. However, should you have had them turned off, you can access the feature from the Advanced Options menu (which, by the way, also has lots of other useful options you should play around with):

Don't worry about this getting in the way of your gameplay, remember that you can still fire your weapon while it's going through its reload animation, the only real problems you'll encounter are if you're using the Force-A-Nature or Soda Popper, since those will discard any existing shells in their magazines while reloading. Of course, if you're easily distracted by the constant animation on your screen every time you shoot just one projectile, you can elect to turn off weapon models altogether.

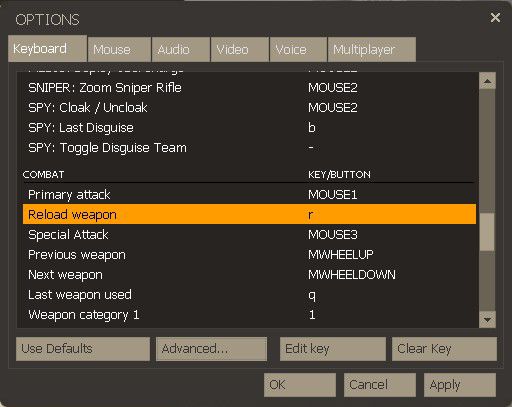
So, now that you no longer have to use the Reload key anymore due to it being done automatically for you, you are now free to re-bind your "Reload weapon" key to whatever you wish to change resistances.

Where you bind it is up to you; you can leave it where your Reload key was, you can put it on a mouse button, you can set it to a joystick button or pedal if you want (assuming that, for some bizarre reason, you use those to play TF2). What matters is, you now have the freedom to assign your Change Resistance key to wherever you want, rather than being forced to take your index finger off of your right-strafe key to change resistances.

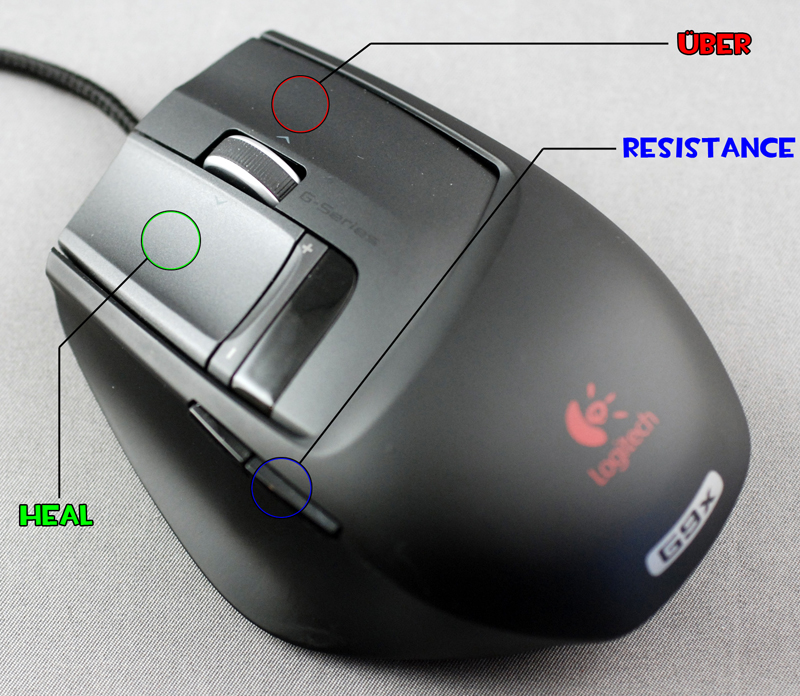
My personal recommendation is, if you have a mouse with more than three buttons (the Left Mouse button, Right Mouse button, and Middle Mouse/wheel), set it to one of the Forward/Backward keys next to your thumb. This way, you will be able to switch resistances with your thumb, while keeping your index and middle fingers firmly on their respective buttons, and freeing yourself from the distraction of having another key on your keyboard to hit with your left hand.
The Quarter Über
What makes the Vaccinator so vastly different from the other Medi Guns is what I call the "Quarter Über."


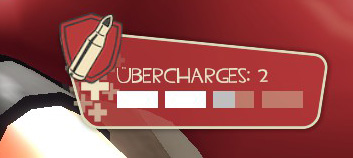
Basically, this means that you are able to trigger off 25%, or one-quarter, of your Über at a time, with each lasting 2.5 seconds. There is no requirement to fill your entire ÜberCharge meter before being able to use it, you only need to fill 25% of it in order to deploy a shield, and there is no requirement to use your whole meter in one go. Just by itself, this vastly increases your flexibility in dealing with threats. Combined with the 67% faster charge rate and build boost on resisting damage, you can build up bars very quickly, gaining one bar every 6 seconds (or less!) in the most optimal cases.

As seen in the above image, I have Bullet set as my resistance (we'll discuss this more in a bit), and have roughly 65% of my Über charged. The first 50% is split into two Quarter Übers, while the remainder is still building up. If I were to trigger an Über right now, first bar would be immediately consumed, dropping me down to 40% charge, and giving my patient and myself a shield that grants us both 75% resistance against bullet damage for 2.5 seconds. Even while the shield is active, I can continue to build up my Über meter, needing about 10% more to reach two charges of Quarter Über, and I can even switch resistances to give my patient 10% resistance against explosives or fire at the same time.

Since a Quarter Über is immediately consumed and the shield stays on for those 2.5 seconds no matter what, I can also choose to switch patients and give someone else 10% resistance to bullet damage, or even pop a Quarter Über for them and give them 75% resistance for 2.5 seconds, at the cost of leaving myself with no Quarter Übers to use at all. Or, if I'm facing multiple damage types, I can even choose to pop a second Quarter Über on the same patient and give him 75% resistance against two damage types (or even three, if I had 75% or more ÜberCharge).

This flexibility allows me to protect multiple teammates against one damage type, or one teammate against multiple damage types, or some combination thereof, so long as I have the Quarter Übers in reserve. Of course, it can also deplete my ÜberCharge meter alarmingly quickly and leave me vulnerable after the fact, so it takes keen judgment and prediction in order to make the most of the Vaccinator.
Quarter Über Build Speeds
Given how complicated the build speed for the Quarter Über is, I've elected to just make a chart to show how fast you can charge in various situations. Keep in mind, this does not include any ÜberCharge that is built by resisting damage.

Patient Health
Charge Speed
Charge Time (1 Bar)
Charge Time (Full)
Below 100%
4.2%/sec
6 seconds
24 seconds
100% to 142.5%
2.8%/sec
9 seconds
36 seconds
Above 142.5%
1.4%/sec
18 seconds
72 seconds

Remember that these values are halved if the patient is being double-healed, either by another Medic or by a Dispenser (including the Payload cart). And again, resisting the correct damage type will also provide a boost in ÜberCharge for you.

I will eventually begin testing how much charge is granted based on resisted damage, however for the time being there is no data on those numbers. Just remember, the more damage you resist, the faster you can build another bar.
The Resistance Wheel
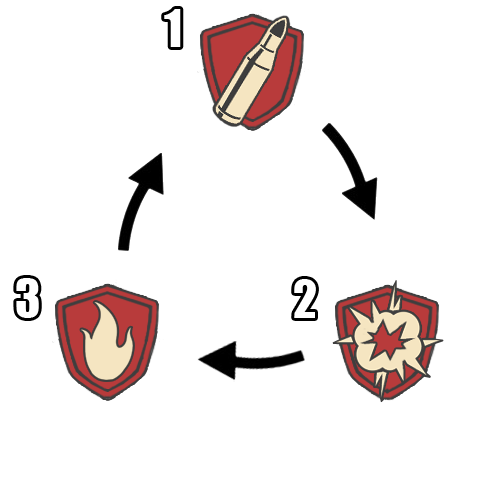
Changing what type of damage you and your patient resist is the key to using the Vaccinator effectively. This is how resistance rotates:

Your resistance type will always begin on Bullet, the most common damage type in the game; this also includes needles from the Syringe Gun and arrows from the Huntsman, Crusader's Crossbow, and Rescue Ranger. When you hit the Change Resistance key, it will shift to the second-most common damage type, Explosives, which is useful when passing through spammy areas such as chokepoints or low-elevation routes. Finally, when you hit it a third time, it will shift to the final damage type available, and the least common, Fire, for when a Pyro manages to get within range of you and your patient. Hitting the Change Resistance key one more time at this point will return you to Bullet, where the cycle restarts again.


In order to swap resistance types efficiently, you will have to get used to knowing when to press Change Resistance once, or twice, in order to shift to the desired damage resistance. Pressing the key twice is the same as shifting the wheel backwards, so ingraining that into your muscle memory as early as possible is highly recommended. In general, it is best to keep resistance on Bullet by default, as you can quickly switch to Explosive with the single press of a key if you suddenly encounter explosive spam. Afterwards, you can quickly switch back to Bullet by pressing Change Resistance twice, and default back to already resisting the most common damage type while being ready to resist the next one at the press of a button.

You will always spawn with Bullet selected as the default resistance. As such, there is no need to remember which damage type you were resisting when you were killed, and switch accordingly.
Basic Tips
So, now that you know how the Vaccinator works, let's go over some tips on how to use it.

Take the Side Line
Unlike other Medi Guns, the Vaccinator is incapable of supporting an entire team alone. While the Medi Gun and Kritzkrieg are capable of fully overhealing teammates, and the Quick-Fix has a faster healing rate, the Vaccinator falls into a middle ground that makes it a liability in large groups. You are incapable of efficiently overhealing teammates, while at the same time being unable to patch them up quickly, making you a "master of none" rather than a "jack of all trades."

Additionally, the specialized nature of the damage resistance attribute means that it's nearly impossible to stand up against multiple enemies in a major push, since they will spam multiple damage types at you, forcing you to use up multiple bars in a short amount of time. If you're the lone Medic on your team, you will be easily overwhelmed, leaving your teammates to fend for themselves.

Even though the Vaccinator excels at shutting down Kritz (more on this below), it can only protect at most two or three teammates at once, leaving the rest to be messily gibbed. At best, it will achieve parity against the other Medi Guns, depending on the situation, and even then it can be easily overwhelmed with numbers.

The best way to use the Vaccinator is as a dedicated pocket Medi Gun in a flanking route. We'll discuss this more in detail later.

Complete Critical Saturation

Besides its extreme flexibility, this is one of the Vaccinator's greatest strengths: its ability to neutralize crits with a Quarter Über.

With the right Quarter Über, you can laugh in the face of a Kritzkrieg and shrug off crit rockets and stickies as if they were just regular explosives, completely ignore that Phlog Pyro who's gunning at you with a full Mmmph meter, and even ignore fully-charged headshots! What's more, your ability to place shields on multiple teammates means that as long as they keep their cool, you can emerge victorious against any single source of critical damage.

Be mindful though, that blowing too many Quarter Übers in an attempt to save everyone might leave you with zero charge in case there's a follow-up with a different damage type. At the same time, there's no point in saving bars if you end up with zero patients left to pocket. Finding the right balance is what distinguishes the good Vaccinator Medics from the bad ones.

Spread and Battle Pocket
Just as with the Quick-Fix, your critical weakness is in your ability to overheal. Don't fall into the trap of using your weapon in a way that it wasn't designed for, focus on what it excels at. In this case, your fast build rate on wounded teammates means that you (and they) benefit the most if you're bringing them from the red back up to full health. Leave the overhealing to Medics with one of the Legacy Medi Guns. This is very much like how the Quick-Fix works, except that you also have to focus on switching resistance types properly.

However, in the most optimal case you'll be pocketing a single teammate into battle as he takes damage from the enemy. You'll be counting on keeping your buddy alive via damage resistance, and building up Quarter Über bars through a combination of properly resisting damage and constantly healing a teammate who's not at full health. Don't be surprised at how quickly you may end up building bars, and don't be afraid to use those bars when needed.

Be Flexible, Be Expendable
This is the hallmark of the Vaccinator: always be shifting healing targets and changing resistance types as you fight different classes.

Your job is to latch onto players in the middle of combat and increase their ability to tank damage, and deploying your Quarter Über as needed. As with the Quick-Fix, don't be afraid to deploy a Quarter Über if you even suspect that it will be useful. You will charge your meter very quickly, even being able to build full bars in the middle of battle, and the partitioned nature of the Quarter Über means that you will waste 25% of your meter at most. If the enemy shifts weapons in the middle of an Über, you can simply change damage resistance types and continue to shrug off damage. Gauge your opposition and what he's likely to do, and swap resistances accordingly.

Be Defensive, Not Offensive
It is almost always better to use the Vaccinator on the defense than when pushing. The reasoning for this is that if you're attacking an enemy group, they'll spam you with all three damage types, and you'll end up expending your Quarter Über faster than you can replenish it. Whereas on the defense, you can see what enemy class is approaching, and ready your damage resistance ahead of time. So if your team is attempting to push, it is better to switch to any of the other three Medi Guns.

Don't ever allow yourself to be taken by surprise either. Letting an enemy to get the drop on you can let them deal damage to you before you can deploy the proper shield, which increases their chances of killing you. Avoid fighting in wide-open spaces or areas with side corridors where an unseen enemy can attack with no warning from an unexpected direction. Keep the threat axis in a single direction, one that you can easily focus on and monitor in order to easily switch damage resistance types.
Intermediate Tips
Once you get a basic feel for how the Vaccinator works, you can start expanding your repertoire in order to increase your effectiveness.

Pop Smartly, Pop Wisely
Keeping track of which damage type to resist in the heat of battle can be tough, and activating resistance shields even more so. The adage, "Pop it, don't drop it!" applies to the Vaccinator as much as it does to the Medi Gun, but it comes with the caveat that you must pop smartly as well. If you don't have the right shield up, then it's as bad as not having a shield at all, and you've just wasted a bar of your Quarter Über to no effect. So make sure that you have the right resistance selected first, and pop a Quarter Über when you expect things to heat up.

When choosing when and where to deploy a resistance shield, you also have to watch out for the biggest threats and avoid being intimidated by the smaller ones. Sure, it would be nice to have 75% damage resistance to both Bullet and Explosive damage, but is the bullet shield completely necessary when you're facing two Demomen and an Engineer? Knowing when not to use a bar can save you some charge to use later when it really is necessary.

Pop-Shifting
In conjunction with the above, one trick you can use to resist two types of damage is to pop a shield, and then shift resistance to the second-biggest threat.

If you're facing down a Heavy and a Demoman is lobbing pills at you from a distance, you can deploy a Bullet resistance shield, then switch to Explosive resistance afterward. You and your patient will then have 75% damage resistance against the Heavy, and take only 90% damage from the Demo (whose grenades will be dealing less damage due to bounce falloff and splash distance anyways), which should be enough to take care of the Heavy and then switch your attention to the Demo.

In an environment with multiple damage types, you need to learn how to prioritize the biggest threats first, and counter the smaller ones only when they increase in magnitude. Use the Quarter Über when necessary, but learn to recognize when it's not needed.

Detterence is Effective
Simply letting the enemy know that you're protecting your teammates can be effective in preventing them from trying to push. As the giant shield icon above both you and your patient lets everyone know what damage type you're resisting, you can use this as a form of psychological warfare against the enemy. Because they can see what damage you're resisting, it gives them pause if they know that their attacks are going to have reduced effectiveness (and if they know that all they're going to do is help you build bars faster).

Don't take this to be a guarantee against the enemy, though. As effective and flexible as a Quarter Über is, it does have its weaknesses. If the enemy does seriously push, then you will have to depend on your actual abilities rather than simply intimidating them.

Sendoff at the Gate
Because of how easy it is to build bars in normal circumstances, deploying a few Quarter Übers at round start can be very effective.

One regular occurence at the beginning of rounds are Sniper standoffs; two Snipers, on opposite teams, line up headshots on each other and wait for the gate to open to see who can kill the other first. You can completely eliminate this factor by deploying a bullet shield on a friendly Sniper, guaranteeing that he'll win the "duel" and giving your team an advantage.

Similarly, if you're on offense, there will usually be a friendly Soldier or Demo who's ready to immediately explosive jump over the heads of the enemy team to cause havoc. On top of overhealing them, using two bars to give them Bullet and Explosive resistance can go a long way towards ensuring their safety up to their liftoff point, and giving them an edge against the first guy they land on top of.

And last but not least, there's the high probability that there will be a Kritz pocket ready to mow down all the people running out of the gate, or that there's a huge sticky trap on a doorframe somewhere. Having the Quarter Über ready to go in either of those situations can help your team get a strong foothold in the immediate beginning of a round.

Watch Your Back
While Medics will always be high-priority targets for the enemy team, you have to keep additional vigilance when using the Vaccinator, especially against Spies and Scouts.

The reason for this is simple: because you are spending more time focusing on selecting the proper damage resistance type, it's easy to lose track of your surroundings and get ambushed from behind. While the other three Medi Guns allow you to mostly set-and-forget, and keep an eye on your team's rear, you have no such luxury with the Vaccinator, since you must always keep an eye on the battle to see what enemy fire is coming in. This makes it ridiculously easy for a Spy to come in and backstab you, or for a Scout to meatshot you with next to no warning. Although you can mitigate the Scout's ability to damage you by popping a Bullet resistance shield, it does nothing to save you if the Scout takes out his melee.

In the end, you'll mainly have to depend on teammates to protect you and ensure your safety. As long as you're doing your job properly and protecting your teammates by resisting incoming damage, you can ensure that there are teammates who can watch your back for you.

Tether Shielding
One way to utilize the Quarter Über is to use your own resistance shield where possible.

While the Medic doesn't benefit from the same healing that his patient gets, you still gain the ability to shrug off damage of the resisted type, and as a result you can use it to body-block bullets or spam for your teammates that aren't shielded. Getting in an enemy Demoman's face with explosive resistance can cause him to do a lot more damage to himself than to you, and ensures that his projectiles don't even reach your other teammates at all. In the same vein, stopping a Heavy's Minigun fire gives your teammates time to pour fire on him while also saving your bars to use in later situations.

Just try to be careful when doing this, as the enemy can still switch weapons against you. Being in close proximity to a Demoknight with his sword out is not a situation you want to be in, and a Soldier who brings out his Shotgun against your explosive resistance can also be very dangerous.
Advanced Tactics
This section deals mainly with tactics and concepts that you should start using once you have a solid grip on how to use the Vaccinator. Once all of the above tips become second-nature, you can start to really put this thing to use.


Expend Bars, Conserve Bars
Just because you may have a full Quarter Über bar, doesn't mean that you should blow it all in one push, but it also doesn't mean that you should save them only for extreme situations.

Because of its extreme flexibility and partitioned nature, you should never be afraid to deploy a resistance shield if you ever feel that you or your patient might be in danger. Remember that bars can recharge extremely quickly in the midst of battle, so it doesn't take very long to recharge an expended Quarter Über bar, as opposed to the amount of damage you are potentially protecting your teammate from. If you suspect that you might see some heavy action ahead, don't be afraid to expend a bar or two in a skirmish, as you will probably recover it before the next major enemy encounter. Of course, this is largely a judgment call, don't feel obligated to waste a bar if you suspect that you will need it later on, just remember that you don't have as much to lose as other Medi Guns by popping part of your Quarter Über.

On the flip side, once you do push forward into a major encounter, don't feel that you need to use up all of your contained charge in a single engagement. One of the flaws with other Medi Guns is that, due to their single-deployment Übers, they have to use their entire meter in one go whether it is all useful or not. Because you do not suffer from the same limitation, you can deploy only one or two shields in a fight and save the rest for use if an unexpected situation arises. If you use one bar on a full Quarter Über to kill that Heavy that was blocking your path, you still have three more in case there's a Demo lurking around the corner. If you use up another bar to dispose of that Demoman, you still have some reserve charge in case a Pyro is waiting to ambush you.

In all, remember that the Quarter Über is far more flexible than an Über from the other Medi Guns, so use it to your utmost advantage.


Scale Resistance With Distance
As a default, you should generally have Bullet set as your resistance whenever moving from place to place, however, this doesn't mean that you should have it set to Bullet all the time. Besides picking your resistance based on what enemies are attacking, you should keep in mind your distance from the enemy, as different projectile types have varying degrees of effectiveness at different ranges.

For instance, let's say that you're pocketing a teammate and you're up against a Heavy, Scout and Demoman. When you're at close range, you should generally have Bullet resistance, as the Heavy and Scout can easily cut your patient down without that resistance. However, at medium ranges you should switch to Explosive resistance; the Heavy and Scout will be able to do less damage to you because of damage falloff and bullet spread, but the Demo can still lob highly damaging explosives at you, so having your resistance set to Explosive can give you more time to react, and maybe pop off a Quarter Über if needed. Once you manage to get out of range of the stickies though, you should switch back to Bullet, because you never know when a Sniper might round the corner and take a shot at you.

Sentry Shifting
While the Vaccinator isn't the best Medi Gun for taking on Level 3 Sentries, it can still rise up to the challenge with the right teammates if you use pop-shifting.

Keep in mind that while a Level 3 Sentry fires both bullets and rockets, the rockets arrive at predictable intervals. You can lead with a Bullet resistance Über pop, then shift to Explosive resistance when the quad rockets impact, and switch back to Bullet resistance for another Quarter Über. Repeat the process until the Sentry or Engineer (preferrably both) are dead.

The key to this is that you don't need to activate both Bullet and Explosive resistance shields, which doubles the amount of ÜberCharge you have available. In fact, with a smart teammate, you can even outright dodge the rockets, allowing you to stay on Bullet resistance the entire time and potentially build up more Quarter Über via successful damage resistance.

As with taking down Sentries in any situation though, be sure to watch out for Engineer's teammates, none of who would be too happy if you managed to kill his Sentry.

Flanking Battle Pocket
Because of the narrowly specialized nature of the Vaccinator's damage resistance, it is best used to pocket a flanking or roaming maneuver, where you use the side routes where the enemy is not attacking from and choose what and how many enemies to attack. You should never bring the Vaccinator to bear on the enemy's main spearhead, since they will attack with all three damage types and either overwhelm your front or completely drain all of your Quarter Über bars, so you should leave the front lines to any of the other three Medi Guns. Flanking the enemy and picking them off one by one is what the Vaccinator does best.

Unlike the Reinforced Flanking attack that the Quick-Fix is capable of when pocketing a Soldier and/or Demo (jumping with them up to areas where only they can access, and attacking the enemy's weak points from unexpected directions with strong Medic support), your strength is less about mobility and more about flexibility and sustainability. The Megaheal is effective in sustaining a single strong attack, but charges more slowly than the Vaccinator and requires the Medic to use the whole meter at once, making it more of a "single engagement" type of flanking Medi Gun.

However, the Quarter Über can be partitioned and deployed as needed, allowing you to use only part of your meter in one skirmish and saving some of your charge for another. You can continue pushing forward after the first skirmish, as you have additional Quarter Übers at your disposal and you can quickly replenish any charge that you used due to the faster charging rate and bonus charge gain on successful damage resistance. As you continue to engage the enemy in small numbers, you can distract their resources from hitting your team's front line. This makes the Vaccinator effective for an "endurance" type of combat.

Keep in mind though, because your only sources of healing will be self-regeneration and the bonus from healing wounded teammates, you'll need to learn to scavenge for health packs when necessary. While you can shrug off a lot of damage through resistance shields, it still adds up over time. Always ensure that you're at full health, so that you can keep your teammates alive.
Weapon Selection
As with any other Medi Gun, the types of armament that you select alongside your primary healing weapon can greatly change how you play the class. So here's an overview of all the possibilities.

Primary Weapons

Syringe Gun: The most balanced of the Medic's primary weapons, the Syringe Gun is a decent choice as a primary weapon. While you won't be expected to make use of it except in self-defense, it is a relatively good choice for protecting yourself while balancing health regeneration.

Blutsauger: Because the Vaccinator's effectiveness depends so much on healing teammates to build up the Quarter Über, taking time away from healing to shoot at enemies isn't always the smartest choice. On top of which, Vaccinator Medics tend to take a lot more damage than most other Medics due to the need to battle pocket in order to gain charge, as well as get closer to the action to spot out the opposition so that they know which damage resistance to use. This means that they rely a lot more on the passive health regeneration to keep them alive than other types of Medics. Because of this combination of factors, the Blutsauger is one of the worse primary weapons that you can combine with the Vaccinator, as their designed purposes militate against each other.

Crusader's Crossbow: As with the other Medi Guns, the Crusader's Crossbow is largely a situational weapon to combine with the Vaccinator. In general you shouldn't be firing crossbow bolts at the enemy since that takes time away from building Über, but there may be situations where you need to heal teammates from long distances away. The Crusader's Crossbow can be a strong utility weapon in this regard, but be sure that you aren't diverting too much attention away from your primary mission, to build up ÜberCharge so that you can deploy resistance shields.

Overdose: As with the Quick-Fix, carrying the Overdose can give you a solid tactical advantage due to how quickly the Quarter Über builds. Since the Overdose increases the Medic's movement speed based on the amount of stored charge, you can almost always guarantee that you'll get the maximum speed bonus should the need arise. While you can't utilize resistance shields while equipped with anything besides the Vaccinator, it can serve as a great fallback weapon in the event that you do have to engage in combat.


Melee Weapons

Bonesaw: Since the Medic has so many melee weapons that can provide all sorts of utility, the stock Bonesaw is often overlooked as a viable choice of armament. As is usually the case with general Medic play, you should generally try to rely on teammates to protect you from enemy threats, rather than taking out your melee weapon to deal with the threats yourself. Remember that any time spent trying to kill an enemy is time not spent healing teammates and building ÜberCharge. However, in the event that combat truly is necessary, the Bonesaw is the most reliable weapon for simply killing your enemies as it does not sacrifice any combat capabilities for utility.

Übersaw: The primary benefit to using the Übersaw is that, unlike the other Medi Guns, hitting an enemy with this will allow you to charge a bar on your Quarter Über for immediate use, no matter how much charge you have built up beforehand. Of course, given that you must get within close proximity with an enemy in order to hit them, this also greatly increases the risk to you, and you cannot rely on an invulnerability to save yourself (a resistance shield is an imperfect solution, since, at melee range, the enemy may just take their melee out to attack, which you are incapable of resisting).

Vita-Saw: Much like the Übersaw, this can allow you to quickly get a Quarter Über ready. In this case, you simply have to latch onto a teammate for one or two seconds upon leaving spawn, and you're good to go. In a hectic defensive situation, this can be a lifesaver. Of course, given the already fast charging rate of the Vaccinator, and the reduced maximum health that results, you may not want to pick the Vita-Saw if you're confident that your teammates can protect you. The relative fragility of a Vaccinator Medic may allow enemies to kill you much more easily than other types of Medics.

Amputator: The Amputator occupies an odd place in the hierarchy of Medic melee weapons. At first glance, it may seem counter-productive to use your taunt to heal teammates to full health; after all, the Vaccinator wants teammates to be below full health so that it can charge up the Quarter Über at faster speeds. However, remember that pocketing a teammate in the midst of battle can just as easily accomplish that, doubly so due to the Über gain bonus on successful damage resistance. What the Amputator does do is allow a Vaccinator Medic to reliably maintain his front line; because of the reduced healing rate on overhealed teammates, the Vaccinator can only efficiently heal them when they're below 100%, but in the meantime they're also vulnerable to being killed by the enemy. By using its taunt, the Medic can top up multiple teammates at once and keep them all in the fight, and then turn to pocketing a teammate into battle to build up ÜberCharge and take map objectives. On top of which, taking out the Amputator can boost the Medic's health regeneration, which can be useful if you need a breather to recover health.

Solemn Vow: If you're not into risk-versus-reward gameplay, are confident in your Über-building abilities, and simply want a reliable melee weapon, then the Solemn Vow can be a good choice. You won't have many opportunities to spot enemy health, or to exploit such opportunities, but regardless it can be helpful for your team to know about the enemy's health situation whenever needed. Be warned that you should focus primarly on healing your team and swapping resistances, so don't get distracted by other things.
Conclusion
As is the nature of any game, this guide continues to be a work in progress. New tactics may evolve over time to better allow Medics and their patients to use the Vaccinator, and new perspectives may change the overall outlook on the weapon as more people learn to use it.

If you have anything to add, don't hesitate to post a comment. My aim is to completely document all of the possibilities with this complex and flexible Medi Gun, so any assistance will be appreciated.


If you find this guide useful, be sure to check out my other Medic guides!

Quick-Fix Medic: For Doctors and Patients
Kritzkrieg Medic: A Comprehensive Guide
28 Comments
MechaSpooka 28 Jan, 2021 @ 4:57pm 
10/10
General Shoeswack 29 Apr, 2016 @ 10:03am 
Is there a Medigun guide?

And r all the other guides updated for the Tough Break & Gun Mettle update
[ λ³ ] nob 4 Jan, 2016 @ 3:59am 
I'm even worse... I also have a guide unupdated for over 2 years now :S
Lord Kelvin  [author] 3 Jan, 2016 @ 10:32pm 
Guide has been completely overhauled! Sorry for the very long delay, but I had way too much trouble trying to document the changes after the Gun Mettle Update, since it was so hard to build Über. But now that that's been fixed in the Tough Break Update, feel free to read and critique!
Keter 23 Nov, 2014 @ 10:21pm 
um dont forgot you can still kill the vac medics with a melee attack, they got no resitance to that!
Chimbo 10 Feb, 2014 @ 8:50pm 
This weapon is very interesting, as it adds a new level of depth to the Medic game. Unfortunately, there's practically no reward for this added depth beyond being able to soak up a little more damage than usual. I've only ever seen the Vaccinator used by one other Medic, and only used it myself once, and I found its usefulness extremely situational. It doesn't help that the Uber is, by all accounts, the worst one in the Medic's repertoire.

The Vaccinator either needs to be buffed or outright scrapped, as a weapon that sees next-to-no use is one that's essentially a waste of space. It's sad, because the level of depth that it adds to the Medic's game is something I'd really like to see expanded upon.
[ λ³ ] nob 21 Nov, 2013 @ 10:57am 
well, atleast it resists crits now ;)
Lord Kelvin  [author] 21 Nov, 2013 @ 10:41am 
The guide has been updated, both for the Summer Event 2013 update and the change to switching resistances. The biggest change was to the re-binding section, otherwise most of the rest of the guide should read more or less the same.
[ λ³ ] nob 17 Nov, 2013 @ 8:23am 
This guide keeps being a good guide eventhough outdated, is there any chance you could update it?
The Doctor 28 May, 2013 @ 12:46pm 
Very good guide. I personally do not like the Vaccinator because I feel like I'm letting everyone down for using it and I'm usually the only Medic on my team. The inability to block critical hits seriously cuts this weapon's usefullness.