Team Fortress 2

Team Fortress 2

81 ratings
Quick-Fix Medic: For Doctors and Patients
By Lord Kelvin
An unorthodox Medi Gun, the Quick-Fix can be hard to use for players new to the game. This guide aims to rectify that problem by teaching you the strengths of this weapon.
   
Award
Favorite
Favorited
Unfavorite
Introduction

The Quick-Fix was first introduced to the game in the Team Fortress 2 Beta on February 11, 2011, and after testing and balancing was subsequently added to the game in the Über Update on June 23, 2011. Compared to the stock Medi Gun, which has been with the Medic since the start of the game in October 2007, and the Kritzkrieg, which has been available since the Gold Rush Update in April 2008, the Quick-Fix is a virtual baby when put alongside the Legacy Medi Guns, being beat out only by the Vaccinator, which was introduced in the Mecha Update on December 20, 2012. Its unorthodox features make it an infrequently-used Medi Gun, as it does not provide the tried-and-true invulnerability of the stock Medi Gun, nor the raw killing power of the Kritzkrieg.

The mission of this guide is to share my insights and experiences from having used the Quick-Fix, as well as having been on the receiving end of it. It is geared, however, more towards Medic players who wish to learn how to use this weapon more effectively (and also because much of my practical experience comes from actually wielding it). Nonetheless, I still recommend that patients read this guide as well, since they can learn what the Medic expects of his patients, and change their tactics accordingly.

Disclaimer: This guide is mainly aimed for players who already know the basic mechanics of how the Medic works, but find themselves in trouble with the Quick-Fix. It is not meant to teach newbies everything about how to play from scratch, there are other guides for that. If you do not already have some existing basic knowledge about the Medic, then please read some other guides and get some practical experience before coming here.


Last updated: 25 December, 2015
Basic Information
Before we get started on how to use the Quick-Fix, let's go over its basic features.

As the name implies, the Quick-Fix's greatest advantage lies in its ability to quickly "fix" teammates up so that they can return to battle more quickly, as its 40% faster healing rate (a total of 33 HP per second) allows you to patch up low-health teammates in a matter of seconds. Used properly, it is possible to start healing a Scout who is at 1 HP and return him to combat-ready status in less than four seconds, or approach a group of five teammates who are all in the red, and get all of them back into battle in ten seconds.

On the flip side, the Quick-Fix suffers from a reduced maximum overheal. It is only capable of overhealing teammates to 125% of their maximum health (sometimes with an extra point of health added in), instead of the 150% that all other Medi Guns are capable of. This makes your teammates less capable of absorbing damage than if they are overhealed by a different Medi Gun, although this can eventually be outmatched on pocket teammates due to the Quick-Fix's faster healing rate.

However, this is also a blessing in disguise. Because you only heal teammates to 125% of their maximum health, and never to the full 150% (though technically the limit is 142.5%), you will always build your ÜberCharge at full speed. In practice, this makes the Quick-Fix one of the fastest charging Medi Guns in the whole game, as it is capable of building a full ÜberCharge meter in 32 seconds under almost any circumstance.

The Quick-Fix's ÜberCharge, the Megaheal, takes the Quick-Fix's basic advantage and cranks it up, allowing Medics to heal their target at triple the normal speed, roughly 100 HP per second in battle, enough to overcome a huge amount of damage. Additionally, the Megaheal applies to the Medic as well, even if he is not connected to a patient, making it essentially a pocket version of the stock Medi Gun's Über. It also eliminates the enemy's ability to influence the pair's movement, meaning that explosives will not juggle you, Pyros cannot airblast you, and Sentries will not push you back.

The final (and sometimes overlooked) attribute of the Quick-Fix is that it can increase the Medic's movement speed to match that of his patient if the latter is faster, and any self-inflicted forces incurred by an explosive-jumping patient also apply to the Medic as well (the Medic does not get juggled if his patient gets hit by enemy explosives). This greatly increases the Medic's maneuverability and mobility depending on how it's used, and can be used in many creative ways, from getting from spawn to the front lines extremely quickly, to reaching normally unreachable areas in tow with a Soldier or Demoman, to quickly escaping a danger zone. All of this will be covered in more detail later.
Basic Quick-Fix Usage
Let's begin with what the Quick-Fix is designed to do, and what it excels at.


Maintain the Front
The more teammates you're healing on the front lines, the less likely they are to retreat, the more likely they are to succeed.This is how the Quick-Fix should be used at its most basic level, and where it finds its niche in the game. The best way to use the Quick-Fix is by healing teammates who are at low health, and getting them back into the fight faster than the other Medi Guns can, essentially maintaining the battle line and preventing it from collapsing. I will refer to this as spot-healing (a term that a friend of mine used that I really like): quickly patching up teammates "on the spot" and moving on to the next one, focusing on your team as a whole instead of on individual players.

70% of the time, a teammate doesn't need to be fully overhealed to jump into battle, they just need to be at full health (or at least not near death). A full overheal will only last 15 seconds, at most, before it decays, so its usefulness diminishes over time even when not in battle. The other 30% of the time is when a dedicated pocket (often with a ready Über) is needed in order to break through an obstacle, and the Medic who is pocketing will not have the time to heal other teammates.

The job of the Quick-Fix Medic is to return injured teammates back to battle faster than other Medics can. Not only does the Quick-Fix allow you to get a teammate out of low health quickly, the time saved doing so can be used to treat the next injured player in line, and so on and so forth, until everyone on your team is at full health in the time it takes another Medic to simply overheal one patient. In a battle situation where a Medic with the stock Medi Gun or Kritzkrieg can only keep one or two teammates going in battle constantly, the Quick-Fix can easily maintain upwards of three to five teammates at all times, which can greatly increase your team's firepower during a push or defense. Keeping your teammates all alive ensures that they can all face the enemy with the confidence that they won't instantly die in the next few seconds.

Of course, you can't let your faster healing rate get to your head either. This is one of the main pitfalls that players using the Quick-Fix succumb to, they try to pocket a single teammate into battle and end up getting killed because they thought they could out-heal the damage taken. Do not use the Quick-Fix like this, it is not meant to be a pocket weapon 70% of the time. There will be times when pocketing can be useful, but it takes time and experience to recognize when those situations will arise.


Split the Duty
Should your team find itself with a second Medic, who is using one of the two Legacy Medi Guns, you should agree to divvy up your areas of responsibility.

The Quick-Fix, with its inability to fully overheal players, should not try to pocket a single teammate, while the Legacy Medi Guns, with their slower healing rates, should not try to bring a low-health teammate up to full. Instead, do what your Medi Gun is best at. A Quick-Fix Medic should focus on spot-healing and bringing teammates out of the red, so that they can keep on fighting. Legacy Medi Gun Medics should focus on overhealing full-health teammates, and pocketing players in fights so that they can survive long enough to take objectives.

The Vaccinator fills a grey area with no easy solution. Unlike the other Medi Guns, it is incapable of building Über as quickly on players who are at 100% health or higher, which can cause it to conflict with the Quick-Fix since they both fill the same niche (albeit differently). The best way to approach the problem is to simply divide up territory rather than duty; as with any other Medi Gun, too many in one place will slow down the rate at which they all build ÜberCharge, and thus how quickly and easily the team can take map objectives.


Always be Healing Someone
While any Medi Gun should always be healing teammates with the end goal of building a full ÜberCharge meter, the Quick-Fix is special in that you will always build your Über at full speed even when pocketing a single teammate. Remember that Über build rate falls off when your patient is above 142.5% health, but you don't have to worry about that since you can never heal teammates above 125%, so use that to your advantage to build your Über before enemy Medics. Where another Medi Gun might require a Soldier or Demo to damage themselves to increase your charge rate, the Quick-Fix suffers from no such limitations.


Maintaining Overheal?
One of the quirks of the Quick-Fix is that, if someone is healed above 125% and you latch onto them, you will prevent their overheal from decaying. While this is useful in theory since it gives your patient 25% more health, it isn't nearly as powerful in practice since you can't heal that back once they fall below 125%. Additionally, remember that your ÜberCharge build rate drops to half when your patient is above 142.5% health, so why take away from your greatest advantage?


Keep Up the Pressure
This is the primary strength of the Quick-Fix, and bears emphasis: keep multiple teammates at full health so that they can return to battle faster and stay in battle longer! A Medic with the other Medi Guns can only reliably overheal one or two teammates in battle, and pocket one at a time, but you have the ability to keep your whole front line from collapsing in the face of a determined attack. Remember, the more teammates there are for the enemy to shoot at, the more spread-out the damage will be, and the easier it will be to keep everyone from dying. A Legacy Medi Gun can only keep one or two people in the fight at a time, even if multiple players are pushing forward; a Quick-Fix Medic who spot-heals can keep everyone pushing.


Your Über is Meant to be Used
While this isn't to say that the Megaheal is expendable, nor that a Quick-Fix Medic is, keep in mind that the Megaheal is, in practice, one of the fastest charging Übers in the game, which allows you to have it ready to deploy more often than the Legacy Medi Guns. As such, don't hesitate to deploy it if you see an opportunity to use it, since you can have another Megaheal ready to use extremely quickly. Pop it early, and pop it often.
Interaction with other Classes
How well you cooperate with your teammates and how much they can make of your healing is the key to victory.Just as with the other Medi Guns, how you use the Quick-Fix will mainly depend on which classes are on your team. Due to its vastly different attributes though, the Quick-Fix interacts with your teammates quite differently than the two Legacy Medi Guns or the Vaccinator, so here's a basic primer on how to use it.


Scout
Most players are usually tempted to pocket a Scout and run around the map at high speed. 85% of the time this is a horrible idea, as even while being pocketed, a Scout relies far more on his speed and jumping ability to avoid damage and fight the enemy. Even worse, a Scout cannot effectively protect his Medic, who will be forced to run into the thick of battle instead of staying safely behind teammates, which is just asking to be killed and spent back to your spawn.

The most that you should do as a Quick-Fix Medic for a Scout is to top him up when he retreats from battle and needs to be healed. Your faster healing rate allows the Scout to get back to harassing the enemy that much more quickly (moreso since he doesn't have that much health to begin with), and as a result increase your team's firepower that much more. If you're just spawning, then latching onto a Scout can definitely get you back to the front lines more quickly, but that's about the best you can do.


Soldier
The Soldier is a big step up from the Scout. As a front-line fighter and due to his ability to rocket jump, the Soldier will require constant topping-up from Medics to stay in the fight. He's also one of the beefiest classes in the game and can easily protect his Medic through his physical bulk and high damage output. If there's any class that could be pocketed by the Quick-Fix, the Soldier ranks near the top of the list.

The one thing you need to worry about is the Soldier's ability to take you with him when he rocket jumps; like the Scout, this can be used to reach the front lines faster when respawning, but it also has other uses as well. Much of this is covered in detail in its own dedicated section, but for Medics who are simply maintaining the front line, the Soldier is one of those classes where you don't want to pocket in order to build Über while in battle. Their tendency to rocket jump without warning means that they could accidentally take you along for the ride, putting you right in the middle of the enemy formation (or worse, straight into an instant-death pit).

One thing worthy of note though, if a Soldier has a Battalion's Backup, he should get priority healing over other teammates when necessary. Due to its ability to neutralize crits, as well as the damage resistance buff, the Battalion's Backup can completely negate the Quick-Fix's vulnerabilities. As it significantly increases your team's survivability during a push, especially when combined with the Megaheal, the only things you would have to worry about are Stickybomb traps and Backstabs. Of course, this doesn't mean you should ignore all other teammates in favor of pocketing a Battalion's Backup Soldier. But by keeping him alive, he's more likely to build up a full Rage meter, which in turn benefits your whole team.


Pyro
In general, treat Pyros as you normally would if the Scout: don't pocket them at all, just top them up. Pyros tend to get themselves into situations where there is no easy escape, so never follow them into battle. Of course, support-minded Pyros (the proverbial Pybro) who Spy-check, deflect projectiles, destroy enemy Sappers and extinguish teammates are certainly worth your time keeping alive, but otherwise you should continue to focus on your job and keep your other teammates alive as well.

The main exception to this is the Detonator-jumping Pyro, who can jump over obstacles to flank the enemy through normally impassable routes. This will be covered in more detail later, but in such situations it's normally feasible to at least top them up after their jump.


Demoman
As with the Soldier, the Demoman tends to see lots of action on the front line so always keep them topped up, especially since they're one of the heaviest damage-dealers in the game. They are easier to pocket in that it's easy to telegraph when they're going to sticky-jump, so you will know when to break the healing beam so that you don't end up flying across the map with them. Like the Soldier, they can also be used as mules to bring you from respawn to the front lines more quickly.

The exception to this is the Demoknight, only top them up but nothing else since, like the Pyro, they tend to get right into the thick of fights where it's easy to get picked off (plus their team contribution is practically nil). You can hitch a ride on their charge to reach the front lines faster, but that's pretty much it.


Heavy
Just as with the other Medi Guns, the Heavy is a prime target for healing and pocketing if the situation ever presents itself. Heavies tend to soak up a lot of damage, so they will constantly need healing in order to stay in the fight. As well, the Heavy's huge HP stock means that, in many cases, they can be stronger pocket buddies with the Quick-Fix than with the Legacy Medi-Guns, since they will often survive long enough for the faster heal rate to outmatch having an extra 75 HP of overheal. Keeping Heavies in the fight by topping them off constantly, and taking them on pocket missions to let them bring their full force to bear, is one of the best ways to win matches.


Engineer
Healing an Engineer should only be limited to if he's hauling or repairing a building while under fire, has the Gunslinger equipped, or has the Wrangler out, otherwise he's taking time away from you healing other teammates that actually need it. As Engineers spend most of their time camped safely next to a Dispenser, they're among the lowest of your healing priorities. Your time is better spent spot-healing teammates that actually go out into battle and take damage.


Medic
As the saying goes, "Medics heal each other." Because of their inability to directly self-heal, you should always take the time to ensure that a friendly Medic is at full health, because your team can never have too much healing or too many Übers to use. In particular, if the other Medic is using a Legacy Medi Gun, keeping him alive means that your team is far more likely to accomplish the map objective by using that Über, because invulnerability or guaranteed crits will always be the game-changer.

What about combining your Über with his? This is covered in another section below.


Sniper
The Quick-Fix is only useful for topping up Snipers, that's pretty much it. The only danger that Snipers usually face are either from enemy Snipers or from Spies, both of which you can do little about; an extra 30 HP that lasts for less than 8 seconds will not save a Sniper from a headshot or a backstab. If a friendly Sniper approaches you and is in the red, by all means spot-heal him, but otherwise you should dedicate your time to healing front-line teammates.


Spy
Like the Sniper, you should only worry about topping off a Spy if he is injured or on fire, but nothing else. While Spies can do things that any other class cannot, they're not front-line fighters so they will rarely be in a position for you to pocket or heal.
How to use the Megaheal
So, let's assume that you've done your basic job as a Quick-Fix Medic, and all of your teammates who are fighting on the front lines are still at full health. You're pushing the enemy back to the next major map location, and have built up you Über along the way. You are now fully charged. What should you do with it?

Here is the very first thing you need to know about the Megaheal: IT DOES NOT MAKE YOU INVINCIBLE! This is the biggest problem that players have when they use the Megaheal or have it deployed on them, they run into battle thinking that any damage that they take will be quickly healed, only to take far more damage than even the Megaheal can deal with and die. Remember, it can only heal 100 HP per second, which enough enemies combined together can easily overwhelm. Once you recognize that the Megaheal does have a limit, you can start using it more effectively.


Big Group Pushes
In much the same way that spot-healing keeps your teammates pushing, the Megaheal allows them to keep pushing forward in the face of overwhelming firepower. As your whole team pushes forward, shift from target to target, keeping everyone topped up and out of the red. The Megaheal allows players to either keep moving forward in the face of withering firepower, or for a player in the red to get back to full health in literally two seconds or less.

Remember: the more teammates there are pushing forward, the more effective it is. The more teammates there are, the more targets the enemy is forced to engage. The more targets there are, the less damage each player takes. The less damage taken, the easier it is to keep them all topped up. Use that to apply enough pressure to break the enemy's defense line.


Defense Reinforcement
If the enemy team decides to make a huge push, the Megaheal can prevent them from accomplishing their main goal, to kill your teammates. As noted above, the Megaheal lets you bring a teammate from the red back to full health in under two seconds, which means that an enemy team pushing forward and causing damage to your teammates is the perfectly ideal situation in which to use the Megaheal. Simply continue spot-healing, keeping your teammates out of the red; as long as they don't die, they can keep pouring fire onto the enemy and hopefully emerge victorious.


Be a Meat Shield
Never forget that the Megaheal applies to yourself as well, so you also have the ability to shrug off enemy damage, not just your patient. Because of this, you have the ability to move forward and block enemy fire for your teammates, on top of keeping them healed. In essence, you are acting as a meat shield and making it easier for your teammates to push forward. You can, literally, stand right in front of a Pyro as he shoots you with his Flamethrower, and still heal faster than he can damage you (so long as he doesn't get lucky crits, have an active Phlogistinator or whip out an Axtinguisher).

Beware, though, the goal here isn't to soak up all the damage yourself, remember that the Quick-Fix does have a limit. What you are trying to do is to divert the enemy's attention and firepower for one or two seconds, in order to spread the damage out a bit more so that you can manage your teammates' health bars more efficiently, and then back off to continue letting your teammates soak up the damage.

In a pocket situation against a single high-damage output enemy (such as a Sentry), you can use the "rubber band" method (also sometimes referred to as the "rocking chair") to extend your survivability. Much in the same way as a Medic can push in front of his patient to absorb knockback with the stock Medi Gun, you can move forward to protect your patient if he's taking too much damage, temporarily shielding him while the Megaheal restores him to full health, then backing up to let him take the brunt of the force again so that you can regenerate, and repeating the process. While an imperfect solution in a case where multiple pushing teammates would solve the problem more easily, it can nonetheless increase your patient's survivability in a situation that can normally be daunting.


Pyro Shutdown
Any Medic will acknowledge that the greatest threat to an Über push is a Pyro who can airblast effectively. Unlike the other three Medi Guns, the Quick-Fix's Megaheal prevents enemies from forcibly displacing you, meaning that you no longer have to worry about a Pyro pushing you into an instant death pit. Because Pyros also cannot deal damage faster than the Megaheal can patch up (with the exception of the unusual circumstances mentioned above), the Quick-Fix is perhaps the most powerful anti-Pyro Medi Gun in the game.


Healing on Objectives
While the Medic and his patient cannot capture objectives while under the effect of a Megaheal, the Quick-Fix's spot-healing nature can be used to get around this somewhat. If numerous teammates are forcing an objective, you can still apply the Megaheal to them one by one, keeping them all at full health. You'll be taking one person off the objective at a time, but the other two or three will still be pushing the cart or capping a point.

Of course, this cannot be done if it's only you and one patient trying to capture an objective, and it won't save you against sticky carpets or crits (random or otherwise). However, it can still be a viable option if your team is able to mass on an objective with you backing them up.


Scout Bum-Rushing
Besides the 10% of the time when a Scout can carry you from spawn to the front lines faster, this is the 5% of the time when pocketing a Scout can be useful.

If you see an opportunity to make a pick on the enemy team, don't be afraid to pop a Megaheal on a Scout and gun for the target. In general, do this whenever you see an enemy Medic who is sitting behind only one or two teammates, or an Engineer who is hauling a building to the front lines. The Scout can quickly weave his way past the enemy and go straight for the target while ignoring push forces from explosives and airblasts. You, however, should not simply follow the Scout in; try to maneuver and weave, distracting the enemy and absorbing some of the damage yourself if you can, or even body-blocking your target's escape route. While you can only overheal a Scout up to 155 HP, this should normally be enough if the Scout is competent at dodging (outside of lucky crits).


Your Über is Meant to be Used
This bears mentioning again, but remember that since you will build a full Über faster than almost anyone else, you don't have to worry about saving your Megaheal for the "perfect" moment. If there is ever any opportunity where it can be used, deploy it and push with your teammates. Even if the enemy falls back and you fail to kill anyone, you will gain a better position to complete the map objective, and give your team the initiative.

The best case is that you force the enemy Medic to pop his Über to counter yours, which results in resetting both of your meters to zero. At that point, you will start charging faster than him and have another Megaheal ready before he can build a full meter.
Enemy Medi Gun Counters
So, what if a Medic on the other team is using one of the other Medi Guns? The Quick-Fix actually forms a triangle of counters with the two Legacy Medi Guns (the Vaccinator fills a grey area), where one is able to easily counter another but is easily countered by the third. Here's how it works.


Medi Gun: Neutralize and Wait

In general, players use the stock Medi Gun so that they don't have to worry about taking damage, while hoping that the one ÜberCharged player can deal enough damage while invulnerable. However, the regular Über's flaw is that it doesn't increase its patient's damage output, and most of the time only one or two people jump out to attack. This is where the Quick-Fix comes in to counter it: simply pop your Megaheal, and focus the beam on whatever teammates are being attacked, while weaving in front of the enemy so that they try to shoot at you as well. Because you are being healed by the Megaheal as well, you can act as a meat shield for your teammates, and spread the damage out. Continue to change healing targets to prevent the enemy Über pair from killing any teammates, and when both Übers fade, your team will hopefully have the upper hand.

Of course, there are some caveats to this. First, of course, is random crits, which can instantaneously end you and your teammates; there isn't much that you can do about this besides play on servers where random crits are disabled. Second is if the enemy is a Demoman who can simultaneously detonate all his stickies at once, doing more damage than your teammates' overhealed health; the obvious ploy here is to just run away from his stickies and don't let him blow up more than one or two at a time on your team. However, this is a case where you should depend on your teammates to solve the problem for you. Finally, of course, is if the target is a friendly Sentry nest, which cannot benefit from faster healing; the best you can do is rubber-band in front of the Sentry and body-block for it, hopefully giving the Engineer enough time to pick it up and run while you meat-shield for a bit.


Kritzkrieg: Retreat and Counter

The other side of the triangle is that the Kritzkrieg is the counter to the Quick-Fix: your faster heal rate does you no good if the other guy can deal more damage per projectile than your patient's maximum overhealed HP. In such a case, there's really little that you can do but to warn teammates to spread out, retreat, and then hit them with your Megaheal when their Über fades. This, of course, is the same thing that Kritzkrieg users do when a regular Über approaches: Stock counters Kritz, Kritz Counters Quick-Fix, Quick-Fix counters Stock.


Vaccinator: Strength in Numbers

When facing an enemy that is being protected by the Quarter Über, you should do what the Quick-Fix does best: bring multiple teammates in to bear down on the target. While the Vaccinator is capable of resisting multiple damage types at a time, doing so simply turns it into a contest of stamina, and forcing the Vaccinator to use more than one Quarter Über bar at once means that you're almost guaranteed to outlast him.

At the end of the day though, this one largely results in a stalemate since neither Medi Gun can allow a buddy to exploit the other's weaknesses. The only thing you can really do is try to exhaust the other Medic's Quarter Übers, prevent his buddy from killing your team, and then kill him when his resistances run out.


General: Take the Initiative

Remember again, the Quick-Fix is one of the fastest charging Medi Guns in the game, so use this to your advantage whenever you can. If you heal the right targets and focus on building your ÜberCharge meter, you should almost always have a Megaheal ready before the enemy Medic, so try to take advantage of this window to kill them first. If you succeed, it gives you the additional advantage of being able to build another Megaheal while the enemy Medic is respawning, and rinse and repeat. Even if the enemy Medic somehow gets an Über off, simply back off and begin charging your Megaheal again; unless the enemy Medic has an Übersaw, there should be no real reason that you can't get your Megaheal ready to take him down before his next full meter.


Stealing the Charge

If you manage to successfully kill an enemy Medic before he pops, don't be afraid to pick up his Medi Gun and use it. Since you are now at empty from popping your Megaheal, picking up the enemy's Medi Gun that has residual charge in it will almost always put you at an advantage. However, keep in mind that all Medi Guns have their uses, and the one you pick up may be ill-suited to face their class lineup (remember that the map itself is also a factor, as is whether you're on attack or defense). Judge the situation accordingly before committing.
Cooperative Medi Gun Combos
Now, what about if a Medic on your team is using one of the other Medi Guns? In this case, you have lots of options for either augmenting the strength of their Über, or serving as a backup should theirs fail. Again, since the Quick-Fix charges so quickly, you can use the Megaheal profligately and have another charge ready not long after.


Kritz Endurance
In the same way that a Medic with the Kritzkrieg should get topped up with overheal before jumping into the action, the Quick-Fix has the option of following a Kritzkrieg Medic in and pocketing him.

Much of the time, the enemy will try to kill the Medic in order to end the Kritz. Keeping the other Medic alive will allow him to utilize all of his ÜberCharge. In dire situations, you can activate your Megaheal and keep both him and his patient topped up in the face of withering fire to ensure that the whole charge is used up.


Health Reinforcement
The same can apply to a Medic with the Stock Medi Gun.

Remember that most of the time, a Medic will pop his Über at the last possible second, when either he or his teammate are in the red; the obvious result of this is that once the Über fades, the Medic will still be in the red, easy to finish off, while his patient may not be fully overhealed. You can spot-heal the Medic in order to ensure that he leaves his Über with full health, or top up his patient so that he'll definitely leave the Über at full overheal.

Generally, you don't have to worry about deploying your Megaheal since the invulnerability will ensure that you can easily get any healing done in the time that the Über is active. However, it can help to latch onto the Medic once his Über is depleted in order to increase his survivability or help him escape if there are still enemies around ready to pounce. Ensuring that a friendly Medic lives to fight another day helps to keep you and the rest of your team alive as well.


Megaheal Vaccinating
On the other side of the coin, the Vaccinator's Quarter Über can be used to amplify the power of a Megaheal Über.

Remember that while the Megaheal is very strong, it can still be overwhelmed with enough damage. However, if a Vaccinator Medic comes along for the ride, he can reduce the amount of damage that the enemy deals to both the patient and you, greatly amplifying the effects of a Megaheal. On top of that, placing the proper resistance shields using the Quarter Über can even negate crits, mitigating the Quick-Fix's greatest weakness. Backed up by a Vaccinator, the Megaheal can potentially become even stronger than a Stock Über!


Counter-Pyro Über
Just because other Medi Guns can get airblasted by a Pyro, doesn't mean they have to. If you see an enemy Pyro approaching to airblast, hit your Megaheal and lock onto the patient or Medic. This can ensure that their Über will accomplish its objective without interference from the Pyro.
Tagging Along
By following heavy classes as they roll out, you can greatly improve your team's chances of winning the mid CP fight.With its ability to increase the Medic's speed to match that of his patient, or to allow the Medic to explosive-jump, the Quick-Fix can greatly improve the Medic's mobility, and allow him to reach places where he otherwise couldn't. This adds in a factor of surprise and tactical maneuverability that greatly increases the Medic's lethality.


Scout Trailing (a.k.a. "Riding the Wind")
This is one of the most common ways that some use the Quick-Fix, latch onto a Scout and let him carry you around the map.

This is both useful and dangerous. For getting from spawn to the fight quickly, trailing a Scout is one of the safest and easiest ways to travel. However, once you do get to the battle, that's where you should stop and begin focusing on spot-healing. Unlike a Scout, you can't double-jump, so you're easier to shoot at than a Scout. Additionally, as noted before, Scouts rely on their speed and double-jump ability to avoid damage and fight the enemy, healing them only really marginally increases their survivability as they can easily reach health packs instead.

But there is one big reason that you shouldn't do this: what if you're in the middle of a fight and the Scout dies? Without your speed boost, and with only a Syringe Gun to defend yourself, good luck not dying. You should pocket a Scout only if you have a Megaheal ready to use and are reasonably within range of friendly support. A Medic who gets stuck behind enemy lines is a Medic who isn't healing his teammates.

On a practical note, if you absolutely must pocket a Scout, you should learn how his speed boost applies to you. Your speed won't change to match the Scout's immediately whenever he obtains a speed bonus; the Quick-Fix will only read the Scout's speed once, when you first lock your healing beam onto him. This means that if the Scout uses a Crit-a-Cola, or fills his Boost meter with the Baby Face's Blaster, your speed won't automatically adjust, and you'll be left in the dust. To fix this, simply break your healing beam and lock onto the Scout again. This will cause the Quick-Fix to read the Scout's speed again, and apply the bonuses to you.


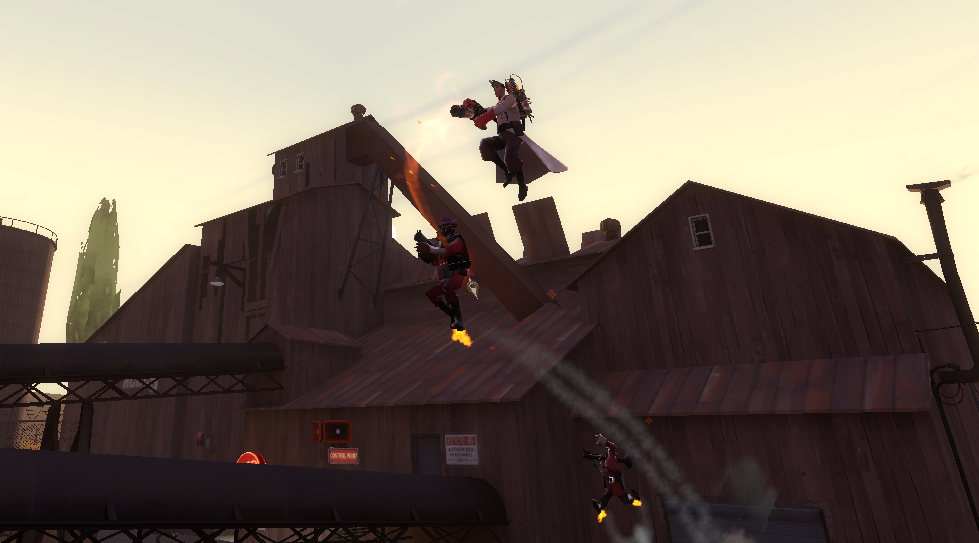
Soldier and Demo Explosive Jumping
Easily one of the flashier modes of travel, latching onto a Soldier or Demoman can give a Medic great vertical maneuverability, and his patient extensive survivability.

While powerful, this also has a significant number of drawbacks. For starters, while the patient will instantly heal any fall damage, the Medic won't. Too much jumping can inflict a lot of damage to the Medic, even one who maneuvers to minimize it, meaning more downtime searching for health packs, or even worse, a weakened Medic who's easy to pick off by the enemy. Additionally, recall that the Quick-Fix is best used in groups, not as a pocket; the fewer teammates you have around you, the more they'll target you and your patient, and the Quick-Fix cannot hope to overcome that much firepower by itself. Combine this with the fall damage, and you have a Medic who is not likely to survive for very long, and a patient who will probably succumb soon after.

If you're going to follow a Soldier or Demoman around, you need to learn how to jump alongside them. The boost imparted onto the Medic is the same as that on the patient, but due to the physics of how explosive jumping works, this only magnifies existing momentum, so the Medic must jump at the same time as his patient, and press the same directional keys while in the air in order to get more than just a slight hop out of the explosive jump.

To do this, it is virtually mandatory to have Soldier and Demoman explosive-jumping experience yourself. For Soldiers, you need to get a feel for the places where they would usually begin a rocket jump, since there is no telltale warning of when he will start. Whether it's a wall jump immediately after clearing a door, or a common lift-off point towards a landmark objective (e.g. Badlands spire), you must be in perfect sync with your partner in order to follow him. With Demomen it's considerably easier since you can see them lay the sticky first, you just have to time your jump to coincide with theirs. Regardless of who your partner is, communication is key, and you must be in sync as to where you're going to jump, as well as when.

One final warning: you must know when and where your partner is going to air-strafe, so that you won't get separated during the jump. Fortunately, as the Medic is light and fast, you don't have to worry about crouching as you jump, since your higher footspeed will usually mean that you can more easily control your aerial movements and stay within range of your patient. Even if you get separated and land in different locations, you can run to catch up if he overshoots, unless he decides to navigate several sharp corners.


Pyro Det-Jumping
While it provides Pyros with vertical mobility, the Detonator can lift a Pyro up one storey at most, far less than the heights that Soldiers and Demos can reach. However, even hopping over a single ledge can be useful on maps where such ledges are all that prevent a Pyro from flanking the enemy (e.g. Thunder Mountain).

Again, remember that a Pyro is not the best class to pocket. If you have a Megaheal ready and the Pyro does not intend to simply W+M1 into the nearest enemy group (unless he has a fully charged Phlogistinator), then it may be feasible to support his ambush; as always, this depends on your partner's competence. However, if you're not sure how good your partner is, it is often safer to stay a reasonable distance back and heal him as he attacks, but be ready to abandon him and retreat at a moment's notice.


Reinforced Pocket Flanking
One of the deadliest ways to use the Quick-Fix is to let a Soldier or Demoman carry you up high elevations to places where normally only they can reach, and set up devastating flanking attacks.

Reaching the top of the garage after BLU captures this point lets you flank through the back, or even threaten their spawn.
In a textbook explosive-jumping attack, a Soldier or Demoman will surprise his enemies with the initial jump, kill a few enemies, and then be forced away due to the damage he took from the jump as well as enemy counterattack. Now imagine how much more devastating that same attack would be if he was being pocketed by a Medic the whole time. The Quick-Fix's ability to follow teammates in their explosive jumps can turn what would normally be a one-man hit-and-run raid, into a protected pocket that can inflict signifcantly more damage.

There are many such opportunities to do this depending on the map, and how you perform such attacks is limited only by your own imagination and creativity, but Gold Rush on RED is one of the best examples. In general, any place where a Soldier or Demo can explosive-jump to is a prime candidate for flanking. It's even better if you can get more than just one teammate to follow you (multiple Soldiers with backpacks, as well as Demomen), as it can turn into an armored spearhead that completely sunders the enemy front line.

Such tactics require practice and experience though, especially on the part of the Medic. As mentioned before, the Medic must have extensive explosive-jumping experience both as a Soldier and a Demoman in order to follow their patients to such locations, and their communications must be clear. But if it can be mastered, it can turn entire maps upside-down.
Weapon Combinations
Your loadout might not seem to make much of a difference since you won't be fighting very often, but when it really matters, it can save your life.Besides your Quick-Fix, what weapons should you carry? Truthfully, that is entirely up to you, most Medics have their own preferences for which weapons they want to use alongside their Medi Guns. Based on my own personal experience, I'll make the following recommendations, but if you can find something that works better, more power to you.


Primary Weapons

Syringe Gun: As a tried-and-true staple for the Medic, there's not much to go wrong with using this if you want a balance between health regeneration and damage output. In general you shouldn't worry about damage output anyways, since that's what your patient is for, but if you do have to end up defending yourself it might come in use.

Blutsauger: The Blutsauger mainly impacts how you will regenerate health, it can be useful if you can't rely on your team to protect you but can otherwise be a liability. Because you only regenerate health at 1 HP per second, fire and bleeding become much deadlier. Additionally, the time that you spend firing at enemies is time not spent spot-healing teammates, which in turn results in building your Über that much more slowly. Why take away from your greatest advantage over other Medi Guns?

Crusader's Crossbow: The main use of the Crossbow comes from providing fire support for your teammate(s) if you're taking the reinforced pocket flanking route, though it also leaves you vulnerable if an enemy manages to get up close and personal (and eats up ammoboxes that your buddy may need). By itself the Crossbow has little use if you're doing front-line spot-healing, since you'll be right next to your teammates. While you can provide cover fire for flanking teammates in the far distance and even heal them, this is not something that all players will be capable of accomplishing regularly as it requires impeccable aim. Even though healing teammates with the Crossbow does provide you with ÜberCharge, directly healing them with the Quick-Fix is faster and allows you to overheal them as well.

Overdose: This weapon has perhaps the most advantages that you can combine with the Quick-Fix. Remember that while you have this out, you will move faster the fuller your ÜberCharge meter is, which can be a significant tactical advantage (the only thing that can move faster than you is a Scout). Because the Quick-Fix builds its Über extremely quickly, you can employ the faster move speed almost at will, whether it's to escape faster or to make yourself harder to hit in a fight. The 10% damage reduction is not much of a penalty since Syringe Guns rely on aim rather than damage output to kill enemies, and you shouldn't be shooting at enemies unless there are no teammates around. All this, combined with the standard 3 HP/second regeneration rate, makes the Overdose a well-rounded choice.


Melee Weapons

Bonesaw: The Bonesaw should be considered only if you expect to use it in combat. Because the Medic has a wide range of melee weapons that provide him with various powerful advantages, the Stock Bonesaw is usually near the bottom of the list. However, if the enemy is constantly getting in your face, it is the most well-rounded melee weapon that the Medic can carry; while it doesn't have any flashy features that let you make clutch plays, it's also the most reliable weapon for simply beating someone to death.

Übersaw: While the Übersaw can be useful with most other Medi Guns, it's a waste to even consider bringing one along with the Quick-Fix. At most, you are saving yourself eight seconds by hitting an enemy, eight seconds which could be spent keeping teammates alive. Again, the Quick-Fix is the fastest charging Medi Gun in the game, so it is pointless to spend time trying to do something that would divert you from that advantage.

Vita-Saw: Like the Übersaw, the Vita-Saw's usefulness when combined with the Quick-Fix is wasteful at best, since you're going to be in the thick of action spot-healing teammates, and even moreso when you deploy your Megaheal. The last thing you'll want is for the enemy to have to deal 10 less damage to kill you. Put bluntly, you're saving yourself only 6 seconds of charge time by equipping this, which you will have already filled by walking from spawn to the front lines; the health loss is not worth it given the Quick-Fix's fast charging rate.

Amputator: It is counter-productive to use this alongside the Quick-Fix, since they compete for the same role. Stopping to taunt in order to heal multiple teammates at once is handy, but remember that the Amputator only heals teammates at the same speed as the other Medi Guns, which is slower than the Quick-Fix, on top of being unable to overheal. Besides, if you're doing your job as a Quick-Fix Medic right, none of your teammates will be in the red. The main strength of the Amputator is to return several injured teammates to full health simultaneously, something the Quick-fix already excels at. As with the Crusader's Crossbow, directly healing teammates will build Über faster anyways.

Don't bother trying to carry it for the passive +3 HP/sec healing either. While it is true that this can get you out of tight spots when you're at low health, the fact that you'll most probably have a Megaheal ready anyways means that you shouldn't have to worry about it, period.

Solemn Vow: Given the lack of other viable options, this is probably the best choice you can make in picking a melee weapon to go alongside your Quick-Fix. Because the Megaheal allows you to act as a meat shield, this lets you walk up to the front lines and directly spot how much health each of your enemies has, and notify your teammates accordingly, without worrying (as much) about having your head taken off. While it doesn't have the gimmicky attributes of other melees, like the Overdose is well-rounded and useful at the same time.
Conclusion
Hopefully, if you've made it all the way to the end of this guide, you now have a better idea of how to use the Quick-Fix. And hopefully, as a result of this, more people will give it a try and less people will fail with it.

Any comments or criticism are welcome. Even if you only spot a typo or a grammatical error, I'll be sure to try to correct it. And if you have more tips or tactics to suggest, I'm all ears and am willing to listen in order to improve this guide.

So have fun, and enjoy using the Quick-Fix! If you enjoyed this guide, be sure to read my other Medic guides as well!

Vaccinator: Basic Usage
Kritzkrieg Medic: A Comprehensive Guide
31 Comments
uhu 16 hours ago 
I disagree re: the value in healing demoknights. When I see one lining up a charge, I heal him, follow the charge forward a bit, and if I don't want to go all the way in I just turn my camera around and jump as the beam breaks to go flying back towards my team. That extra health can make a big difference in the knight getting the pick, and ideally living long enough to get back to you for a top up. Megahealing knights is fairly risky, a bad charge can easily get 0 value even with knockback immunity, but there's also a lot of potential if you can identify a good demoknight, ideally with eyelander or one of the items that gains charge/random crits.
Sattellight 25 Dec, 2015 @ 4:02am 
The Vaccinator, while nerfed, was buffed to me in the recent Gun Mettle Update. You can Uber multiple teammates at once with the Uber not fading. While this is possible with the stock, it's more effective with the Vaccinator. The Vacinator used to be my favorite Medi-Gun due to it being complex, able to change the tide of battles, but I realized i've been doing a bit bad. I use the Uber after I get directly hit with a rocket in the face due to my poor reflexes. But now the Quick-Fix is my favorite Medi-Gun. The stock and the Kritzkrieg never became my favorite Med-Gun, strangely. They don't have the "feel" of healing at a rapid rate which the Quick-Fix has and they don't feel too complex enough that the Vaccinator has.
Lord Kelvin  [author] 25 Dec, 2015 @ 12:11am 
Yeah, I guess Valve realized that pocketing a Scout as he runs away with the intel was way too good. But it should still work for mass point capping or cart pushing.

I've overhauled the guide with the changes to the Quick-Fix and the Vaccinator. I realized that I hadn't changed the introductory section in years, the Quick-Fix is hardly a new weapon anymore, and the word flow was kind of stiff in some places too. i also removed a bunch of the URL links, since they were breaking up the formatting, so hopefully it will be an easier read now.

I promise I'll eventually get back to my Vaccinator guide, I've been using it a lot in the last few days to see how the changes have improved it!
Sattellight 21 Dec, 2015 @ 8:38pm 
The Medic and his patient can no longer capture the objective while under the effects of the Megaheal due to the recent Tough Break Update, unfortunately.

One of the best Medic-based guides i have read so far, this guide offers tons of information any Medic who plans on using the Quick-Fix can benefit from. Beginners can learn a ton from this guide while the better players can improve strategies with this.
Lord Kelvin  [author] 15 Sep, 2015 @ 12:39am 
Guide has been given a tweak, mostly re-wording and accounting for the Gun Mettle changes. Give it another read to make sure you stay updated!
Box-O-Soldier 4 Oct, 2014 @ 1:39pm 
As for class interaction: Add that scout can be used as a quick return back to the front (unless you have a tele), so when you respawn you can use scouts to quickly get back to the front lines! Awesome, isn't it?
Lord Kelvin  [author] 7 Aug, 2013 @ 6:54pm 
I already did update the guide for the overheal buff. All the information should be up-to-date.
DTCC 7 Aug, 2013 @ 6:24pm 
hey its a great guide, but better update it since that big stat change so ya better start editing!
yunni~* 3 Jul, 2013 @ 10:46pm 
When Quick-fix versus another Quick-fix I think it's can only depend on the player's skill or random crits...
ob 29 Jun, 2013 @ 11:15pm 
Nice guide... but how does a Quick-fix medic combat another? How can two quick-fix medics combine their ubers? The answer to the second is pretty much nigh invulnerability without being invulnerable, but the first I don't know, guide doesn't say.