Arma 3
258 ratings
ArmA III [ACE3] - Marksmanship - Advanced guide [ Updated 26.10.2020.]
By DrunkeN
Advanced guide on Marksmanship.
3
7
2
   
Award
Favorite
Favorited
Unfavorite
1.0 - Introduction

.
Greetings and thank You for clicking on this guide!

If you decided to learn more about marksmanship in ACE3, this is the guide for you.

But before we start there are a few things you need to know:

This is NOT a guide on how to become the ultimate sniper or something of that sorts. This is focused on what I would consider basics of bullet ballistics. Feel free to poke around and find out more.

Word of advice, read everything. The guide contains a lot of information that can be useful to you and might give you an advantage over other enemy units deployed in your area of operation. Patience and careful observation is what matters the most. And believe me, reading it all is much much better than editing it for weeks...

.
The information I gathered and analized, tested many times, was put in this guide with credibility. I myself wanted to turn this guide into a proper ACE3 Marksmanship guide, to be of use for all players within the ArmA III community. The information displayed in this guide is presented in a simple way, meaning that the guide contains information that is essential to your success in eliminating the desired target to a range up to 1000 meters or 1 kilometer, but nothing above that range.

Marksmanship is supposed to be a challenge, and that's what makes it interesting and good! That is why the guide contains additional information on how you can improve (hopefully enhance) your estimate skills so you can acquire a certain information on the field without using other tools in a short amount of time.

"These are formulas that you can use, but in the end you have to trust your gut!" - Movie Jarhead, 2005.

ACE3 is still in development, so things could change, even without me knowing so keep up with the development info. I'll do what I can on my side.

If the text is over the pictures, reload the guide/page so it does not happen again.

.
Let's get started.
1.1 - Setup
When it comes to mods, you will need the following:

CBA_A3 - Community Base Addons - http://steamproxy.net/sharedfiles/filedetails/?id=450814997
ACE3 - Advanced Comat Environment - http://steamproxy.net/sharedfiles/filedetails/?id=463939057

Additional mods - Normal requirement for 90% of public ACE servers. Pretty cool tho!

RHSAFRF - Red Hammer Studios - Armed Forces of the Russian Federation - http://steamproxy.net/sharedfiles/filedetails/?id=843425103
RHSUSAF - Red Hammer Studios - United States Armed Forces - http://steamproxy.net/sharedfiles/filedetails/?id=843577117
RHSSAF - Red Hammer Studios - Serbian Armed Forces - http://steamproxy.net/sharedfiles/filedetails/?id=843632231
RHSGREF - Red Hammer Studios - Green Forces - http://steamproxy.net/sharedfiles/filedetails/?id=843593391

ACE COMPATIBILITY PATCHES (in this case, all RHS mods) - http://steamproxy.net/sharedfiles/filedetails/?id=773125288
http://steamproxy.net/sharedfiles/filedetails/?id=773131200
http://steamproxy.net/sharedfiles/filedetails/?id=884966711
http://steamproxy.net/sharedfiles/filedetails/?id=2174495332


You can add any mods that contain all kinds of different weapons, that is not a problem, but they need to be compatible with ACE3 itself. You can't expect balistics to work with the gun that you are using, that is not ACE3 compatible. The RHS mods we are using in this guide are compatible, as well as vanilla weapons from ArmA III.

That is pretty much it.
1.2 - Gear
This section contains the necessary gear that you need.

Before you head out, you should have proper gear on you that makes you operate at longer ranges, making you more valuable and effective on the field, alongside you squadmates.

A marksman unit should contain the following items -


- Earplugs,
- Rangecard,
- Kestrel 4500NV,
- Map and a compass,
- GPS - either vanilla or microDAGR GPS,
- Vector 21B Nite or a M151 Spotting scope,
- a device for short-range and long-range comms,
- a rifle of your desired choice.


.
I find these items a standard equipment of a marksman unit. Everything else added can give you a small advantage, depending on the gadgets you use.

Regarding the communication on the field, both ACRE and TFAR are good. I do not know which one the community uses the most, but I do prefer ACRE over TFAR, just because of its improved and realistic use.

And now, for the ATragMX part.

The reason I excluded this specific gadget is because I don't use it. Those who know more about marksmanship than me, might think of this as rediculous, but there's a good reason behind it.

From my PoV, the ATragMX is a very good device, because it requires information from different gadgets and calculates the trajectory for you, but it kills all the fun to the point where you might lose interest in marksmanship and it loses its sense of purpose. I won't include it.

I like things old-school, as some might know this. I don't like computers calculating instead of me doing it and I find this reasonable, as I might find myself in a situation where I need to apply these known calculations and estimate skills to defend myself against an enemy. I am not forcing anyone to not use the ATragMX, this is not the problem. Use it whenever you feel like it, but for this guide and for these distances, there's no need for such a device.

.
With proper training, formulas and a nice pair of guts to put your trust into, you won't be needing the ATragMX. This guide will do the job.
1.3 - Marksman role
.
Marksmen units are qualified specialists, that are usually mixed up with regular infantry. They provide support behind the backs of regular infantry or alongside them.

Marksmen units do not operate alone, most of the time they have a fellow soldier to act as a spotter, comms unit and backup firepower for additional security.

Quick and precise shooting, they act as a fire team, but remain as a part of a squad within a platoon (depends which country though...).

Referred to as SDMs or DMs (Squad Designated Marksmen or Designated Marksmen), they engage from 100 to 1000 meters distance, but their main purpose is to engage beyond the range of a normal infantry unit.

Marksmen units can also be assigned to sniper teams, as observers, spotters or anything that is crucial for specific operations.
1.4 - Sniper role
.
Snipers are more qualified specialists when it comes to marksmanship meaning they are better than marksmen units.

They care more for not getting spotted when it comes to such a role.

Their job is also spotting enemy units and reporting enemy positions / changes to HQ, directly from the field for any kind of fire support activities such as artillery support or CAS (STA - Surveillance and Target Acquisition), and if needed, they can be ordered to relocate and eliminate VIP targets.

They can also provide high-accurate fire on targets that cannot be reached by a regular unit when it comes to distance, location, visibility, size and many other things.

Snipers don't go out on the field alone, just as marksmen units, they are in a group of 2 or more, depends on the situation. Each soldier has its own job in these cases.

Additional information:

I've heard and seen that some countries don't have names for different roles when it comes to marksmanship. It's because the name for both sniper and marksmen is basically "Sniper". Why is that?

It is because some countries either don't have a name for different marksmanship roles, or the military has never got itself into a situation where different roles were needed. It also depends on the weapons each military has in its arsenal. There could be many other things that have the effect on this, but it is not the part of this guide.

I just wanted to point this out in case other players do not know the difference and think it is all the same.

It is not.
1.5 - Different calibers, rifles and attachments
The 3 main ingredients.

Marksmen use semi-automatic rifles, snipers use bolt action rifles. Easy as that? No.....

.
They can choose what to use, basically whatever they want, it depends on the situation / mission and information they have been provided with.

.
It is crucial to use a scope that can be used for all situations, something that you can get used to when facing enemy infantry at different distances. If that's a problem, it is advisable to grab a different scope which you can mount on your gun, once on the field, in case the one you have can't be used in specific situations.

.
Bipods are advisable as well, for better gun stability. If you've found an object where you can rest your gun on, it works as well if you don't have a bipod, but the effect won't be the same. It is not a mandatory, but it doesn't hurt to carry one. At least you'll reduce the gun sway to a bare minimum.

You could do some research about different calibers, if you wish. Each caliber has its own weight, which means different zeroings displayed on the rangecard. If you decide to attach suppressors... *sigh* well, in reality, you would need to use cold ammo to use the maximum of noise reduction, but in ArmA III, you are free to use ANY kind of ammo, because no matter which type (Tracer, cold ammo, FMJ, JHP, what not...) of that specific caliber you use, the gun will STILL remain silent.

Well, the bigger the caliber, the bigger the range, less problems setting up the zeroing.

.
But this also means carrying heavier weapons and ammo, which could result in losing a lot of your stamina. You could have real problems with fatigue out on the field.

Sure, you can always use a vehicle where you can store your necessary equipment and ammo, but what if you are not able to use any vehicles inside/outside the AO or behind enemy lines? Or what if the vehicle cannot be used on such a terrain?

For training purposes, use whatever you want, how you want to use, experiment with different things on different altitudes and ranges. You are free to be creative however you want.

Remember, you're a marksmen unit. Quick and precise firing, closer to action. So having a semi-automatic rifle would suit you better.

BUT!

Think and choose wisely, sometimes a mission can be acomplished without firing YOUR weapon at all. You only use your weapon IF needed. You are not here to use your weapon just to kill some enemies and scream "GET SUM!" once deployed in the area of operation. If you're that kind of a guy, only thirsty for quick action, circle around this guide, perhaps even ACE, for the sake of others.

2.0 - Distance
Things I will talk about:

MILDOTS - ("2.1.0 - LR & Spotting scopes [MILDOTS]" - Section)
Rangefinder - ("2.1.1 - Rangefinders" - Section)
DAGR - ("2.1.2 - DAGR" - Section)


I will present many different ways of acquiring the range from your location to the target using different tools and attachments.

2.1.0 - LR & Spotting scopes [MILDOTS]
A very effective way of getting an estimated distance on the target is by using MILDOTS.

It is very easy, depends on what scope you use.

Scopes with high magnifications of x20 are perfect for estimating the distance to your target.

Spotting scopes provided by ACE3 or RHS mods are also perfect for the job.

If you want to know more about magnification and MILDOTS, do a bit of research on your own.

Don't forget to lean the rifle to an object or place a bipod on the ground or on a object, so you can reduce your gun sway.

.
On the first picture we can see a target. We don't know the distance so we will have to improvize.

First thing you will do is zoom in with the scope, in this case, I'm using the Mk. 4 ER/T 6.5-20x M5 scope from the RHSUSAF.

.
After you have zoomed in, we do the math.

.
The height of all soldiers and civilians in ArmA III is 180 centimeters or 1.8 meters, that is, if they are standing like usual with their weapons holstered.

To get the estimated distance, we shall use a formula:

Target height in centimeters x 10 : Target height in mildots = Estimated distance

So, the target on the picture is 4.5 mildots tall, so we will do the following:

180 x 10 : 4.5 = 1800 : 4.5 = 400 meters <== Estimated distance

.
As you can see on the rangefinder, we got the distance. Basic math. At longer ranges there will be difference in 2-4, 4-6, 6-8 meters, depends on the distance. If the estimated distance was very close to the target, then you are doing everything right.

You don't have to lock at 4 or 4.5 mildots if the target is in between those two numbers. You can split the MILDOTS into smaller number to get 4.1, 4.2, 4.3, 4.4, 4.5... for a much better and accurate estimate.

Each scope works differently when it comes to MILDOTS so keep that in mind.

Additional information:

If the target is 2.3 MILDOTS tall, it is good to take the 2.4 and 2.2 MILDOTS and get the estimated distance as well. After you get the estimated distances, pick the one that fits the target.

It happens that in ArmA III, due to terrain deformation (if you turn off the grass and such), the target's feet can sink into the ground or worse (because it's ArmA), so you could miss the estimated distance by 0.1 or more MILDOTS. Keep that in mind.

Be prepared for anything.
2.1.1 - Rangefinders
Rangefinders are very useful tools when it comes to acquiring the distance.

.
The Vector 21B Nite is the best rangefinder you can have in ArmA III ACE3. Lerca 1200 Rangefinder is also helpful, but it has its own limit.

All other rangefinders are not as effective as Vector. You might as well stick to that, but every players has its own taste.

.
When using a Vector 21B Nite, hold down letter R on your keyboard until a red circle shows up on the cross when using the Vector interface.

.
Aim at the target, release letter R and the distance shoud show up middle, down-right side of the grid.


2.1.2 - DAGR
DAGR is a nice addition to marksmen and sniper units.

It is like a mini GPS with the capabilities of showing You your grid location, height and when connected to the Vector 21 Nite, it shows you the distance, height and grid location of the thing you are lazing down on. It does include many features.

.
Left shift + Home > Scroll through the items you have (such as Kestrel and DAGR)
Home > Show up / open up
Left Ctrl + Home > Hide

.
Double press Home to open up the DAGR and you will see this. Use the arrows on the device to navigate, and keep pressing the down arrow until you see "Connect to" option. Press "Help Sel" button.

.
After you have done that, choose the Vector 21 and press "Help Sel" again.

.
Now that you've done that, everything you laze down, will show you the information on the DAGR.

Make sure you open it up by pressing Home key.
2.2 - Rangecard
The rangecard is an important tool for all soldiers, both ingame and in RL.

This rangecard cannot tell you the distance between you and your target, but it shows you the zeroing for every 50 meters for every 5°C for the following:

1st - Ranges
2nd - Wind
- ( Explained in the "Setting up the scope [WIND]" section)
3rd - I've got no clue and never used it.

In the picture below you will see what I mean.

.
This is the rangecard of the rifle Mk11 Mod 0 , caliber .308

Every caliber and its ammo types have their own rangetables with different zeroings.

First we will start with the distance.

As you can see, you have zeroing for every 50 meters every 5°C.

When it comes to zeroing in on the target, it is very easy.

You get the distance, you check the temperature using Kestrel and find the correct zeroing.

At shorter distances, zeroing will be close in between every 50 meters, but if you're engaging the enemy at long range, then you will need to be more accurate, basically finding the right number in between 2 set zeroings for a specific range. I will mention this later on.

After the distance zeroings, we have wind zeroings displayed at 4 mps.

As for distance, this also applies for the wind as well. Although, you won't see each zeroing for every 5°C. That is why, at longer distances, you'll have to split the zeroing for every 5°C yourself. For shorter distances, there's no need for spliting up the zeroing, as the difference in numbers are very, very small.
3.0 - Wind
From the information I have collected and all of the notes I've taken, I will talk about the wind in-game.

Wind is one of the most unpredictible things you will ever face in ACE3.

I know this will be weird, talking about the basics at the beginning, but in order for you, players reading the guide, to be good at marksmanship you need to know things like this.

Wind can be very... interesting. It all depends on how the wind is acting.

There is something called Crosswind, Headwind and Tailwind.

A wind blowing across one's direction of travel, in our case, wind messing up our bullet's flight path a.k.a. bullet's trajectory.

I've placed the sections in order so you will see how it all mixes up together, piece by piece.

I will try and explain this the best way I can.

In order to understand the wind, you must observe it carefully.
3.1 - Kestrel 4500NV
The Kestrel 4500NV.

A very useful tool you'll be using to check the temperature and wind speed, thus all the other information...

Again, in order to get the 100% full wind speed, open up kestrel, aim where the wind blows while standing up and you will see it.

You only need 2 things on Kestrel when it comes to marksmanship. Temperature and wind speed (m/s), located on "User Screen 1" and "User Screen 2".

User Screen 1: (m/s) - Meters per second


.
User Screen 2: - Temperature

.
In order to use it properly, if using "ACE interaction menu", go to "Equipment" and then "Open Kestrel 4500NV".

As it opens up, use the up and down arrow keys to navigate. Not on the keyboard tho, but on the device itself.

A quick note:

On "User screen 1", right above "m/s", you can see "m".

It tells you your current altitude. Could be useful. ;)

That is pretty much it when it comes to this device.
3.1.1 - Wind layers & wind strength
This section is mainly focused on Wind layers and Wind strength.

When it comes to wind in ACE3, there are many layers, to infinity and beyond. No matter how high you are, the wind will always be there with you.

.
Each layer has its own strength which depends on the actual weather around you and your current position. For the player, there are 3 things you will notice.

.
When you are prone the wind is barely noticable, when you are crouching the wind is slowly getting stronger, but when standing, you can experience the full strength of the wind if it blows towards you or behind you. The numbers, when standing up, will be the same, if facing the wind just like in the screenshots.

.
Wind strength in each layer has its own speed. Will be explained in the section after this one.


3.1.2 - Wind speed
This section is mainly focused on Wind speed.

.
In the picture above, you can see 4 arrows.

Each of those arrows has a set of dots. First arrow has 1 dot, 2nd has 2, 3rd has 3, 4th has 4 dots and this can go on.

The most dots I've reached was 8.

The more dots you see on the right side of the arrow, the color of the arrow will change.

The colors, as well as dots, show you the wind speed.

.
If changing stances (going prone, crouching or standing up) you will see (when using kestrel) that the wind speed is not the same. Obviously. The more you go lower with stances, the more it will drop the speed of the wind.

Here is the table showcasing you the speed in different colors ( Beaufort Scale[en.wikipedia.org] ):

.
Obstacles can block the wind around you, as an example, if you're inside a building, but that does not mean the wind is gone.

This also goes for trees, but they can't block the wind, they can reduce its speed.

3.1.3 - Wind direction
This section is mainly focused on Wind direction.

It is mainly focused on Crosswind, Headwind and Tailwind.

.
The final section when it comes to wind is the wind direction.

What use of wind layers, strength and speed if it has no direction? :)

Direction is important because if you are facing the right direction, you can check the full wind speed in order to calculate the zeroing for the target.

Now, think of the arrow as a clock. You have all of the directions displayed in the picture above.

Direction of the wind affects the bullets trajectory.

Crosswind affects the bullet horizontally. Headwind and Tailwind affect the bullet vertically, the difference is in increasing the zeroing ( Headwind ) and decreasing the zeroing ( Tailwind ) regarding the bullet drop, but only after setting up the scope regarding the distance. Soon to be explained in the section after this one.

Sometimes, there's a mixture of both Crosswind and Headwind or Tailwind.

The picture I'm about to show you explains how the wind strength affects the bullet when using the clock system as a wind direction identification:

.
The picture above will be very useful for you fellow players, if you want it, download it. Do notice please, the picture is not mine. It is unknown to me, but ACE uses this information, as shown on the picture above.
4.0 - Height difference
This section is mainly focused on Height difference.

As stated before, the wind is the most unpredictible thing in ACE3. The wind can either be in your favor, or it can go haywire and start rapidly changing direction, strength and speed in matter of seconds.

I'm not going to lie, because it happened to me in some situations. Most of the time, the wind was moderate and nothing too serious, sometimes wind was non-existing. But anything is possible.

The height difference is mostly reffered to the height difference in between your position and target position. As said, the wind ( when observed more in details), is not the same everywhere.

The 3 pictures you're about to see will give you a deeper look into what I'm trying to get you to understand.

.
In the example shown above in the pictures, we can see that the wind arrow displayed in the upper left corner of the screen, shows different information from 2 points of view, which proves that information displayed on your side is not the same as where the enemy is. The last, we can see that the height difference is around 120 ~ 130 meters.

A bullet's trajectory can never be perfect in these situations, but getting the trajectory as sharp as possible to hit close to the target is your goal. More on that in the sections that follow!

5.0 - Locking down the numbers
I wanted to add this section because it is important.

We will be focusing on locking down the numbers.

Mathematical term would be "Interpolating", but for easier understanding, we'll just stick with what we've got.

Locking down the numbers goes for all numbers in both temperature zeroing (if we have .00 [Meaning, if we have 2 numbers after the dot] ) and wind & distance zeroing (if we have .00 [again, if we have 2 numbers after the dot] ).

You only lock down the numbers AFTER doing all of the necessary calculations, if there's a need for locking the numbers anyway.

First we will start with locking down the temperature.

With this example, you will see how it works.

Using Kestrel 4500NV, we have a temperature of 23.7°C.

In order to get the zeroing for a random distance, we need to lock the temperature at 25°C.

On the rangecard, you don't see the "23.7°C" tab, right? But you do see "25°C" tab.

So, because the 23.7°C is closer to 25°C and far away from 20°C, we will lock the temperature at 25°C in order to continue with the caluclations for the distance in 25°C tab.

Minor example of the temperature locking:

BASE: 20°C

22.0°C - locking it to 20°C
22.1°C - locking it to 20°C
22.2°C - locking it to 20°C
22.3°C - locking it to 20°C
22.4°C - locking it to 20°C
22.5°C - locking it to 20°C (Interesting part, read it after this small example)
22.6°C - locking it to 25°C
22.7°C - locking it to 25°C
22.8°C - locking it to 25°C
22.9°C - locking it to 25°C
23.0°C - locking it to 25°C

BASE: 25°C

22.5°C is the middle that splits 20°C and 25°C. IF the number is 22.6°C, then you lock down the temperature at 25°C, but IF the temperature is 22.5°C then you lock down the temperature at 20°C. And it should stay like this.

When it comes to engaging the enemies at a longer distance, let's say over 1000 meters, you will be able to split the base temperature into more parts to get a correct zeroing (temperature like 21°C - 22°C - 23°C - 24°C), but it will be more than visible on the rangecard. What do I mean by that?

Something like this:

20°C - 3.1
21°C - 3.2
22°C - 3.3
23°C - 3.4
24°C - 3.5
25°C - 3.6

The actual difference between the 2 base zeroings will be big enough (0.1 mil) for you to immediately set the scope to your needs without having to lock down any numbers.


Now we shall start with locking down the zeroing (both distance and wind).

As seen in many examples in this guide, we were locking down the zeroing.

When increasing and decreasing the zeroing on the scope, you will see that the numbers go like this:

1.8 - 1.9 - 2 - 2.1 - 2.2

When it comes to locking down the numbers in zeroing, we lock the number until 1 number remains on the right side of the dot.

Example:

0.18 - We lock the number to 0.2.
0.13 - We lock the number to 0.1.
1.24 - We lock the number to 1.2.
3.45 - We lock the number to 3.4.
0.189 - We lock the number to 0.2
0.592 - We lock the number to 0.6

Why is it like that? It does include math, so bare with me.

.
You always take care of the numbers from right to left, meaning:

The 2 numbers on the right side of the dot are what matter the most.

If the number is 0.189, then we lock the number to 0.2.

If the number is 0.592, then we lock the number to 0.6

This is the correct way of doing it.

[0.592]
[0.6<<]


Here's the example of locking down the zeroing for both distance and wind:

0.1 > 0
0.2 > 0
0.3 > 0
0.4 > 0
0.5 > 0
0.6 > 1
0.7 > 1
0.8 > 1
0.9 > 1
1.0 > 1

Again, 0.5 is the middle that splits 0 and 1.

Marksmanship is all about numbers. With the right set of tools and calculations, you'll be fine.
5.1 - Formulas
This section is mainly focused on the Formulas.

The rifle I will be using is the RHSUSAF M24, bolt action rifle. Ammo type: Tracer, more info below.

.
.
.

.
We'll split the section in 3 parts: Distance, Wind and Dividing the numbers.

We will first start of with the distance.

For the distance, is nothing special. The important things to gather are the temperature and the range on the enemy. To obtain the temperature, you must use the Kestrel.

.
Once you've obtained the temperature, you need to get the range on the enemy. You can either use one of the rangefinders or a spotting scope, or a Long Range scope.

.
Once you've obtained both the temperature and the range on the enemy, you can now start looking for the specific zeroing to fit the range.

.
The temperature is 12.6°C, which means we will lock the temperature at 15°C. The range is 442 meteres, which we can circle the zeroing at 3.2 .

.
Now, why did I circle the zeroing at 3.2, and not 3.3? The reason was, I've split the zeroing in 5 parts. On the range card we can see:

400 meters - 2.7
450 meters - 3.3

In situations where nothing is happening, just before breaking the silence on the field, you have a chance to zero in your rifle as best as possible. If you do the math, 3.3 - 2.7, it turns out to be 0.6.

So we now have 50 meters zeroing in between 400 meters and 450 meters at 15°C. In order to get the zeroing for the 442 meters, we'll divide the 0.6 zeroing into 5 parts. 0.6 : 5 = 0.12 , which is the result and now we have split these 50 meters into 5 parts. 10 meters = 0.12.

But we are far from over. We need the zeroing for 440 meters. So we'll do the following.

0.12 x 4 = 0.48 , if we lock the number, we get 0.5 , which is the zeroing for the 40 meters we were looking for.

400 meters + 40 meters = 2.7 + 0.5 = 3.2 zeroing. And there you have it. That's it.

For shorter ranges, you won't need such calculations because there's no need. The difference in numbers is going to be a lot smaller at ranges up to 500 meters, but that depends on the caliber the weapon is using. The same applies for the wind.

But, if you're going to be engaging the enemy at around 500 / 600-1000 meters, then such calculations must take place or you'll just be wasting bullets.

The controls for setting up the scope:

[PgUp] for increasing the zeroing. [Range]
[PgDn] for decreasing the zeroing. [Range]
[Left Shift + PgUp/PgDn] for increasing/decreasing the zeroing even more by 1.0, instead of just 0.1, 0.2, 0.3 and on... [Range]

Now, we will start of with the wind.

In order to get the zeroing for the wind, we must obtain the temperature, range and wind speed.

.
We will use the range of 450 meters from the same rangecard we've used in the example above.

.
So we've acquired the following:

Range: 450 meters
Temperature: 15°C
Wind speed: 2 m/s

The wind table is split into 3 temperature columns. -15°C, 10°C, 35°C.

For our purposes, we will use the 10°C column because 15°C is closer to it, unlike the others.

So, the zeroing for the wind at 4 m/s at 450 meters is set to 1.3.

In order to get the 1 m/s wind, we must divide the current zeroing into 4 parts.

1.3 : 4 = 0.325

0.325 is our 1 m/s wind zeroing. Now we can get to the real thing. We will multiply this zeroing with the actual wind speed we've obtained, meaning:

0.325 x 2 = 0.65

The 0.65 zeroing must be split into 10 parts.

0.65 : 10 = 0.065

.
.
.
.
.
.
.
.
.

.
The wind direction has changed, but not the speed, which means we have crosswind and headwind, nothing too serious.

If we use the picture I've shown before, we will get this zeroing the proper way.

.

Now, we can see that the crosswind strength is 1/2 or 50%, resulting in 0.5 .

We have already divided the 0.65 into 10 parts, so we'll do the following:

0.065 x 5 = 0.325 ( What a surprise there... )

The 0.325 will be locked down to 0.3 zeroing, which is the final zeroing we needed to setup the scope regarding wind. We did it.

If the wind blows left, you use [Left Ctrl + PgUp].
If the wind blows right, you use [Left Ctrl + PgDn].

[Left Ctrl + PgUp] or [Left Ctrl + PgDn] for increasing the zeroing. [Wind]

.
The final part is dividing the numbers.

There's a need for this specific part, due to Long Range Engagement with bigger calibers.

Even though I don't engage over 1000 meters, I must include this part, for the sake of calculations.

What if you wanted to use a rifle such as the M200 Intervention?

.
A rifle such as this one can reach far, and just because it can reach far, it gets more complicated, more importantly, with calculations.

.
The difference in numbers gets bigger and bigger, with bigger distances. For a much higher and accurate fire, math follows.

We can do the same steps with acquiring a certain zeroing between 2 different sets or ranges. The same thing we've done with those 40 meters can be done with much bigger distances. That's for the distance.

For the wind can also be done with the exact same steps, but let's say we wanted a zeroing for a temperature of 25°C. But wait, there's only -15°C, 10°C and 35°C.

Well, let's take an example from the rangecard.

.
For this example, we'll take the following wind zeroing for the range of 1250 meters.

On the picture, where the wind is, we can see 3 displayed wind zeroings, 2 of which are needed.

10°C - 2.3
35°C - 1.9

So, how do we get the right zeroing? We need the 25°C zeroing, so let's begin.

10°C - 15°C - 20°C - 25°C - 30°C - 35°C

If we decide to mark each temperature at the count of 5°C, then we need to split it that way. We need 4 different zeroings for 4 different temperatures.

2.3 - 1.9 = 0.4 , 0.4 : 5 = 0.08 >> every 5°C.

10°C - 2.3
15°C - 2.22
20°C - 2.14
25°C - 2.06
30°C - 1.98
35°C - 1.9

Once you lock down the numbers properly, you'll get the final product.

10°C - 2.3
15°C - 2.2
20°C - 2.1
25°C - 2.1
30°C - 2.0
35°C - 1.9

Keep in mind, this is the base zeroing we were trying to get, the same one you divide into 4 parts at the beginning of wind calculating.

Having either a mixture of headwind and crosswind, or tailwind and crosswind, does not affect the calculations you're doing on the field. Crosswind, Headwind and Tailwind only indicate from or to which direction the wind blows so you, as a player, can know what will affect the bullet trajectory.

Doing such math for such distances can be very useful, but I rarely get to use them. As I said, I don't engage over 1000 meters. I have my limits, so should you.
5.2 - Priority Targets
Like in any combat situation, you have found yourself in a situation where you talk to your team or to your friends on what to engage first in the AO. Now it depends if it's setting up before shooting or taking out important enemy targets ASAP before anything else, while in a firefight.

.
Before taking any shots, scout the area around you, search for any critical locations that could make the enemy weak or make them retreat.

High Priority Targets:

.
Infantry targets that may pose the greatest risks against friendlies (OPFOR Marksmen, Machinegunners / Autorifleman / Grenadiers / Shoulder launchers), static weaponry and such things - would be your primary targets in order for your team to clear out the area efficiently or approach a task without taking serious damage.

.
Static weaponry that can disable any chances of air and ground support, should also be your target.

Basically, any enemy units that can make serious damage to you, your team or any friendly assets, need to be taken out for better efficiency on the field and better morale.

6.0 - Scenario
You have reached this section. The displayed information above in the previous sections took quite some time to read, I believe. So without anymore delays, let's get onto A REAL scenario.

For the location, I've decided to pick something that allows me to have a clear view over the entire area around me.

.
So far so good.

.
On the top, we have our Turian friend, already got his eyes on the enemy. Let's see what we have down there.

.
This scenario is supposed to serve as an example.

.
Do excuse my level design.

The weapon I'll be using is the Mk.11 Mod 0 (EC) with a suppressor, a bipod and a Mk. 4 ER/T 6.5-20x M5 long range scope.

Ammo:

7.0 - Setting up the scope [DISTANCE]
Let us start.

.
We first need to get the temperature.

.
Once we obtain it, we get the range on the enemy.

.
Great, now that we have obtained both of the informations, we open up our Rangecard.

.
.
.
.
.
.
.


In the upper right corner of the screen, we can see which caliber the weapon is and which ammo type is it.

The temperature is 27.4°C, which we will lock down to 25°C. The range is 444 meters, which is closer to 440 meters. I want to make this shot accurate, so I'll start with the calculations, because the enemy has not spotted me yet.

400 meters - 2.5
450 meters - 3.1

3.1 - 2.5 = 0.6 : 5 = 0.12

0.12 x 4 = 0.48 , which we will lock down to 0.5 .

2.5 + 0.5 = 3.0

440 meters - 3.0 zeroing

.
And that's it. We're done setting up the zeroing for the distance.
8.0 - Setting up the scope [WIND]
Now we will set up the wind zeroing.

Open up the Kestrel and under User Screen 1, check the wind speed.

.
Once you've obtained the wind speed, open up the Rangecard.

.
10°C - 1.4
35°C - 1.2


Since the temperature is 25°C, we must get the base zeroing. Thankfully, the difference in between both temperatures is very low, so we'll take 1.3 number as our base zeroing.

Now we start with the calculations.

1.3 : 4 = 0.325

0.325 x 1.2 = 0.39

0.39 : 10 = 0.039

.
As seen on the picture, the wind blows to my 8 o'clock, to which I'll have to multiply the number by 9 because of 9/10 wind strength.

0.039 x 9 = 0.351 , after locking the number we get 0.3 wind zeroing. But due to the wind speed increasing while performing the calculations, I've decided to increase the zeroing from 0.3 to 0.4.

.
And that's it. You have calculated the wind zeroing on your own.

9.0 - Taking the shot
The moment we've all been waiting for. The pink mist.

Distance zeroing: 3.0 mildots
Wind zeroing: 0.4 mildots

When aiming at the enemy, aim for the chest, that's what you want to hit. The center of the body.

.
^^ Pink mist.

.
Enemy officer dead.

By observing the trajectory on my end of the screen, I've hit the enemy officer in the very center of the head.

But in the end, we've managed to take out the enemy and we have done our part.

Since I can't upload gifs over 2 MBs size, there's not much you can see on these photos. Apologies.

If you fired your weapon and hit the enemy, therefor killing the enemy, congratulations.

If you fired your weapon and hit the enemy, injuring him, keep them rounds coming!

If you fired your weapon and failed to hit the enemy, but the rounds hit close, keep 'em coming!

It's all about training, motivation and discipline that makes you perform in your best shape.

10.0 - On the battlefield
.
This section contains some of the suggestions I'd like to share.

- Always lean your rifle to a flat surface or to an object. Leaning the rifle gives you a better advantage over the enemy, thus reducing your recoil and gun sway.

- On the field, it's always the first bullet that matters. If the bullet lands very close to the target, the rest are just minor adjustments to the zeroing, depends if you are trying to correct distance or wind.

- Sometimes, there's no need to do minor adjustments. If the bullet landed close to the target, try aiming using the trajectory of the previous bullet. While looking through the scope, look where the bullet will land and after it lands, place that trajectory on the target. The next bullet will most likely land either closer to the target or on the target itself.

- Use the provided formulas when you think it's ok. It's always good to be prepared.

- Set up diferent key bindings for these random tools. You will be using them on the field a lot.

- Avoid tunnel vision, be aware of your surroundings, share the information with others on your team. Being useful on the field benefits the entire team.

- Keep an eye out for wind. If the information changes, then you need to adjust your zeroing. Have another player do that for you, or if you feel like it, do it yourself. There's no need to do it all the time, especially if you're moving more than you're shooting.

- If you have set up a firing position, it is important to have your kestrel and wind indicator opened up. If something changes and you're not aware of it, results can be negative.

- If you're planning on sticking to the same position for quite some time, ( such as a base or an FOB, FARP...) it might be better to use landmarks or give names to different places and pre-calculate the zeroing for these landmarks or different places you've named yourself beforehand so if you see a target you can just take the nearest landmark or place you've named and set your pre-calculated zeroing and take a quick and quite accurate shot. This does not guarantee success due to wind speed and direction changing from time to time.

- In open areas, you'll have plenty of time to do calculate specific zeroings and such, but once you hit an urban environment such as a village or a city, you won't have time to calculate your zeroing for a specific range. It is going to be easier to fire off a round at the enemy and remember where the bullet landed, then use that trajectory and place it on the enemy and take him down.
11.0 - Ending
I really tried to do my best, exploring things and everything else when it comes to marksmanship, so I'd really appreciate the feedback from people who have more experience (both ingame and real military experience).

I made this guide from my PoV as a marksman unit, not as a sniper unit. This guide can be very useful, because of its simpleness (basic things you should know), but when it comes to LRPE, different and more complicated calculations start to kick in at longer distances. I am not going to cover that.

Keep training. You'll get good results at first, but with dedication and through time, results will be getting better.

.
The video above is not mine. I've found it on YouTube and it's quite nice to listen to from time to time.
Rate, follow, share!

.
If this guide was useful to you, I'd ask you to rate it, share it, favorite it, every little action helps.

You're not just helping me get this guide more attention, you're helping others aswell by letting them know they can check it out as a proven source of information regarding marksmanship.

Good and bad critics are always welcome, unless the content or the user itself immature.

If you need any help regarding, leave a comment and I'll see what I can do.

Also, here's a funny video I found not that long ago! (Video is not mine!)


Creator
Originally posted by author:
DrunkeN

68 Comments
DrunkeN  [author] 12 Jul @ 5:54am 
@bubbles99 - You could take a screenshot of the rangecard and keep it on your PC, maybe even print it out if that's an option? Values are prone to changes however.
bubbles99 11 Jul @ 2:20pm 
Is there anywhere I could find the actual rangecards as a PDF or something?
Veni Vidi Vpici 22 Jun, 2021 @ 4:36am 
Just a tip, when I do wind, all you need to know with rangecard is the 90° of the fire, you don't need to the bit with the picture, and then you do the 4 / X = Y and then Z / Y = A where A, is the mils you need to do, Z, is the mils for that temperature and range at 4mps, X, is the 90° degree side wind, and Y is the number you need Z to divide by.
Bobby B 16 Feb, 2021 @ 2:34am 
The guide is awesome but I have a couple of questions regarding to long range sniping.
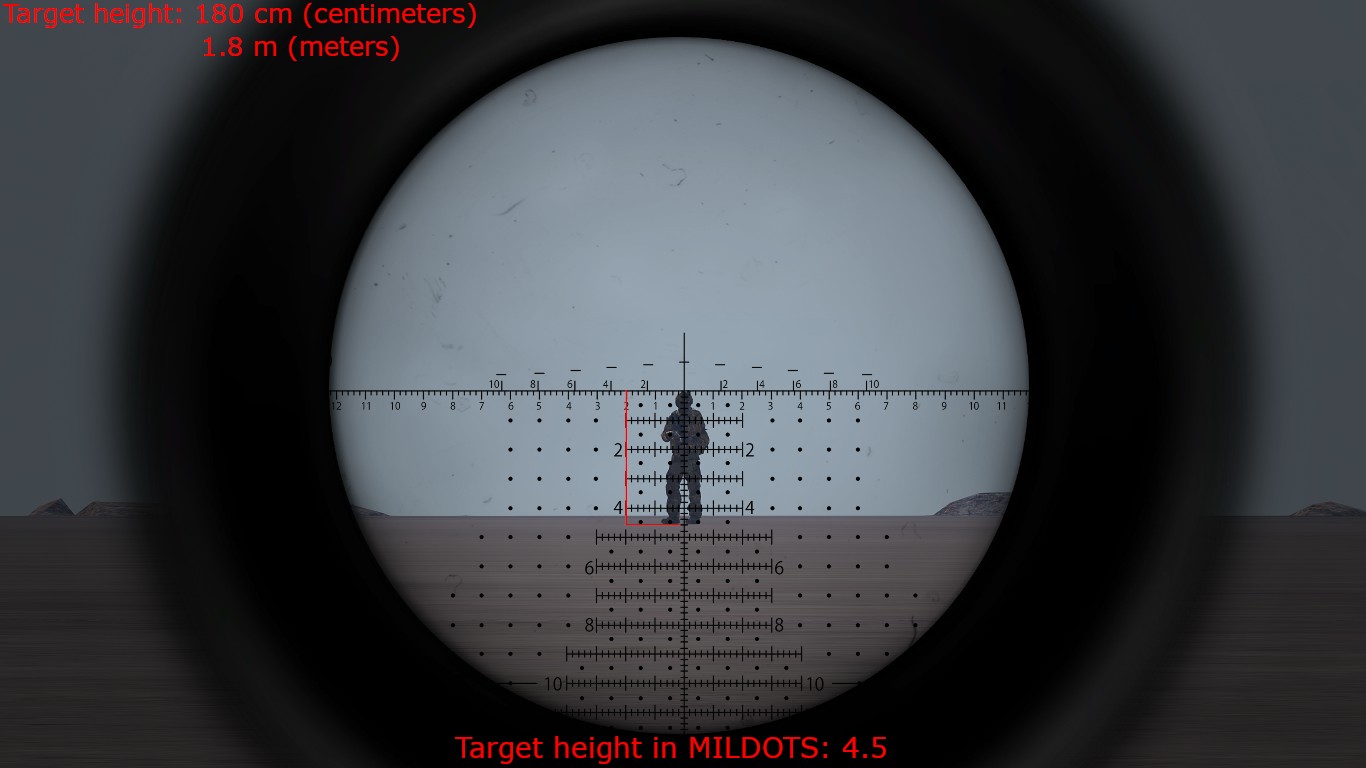
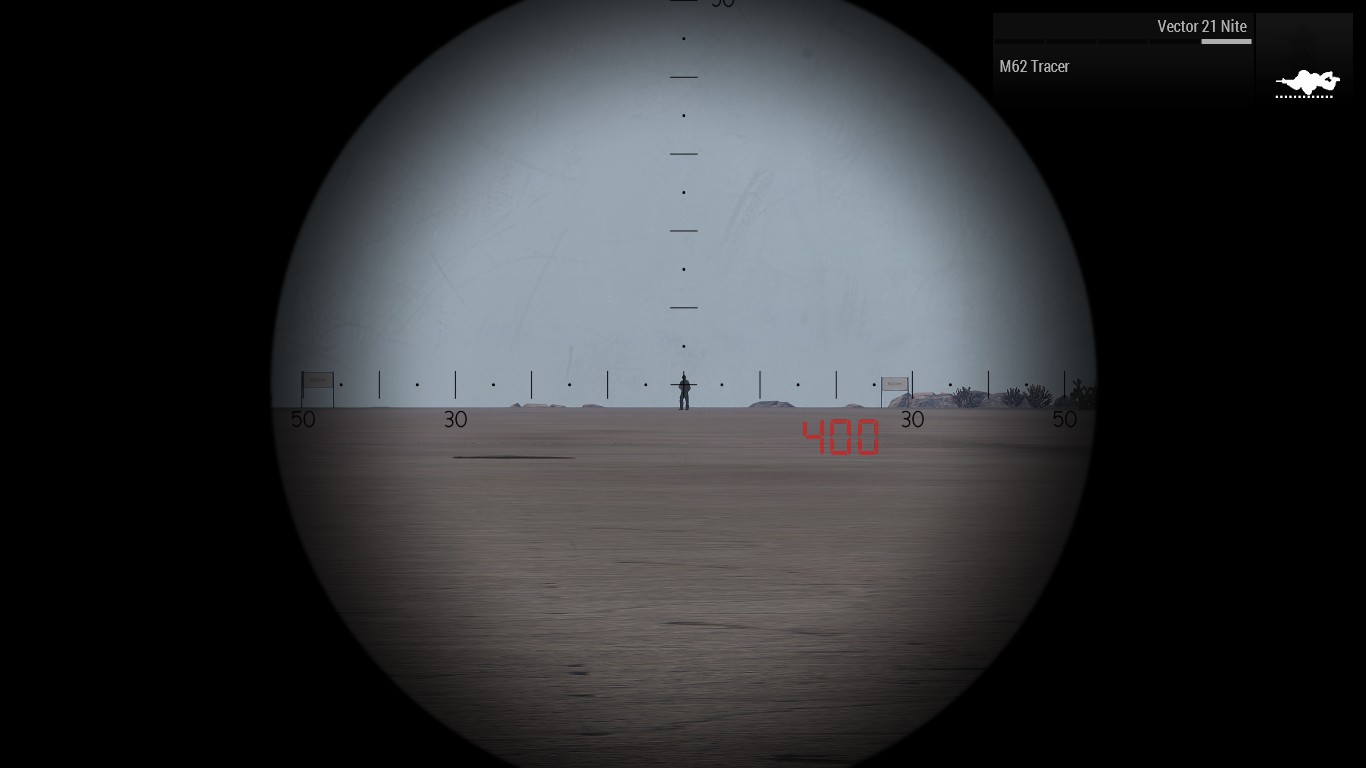
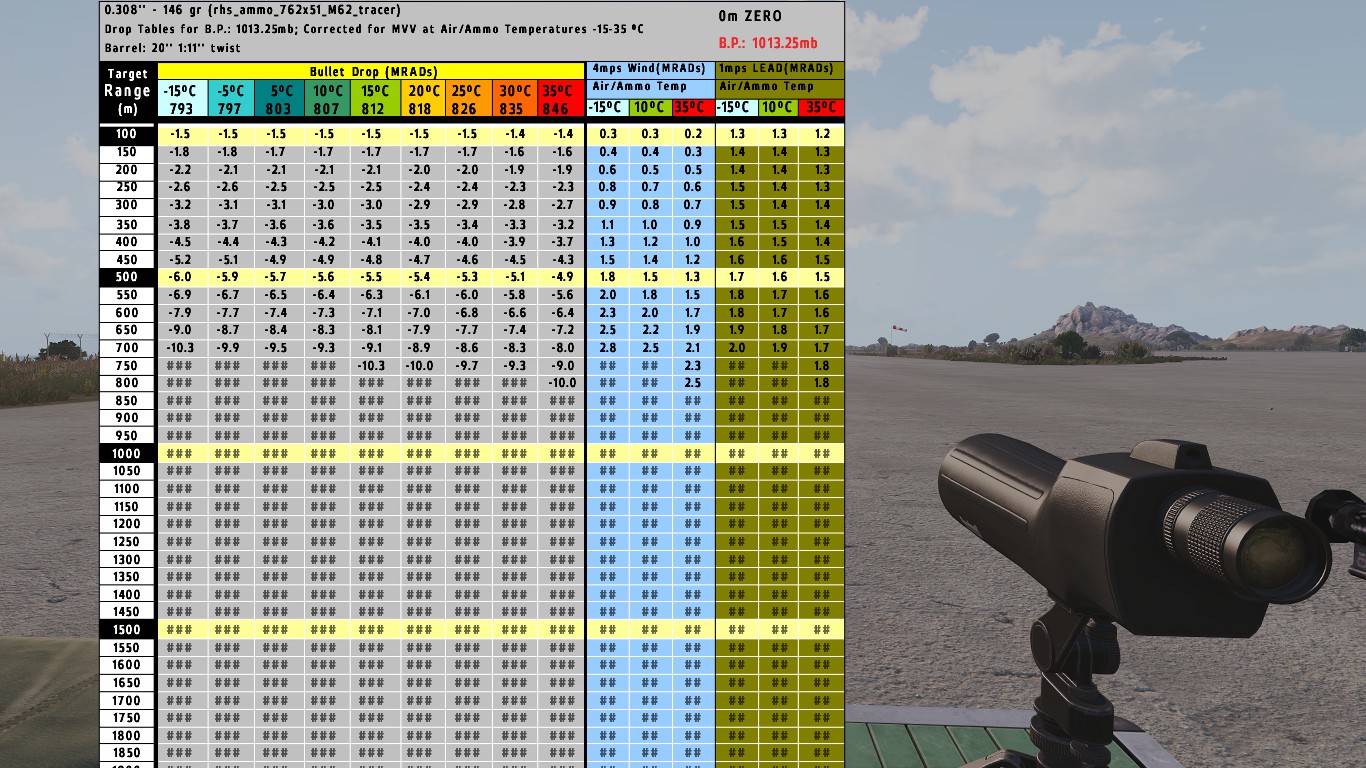
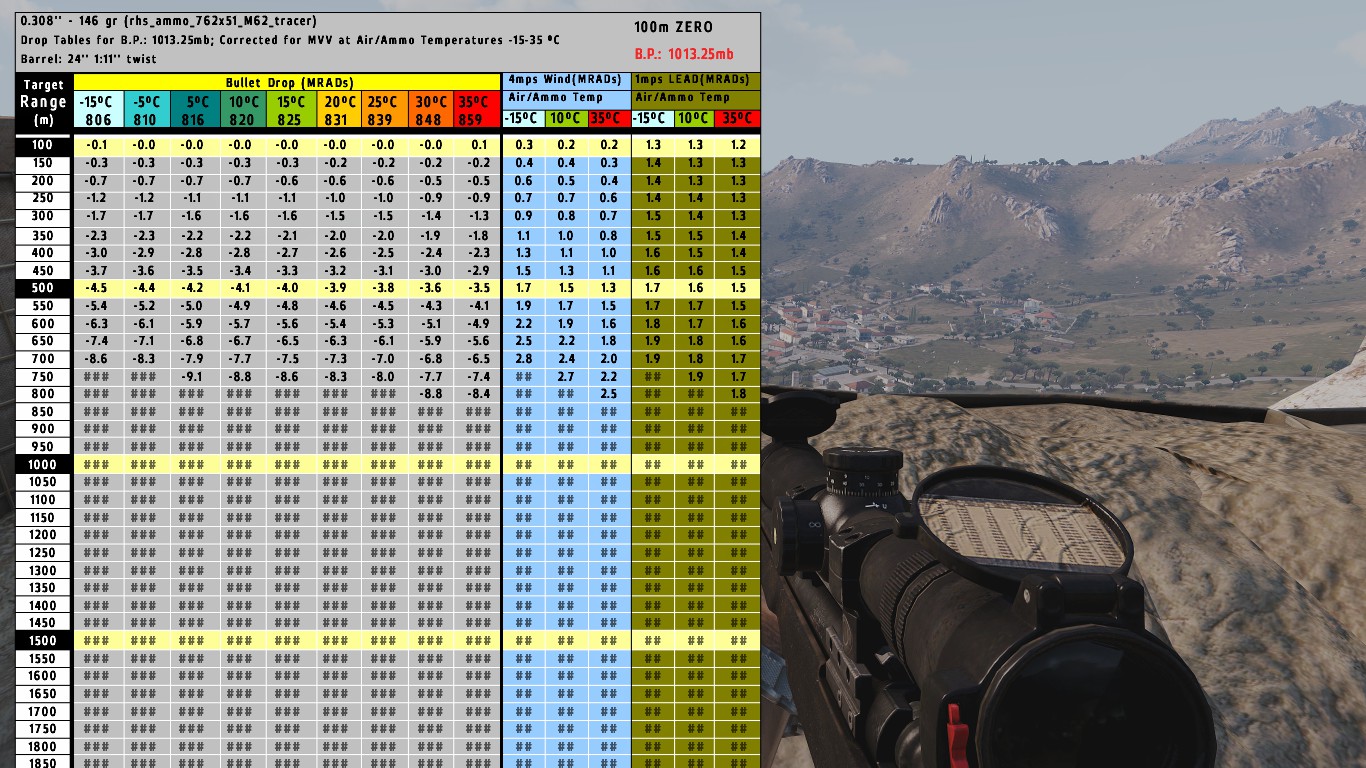
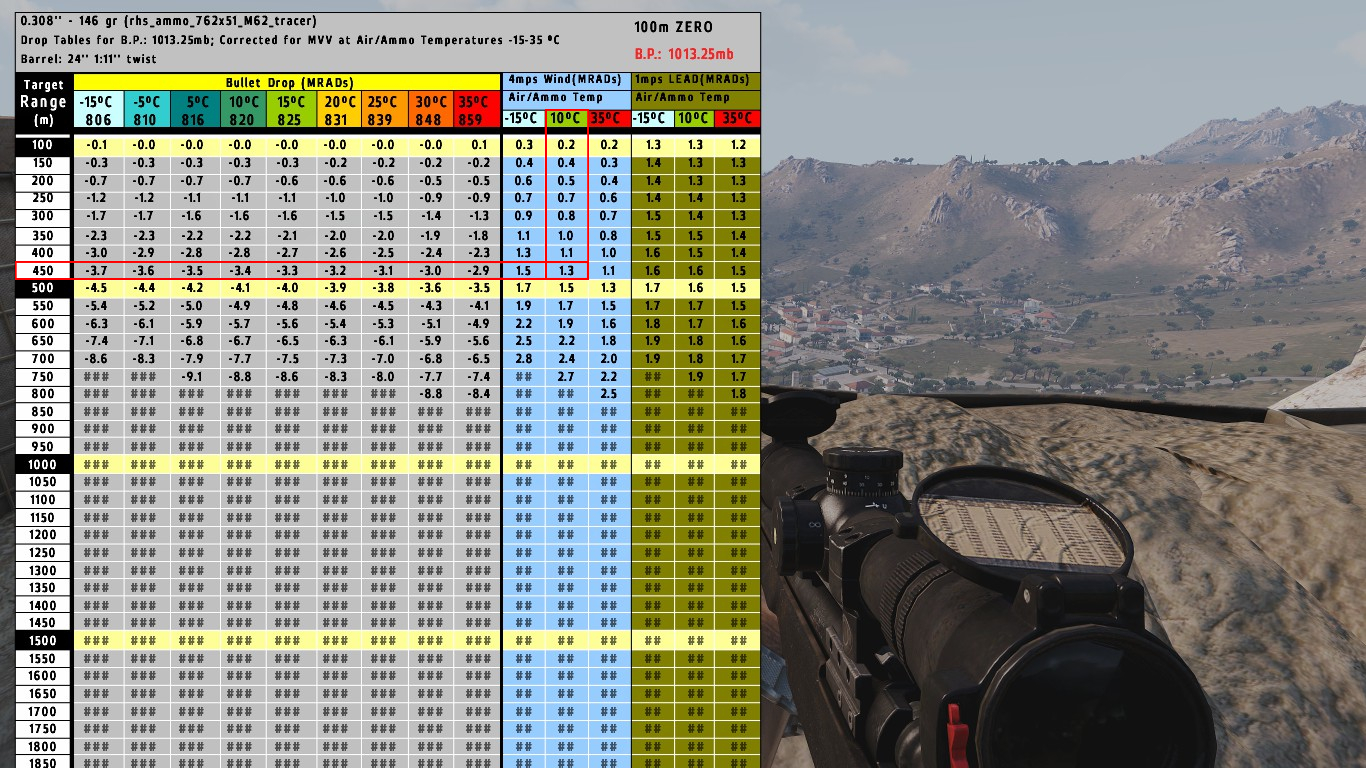
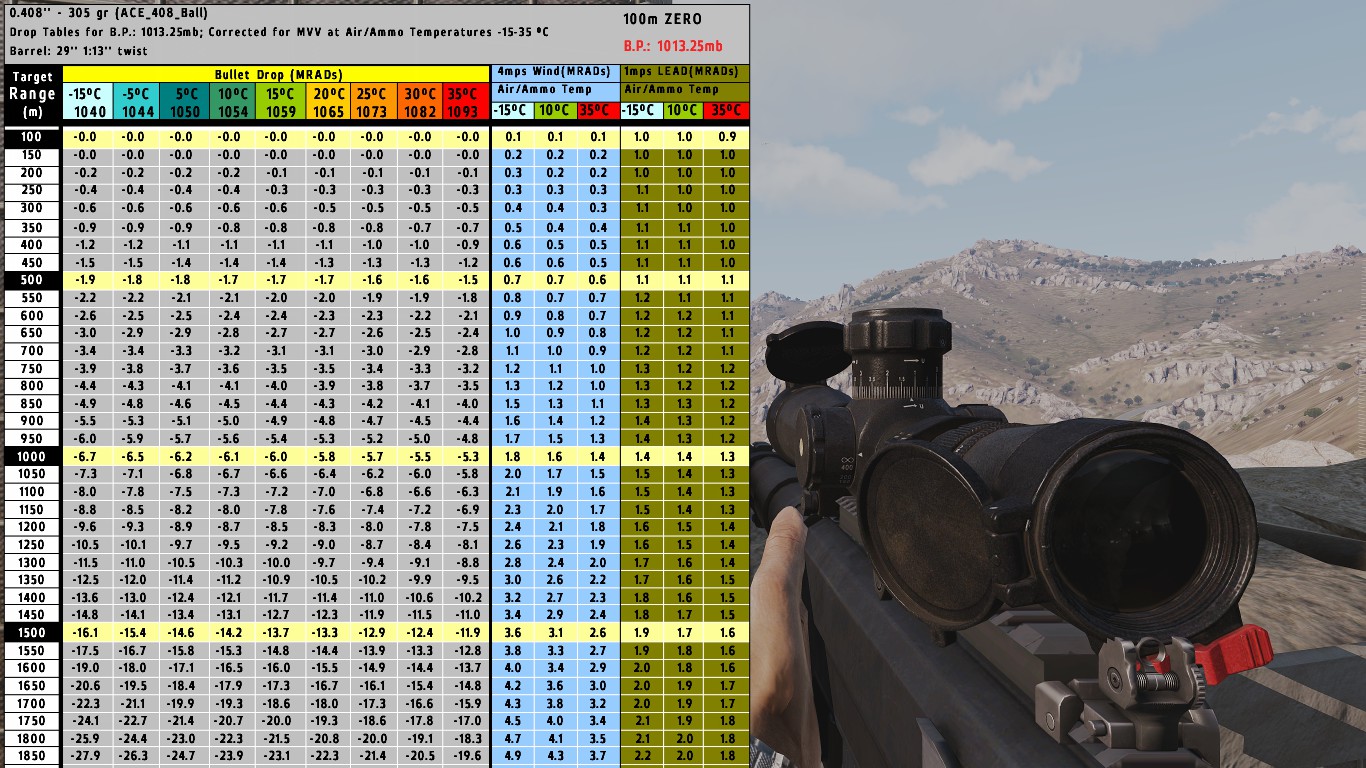
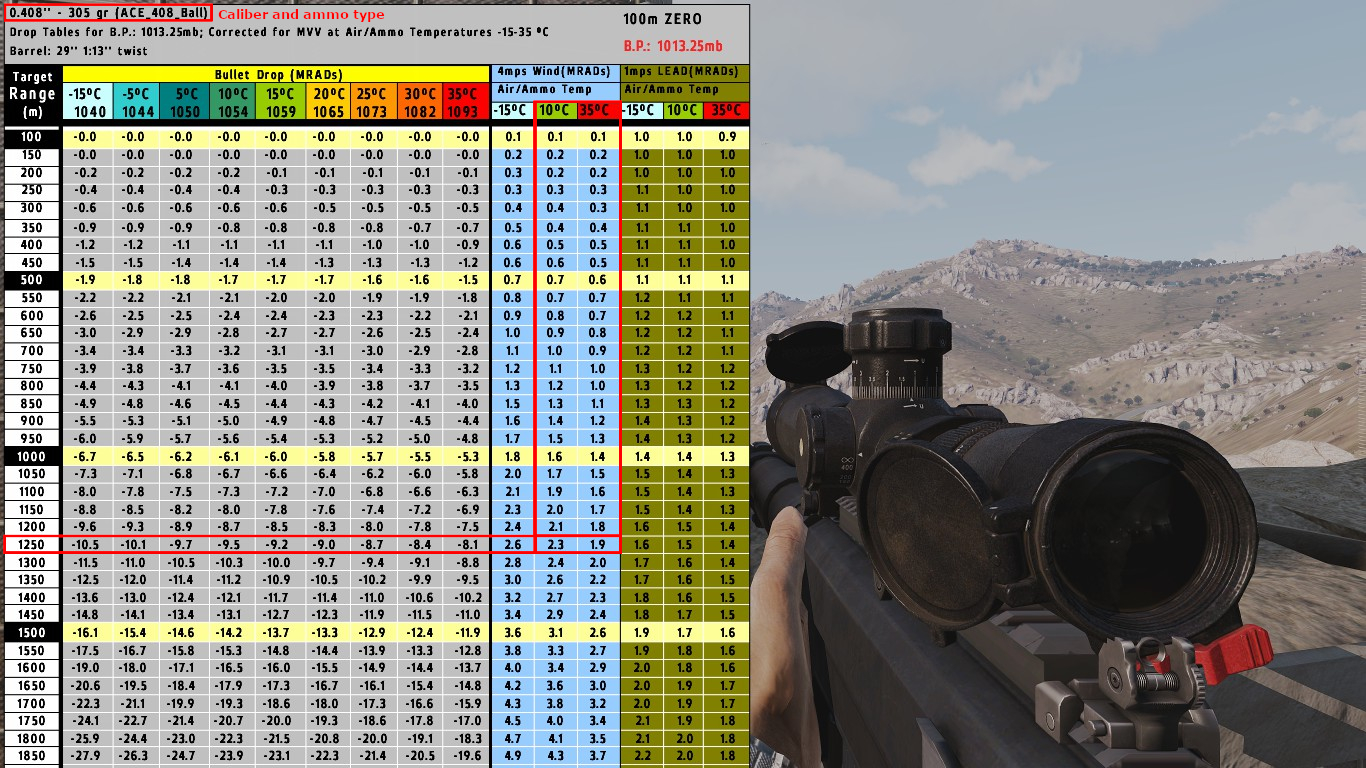
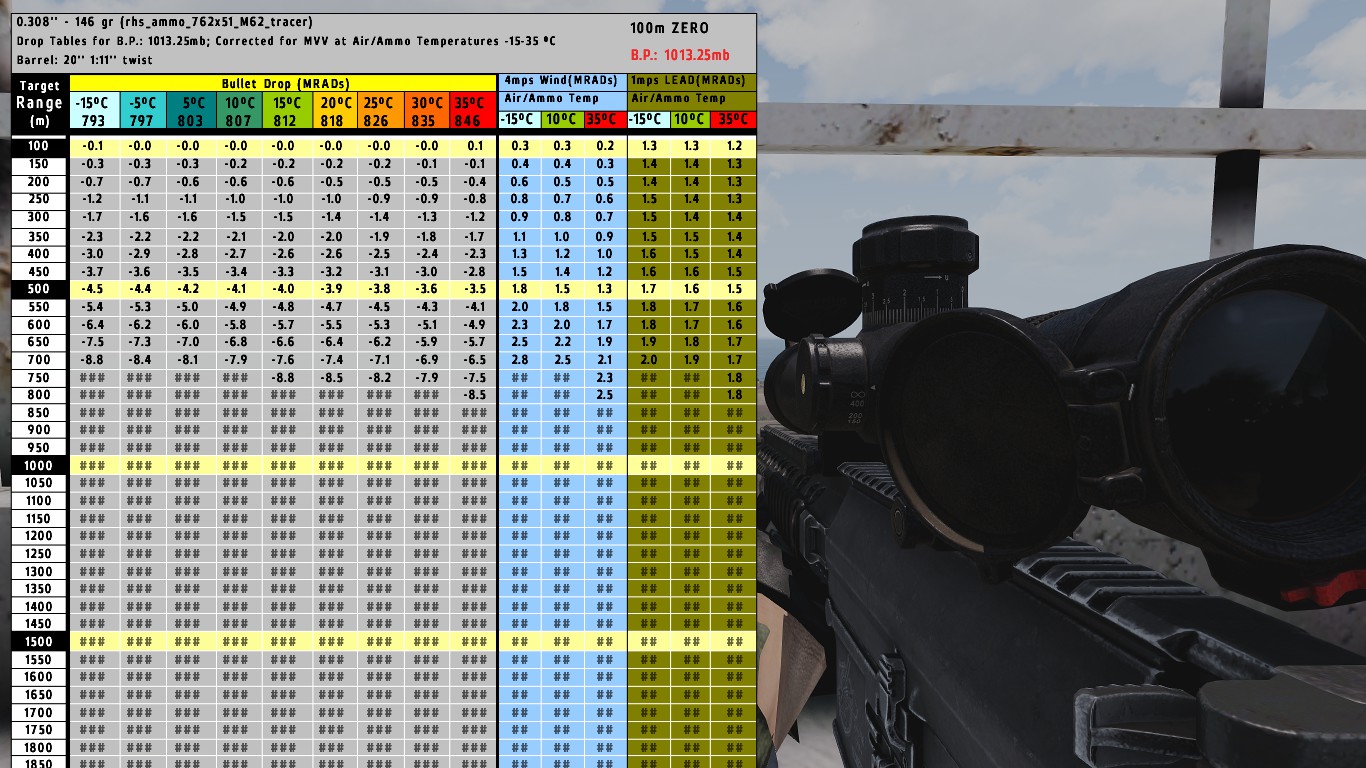
In this case how would you take into account the height difference with the target?
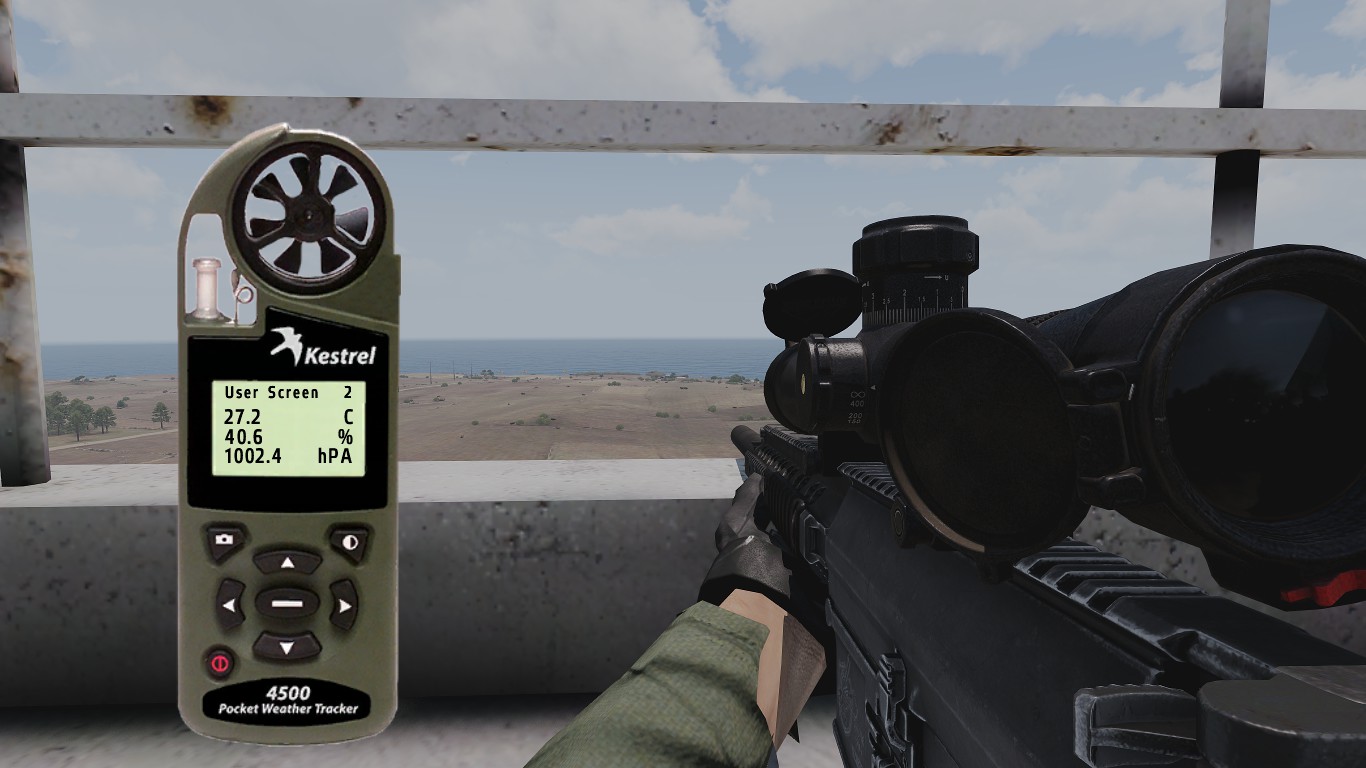
And in case we have either tailwind or headwind how do we take it into account?
DrunkeN  [author] 6 Jan, 2020 @ 8:55am 
@☾★TriMoon☾★

:)
☾★TriMoon☾★ 6 Jan, 2020 @ 7:21am 
Splendid, bravo and thx !:cleandino:
DrunkeN  [author] 25 Nov, 2019 @ 6:05pm 
@ToastyTerrorist

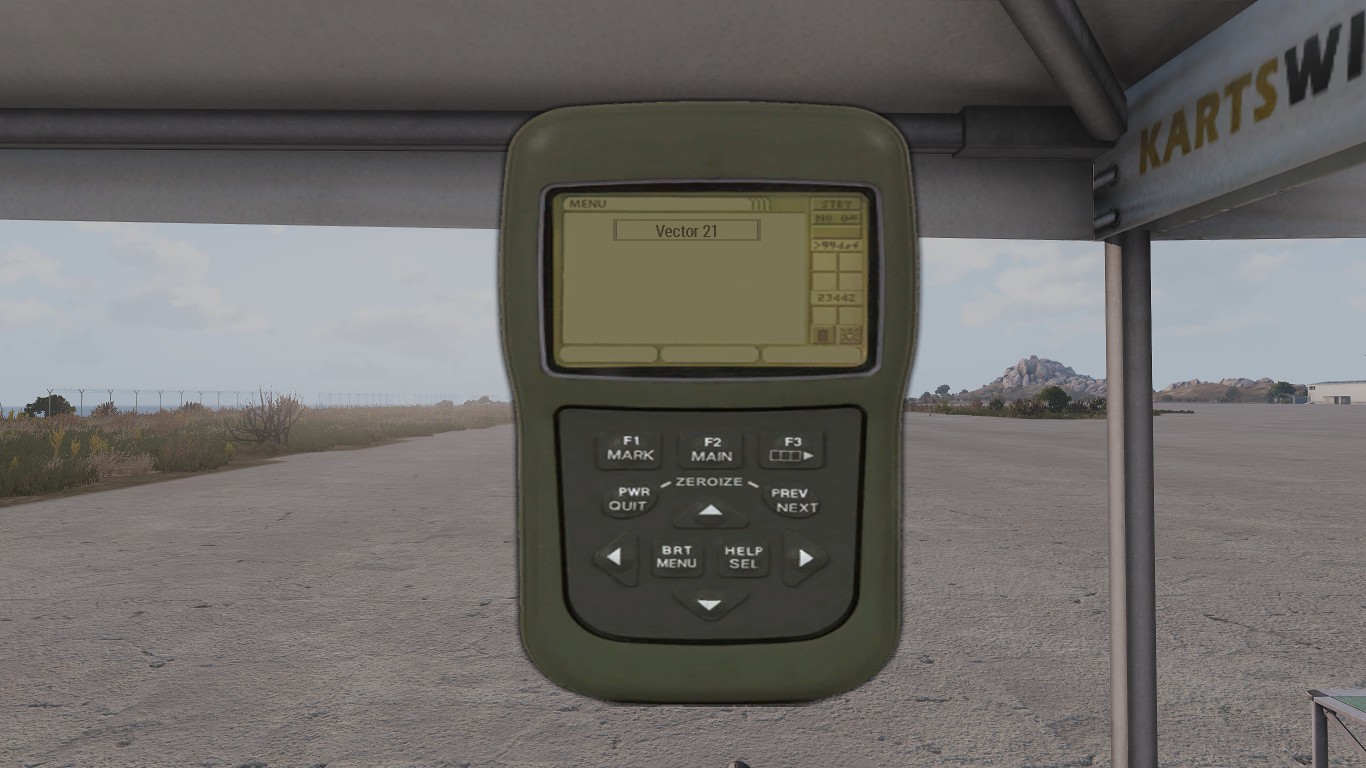
For me it is Left Shift + K. I'm pretty sure it is set like that by default.

It could be different on your side. :)
Pectoral Paladin 25 Nov, 2019 @ 3:55pm 
How are you getting that wind arrow on your screen? That one with the dots and the colored arrow? Thanks in advance
DrunkeN  [author] 12 Aug, 2019 @ 4:15am 
@Mercy - Glad it helped. The smaller update will come soon, I've been away for some time. :)
Mercy 9 Aug, 2019 @ 9:36pm 
Thanks for this its actually so useful!